

All Activity
- Past hour
-
I didn't want to tag this onto the sewing machine accidents post so I'll say it here. Many years ago an engineering pal told me about the day when when a 1 1/2 inch by 12 inch grindstone came loose at full speed. It whizzed around the workshop 3 times causing much damage before coming to a stop such was the inertia. My worst nightmare accident is getting a tie caught in one of those. You wouldn't be able to stop it in time. Makes me shiver. Is why ties are banned.
-
My dogs (only two left now) won't leave my side even when sitting on the loo they have little beds at my feet. This goes for the project room as well and once or twice one of em has trod on the pedal, fortunately at a safe time. I know I should find a way to stop this happening. If I kept them out of the room they would howl the place down.
-
@mbnaegle ouch.. That is some really ice cold thinking under pressure, to be able to tell someone quietly that they need to step on the pedal to loosen the brake and getting them to back the handwheel!. Kudos to your dad! I agree completely with the problems of making things safer without messing up the utility. Brgds Jonas
- Today
-

singer 45k Singer 45K25 Roller Foot
Constabulary replied to nategines's topic in Leather Sewing Machines
what Wiz said! The above linked roller foot will NOT WORK. But OEM Adler 4, 5, 104, 105 roller feet will work but they cost big $$ We had this topic before: -
Yep, gotta make sure the machine is off and the motor is wound down (if it's the old clutch motors) or the power is bled out (if it's the newer servo motors). The old motors need time for the momentum of the motor to wind down, while the servo motors have some electricity stored in capacitors that needs to bleed off. My dad used to tell the story that not long after he and my mom got together (they met and worked together doing leatherwork) he was sewing on one of his old Landis 3 needle-and-awl stitchers, which have an awl punching from the top and a hook tipped needle coming up from the bottom. He always used his thumbs for edge guides as he sewed and did so safely for years, until one day he got a little too close and the awl came down into the nail of his right thumb. He stopped right away and said it wasn't too bad, but he couldn't reach the handwheel with his left had to back it up. He knew if he kept going, the awl would come out but immediately followed by the needle which would really tear up his thumb when it came out. He called for my mom to come help, but as soon as she saw it she got scared and ran off. She came back a couple times and kept running off saying "Oh my gosh! Oh my gosh! Oh my gosh!" until finally my dad had to raise his voice and holler "STOP!!!....... Ok..... I'm going to step on the pedal a little bit to take the brake off of the motor, and you're going to turn the wheel BACKWARDS slowly...." Which she did, he pulled his thumb out, sucked the drop of blood off of the nail, and finished sewing the tack or harness he was doing. He still used his thumbs as edge guides too, as do I, and Mom quickly got better acquainted with the "blood and gore" associated with working in a shop too. Having level-headed help with you is a major necessity. Over the years, we've had lots of people try or ask us to make sewing machine more OSHA friendly to operators, adding barriers and switches and everything to keep hands out of the danger zone, and in almost every case the safety measures significantly reduces it's utility and increases spoiled work, if not making it just impossible to use. It's just one of those things that takes some training and respect for the machine and the task at hand. It's like trying to make a bicycle impossible to crash. On the plus side, the new servo motors shut down a lot quicker than the old clutch motors, but you still need to tap the pedal or watch the LED light dim away until the power is all the way out.
-
Might contact Bob Klenda about his batwing pattern #44. https://www.klendasaddlery.com/patterns.html He's a regular contributor to the Leather Crafters and Saddlers Journal, and recently published a book on making chinks and chaps. https://leathercraftersjournal.com/product/from-my-bench-to-yours-a-handbook-for-making-chapschinksarmitas/
-
In addition to the other comments you never mentioned what size of thread being used with what size of needle in how thick of leather. kgg
-
Email me some pictures and how your wanting this to work and we can talk. Mike@desertmoonleather.com
-
Yeah, I knew somebody would spot that I burnished before I glued ... Normally, I would glue/sand/burnish. It also would have flattened that edge and avoided the little stitching hiccup on the back. Appreciate the comments ...
-
Thanks Tom, I had seen that continuation sewing somewhere on this forum, and I immediately liked it, Brgds Jonas
-
I'll see if I can dig up his name, He just shows up at the show and I recognize him.
-
Glad to be able to help :-) The Tandy Paper pattern pack is a bit different from this one. Most noticeably is the shape of the yoke for the shotgun patterns. On the old (pdf) pattern the yokes are much more dramatic. I haven't compared the actual leg patterns, but I think they are pretty alike, at least the measuring instructions are similar, so they should end up fitting well. Brgds Jonas
-

singer 45k Singer 45K25 Roller Foot
Wizcrafts replied to nategines's topic in Leather Sewing Machines
It's probably not going to fit on the needle bar of the 45k. I recommend contacting industrial sewing machine dealers who sell the GA5-1 machines and ask if they carry the roller foot assembly for it. -
I'm not familiar with either machine. But, I googled both and found that the main difference is that the Seiko is a compound feed walking foot machine, while the Consew is merely a needle feed machine. The walking foot would have an advantage if you have to sew over new layers and tall seams. Its compound feed will simply walk up and down over these changes in layers. The needle feed machine will stop against a new layer unless it is very thin. Both machines are double neelde machines. You'll need to learn how to turn corners properly and balance the knots with two tensioners and bobbin tension springs. Both use large bobbins. In some instances, time is money. If your sewing is based on an hourly charge, the needle feed machine will probably spin faster and run smoother. There was a discussion about the Seiko in 2016, here:
-

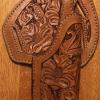
Some exotic inlay for 1911
chuck123wapati replied to Stetson912's topic in Gun Holsters, Rifle Slings and Knife Sheathes
Those Rock!!!! you need my address? -
When you come to any sharp corner, bury the needle, then feather the speed pedal, or hand wheel the machine until it rises a little so that the hook is inside the thread loop on the right side of the needle. Raise the presser foot enough to clear the leather, then rotate the leather, lower the foot and continue sewing. Doing these steps insures that you don't break the needle or lose the thread loop, which will cause a skipped stitch.
-

Some exotic inlay for 1911
DoogMeister replied to Stetson912's topic in Gun Holsters, Rifle Slings and Knife Sheathes
nice look! -
@bruce johnson, what's the contact info for the VA guy who might want tools? That's something I could probably help out a tiny bit with.
-
I use popsicle sticks and tongue depressors under plastic clamps from Harbor Freight. Spreads out the pressure from the clamps so there are no marks.
-
I'm not sure if you were asking about the original pins or the ones I used. The pins originally looked like they were fat near the outside and skinnier near the inside. The handle I replaced was a plastic casting. If you get a file or a dremel tool, you can easily remove them. Another trick is to use a box cutter blade. Wriggle the tip in between the steel and the scale and give it several good whacks with a hammer (wear safety glasses) the box blade will shear the pin, and isn't hard enough to do (much) damage to the tang. For the replacement - if you have a band saw, cut the scales a little bit thicker than you will want them to end up being (like 1/16 to 1/8 thicker, depending on how you will be finishing it).I cut the scales a bit oversize, then glue one of them on. I drill through the tang and through the scale. Then I glue the other scale on and drill all the way through. For the pins, I got a stainless welding rod and ground it to fit the holes carefully. If you don't have a 2x72 ... that takes forever. I would really recommend German silver instead, SS welding rods are *tough*! Anyhow, handle is shaped up to 220 grit, then the pins are cut so that they go all the way through and stick out slightly on each side (I file them down so that they are cylindrical). Then I peen the pins. I don't beat them mercilessly, but I wind up tapping them pretty solidly about 200 times apiece. This mushrooms out the metal and makes sure that I don't bend the pin over, just carefully tap straight down on your anvil / block of steel / whatever. Once the pins are good and flat to the surface, I get the file out again and flatten the pins flush with the scales and do the fine sanding with a hand sanding block. I don't use my fingers and paper, because that causes the pins to stand out since they're harder than the wood. Even though I glue the scales on, the peened pins are really what holds the scale on. Also, if you use purpleheart - if you spritz the wood with acetone (nail polish remover) and leave it in the sun for a few hours ... it turns a really rich shade of purple. An old guy near me was teaching me how to re-handle things. I can share what little I know if you had more questions. However, the largest source of information on re-handling knives might be a forum like "blade forums" ... scroll down to the "Bladesmith's Q&A" section. Some of the best knife artisans in the world will answer your question, surely much better than I ever could. However, nothing teaches like hands on experience. I'm looking to refinish pocket knives and supply nice leather sheaths for them to local folks. I get to carve leather and file steel, it's the best of both worlds.
-
Do you lift the foot slightly so you can turn the leather without it acting like a lever and pushing your needle to one side or the other?
-
you can also glue some leather on your clamps if they are putting out impressions.
-
I bought a bag of those clear plastic little leather clamps at hobby lobby. They work pretty good for not leaving clamp marks.
-
Juki 5550N experiencing problem in the bobbin area
thobgood replied to thobgood's topic in Leather Sewing Machines
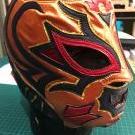
Yes! I got the Juki about…8 or 9 years ago? Something like that. (The brain is rapidly disappearing with age.) I primarily make masks for professional wrestlers, and the Juki has really improved my ability to make masks! The knee lift and the large amount of presser foot raise have really been a boon. It's worked flawlessly all this time, so now that it's acting up it's really thrown me for a loop. I do a little leatherwork, but I'm not very good at it. I just do it for friends and whatnot. I do have a Consew 206RB walking foot machine that I use with leather. I find it amazing that it can seemingly sew through anything and take needles that look like decking nails! It's nothing like y'all's Cowboys I'm sure. I'd love one of those, but I can't really justify it with the small amount of heavy duty work I do. They look like wonderful machines though! -
I'm sewing canvas and leather bags. Which is best for the job?


.thumb.jpg.6e903dd66163ad5672f00f144058c571.jpg)

