All Activity
- Past hour
-
yeah - keep that old cast iron alive - I seldom went wrong with that! 😉 I love my 51w but the 2nd type as yours would be even more preferred but I love mine too. Singer crazy me is. 😁
-
Sweet!
-
 It is my understanding that the fridge isnt doing anything for keeping moisture in. Its the bag. The fridge just delays molding. If youre doing a project that you'll have to come back too a bag should suffice fine. If it will be a few days then I'd stick it in the fridge. Peter main has a bigh sheet of tempered glass he uses. He would wet the leather and stick the glass on top and it would stay cased as long as he needed it too right on his bench. I believe this works because Moisture isnt lost much through the edges but the grain. Thats just my theory though
 -

FEIT DCL-8500N : Stump for Tilting Machine Head
kgg replied to friquant's topic in Leather Sewing Machines
This a typical location for the "tilt stump". Typically just made of plastic, pressure fitted into a hole drilled into the table top and meant as a temporary rest. The machine " slithered off the table hinge and into the drip pan " indicates to me incorrect / damaged hinge and or hinge installation. I have never had a head slip off and with my stubby fingers I am also titling my flatbed machines back to install / remove bobbins. kgg -
I have a fairly new (2years) CB3500 that hasn't gotten a lot of use recently due to health issues. I've finally felt like doing a couple of projects and when I was going through the maintenance points I simply turned the power on and the machine takes off. The foot petal is 'up' and the arm in the motor is 'up' where there should be no stitching. There's a grinding noise coming from the motor when I turn the handwheel so it's not in the head unit. Any ideas on what caused this and how to fix? Thanks!!!
-
This machine would definitely do the job for you. The learning curve on my skiver was a bit steep but patience and lots of trial work. I'd label each control on the machine as soon as you get it as this helps when tweaking it!
- Today
-
Very Nice....
-
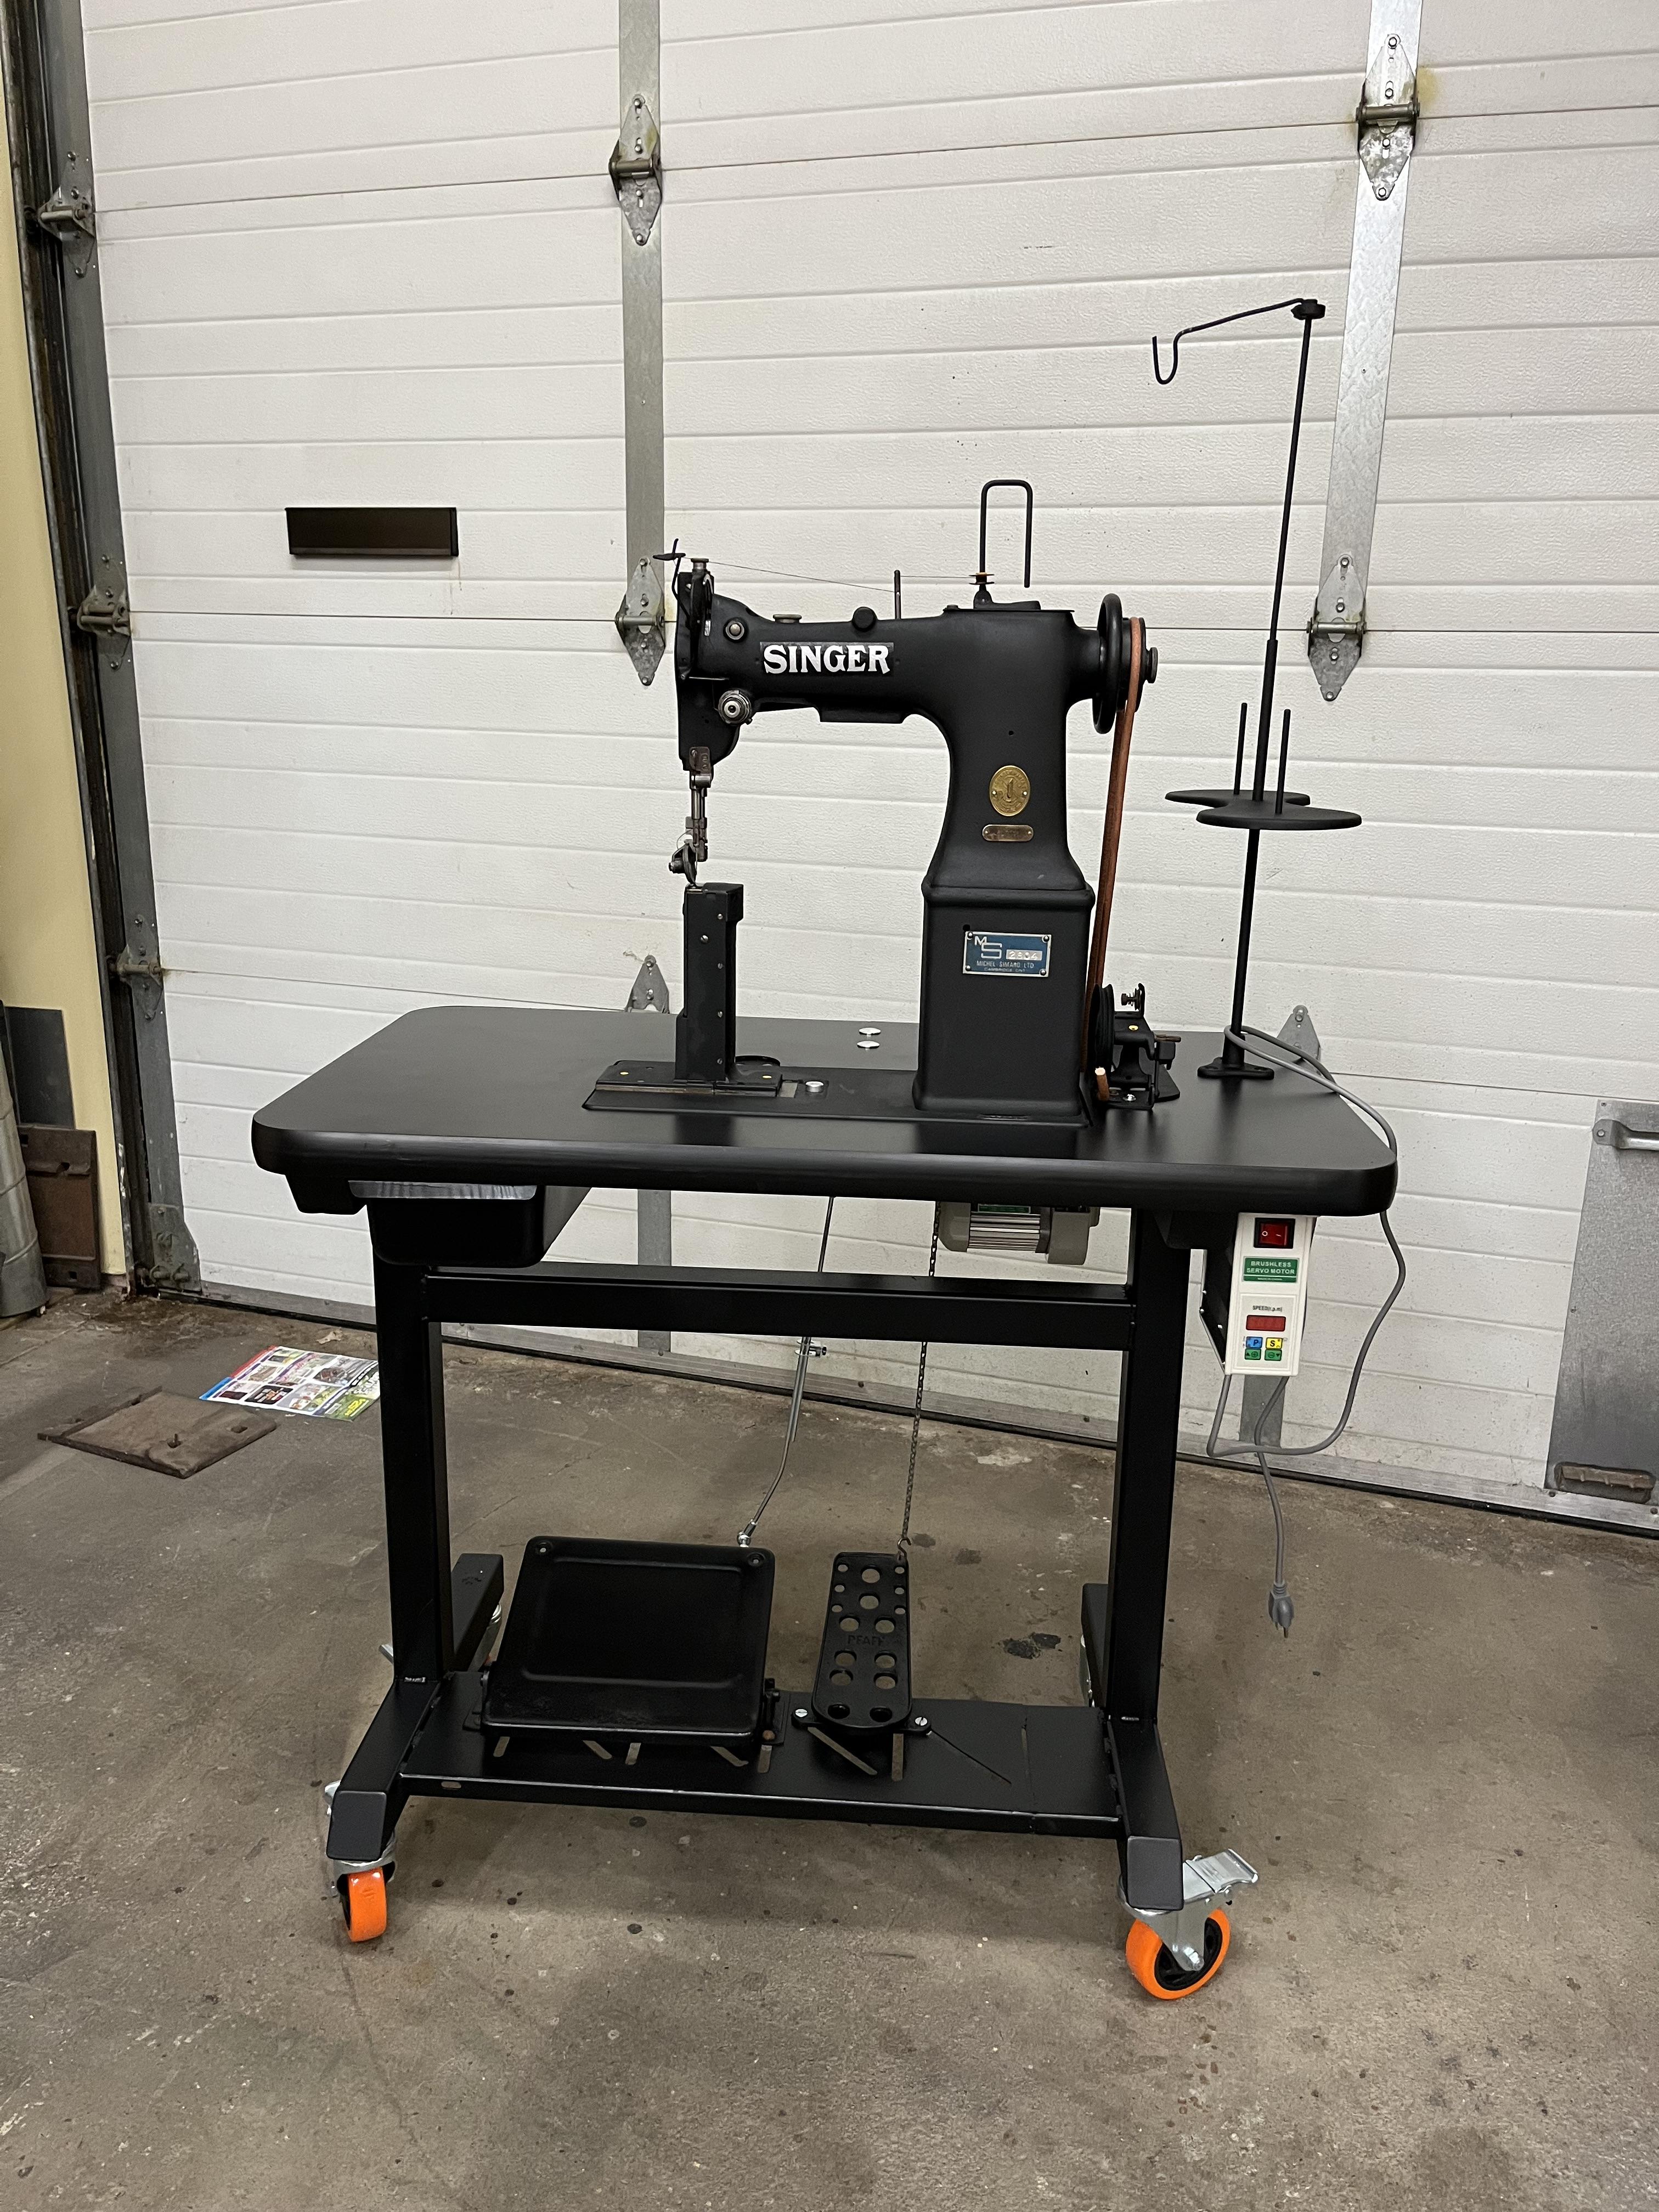
I wanted a post bed machine for years but the price of a new 810 was a bit over the top for my usage/needs. Constant serching on used on-line apps finally coughed up a little gem - A Singer 51W59 withing 20kms of me. It was mine for $300.00 CDN. It took over 2 years but there it was! I threw away the table and set aside the clutch motor, bought a servo motor and controller and built a new compact table for the head. The head got torn down to the last screw and restored. It is a lovely little machine to use and look at and it lays down perfect stitches. I bet that you can find one as well, it just takes time!
-
That is a masterpiece! Beautiful design and execution!
-
True. About a third of my stamps are ones I've made. I usually only make ones that I can't buy. Why make one when someone else has gone to the trouble to make it? There are some I don't have the ability to make. Then I'll buy what's close.
-
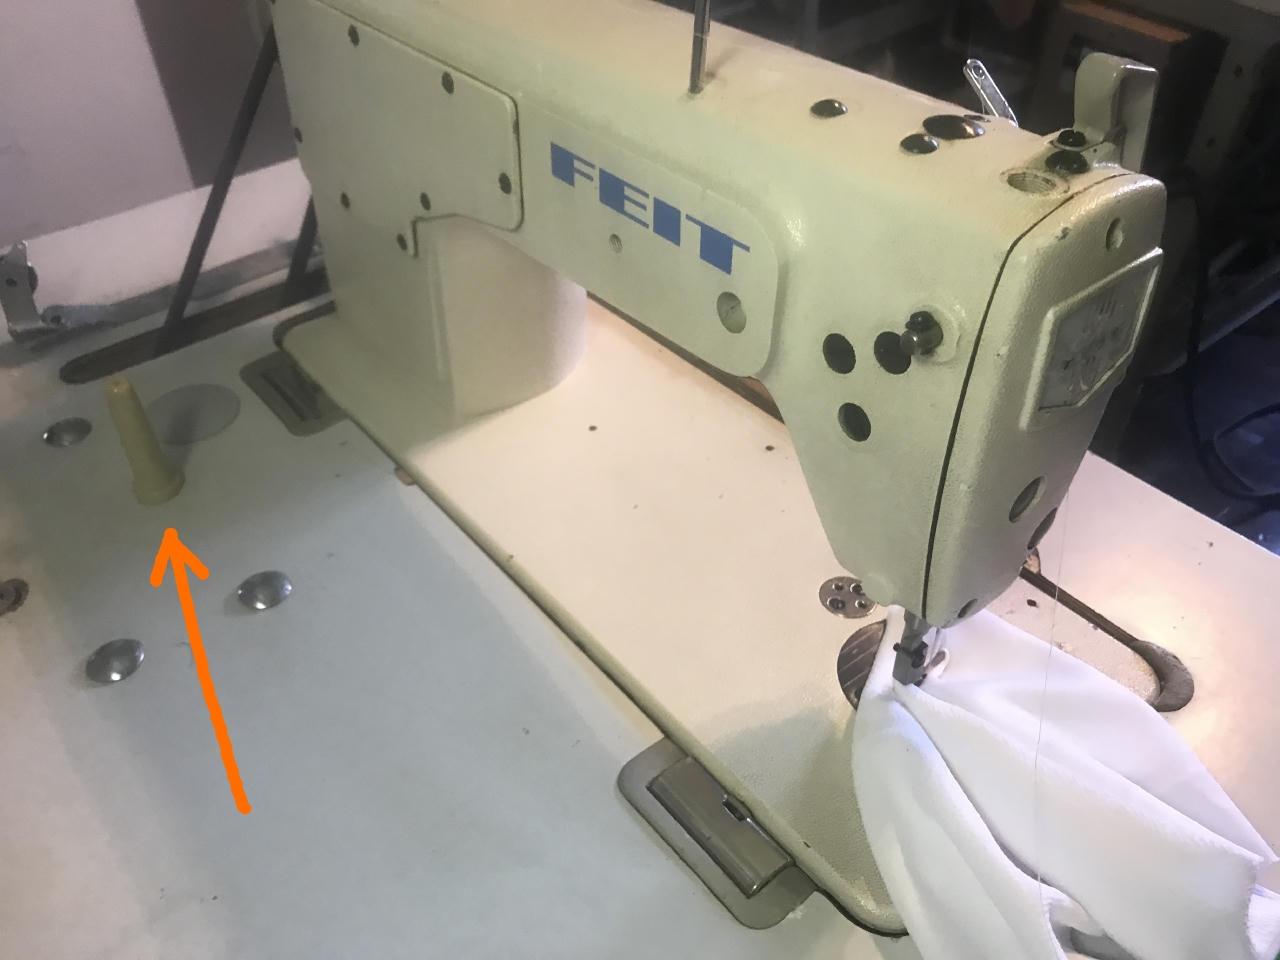
How does this "tilt stump" attach to the table? Is there a nut under the table? Or do I pry the plastic cap off to reveal a bolt head and it screws out the top? This is a customer's machine, a FEIT DCL-8500N. The closest manual I have found so far is this one for the Artisan 8500N. I brought the head unit home with me for repair. But I'm convinced that the tilt stump is in the wrong place. It prevented the head unit from tilting all the way back. But after a couple minutes, the handwheel end of the head unit slithered off the table hinge and into the drip pan. Nobody was hurt in the process, but seems liable to happen again. My intention is to move the stump further away from the operator, and a maybe a couple inches left (from the operator's perspective) so that it loses its tendency to lift the machine off of the table hinge closest to the hand wheel. But I'll need to pack the appropriate tools to do so, and while I was there I did not manage to figure out how it attaches. artisan-8500n__similar-to-feit-dcl-8500n__manual.pdf
-
 I’ve done both. Straps loosely rolled in a jumbo zip lock. Flat pieces left flat. I left enough air to keep the plastic off the leather surface. Initial case in the morning or evening, 12 hours to even out, then tool. If I didn’t finish then back in the bag. I didn’t see much difference in the refrigerator or not.
 -

spring flowers and good food
chuck123wapati replied to chuck123wapati's topic in All About Us and Off Topic
Haven't heard from you lately. Are you lost under your AC? -
I agree you can't make 'em all, but you can make the easy ones with simple hand tools, save a bundle, learn a new skill, and have unique stamps no one else has.
-
Downside I think is getting the bobbin tension adjusted. The Juki style is where the bobbin is placed in the top half part of the bobbin assembly, threaded and tension adjusted while still in your hand and then dropped in place. Personally I like being able to adjust the bobbin tension this way as I can do a bobbin tension drop test. kgg
-
A plastic bag works for me, or even plastic wrap but my biome is in a very high-altitude desert environment. Plus i have a sealed box that is for acrylic paint palette that I use for large flat pieces. And not in the fridge, just leave it on the worktable.
-
Thank you, making a few stamps also, background and border out of bolts. It is cheap to try and if it fails put it in the scrap metal pile. I do buy good stamps too, their is a skill to it and I don't have it. Simple things are fun who knows what happens though. I like the stacked handle. I wouldn't say fancy, more options.
-
Thanks Keith. Seems like a foolproof way to do it. I wondered if I was doing something wrong.
-

putting a belt in the fridge?
Dwight replied to LakeOtter's topic in Purses, Wallets, Belts and Miscellaneous Pocket Items
I've never done that . . . and it would take a bunch of convincing to get me to do that. Stuff dries out in the fridge almost as fast as laying on the counter. For what stamping I do . . . if I have to shagnasty for a while . . . I leave it and hit it with the sponge when I get back. Works fine for me May God bless, Dwight -
That is correct for the Cobra Class 26 it does not have a Juki compliant bobbin assembly. Here is a video for the bobbin installation. kgg
-
 I got so used to working on small items I could tape down to a modest stone slab, and stick it in the fridge in plastic, when I'm not finising it in one evening. This is about keeping the work moist until the next go. Now that I'm moving to giant-breed dog collars (and probably human belts) I was wondering if there was any option other than carefully, loosely coiling the belt and placing it in the fridge on its side...? It gives me the willies not lying flat becasue I don't want it to deform r get squished etc. Or... presumably people put work in the fridge because they don't want to start rotting the leather, moist in a bag without cold, but I'd never tried just leaving work room temperature for two or three days, in a more convenient spot to spread out than a fridge. I don't know how much preservative is left over in veg tan leather. There seems to be something. I mean, I've used oils that go rancid smelling in wood or rags, but which seem to do so much, much less in leather. This made me think there is at least some light preservative left over in veg tan leather, but I don't want to start unecessary bacteria colonies. The real pros seem to trace and tool a belt all in one go. If you don't, I'd like to hear how you store the long, moist leather belt overnight for finishing the next day or so. Thanks! Jeff in FL
 -
Oh wow thanks! This was a post I made back in June but I'm glad I popped in just now and learned this term escapement files. I looked at some based on your reply and, indeed, found files useful to this end which I'd not found, before.
-
That cabinet manual might be interesting to important for Singer collectors. Cabinet information for antique machines is sketchy. Ismacs.net has a number listed but it's far from a complete list.
-
Ohhh ok. Thanks
-
That is how they are supposed to look. They are designed mainly for floral carving and especially beveling tight stem work with close lines. You can bevel a line without mashing down the adjacent cutc. Also to bevel a crossing element without mashing and leaving a large halo on the part below lie a flower over a stem or leaf. I liked steep bevelers for lightly breaking over the outside of a cut line for beadlines too. just lightly break that square edge.