

All Activity
- Past hour
-
I used to sew Biothane and heavy webbing in a previous location. I found that I had to move up one needle size, and use a diamond or round point needle. Additionally, I had to double the foot pressure to keep it from lifting with the ascending needle. Running the top thread thru liquid silicon will help the knots move up with less friction. It might help if you adjust your check spring to give more slack top thread as it goes around the hook. Try it on a test strip. Thread color also plays a part in all heavy sewing jobs. Black thread is often double-dipped to get total color penetration. This process stiffens the thread more than lighter colors. You can usually feel the difference when you handle the thread to feed it through the guides on thread stand. Straw color is usually much softer than black. That translates into tighter knots being formed. Tighter knots are easier to pull up in dense materials, like Biothane and thick webbing.
-
I’ve seen those too — they’re really handy. You can sometimes find ready-made patterns on Etsy or Pinterest if you search for ‘leather stylist tool holster pattern’ or ‘DIY barber pouch.’ If you or your daughter like sewing/crafting, some leatherworking supply shops sell downloadable templates that you can print and trace right onto the leather. Another option is to look at simple leather apron or tool belt patterns and scale them down - the construction is similar, just smaller pockets for scissors and combs. A basic kit from Tandy Leather or Weaver Leather might be a good starting point.
-
What size needle did you use for your initial timing? Does your machine require the shuttle to be shimmed when changing needle size in order to maintain the same hook-to-needle distance?
- Today
-
I'm trying to figure out what skiving knife to buy. I have pull skiver, one that looks like a potato peeler, and a little flat blade knife from amazon. None of these work very well for me. I'm looking for one I can buy that's going to provide better results. I don't really want to make a skiving knife myself.
-
Good morning everybody! I’m working on a small bag about 8”x12” and need to learn how to figure how long the gusset has to be. I tried laying a waxed thread all the way around the side piece like the video showed but it came out way too long, like 2”. Sooo…..I’d like to get it closer the first time. The sew line will be 3 /16” from the edge so does that mean the dimensions are now 7-5/8”x11-5/8” ? That makes sense to me…. Any sound reliable advice will be greatly appreciated! HELP! Dano P.S. Thought I should say the panel will overlap the gusset, panel on top.
-
I don't have a clear plate to view the hook, and it seems to only happen with the holster plate. I'm going to reconfirm that leather sews without skipping stitches using the holster plate. I am guessing that the skipping is caused by friction on the upward stroke through biothane, causing flagging even though I'm not feeling it. With a size 25 needle and #207/#138 thread the knots were on top, even after considerable decrease in top tension, so I installed a size 24 needle and that buried the knots. I guess I could switch back to the larger needle and try increasing the bobbin tension. If I can't find the right needle and thread combination then I guess lubricating the thread is the next step.
-
I'm using a product I believe is similar to Alcantara: https://www.onlinefabricstore.com/wine-microsuede-fabric-.htm I don't know how the quality compares, but this stuff it pretty nice. Years ago I looked over a Louis Vuitton bag that was lined with something similar...I believe the LV material was superior to this stuff. Alcantara is over $135 per yard...maybe it's worth it, but that seems pretty expensive to me. I can see now that rolling pressure is not the way to go with gluing this to the raw side of the leather. I want to make sure I have good adhesion without soaking through the microsuede. I guess I'll just lay it as flat as possible on the glued leather and pressure with heavy book to make sure it bonds well. I think I'll take your advice and glue the edges of the fabric. I don't want to have trouble later and wish I had done a simple step like this. I'll think about which side of the holes I want to terminate the lining. I don't know how well I'll be able to paint the edges if there's a layer of liner mixed in with the edges.
-
So when I measured my pattern for my fender I guess I made a mistake as I made it too wide and so now that im at the installation step I can not get it to lay flat, as it extends out over the edges and creates waves when I try. I think I have to trim this down on both sides to the inside of the stitching(aka good by all that hard work); but before I do that I was wondering if anyone had any better ideas? I also was going to use 3m tape to adhere it to the fender and not the pinion hole in the back Images are of the fender bib and of my bike fender. Thank you for the ideas/help!


-
.thumb.jpg.6e903dd66163ad5672f00f144058c571.jpg)
Finishing Coat
Northmount replied to Cactusman's topic in Dyes, Antiques, Stains, Glues, Waxes, Finishes and Conditioners.
I moved your post to Dyes, Antiques, Stains, Glues, Waxes, Finishes and Conditioners. -
Is there any visibility into that machine, for instance removing a cover so you can see the skipped stitch with a flashlight as it's happening?
-
Is this the thread, on the bottom of the punch? It is from their website, but no thread data.
-
I'm old school . . . one pencil . . . 2 or 3 erasers (lol) . . . ruler(s) . . . compass . . . blank paper . . . and masking tape to use for making a pattern bigger than an 8 1/2 x 11 sheet of paper. I then take a picture of it with my phone . . . turn that into a *.jpg with Adobe Photoshop elements 2.0 . . . and go to work from there. I've done it so much that it has almost become intuitive . . . AI programs are not as fast as I am . . . because most of the time my pattern hits production run with the first iteration . . . AI isn't smart enough to outthink the directions . . . usually needs a half dozen corrections . . . and by that time the other one is done and I'm off having coffee and pie. But that's just my way. PLUS: Some folks make a separate pattern for each holster or change purse or whatever. If for example I'm doing something different on a pancake holster for a 1911 . . . I basically make the one for the full size . . . and use it for all sizes. There is a bit of waste . . . but it keeps my pattern storage down and I can easily trim a full size to the officer's size in 2 minutes . . . May God bless, Dwight
-

Problem with reverse stitch tightness on Singer industrial
friquant replied to AlainaZ's topic in Leather Sewing Machines
I like this! The inner toe on my Singer 144W103 has a (factory?) relief right there too. -
If by microsuede you mean something like Alcantara, then it's a woven fabric. Woven things always fray eventually. You can limit fraying by stitching in addition to glueing: if you stitch parallel to the warp, you secure the weft so that only warp threads on the 'free' side of the stitch line can come loose (if they're not glued). You should never apply rolling pressure when glueing something non-stretchy to something spongy: by pressing it down you make the spongy bit expand. When you remove the pressure it contracts again and the surfaces of both materials won't match anymore. This can result in wrinkling or warping depending on either materials' strength.
-
I'm currently working on a duffle bag I plan to line with microsuede. I didn't realize it at the time of purchase, but the chrome tanned leather I'm working with is very soft, floppy, and spongy. I did a test and glued the microsuede to a section of the leather. I used a bakers rolling pin to join the two surfaces. I was surprised by the results. The leather stiffened up on the lining/glue side and tends to wrinkle when I flex it that direction. Flexing it the other direction, it remains soft and spongy. I think the rolling pin stretched the leather out as it pressed onto the liner...this caused the wrinkling. I think if I glue the microsuede to the leather without using the rolling pin, this might not happen. I'll do another test before I start applying the liner to the bag leather sections. I also noticed the edges of the microsuede are showing some fraying after I cut it to a uniform size. I'm not sure how much of an issue this will become after the duffle bag is put together. I think the glue on the surface might hold it all together after a little fraying. If that's not the case, I want to deal with it now before the bag is stitched together. Any thoughts about this?
-
I am starting to sew halters made from 2-3 layers of Biothane Beta 520 super heavy (3.5-4 mm thick) on a Cobra Class 4. I am having problems with skipped stitches, mainly when backstitching 2-3 layers near hardware. I am using a holster plate that allows me to stitch closer to a center bar buckle. I did make small adjustments to the hook timing, following @Uwe's video on Youtube. Thanks, Uwe! The machine sews leather fine. My current setup for Biothane is the Hennigan Precision holster plate with feed dog, the Hennigan narrow presser foot set, #207 thread top/ #138 thread bottom, size 24 794 7x3 round point needle, and 5-6 stitches per inch. This setup buries the knots in a single layer of Beta 520 super heavy. I have also tried #277/#207 thread with needle sizes 27, 26, and 25. I've done a limited test of cutting point needles but I like the thread tension with round point needles. I have used the stock holster plate and harness feet that come with the Class 4 for the larger thread and needle sizes. Still get occasional skipped stitches. The information for needle choices that I've read in this forum and seen on Youtube is contradictory. Most suggestions are to use round point needles that are 1-2 sizes larger than what would be used for sewing leather. I haven't yet tried thread lubricant, and I haven't played with presser foot tension. I don't notice flagging while sewing. I mainly sew bridle leather on this machine and would prefer not coating the thread path with lubricant, but I am open to suggestions. I appreciate your advice on machine setup and best practices for sewing Biothane.
-
It basically is a modern version of the Singer 45K Parts list an manual can be downloaded here: https://leatherworker.net/forum/topic/104255-neels-saddlery-tension-issue/#findComment-696717
-
Some people buy them because the quality is better than the new versions of today, these were built for the factory not just for a back shed hobbyist.
-
Great machine the 133k13, in good condition better than any modern version, works a treat.
-
 nasrin joined the community
 -
Five feathered tulip leather pattern
-
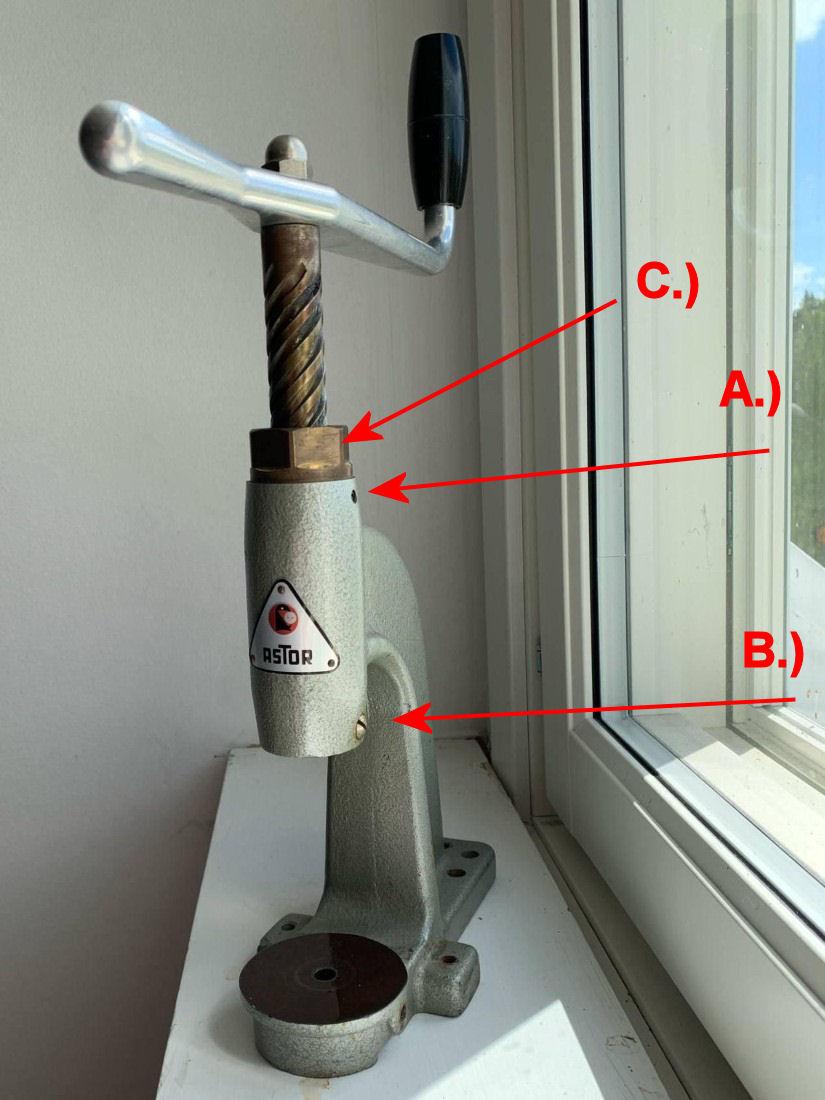
Have you taken apart the press? Maybe the solution is simpler than you think. As I said before I once replaced tool holders with a round long nut. Its a quite simple part. Worth checking I´d say. What is the outer diameter of the tool holder? A.) is a guide screw for the tool holder, the tool holder either has a slot of a flat site where it slides along the screw. B.) is a lock screw for the big brass spindle guide C.) is a spindle guide - all spindle guides I have seen are right threaded so it should go out left. But C could be very tight. EDIT: quote from the text on this website: Presswerkzeuge - GETMORE-SHOP Tools for presses with M6 thread - like many machines from Astor, Stocko, Daudé - can be found under "Tools M6" Have you checked if you can screw in a plain M6 screw?
-
I'm sorry for jumping into a thee year old thread. USMC42, I'm wondering if you ever resolved your issue. I own and use a Weaver Cub with a mixture of success and failures but it's getting better for me. My Seiko CW-8 is laying the exact same stitch as in your first linked picture. My issues is, it only does that when I sew around a circular pattern. Otherwise, it stitches beautifully. In my case, I cannot understand why the tension should be different in a turn than on a straight row. Perhaps the straight line stitching is more tolerant of the bobbin tension being slightly weak. I'm reviewing recommendations on this thread and am leaning toward increasing my bobbin tension slightly.
-
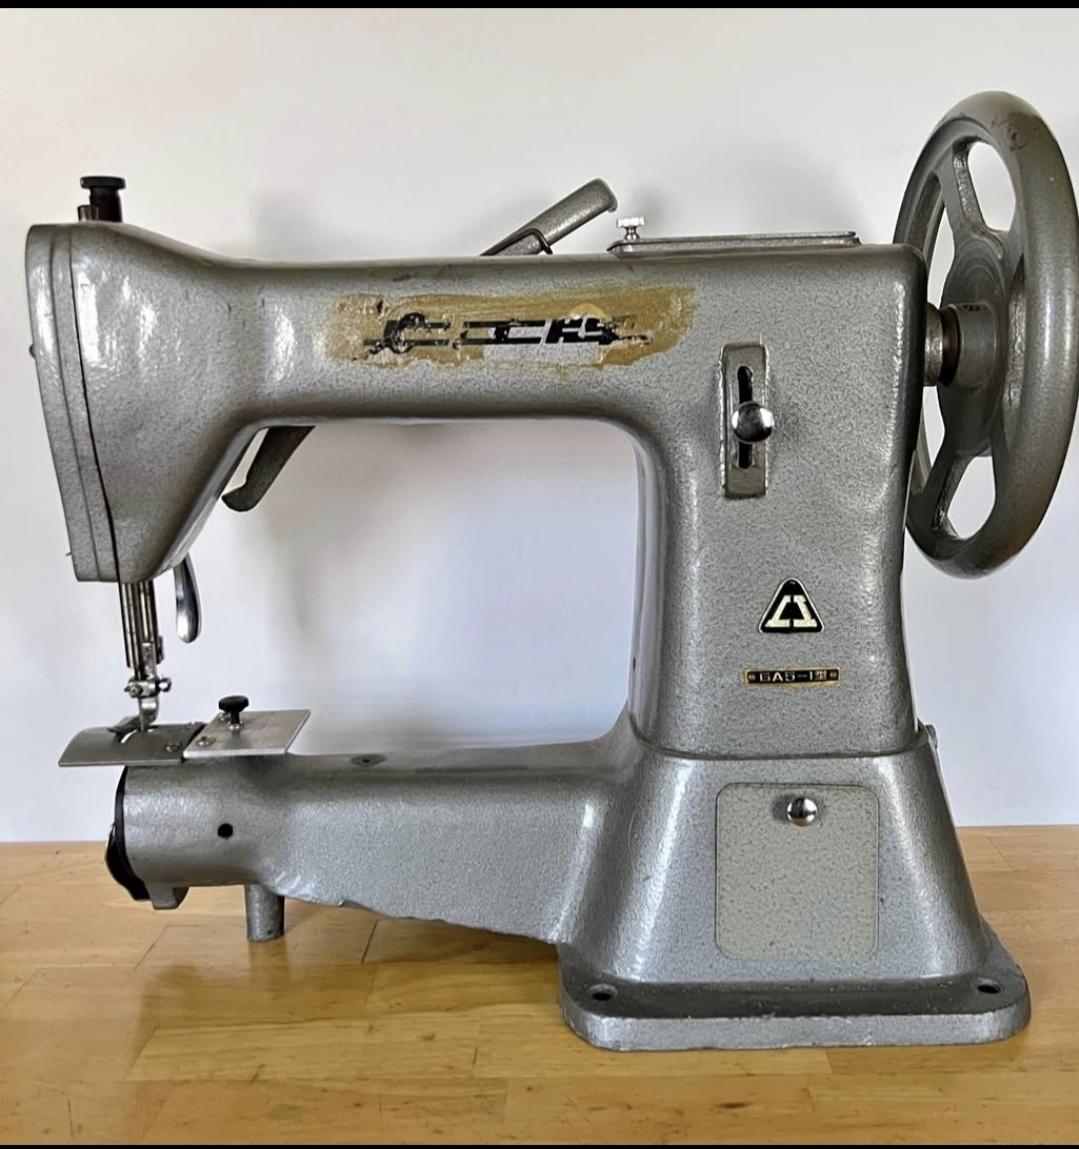
Hello...just picked this machine Ga5-1 on Marketplace. Cannot find a manual on line. I need help adjusting the timming. Pictures or even a video of closeup up correct position will be greatly appreciated. Lower tension mechanism was missing, have a new one but have no idea how the springs go. My apologies for my lack of knowledge Thank you. Model GA5-1 Manual and parts list would be appreciated in where to buy them
-
If they have their own proprietary thread size why not just say so? I don't think Singer made any big deal about it. I'm curious to see what you find out.
-
 roselerfamilyprinting joined the community
 -
I just got mine yesterday and had mine keep throwing an er 7 code and said its overheating. It stopped and wouldn't turn back on plus it was loud. I disconnected all the belts and narrowed it down to the servo motor. The noise is coming from the motor itself and sounds like its unbalanced inside.


