All Activity
- Past hour
-
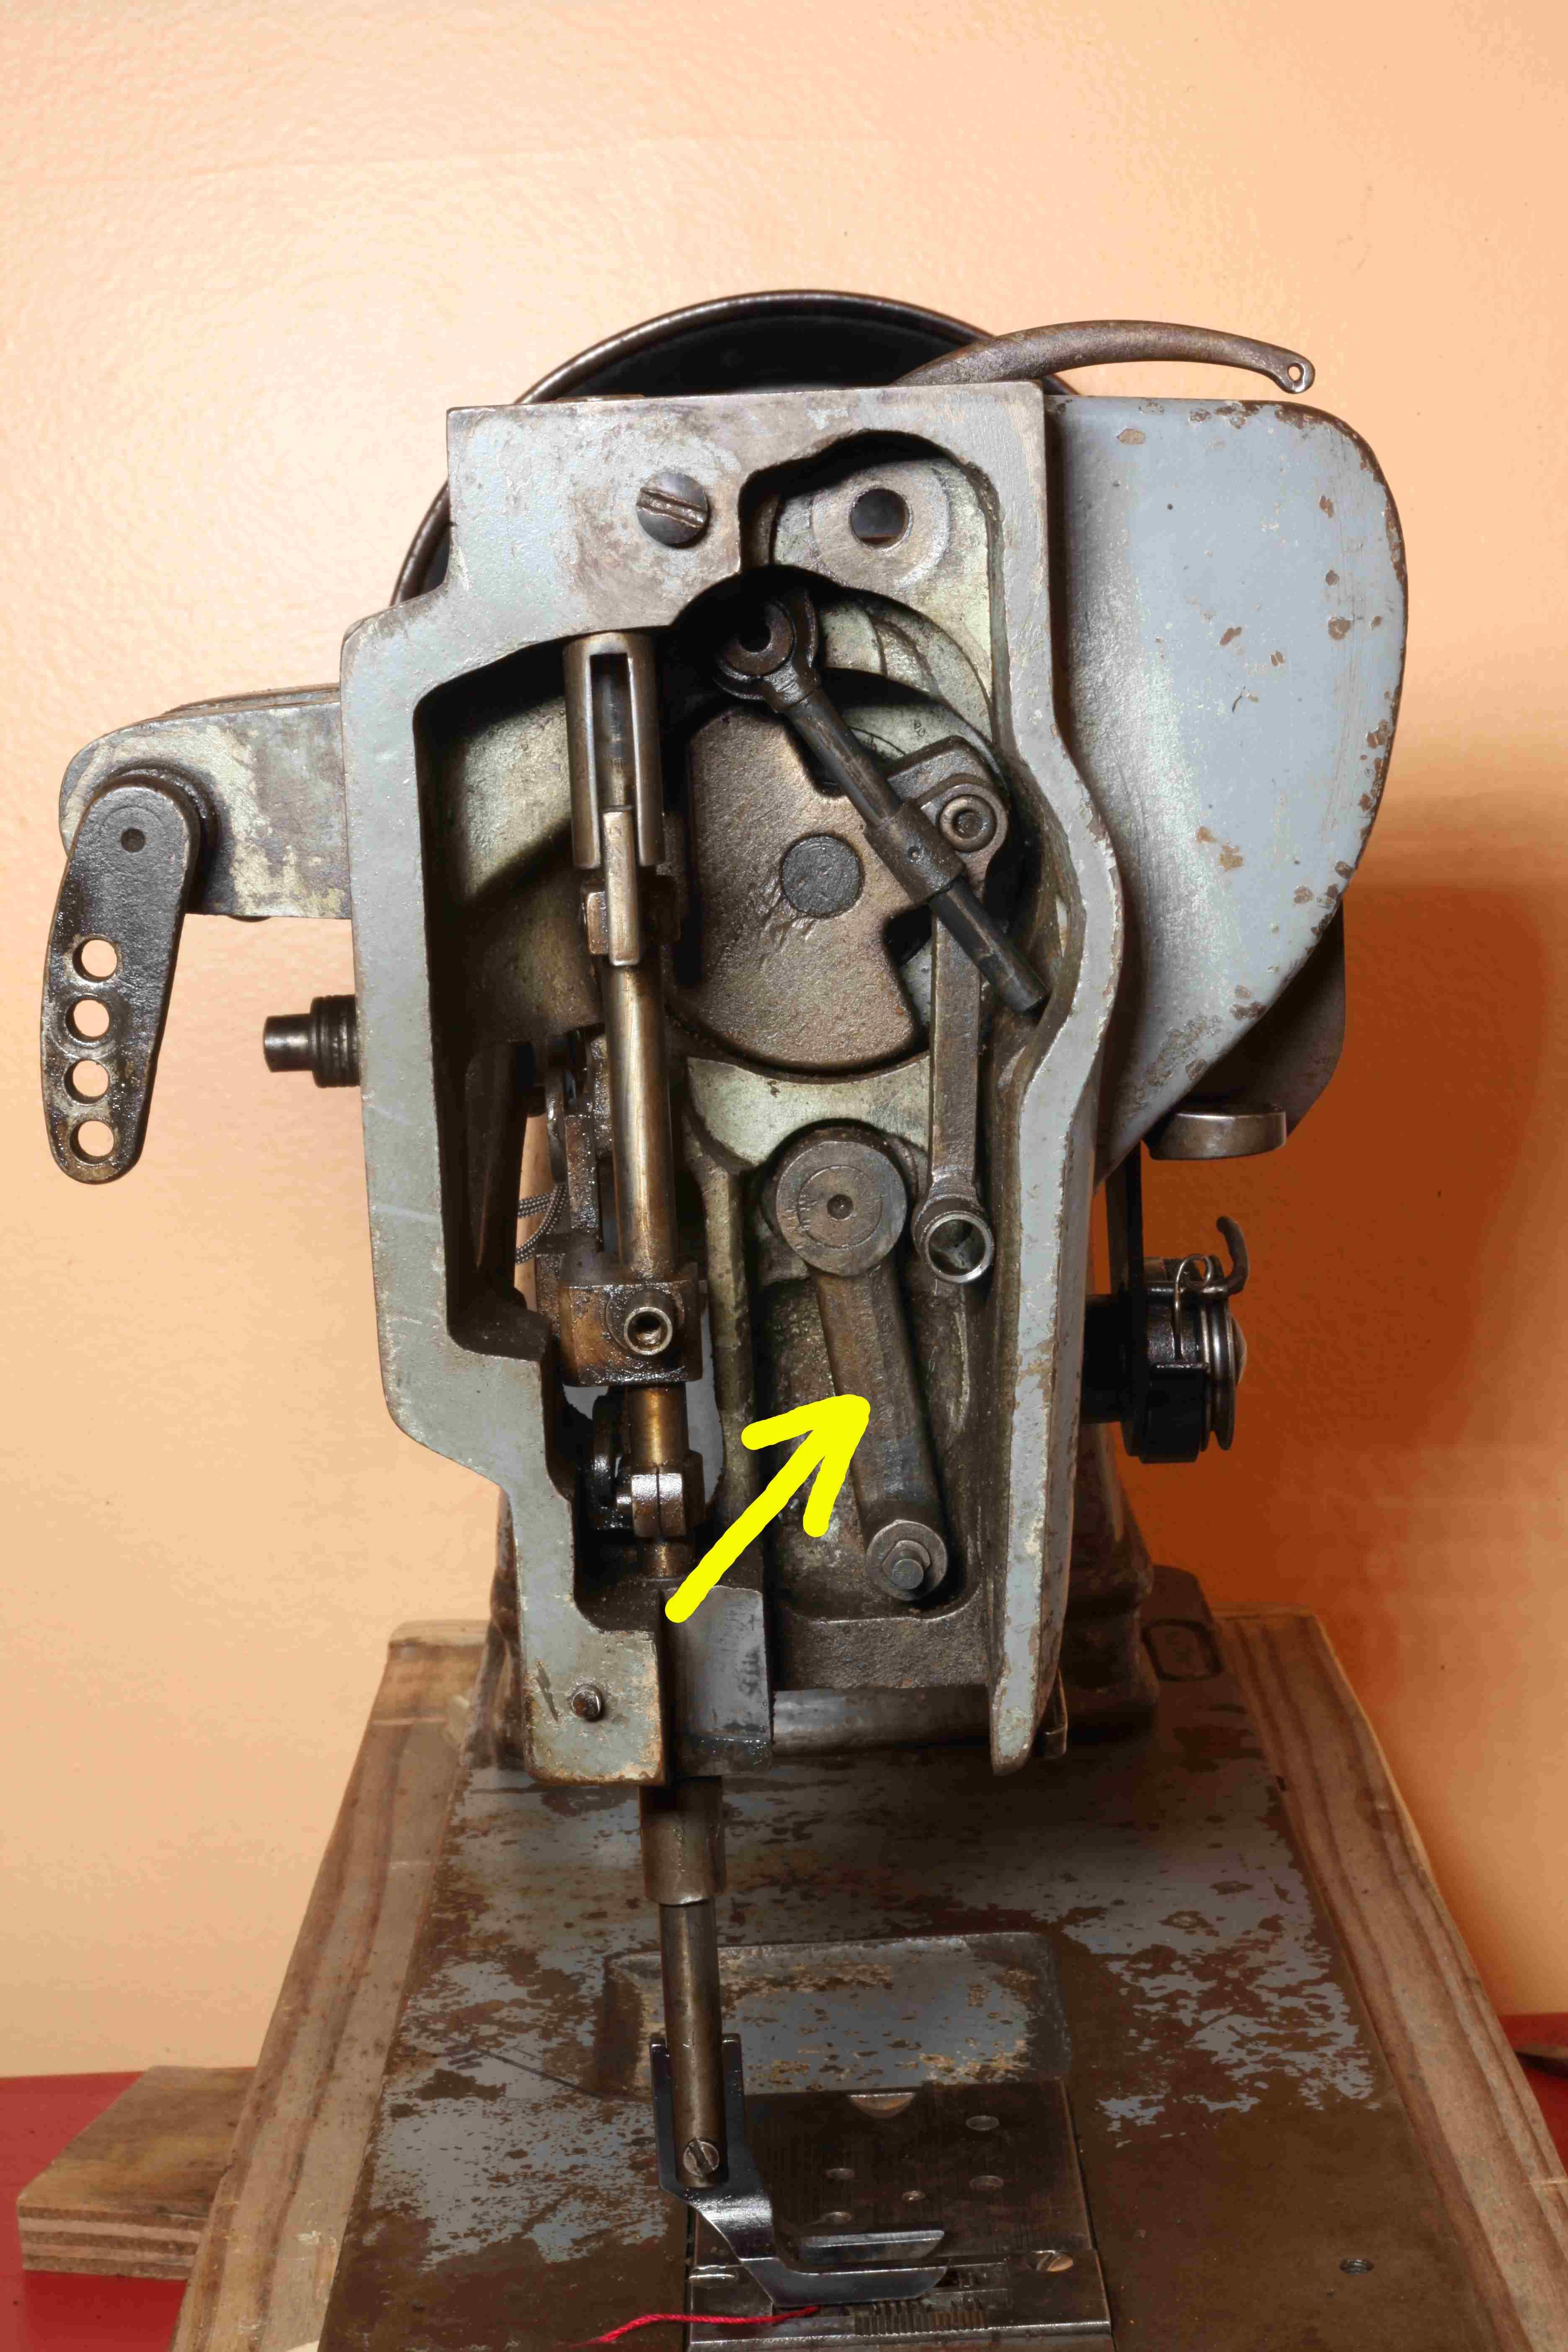
Is the handwheel easy to turn? Have you oiled the machine? (Do add some oil if not) Does the needle bar move front to back if you push it with your hands? You will need to find the clamp that Wyowally references and verify that it is indeed moving the "needle bar rock frame rock shaft" as singer calls it. We are looking for the clamp at the far right end of that shaft. If the clamp is loose, tighten it. Make sure the clamp and the rock shaft both move together when you turn the handwheel. If neither the shaft nor the clamp move when you turn the handwheel, flip the machine on its back and inspect the parts underneath that drive that clamp. If the shaft does move but still no movement at the needle bar, take the left end cover off the machine and find the crank arm at the left end of that shaft. Here's a photo of my singer 144W103 with the needle bar rock frame removed, and the yellow arrow points to the crank arm you want to check for movement.
- Yesterday
-
.thumb.jpg.6e903dd66163ad5672f00f144058c571.jpg)
Hand-sewing and zips. Bane of my existence!
Northmount replied to HondoMan's topic in Sewing Leather
Moved your post to Sewing Leather -
I moved your post to Marketplace Items For Sale Miscellaneous/Other
-

Replacement Pulley for Tapered Shaft
friquant replied to friquant's topic in Leather Sewing Machines
Can you post an amazon link? -
Thank you! I've removed covers and have attempted to find something out of the ordinary. Were you able to watch the video I posted about the issue? Looking forward to hearing what you find. Dan
-
I have a couple of this class machine but haven't run into this problem. Forgive me if you've done this, but it seems like popping that cover off and turning it by hand should yield some kind of clue. Just observing and following the mechanism back. I poked around a bit and couldn't find any videos on adjusting the needle bar position other than height. Tomorrow if it's warm in the craft room I'll look at mine and see if anything jumps out at me. Now I'm curious, too.
-
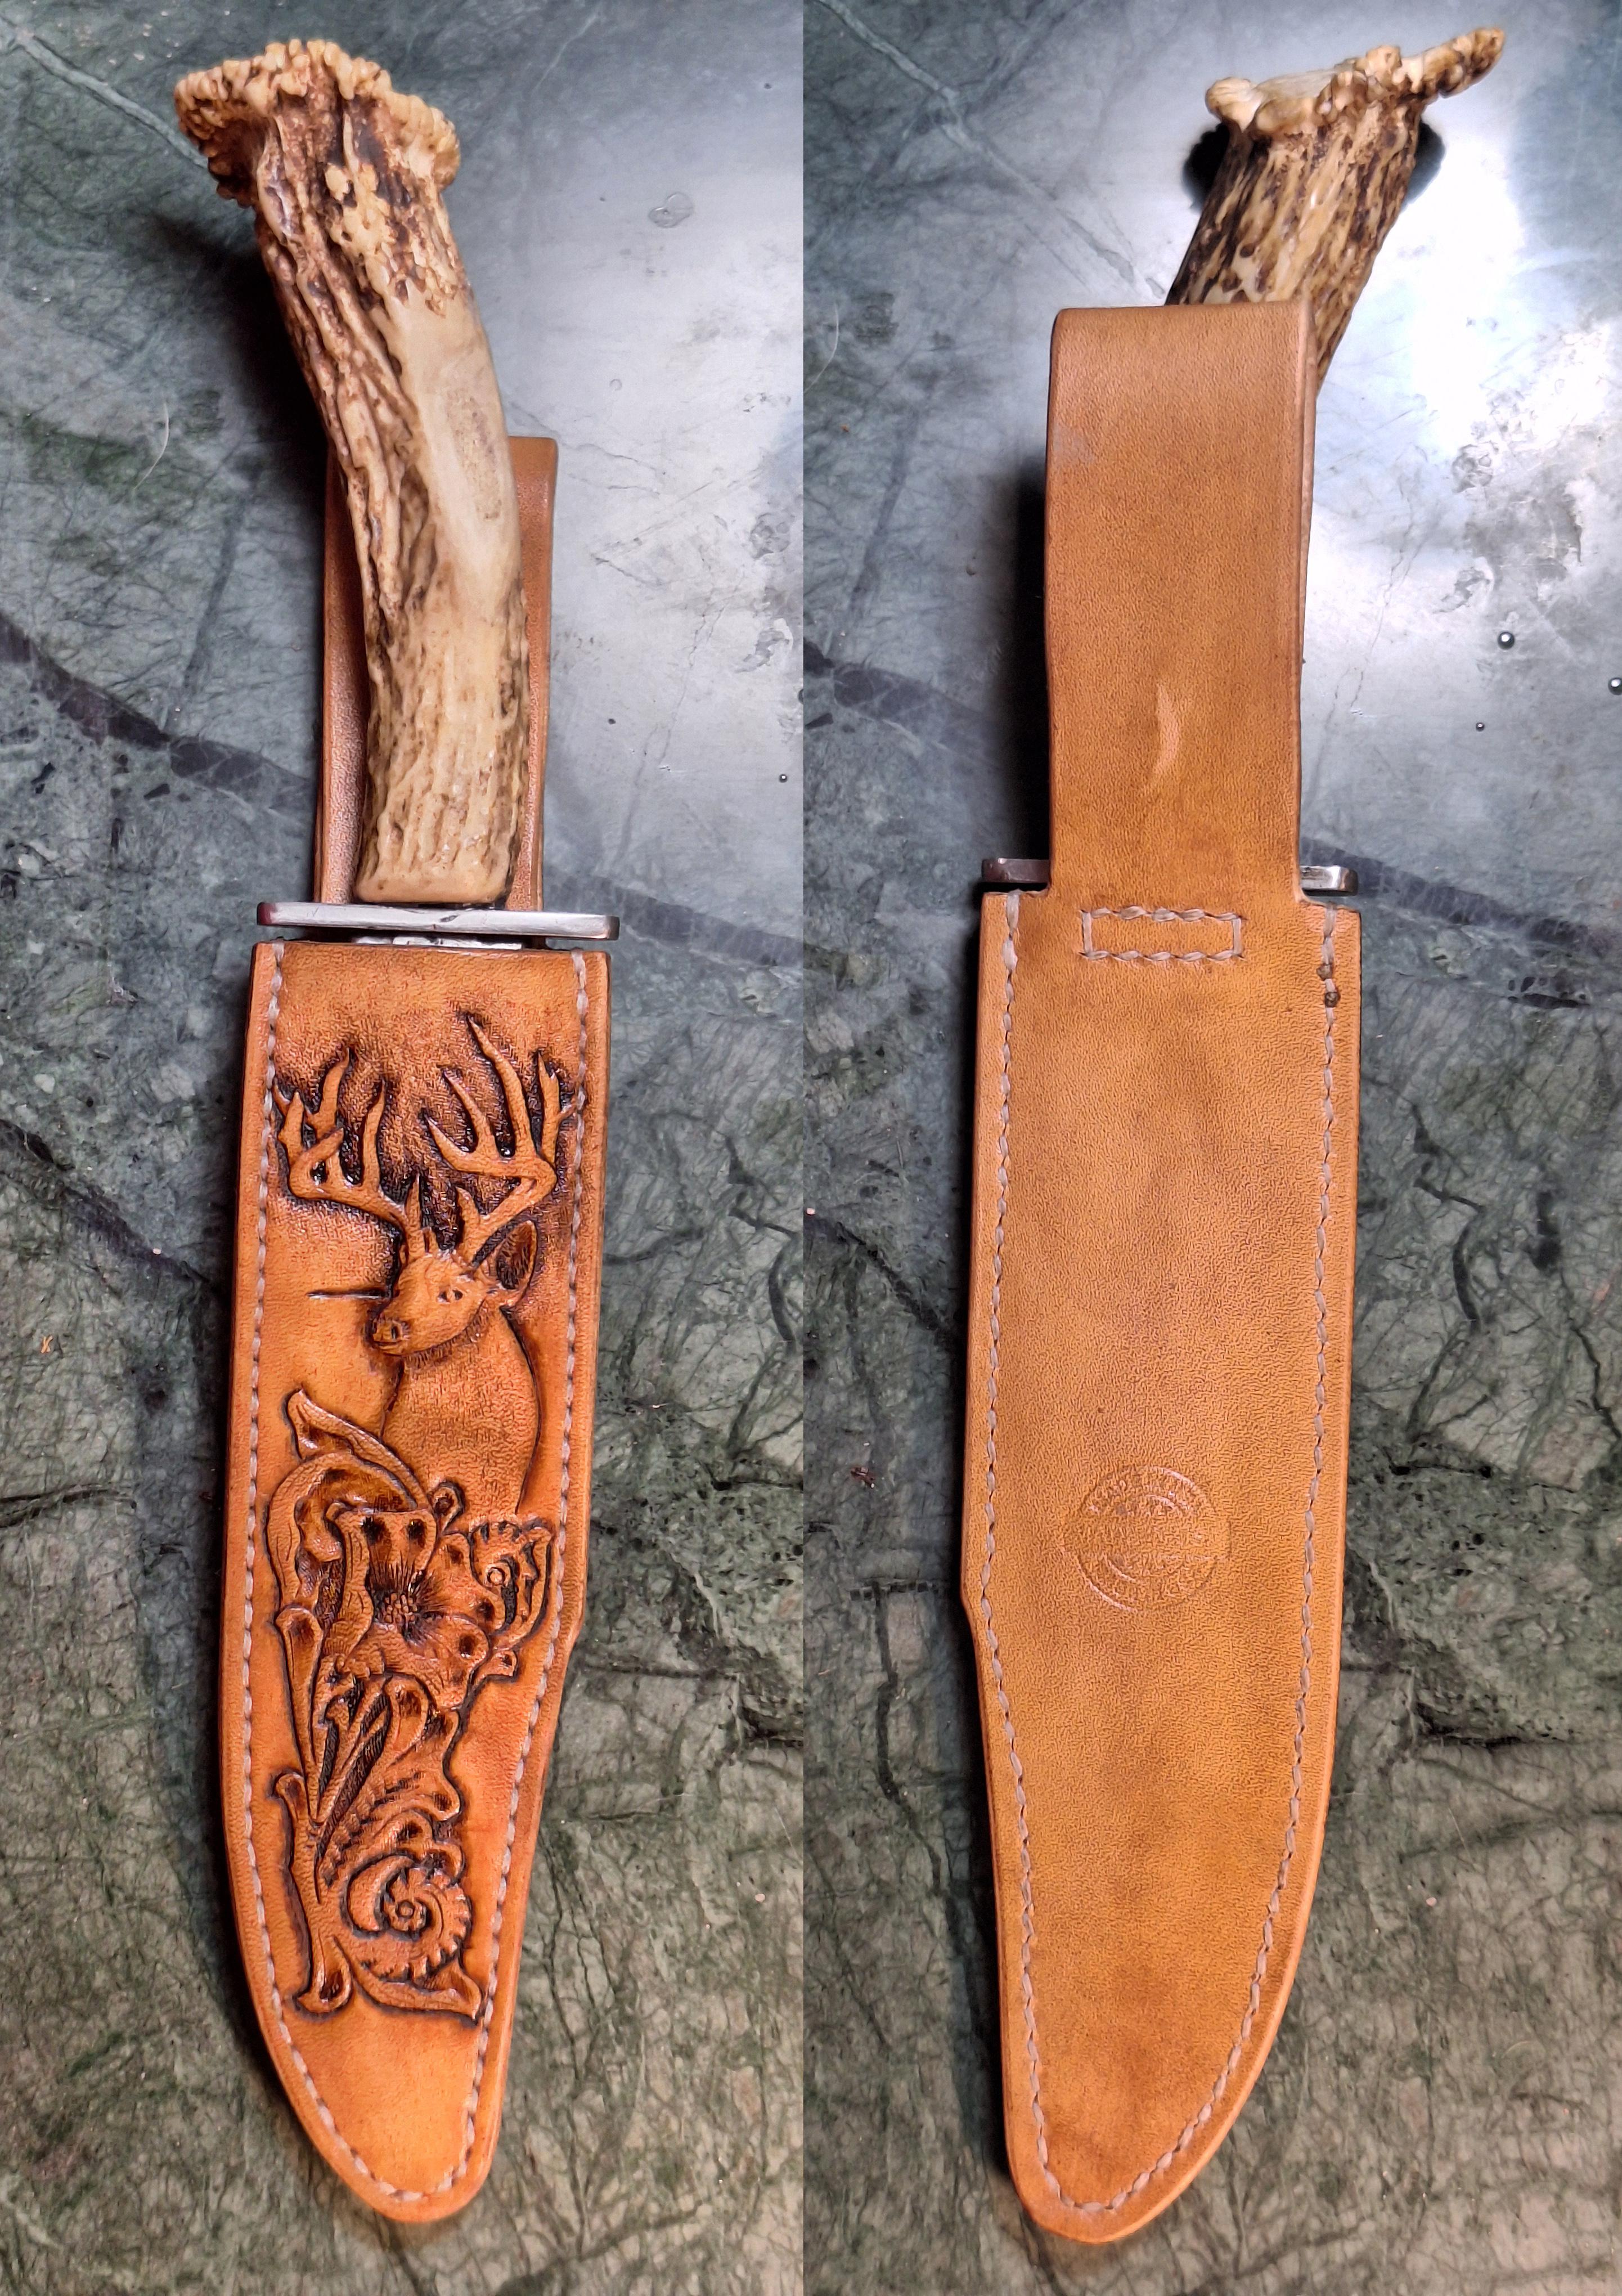
Finished the deer sheath for a cousin, with the deer antler handle fits good.
-
I think he moved? Two years ago I sent him a list of parts I wanted in writing to his long published Arthur IL address and I didnt hear back. A year ago I call his answering service and he called me back. Said he never received my order so I gave it to him then. When the parts came his invoice was overstamped McLeansboro. 6373 County Rd 400 N, McLeansboro, IL 62859.
-

FOR SALE - Cowboy CB12 Hydraulic Clicker Press - CLEAN - $2800
soulcraftgoods replied to soulcraftgoods's topic in Old/Sold
SOLD -
Thank you for the response! Much appreciated! This machine has been pretty much trouble free in my lifetime. Were you able to watch the video? I downloaded and printed the military manual and some illustrations were scrambled. Lubrication drying out? Does the needle bar get moved by a cam? Gets pushed on way and spring return? I'm attempting to wrap my head around how dried lubrication can cause the needle bar to act this way. Dan
-
Legacy Saddlery
MamiaGirl replied to MamiaGirl's topic in Saddle Identification, Restoration & Repair
Thank you so much.I still don't have any information on this saddle. But hopefully someone will know something.It's very well made. It's not too old.The leather is still very good and I use it. Does hoping to find some history on it. And what it sold for perhaps new. -
The seller of these has put a 55mm on amazon at my request. This is the only other size avail.
-
not sure what I would do with 50 yards of this webbing, but just on the historical part of the find, it's pretty cool. And olive drab. I haven't heard that color description in... well, since 19-longtimeago...LOL!
-
did you look here?https://fiebing.com/blog/
-
I also have the same machine, redone by me with help from others on this forum. I am not near it and won't be for a while. My first thought is the main pinch screw (the big-headed one) in the exposed linkage on the back let slip. Not common, but it does squeeze a clamp, so unwanted rotation is possible. Next thought is lubrication dried out if it has sat for years. Another possibility is something moved in the internal feed eccentric that also adjusts the two feet and their movement and relationships. I did find the military manual I have pretty useful. On YT, search for Uwe Grosse and his videos - not all specific to Singers, but also the other machines of nearly identical design. I found this very good.
-
✨ Help Wanted: Leather Tooling Artist ✨ looking for a skilled leatherworker to take on piece work for our busy, high-end tack company. We create everything from fantasy-inspired masterpieces to elegant western designs — and we’re looking for someone who can think outside the box, have fun, and bring bold creativity to the table. I will ship the pieces to you, so you can work anywhere you choose. Details: Paid per piece (rate based on complexity and quality) All leather and tooling materials provided (if needed). You’ll be creating parts for custom bridles, halters, breast collars, and more Must have a portfolio of previous work so we can ensure our styles align This is an excellent opportunity to collaborate with a well-established, high-demand equestrian brand with a strong following and reputation for unique designs Due to a recent hand injury, I’m no longer able to do the tooling myself, so I’m seeking a dependable artist to help continue creating the level of craftsmanship my customers expect. If you’re passionate about high-quality leatherwork and want to be part of something truly creative, message me with examples of your work and we can chat. Thanks! (I am located in CA, but can ship anywhere in the US)
-
I generally put a coat of NFO on and let it set 24 hours before dying. I finish with Resolene diluted 1:1 with water and have never had a problem. I use a wool pad for the NFO just putting enough of a coat on to see the color change, I am not soaking it with the NFO I think you can over do it and make your leather too soft. Todd
-
and I did a little better on my stitching this time
-
I use NFO before dyeing, it helps carry the dye more evenly and makes it more pliable when it dries. I let the NFO sit for a least a few hours I have done NFO after dyeing and used Resolene/water 1:1 ratio and it comes out fine. One trick I do after the leather dries, in this case a belt, I work the belt into a coil in both directions and inside out to make it pliable before adding the Resolene mix.
-
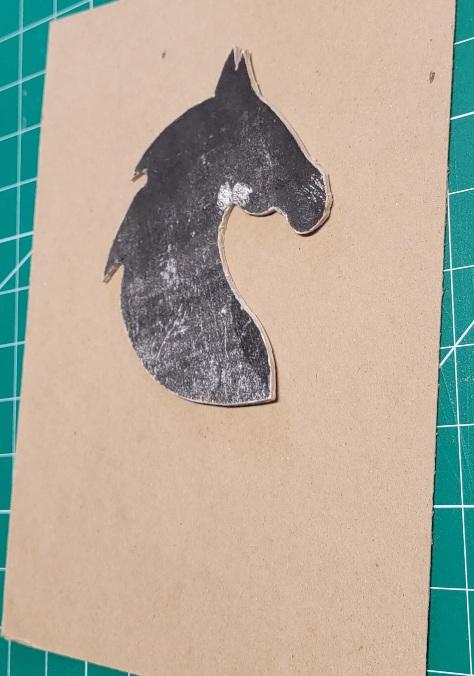
Thanks! For the inlay I used a second piece of binder's board in the shape of the horse head. I formed the inlay leather to that shape. That second binder's board raised the leather up to be just a little higher than the outer leather otherwise it would have made the horse flat. When I made the inlay I extended the leather all the way to the left, right, and top so you don't notice a seam line. For the bottom I skived the edge to minimize the seam line. Thinking about it now I should have extended the leather all the way to the bottom to save me the headache. lol It looked something like this before covering it up. In this image the back board is .6mm but in the actual one I used 1.8mm board, just like the horse head.
-

will juki 1341 accessories fit this Typical tw3-343?
kgg replied to TakashiOkada's topic in Leather Sewing Machines
I use an office chair with caster on all my machine without any difficulty. I have seen the foot lift to be more difficult then the using the rear presser foot lift lever for two reasons. 1) a missing washer on the pivot point of the the foot lift lever at the rear of machine and 2) the point of contact of the foot lift lever at the head needed to be adjusted / oiled where it made contact to lift the presser foot. You should check and see if the knee lift shaft is binding which maybe contributing to the hard lift when using the pedal to lift the pressure foot. Also: 1) The location of the cable to the foot pedal should be mounted to a bracket that is mounted to those two rear holes in the pedal. The closer you move that cable to the pivot point of the pedal the more difficult it is to operate. 2) Since you like using using a knee lift there should have been one come with the machine and it bolts to the shaft extending out of the base of the machine. 3) You should check and see if the knee lift shaft is binding which maybe contributing to the hard lift when using the pedal to lift the pressure foot. kgg -
As a suggestion try doing a test piece and compare the result with your present method. Test piece i) Oil the top side of the leather by airbrushing (above 34 psi) first and then lightly oil the backside after letting the topside sit for a few minutes. Let the leather sit for 24 hours to soften and let the oil spread the leather fibres. ii) Then airbrush the top side of leather with the dye (50/50 mix at an air pressure of above 34 psi). Then lightly airbrush the dye to the backside. Let sit for 24 hours or longer then to allow the dye to spread and darker slightly. Then a final light coat of oil. Compare the result with your present method. kgg
-
Stapler! Not the office type, the plier type. Use anywhere the holes are not seen. Simply remove after they've done their job. Office/Work/Home Stapler - Foska Plier Grip Stapler ST0512 - Black | eBay UK
-
Right then, Hand-sewing in zips. This really does get under my skin. I do them, but it brings me no pleasure. The problem surrounds the gluing in. I have tried contact glue as well as PVA. Neither of these adhere to the zip material. Ok, a wee bit. But I found the zip moves, which creates an non-straight zip. I have been using a double sided tape for the past couple of years. This does work well keeping the zip in place; however, the adhesive is all over my awl and needles. Urgh! Now I have to wipe the residue from the tape off my awl and needles about every five holes. The residue and tape also do not allow the awl or needles to move smoothly through the leather. There has to be a better method. Some type of adhesive that will keep the bleedin zip still and won't smear adhesive all over the tools. Ideas? Cheers!
-
I use 100% of Fiebings products for dying, staining and finishing leather, I don't use any other - although it's more expensive than others that I've tried, but it's the only one I'm satisfied with so far. This is not a commercial for Fiebing's, I'm just explaining myself. I use Fiebing's Pro Dye to dye the leatherwork (then applying acrylic resolene with airbrush. I dip-dye belts and for everything else I use airbrush. But after dying (mostly after dip-dying) belts are very stiff - so I would consider using Fiebing's Neatsfoot Oil and then Resolene - would it work? Would it even be reasonable to use Resolene after Neatsfoot oil? And another question: After tooling leather and dying it with Pro Dye - is okay to use Antique Finish? And after that, I would use Neatsfoot oil and then Resolene for the finish - would it work or am I using too much preparations for leather? Thanks for any help!