
Trox
-
Posts
1,593 -
Joined
-
Last visited
Content Type
Profiles
Forums
Events
Blogs
Gallery
Store
Everything posted by Trox
-

New Dürkopp Adler 969 And 967 H Type Machines For X Heavy Work
Trox replied to Trox's topic in Leather Sewing Machines
Look at the price I posted here 6 years ago (top of the thread) The price has gone down since that time when it was new on the marked. Knock off's has dominated the marked and "Original machines" producers had to lower their prices. When it comes to tables/stands most dealers have their own. -
New Dürkopp Adler 969 And 967 H Type Machines For X Heavy Work
Trox replied to Trox's topic in Leather Sewing Machines
http://www.sieck.de/en/machines/sewing/arm-type-machines/?produkt=5656 When it says brand new, why wouldn't it be? That what Sieck does, they just sell machines cheap without investing much talk in to it. I've dealt with them several times, you get what is announced. But do not expect any support or answer to question's -
New Dürkopp Adler 969 And 967 H Type Machines For X Heavy Work
Trox replied to Trox's topic in Leather Sewing Machines
I kind of went the other direction, from a 441 back 100 years to BUSM N⁰6.....the right direction by the way. Kept the 441, it has to many attachments not to be useful. -
New Dürkopp Adler 969 And 967 H Type Machines For X Heavy Work
Trox replied to Trox's topic in Leather Sewing Machines
6500 Euro with all the good stuff on it at sieck.de Germany. Machine without support, you can always get support from Dürkopp Adler. -
New Dürkopp Adler 969 And 967 H Type Machines For X Heavy Work
Trox replied to Trox's topic in Leather Sewing Machines
6500 Euro with all the good stuff on it at sieck.de Germany. Machine without support, you can always get support from Dürkopp Adler. -
Best Skiving Machine For Soft Temper Leathers (And Firm Too)
Trox replied to 25b's topic in Leather Tools
When it's a choice of the Japanese, that speaks for itself. They know the Asian market and are particular about getting good quality. It would probably crush it's Chinese competition anyway, although it's pretty likely made in China now like everything else. If it's made in Japan still, it would compete with the Italian and German machines. Not in techniques but quality of course. -
There it is, thank you! I'm sorry for the late reply. Seems to be a very rare brand this. Thank you so much for posting! Tor
-
I know this is an old thread now but I failed to answer you post. There you have the same one Allan, Great! Did you find any more info on it? Thanks
-
Vintage Woburn Mach. CO. No. 1 Leather thickness measuring Tool
Trox replied to jvsaffran's topic in Leather History
Nice find! -
Probably not a leather punch when its no way to eject the leather. These antique dealers always say its a leather tool when they haven't got a clue. Looks to be used on heavier stuff than leather, sheet metal perhaps, a mallet strike would disappear in the mass of it.
-
The lasting pliers most certainly have a makers mark to it. Looks English or German, but so many made these. Just because the box is found in Japan, the tools doesn't have to be Japanese. The awl handles looks to be English beech wood, pattern is similar to Geo Barnsley. You can hardly find a shoe maker shop without any of his tools. Yes the tools looks to be own by a shoemaker. Saws looks Japanese style, would have been used to make wooden sandals and last's. What's look like a pricking iron is a distance maker, used to guide an awl to uniform distance by laying it flat on the work surface. Shoemakers used these, but it also could be use to spread glue. Would perhaps been a little dirtier, traces of glue etc. I see sheet metal shears, for cutting soles perhaps. Some repurposed feeler gouges (car mechanical/machinist tools) looks like distance makers too. But the photo is to blur to tell. Those draw markers might have been used to measure the lenght of a foot or copy a pattern on to leather. There are heal and sole creasers that only a shoemaker would buy. Take some close up of makers marks on them for more info. Tor
-
Love that tractor seat treadle. Was there not a longer arm version, thought I saw one for sale the other day. I've heard they are hard to get parts for. Tor
-
I agree with Constabulary on this. The Pfaff is a very old machine with expensive spareparts. Looks to have had a air cylinder pneumatic reverse perhaps. That might have been in a factory set up, looks painted too. The Juki is a quiet modern machine although it looks similar. Bigger bobbin is a plus, these 563's are also very well made. Of course the Pfaff is too, but its a very old machine by now. Also, Im not sure if the Pfaff has a hook safety's clutch. The Pfaff 1245 has that but I don't think this one has it. That's an very important issue. Tor
-
No worries. I don't think I have any sewing machine foot I didn't have to modify.
-
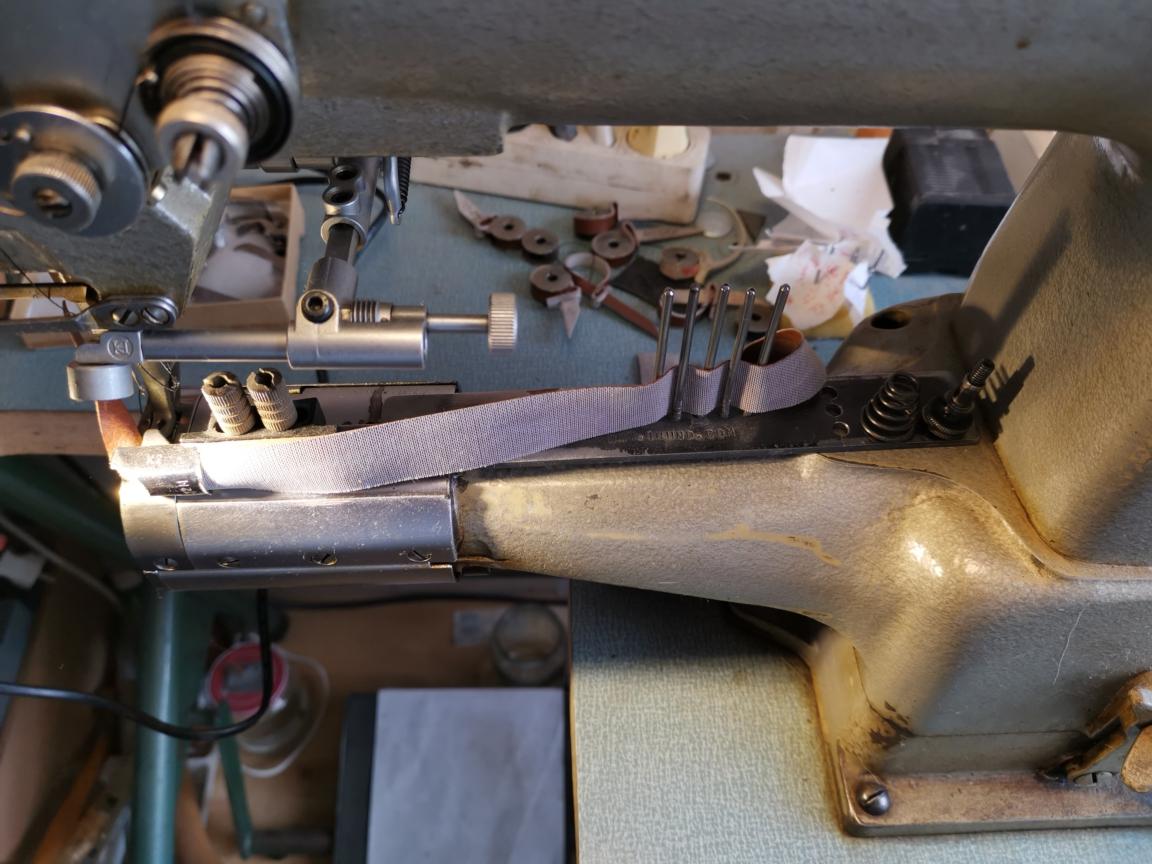
To use the synchronized binder your machine got to have binder feed (feed dog that just go back and forth, no upwards movement) But of course you know that already. Tor
-
Well there is a way of adjusting the needle bar and the feed dog to each other, but they are already perfectly in the middle where they suppose to be. The problem is the feet's aren't accurately made, they need modification. You wouldn't have to do those adjustment's every time you change a foot. Tor
-
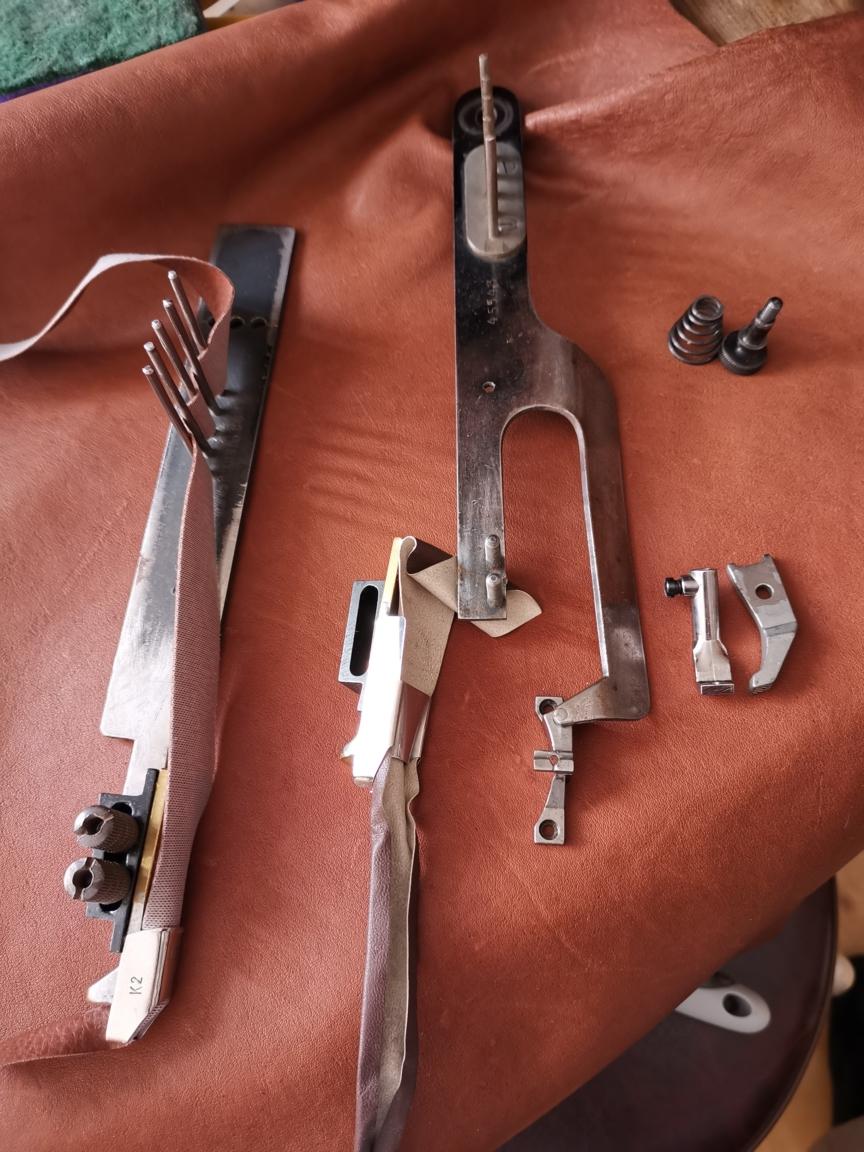
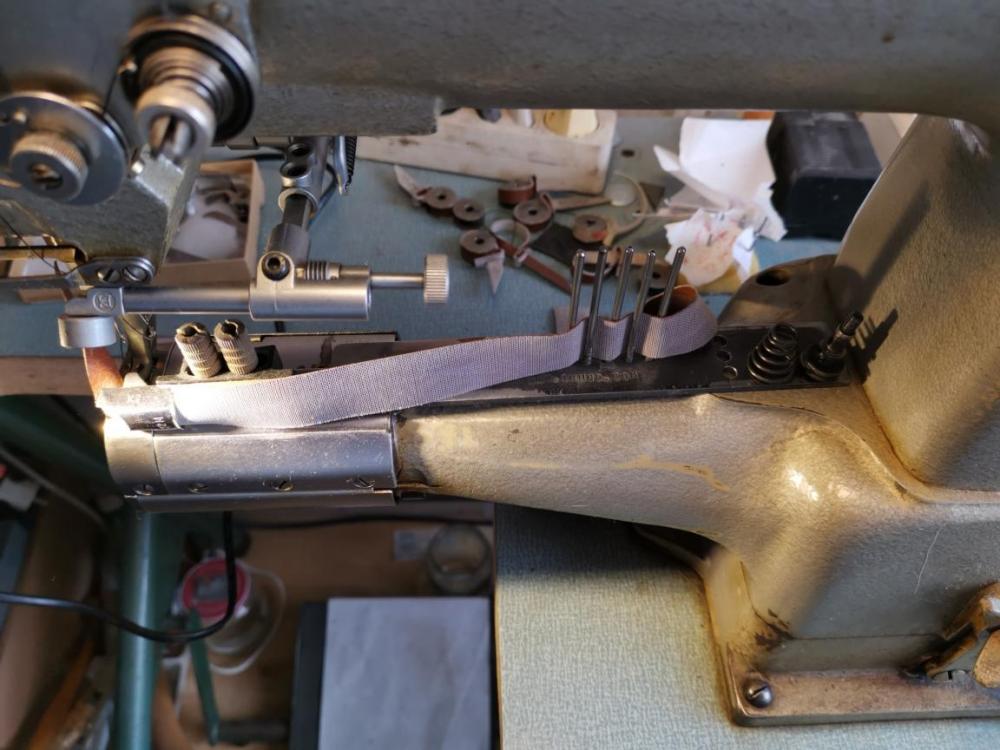
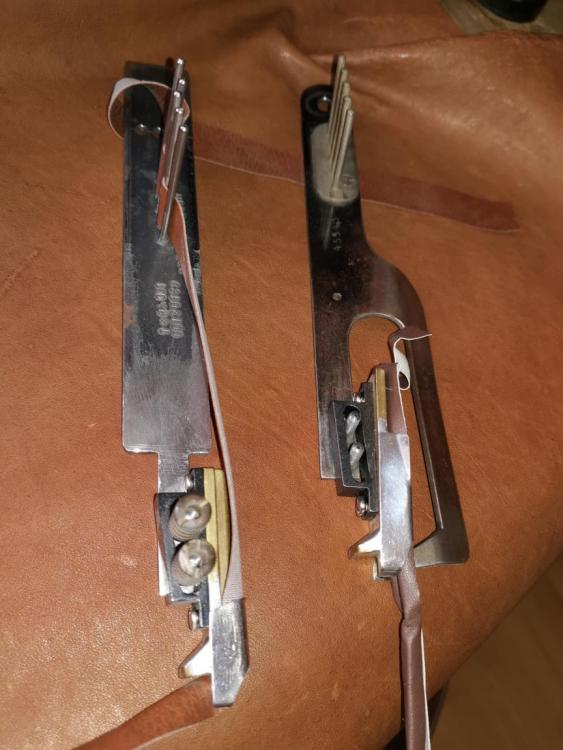
Here is one I made for my Pfaff back in 2013. I stamped the date in it that's how I remember The one to the right is a propelled synchronized model, original Pfaff with the feed dog and binding foot. It attach with the coil spring under the screw (top right corner) so it moves with the feed dog. The set contains a special needle plate not in the picture. As binding reel I use my Lazy Susan rotating nail cup, to the cocourtesy of of Peter Main. His idea to use the nail cup for such purpose, works great. Tor

-
Yea that's typically Hohsing aftermarket feet's. Make the inner foot a little thinner with your grinder/file etc. And turn it to center the needle in the hole. Tor
-
You can't move the needle bar no. Just up and down and it will screw up the machines needle hook timing. You can only move the inner foot, but make sure the outer foot are in the right place before tightening the set screw. Its on a square bar but still there can be some wiggling there. Are those aftermarket feet's? My experience is that most feet's needs a little modification before they fit perfectly. However, your needle might also be bent. Put in a new one in to check. It's common to see aftermarket feet's looking like that, Hohsing feet's always looks like that. I think I almost had to modify every one I bought from them. But a genuine DA foot will set you back several hundred dollars each, its worth a little tweaks getting them as cheap as these. Tor
-
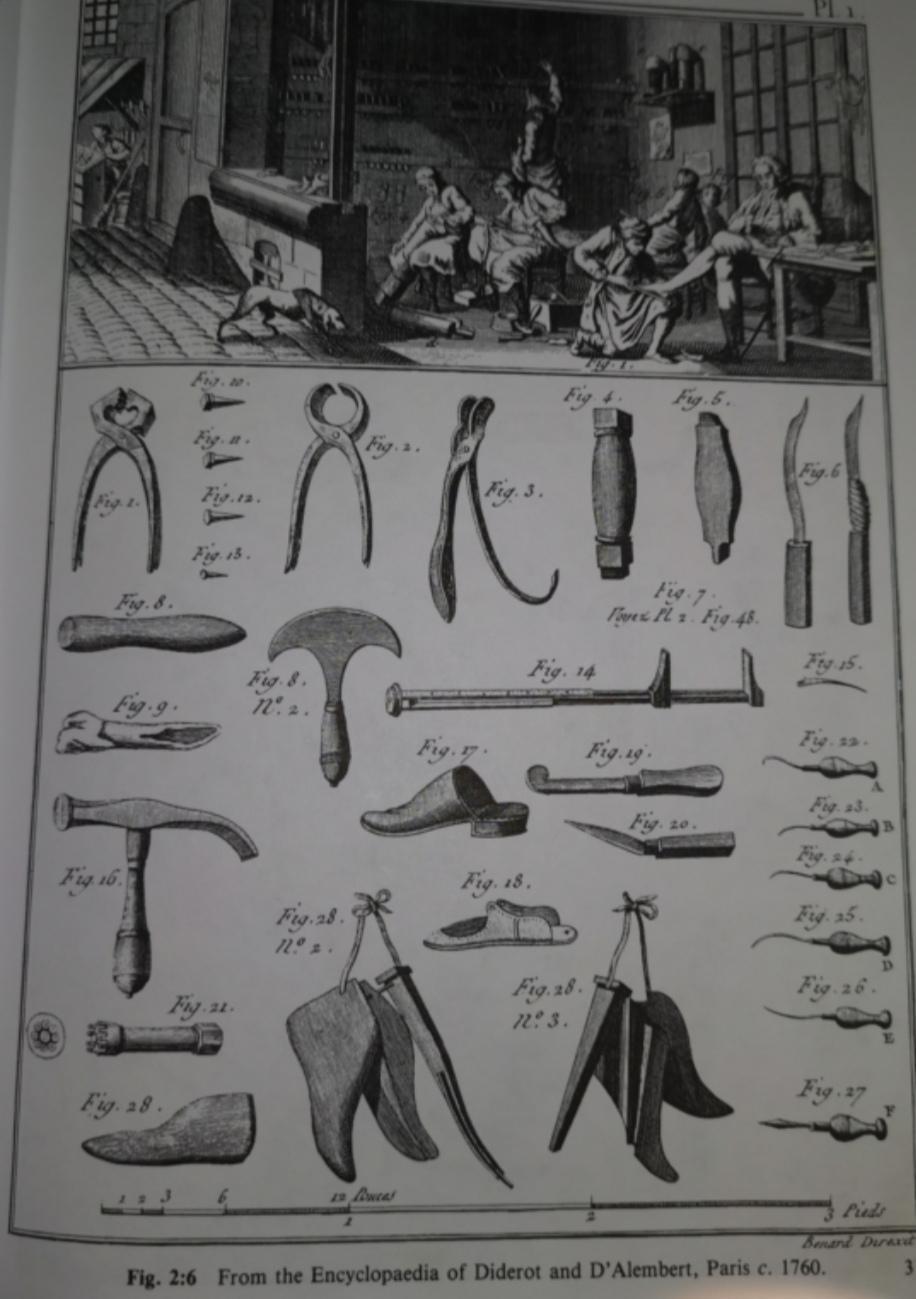
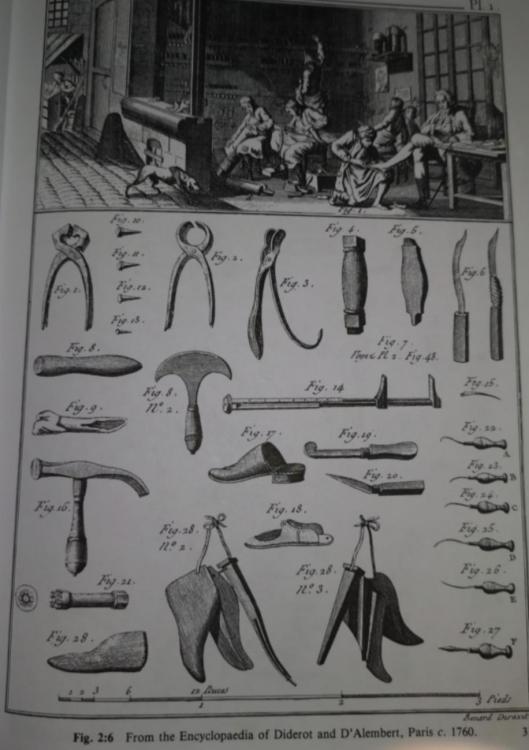
In Dictionary of leather-working tools, c 1700-1950 and tools of allied trades by R.A. Salaman. You will see various old tools made for edges. Picture is from the book and shows plate from the "Encyclopedia of Diderot and D'Alembert, Paris c. 1760". Fig #5 shows a edge slicking tool. It proves such techniques where uses way before that book came out. There are evidence of edge finishing leather in bookbinding back in the fifteenth and sixteenth century. Not much antique foot or horse leather are preserved for us to look at. But old books are been taken care of and preserved. The above dictionary comes in to this subjects of several occasions. Edges wad weak points and where creased/ compressed and must certainly closed of when necessary way back in history.
-
Nice hammer, what are those rivet's for? Is there a tang inside going all the way to the back of the handle? Some buckles will need oval holes, it will look better and keep the holes smaller. You would need a much larger round hole for the same job. That might make a strap weaker and look ugly. However, in most cases you will get away with a round hole. There are cheap roller punch pliers with oval punches available. You can also buy cheap oval punches, but they will not last very long and some of them makes ugly holes too. I've tried a few types of today's oval punches. You can be lucky to find some old ones in good condition otherwise there are very few new good ones. The new Blanchard's aren't good, small sizes are to soft steel. There are inexpensive Dixon copies, they look like they have just pressed a round punch to a oval shape...bad outcome. I've settled with the Weaver ones. They are a little on the fat side and the flat indicators on the handle isn't oriented correct to ovals long side. I expect that is a mistake to one or two of mine because the rest of the set are correct. Anyway, good punches are a expensive investment. You can use something cheap while you collect the good one over time. Tor
-
Some buckles will need oval holes, it will look better and keep the holes smaller. You would need a much larger round hole for the same job. That might make a strap weaker and look ugly. However, in most cases you will get away with a round hole. There are cheap roller punch pliers with oval punches available. You can also buy cheap oval punches, but they will not last very long and some of them makes ugly holes too. I've tried a few types of today's oval punches. You can be lucky to find some old ones in good condition otherwise there are very few new good ones. The new Blanchard's aren't good, small sizes are to soft steel. There are inexpensive Dixon copies, they look like they have just pressed a round punch to a oval shape...bad outcome. I've settled with the Weaver ones. They are a little on the fat side and the flat indicators on the handle isn't oriented correct to ovals long side. I expect that is a mistake to one or two of mine because the rest of the set are correct. Anyway, good punches are a expensive investment. You can use something cheap while you collect the good one over time. Tor
-
The paint roller machine is CNC machines out of one piece aluminum, very durable and easy to clean. What it's missing is a lid of course. But I've use a plastic box for that purpose. I'm thinking about making something with guides on in conjunction to a lid. It good for belts reins and larger volume. It works well with Fenice, Giardini and other Italian style paint. Haven't tried it with thinner liquid ink based color yet. The Giardini have very nice results color and finish wise. But I find it to be a little to much work applying base color and several layers paint in adjunction to top coat. But of course it looks nice. Tor
-
Of course the labor cost is somewhat higher here in Europe where child labor is not legal It's not only labor cost, it's the components they use in them. The secret to this tool is how accurate it keeps the temperature. How fast it's heating, there shouldn't be any down time before it's hot enough. A thermostat would not work, a accurate PID controller is needed. Even professional class soldering stations cost money because of the components it's in them. Perhaps a cheap Chinese PID control will do the same job as a expensive one. Only way to see that is to compare them doing a test job. I've just bought such cheap Chinese PID controller for upgrading an old hot foil machine. I hope it will do the job. Tor
-
You would need a harder shore cutting board and sharp dies.