ClayB
-
Posts
2,063 -
Joined
-
Last visited
Content Type
Profiles
Forums
Events
Blogs
Gallery
Store
Everything posted by ClayB
-
Hi Randahl, Thanks for sharing this with us. The pictures and the explanations should really help with all the people that are interested in trying to carve a feather like this. The thing I like is that it's not an eagle feather. I'm going to have to try one of these some day.
-
You've done it again Tina! I like that a lot. I started drawing a pattern up a few years ago with lots of different wildlife on it, but mine was way too busy. I like how you seperated the different scenes on the front, but I really like the whole scene on the back. I've had the picture up on my computer for the last couple days. I just keep looking at it and trying to figure out how you did certain parts of it. As for boo boos, you're probably the only one that's ever gonna know they are there. I know that they are the first thing that you see when you look at it, but the rest of us just see another really cool project. You truly are inspiration to a lot of us.
-
Hi Tina, Thanks for doing this little demo. I'm stuck somewhere between Casey and Leatheroo. I can see what you did, you make it look easy and I should be able to do that, but it's probably going to give me a headache if I try it. Good thing I know someone that can do it for me if I get stuck
-
Hi Tom, I'll give you a few suggestions that you can try. These are things I'd do different from what you have done, that doesn't mean mine are right, just different. Starting from the beginning. One the cut lines that end, I'd stop the cut shorter than you have on most of them. I cant tell from the picture if you have faded the lines out with the knife or not, but you should. If the cuts ended sooner, when you bevel them, you can continue past the end of the cut line and that will help them fade out even more. I agree with what Tina is telling you about the camoflage work, especially on the scroll. I try and keep the outside tip of the inside curve of the cam (does that make any sense?) right on the line. Maybe you can see it on this picture. By keeping the edge of the cam on the line, it makes the scroll look almost scalloped instead of a straight edge. The veiner you have tilted it and done a good job with it. I just tried something different on the seed pods too. I don't like a sharp edge on them. I dont cut and bevel that line. On the last ones I did, I tried to shape them with a small pear shader to make it stand up, but without that sharp line. I would do the pearshading on the flower petals a little different too. I don't care for the way you went across the tops of the petal (and again, that doesn't mean it's wrong, just different). I'd do another row of the pear shader impression down the center of the petals instead. If you want the shader to fill in more area, you can move it over to the side and hit it again to widen an impression. You might have to work at it to get it smooth, but it's not too hard to do. Your backgrounding looks real nice. The only other thing I'd do is try and even out the beveling halo in that circle at the bottom that the flower comes out of. You are doing nice work, but you also seem to want it to get even better. I hope this gives you some ideas of things you can try.
-
I know they are, and it's really sad. This is just my opinion, but if you allow that kind of stuff anywhere on our forum, that attitude is going to carry over. If that happens, then we lose all that we have worked so hard to create. Maybe we already are losing it. I'm glad it's not my decision to make. Someone asked for our opinions, that's mine.
-
I really hope you don't decide to do that. I feel like Leatherworker.net should remain focused on leather. There have to be other places on the internet people can go and discuss things like politics that can get people riled up really quickly. I dont see where having a place on this site for such conversations contributes to our goal in any way.
-
Tom, Something else you might try (on some scrap first) is to use antique without a resist. It will darken all the leather some, but still be deeper in the cracks and depresions. When I first learned to color leather, we didn't use a resist before using antique. You can also thin the antique (Fiebings) with Tan Kote to make it easier to work with, and somewhat lighter. If after you apply it and the high/smooth spots of your carving are darker than you want, wipe it down with a damp sponge and Tan Kote again and it may remove more of the antique. Just a damp sponge will take more of it off the high spots too. Just some ideas to play with. There are lots of different ways to color leather and you just have to do a lot of experimenting to see what you like and what works for you. It's a good way to use up some scraps cuz your gonna find some things that just DONT work too! You've been putting out some nice projects lately.
-
 I just talked to a friend and he had a question about putting a name on a belt. He had seen this done in a store where you buy a belt and they will stamp the name on for you. He said the guy put a strip of tape over the belt before he used the stamps to stamp the initials on the belt. The stamps cut the tape when they were puonded into the leather. He pulled the cut out shapes of tape off the belt and then wiped dye right over the tape. He said when the guy in the store did this, it left perfectly dyed letters on the belt. When Rex tried this at home, he said his dye seeped under the tape and messed up the belt. Anyone do this, or seen it done and have any tips like what kind of tape etc?????
 -
I bet that's going to be a great article Tom! You've developed your own unique style and some neat techniques for coloring and things. It should be inspirational for other leather workers in Norway and where ever else the magazine gets read. (hope you can translate the interview so we get to read it too) I hope it gets you some business too, when you are ready for it. Congrats!!
-
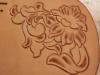
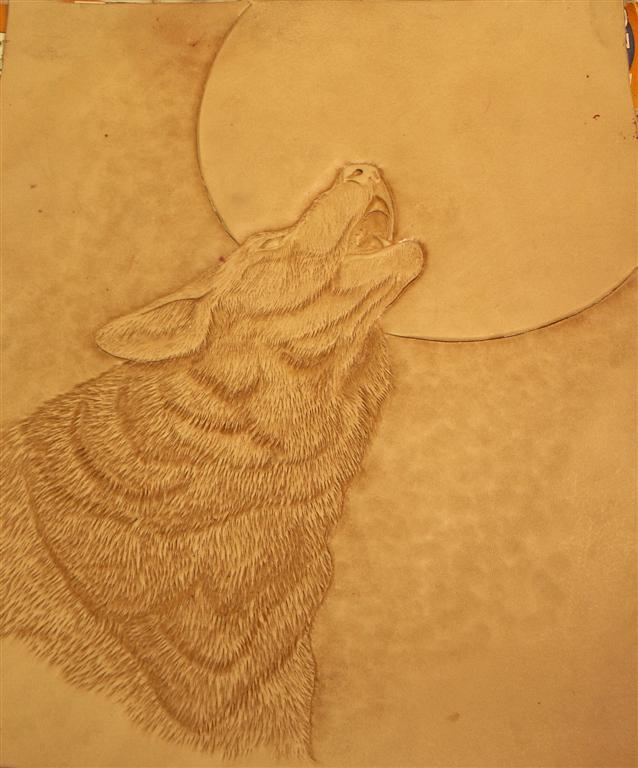
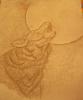
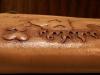
I did a very similar pattern to this one for one of our carving challenges here on LW back in September. There are a lot of ways to add hair to a project like this. I took a couple pictures as I was working on this project, maybe they can give you some ideas. There were very few tools used, but I did cut the outline with a swivel knife. It looks like you did fine without it. I did some beveling on the face to put in some of the features, and then cleaned them up with a modeling tool. Then I used a pear shader to put some muscliing on the body. All the hair texture was done with a narrow pointed figure beveler. I just tapped the impressions very close together, and made sure to try and follow the natural flow of the hair, making layer after layer of hair. I haven't finished mine up yet. I'd like to put some texture in the moon, and then color it someday.


-
Hi Ed, One thing I was told a long time ago was that you should put two coats of Neat Lac as you say to make sure it's sealed, but to do the second coat right after the first. The reason given was that if you let it dry completely first, the second coat wont soak in, and will have a tendency to crack and come off. I've been putting on two coats right away, with the sheep skin like you do, and haven't had any problem that way. Not saying either way is right or wrong, just wanted to pass along what I was told.
-
I use a lot of leather putty in my work, this is the first time I've used plugs in a LONG time. If you look at the tutorial I did on the buffalo here on LW, you can get an idea of how the putty works. Basically, you stretch the leather from the backside, then fill in the cavity you create with a mixture of leather dust and rubber cement. Once dry it is pretty flexible and you can mold and shape it by using tools on the front of the leather again. It works really well for things like animals where you want to create muscles etc. and you want a lot of stretch in the leather. Plugs are pieces of leather or cardboard that you cut to shape, a little smaller than the carving, and glue to the back of the leather piece you are carving. They worked really well under the initials on this piece because I just wanted them raised a little. I started by carving the piece normally, then I traced the pattern again and cut it out a little bit smaller than the lines. You can usually see your beveling marks on the back side of your leather, and you glue the plug inside that line. Then you bevel around the plug on the front again to make it stand out. You can add more layers of plugs if you want your carving to stand out more, and you can shape your plugs by skiving if you want more detail. Al Stohlman wrote a book on embossing that explains the process of using plugs very well. I knew I should have taken some pictures of the back of this before I put it together. I hope this gives you some idea though.
-
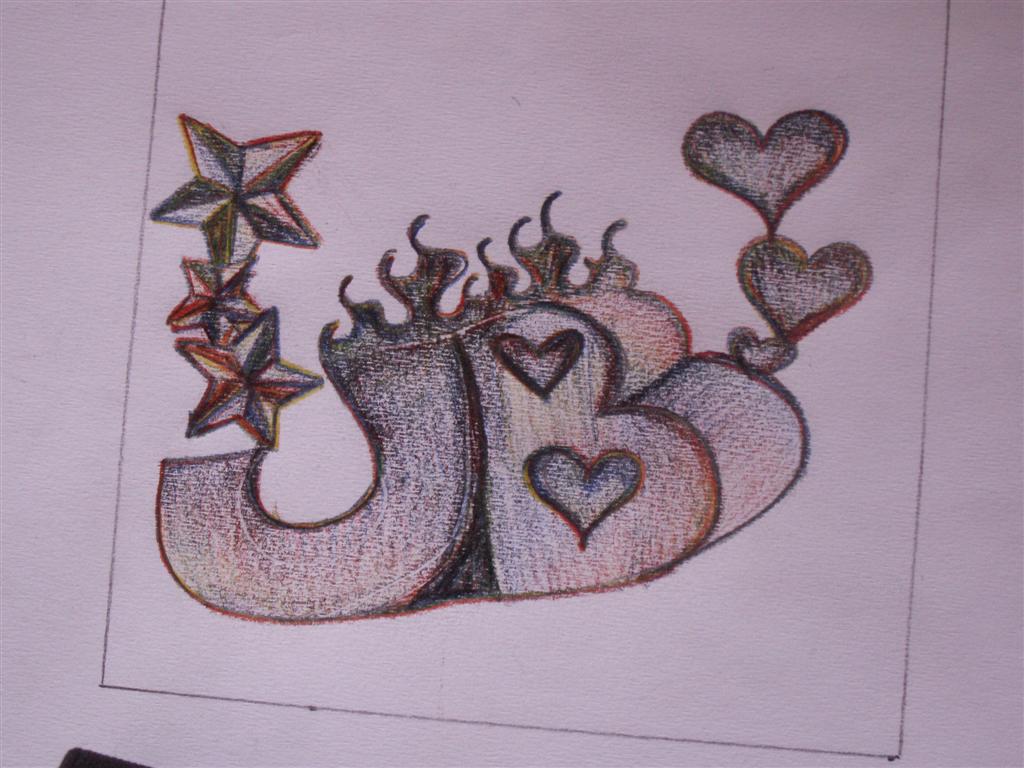
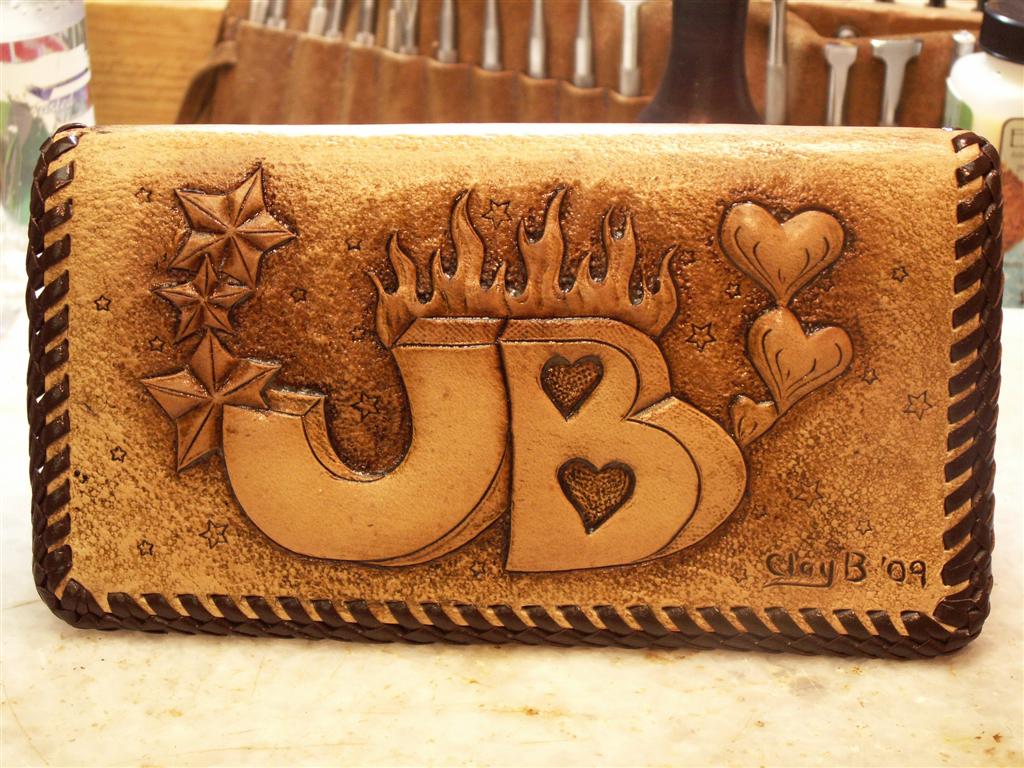
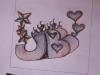
Well a couple days ago Jessi came up to me and said "Daddy, I need a real checkbook cover". I figured I was finally going to have to carve that frog that I have been putting off for so long, but no, she had just done a logo as an art project for school. She asked if I could put that on her cover. Here's the picture she drew. That didn't look too hard. It didn't take much to adjust it to fit. Carving only took a few minutes. I spent an hour or so on the coloring, and it was a failure. I tried to add lots of color with the eco flow dyes, followed that with a couple coats of block out, then finished up with tan all in one. The block out didn't block much out and it kind of looked like mud. SO, off to round 2. We decided that this one gets no color right from the start, so I had to come up with some other ideas to liven up the pattern a little. Jessi thought that a pro petal on the flames might bring them to life a little. Then she thought maybe some leather putty behind the hearts to make them pop. At that point, I decided maybe some plugs behind the initials were in order too. Well, why stop there, plug the stars and the flames too. I haven't done leather plugs in years, cuz my first experience with them wasn't very good. These were actually pretty easy to do and turned a pretty simple pattern into something kind of fun. Here's how it turned out. She's pretty happy with it, so I am too!

-
Jan Schoonover will be teaching his techniques for carving hair and horns at the Sheridan Leather Trade show on May 12th. For more info on this class contact The Leather Crafters and Saddler's Journal, 222 Blackburn St, Rhinelander, WI 54501-3777. Phone 715 362 5393. Or you can call Jan at 406 259 7066.
-
untilJan Schoonover will be teaching a leather embossing to the extreme class in Sheridan, WY during the Sheridan Leather Trade show. This class will feature an 11 X 14 picture of a Polor Bear from start to finish. Class will be held from 8:30 - 5:00 on May 13-14th, 2009. For more information on this class contact The Leather Crafters and Saddler's Journal, 222 Blackburn St, Rhinelander, WI 54501-3777. Phone 715 362 5393. Tools needed for this class include Swivel knife with 1/4 inch angled blade B701 beveler B203 beveler F910 linded figure pointed beveler F976 Checkered pointed beveler F902 Small smooth pointed beveler B60 or B935 undercut beveler 8033 modeling tool 8036 modeling tool F890 small figure beveler F891 small figure beveler F897 large figure beveler Background tool of your choice Scalpel with #11 blade P206 pear shader F895 medium figure beveler 807101 pro petal Multi blade hairing knife (Jan will have some of these available to use or purchase if you dont have one) Mallet A #4 to #6 round brush and a #0 round brush. Jan will supply the leather, acrylic paints, and the leather dust and rubber cement. If you'd like to contact Jan with any questions, his phone # 406 259 7066
-
I still haven't gotten anything official from the Journal yet, but I am starting to hear of some of the things that are going on at the Sheridan show. Paul and Rosa Zalesak of Leather Wranglers are sponsering a swivel knife contest with some great prizes again. Hopefully lots of people will participate in this contest. For more information on this, check out the calendar here on LW or go here Jan Schoonover will be teaching a couple classes in Sheridan again this year. The first class will be Hairing and Horn Techniques and will be held on May 12. The second class will be on May 13 and 14 and the subject will be an 11 x 14 picture of a Polar Bear from start to finsih. I've taken several classes from Jan. He is a good teacher and a good friend. If you are interested in learning about "extreme embossed leather carving" Jan's the guy to teach you. I hope any of the rest of you that know of events that are planned for the Sheridan show will add them here so people will know what's going on and can start planning.
-
untilGreetings leather enthusiasts and friends! We're writing to invite you to participate in a swivel knife contest taking place at the Sheridan, Wyoming leather trade show (May 15-17). The theme is "Hat Bands and Belt Patterns." There will be three prizes: 1st prize is a custom-built SK-3 swivel knife, and the 2nd and 3rd will be cash prizes. This would be a great opportunity to show your artwork and have some fun. If you want to participate but can't be at the show you can mail your entry to us beforehand and we will take it for you. Please read the entry guidelines (attached) or visit our website where you can also be inspired by pictures of past entries and results. We're looking forward to seeing your artwork and having a great time at the show. Please let me or Paul know if you have any questions or need anything. Thank you, Rosa Zalesak Leather Wranglers Inc (505) 269-8563 www.leatherwranglers.com email
-
I got this email from Leather Wranglers over the weekend. I hope it's ok to pass it on to everyone here on Leatherworker. If not, go ahead and slap me Paul Greetings leather enthusiasts and friends! We're writing to invite you to participate in a swivel knife contest taking place at the Sheridan, Wyoming leather trade show (May 15-17). The theme is "Hat Bands and Belt Patterns." There will be three prizes: 1st prize is a custom-built SK-3 swivel knife, and the 2nd and 3rd will be cash prizes. This would be a great opportunity to show your artwork and have some fun. If you want to participate but can't be at the show you can mail your entry to us beforehand and we will take it for you. Please read the entry guidelines (attached) or visit our website where you can also be inspired by pictures of past entries and results. We're looking forward to seeing your artwork and having a great time at the show. Please let me or Paul know if you have any questions or need anything. Thank you, Rosa Zalesak Leather Wranglers Inc sheridan_swivel_knife_contest_pdf.pdf (505) 269-8563 www.leatherwranglers.com email sheridan_swivel_knife_contest_pdf.pdf
-
Hi Jim, Happy Birthday from me too!!!
-
Karl, You're gonna have to change your title to holster maker/purse maker!! That looks really nice.
-
For the last 20+ years my favorite swivel knife has been the same one David mentioned. It's big and heavy and just really feels like you have something in your hand. I like the shape of the yoke on it. Then about a month ago my wife wanted to know what to get me for my birthday. I couldn't think of anything I "needed" so I told her that I might like one of the knives Paul at Leather Wranglers makes. I had a chance to use it for more than just a little practice the last couple days and I REALLY am liking this knife. I dont know if it's the light weight (which I really didn't like at first) or the bearings that make it really turn nice. I think I'm getting some arthritis in my fingers and using the swivel knife has been causing my finger to really hurt. But, with this knife, I hardly even noticed it at all. I cut whole patterns without any pain, and I think my cuts were cleaner and smoother than normal. So today I'd have to say this fancy purple knife is now my favorite! PS. Hey Suze, just how big is that cupboard under the stairs???? Think maybe we could rent some space under there some days?
-
I don't know what else to say. I never expected to have fans.
-
These magazines are still available. Doesn't look like anyone wants the whole set, at least not at that price. If anyone is interested in a set from a particular year, we'll try selling them that way. Price is $5 per issue. Years available are 1998 1999 2000 2001 2002 (missing July/August issue) 2003 2004 2005 2006 2007 2008 (missing July issue)
-
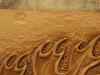
Hi Daniel, That's a lot of background!!! It's going to be kind of tough to get it real smooth. You can just keep going over it with your background tool trying to use even pressure with your mallet. Each pass over the background should make it a little smoother. I think there is a point to where the leather wont compress anymore and at that point you backgrounding gets pretty smooth. But on something this big, it's going to take you forever. If it was me doing this, I'd consider doing background around the letters and the figures, going out to a certain distance, then switching over to a matting tool. Matting tools are a little larger and cover more area quicker. With most of them, you are making a random pattern and it doesn't need to be nearly as smooth backgrounding to look nice. There are several different patterns to choose from. For really large areas, you can make your own matting tools out of something like a wooden dowel. Take a file and make some random grooves in the wood, and it will work like a large matting tool. These are really quick to make, and if you dont like the pattern, just cut it a little shorter and try again until you get something you like. Here's a picture of an oak leaf where I used a pebble background tool close to the leaf, then switched to a matting tool. Hope this gives you a couple ideas to try.
-
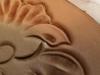
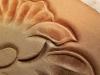
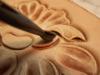
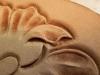
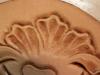
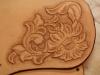
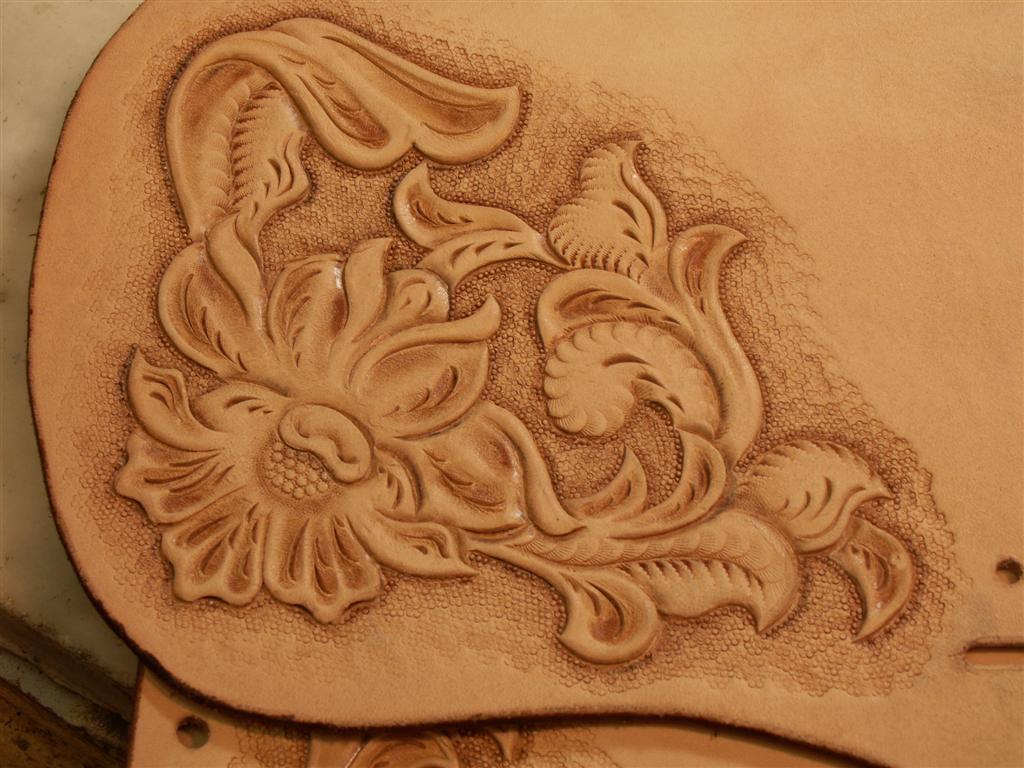
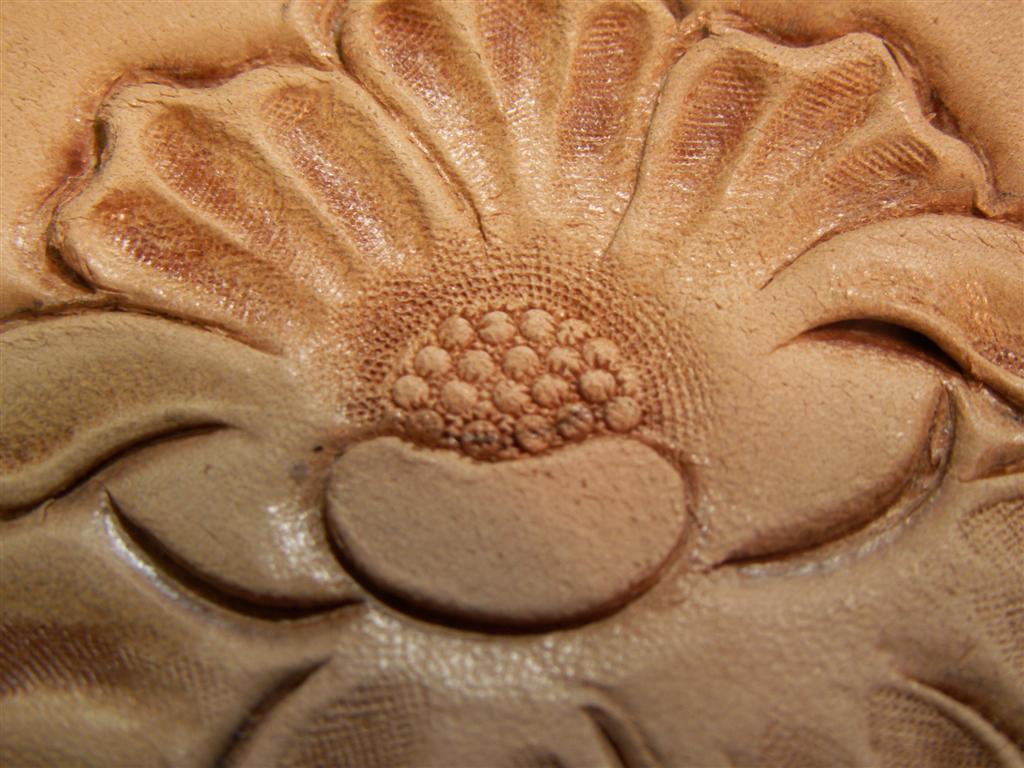
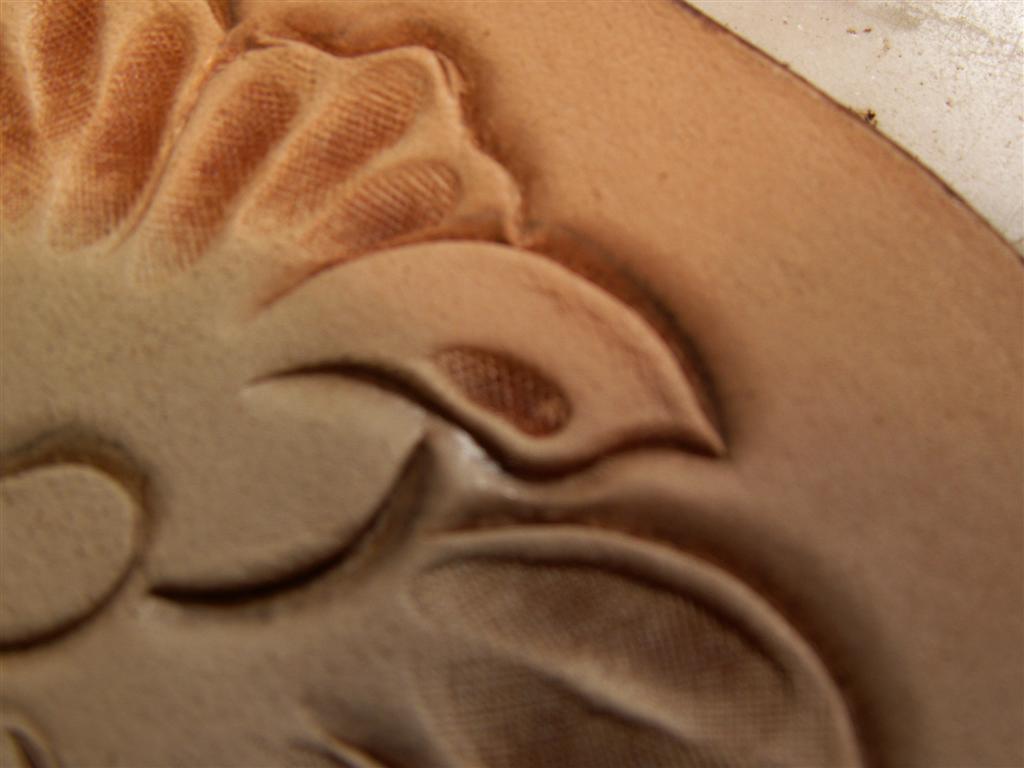
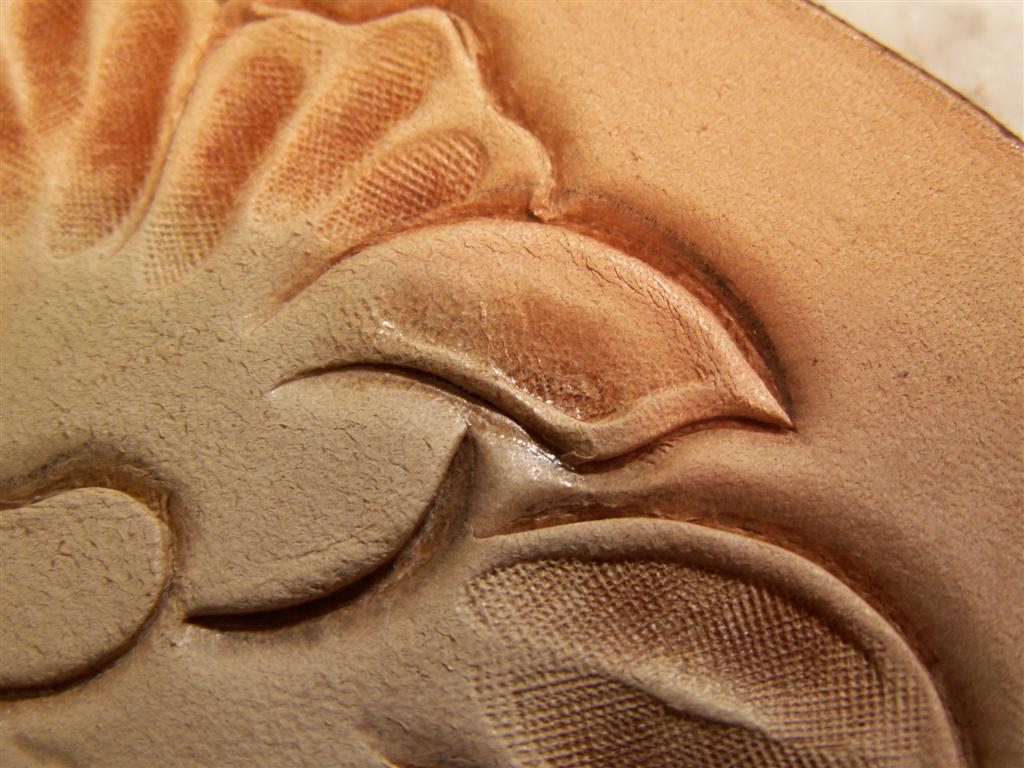
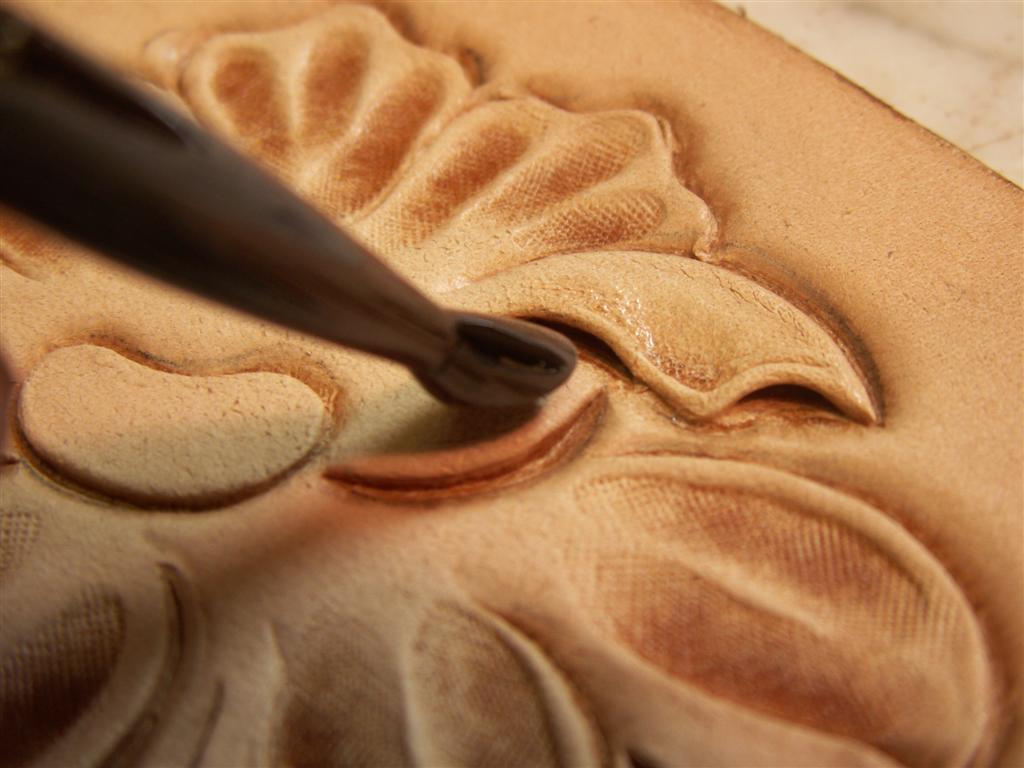
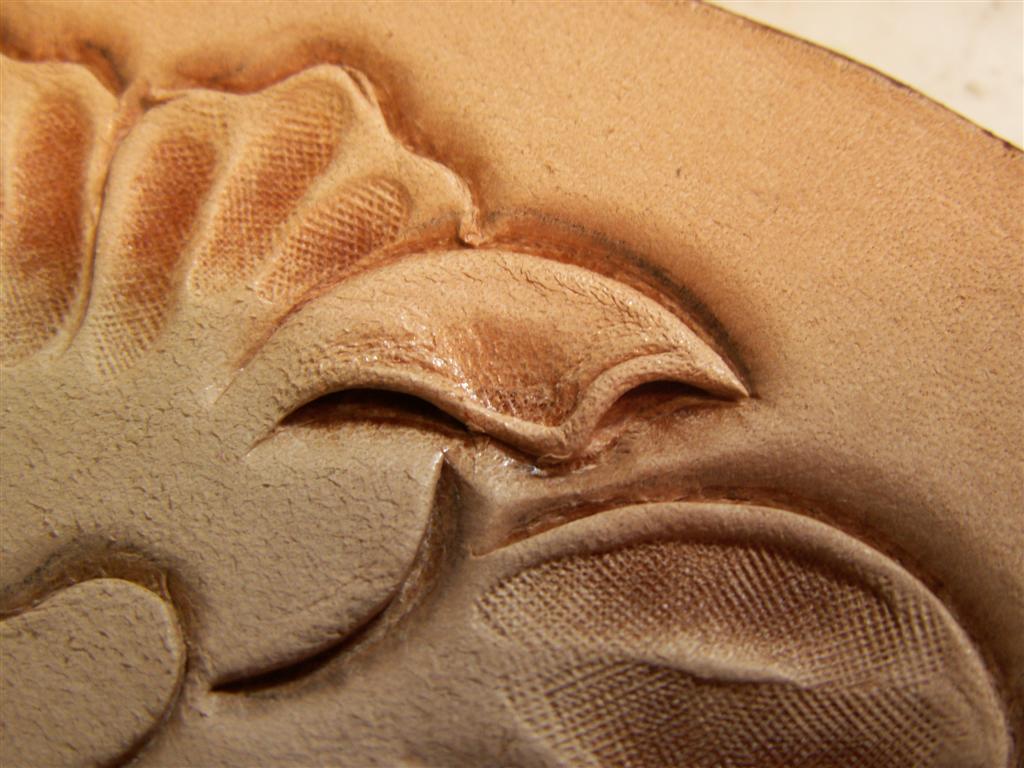
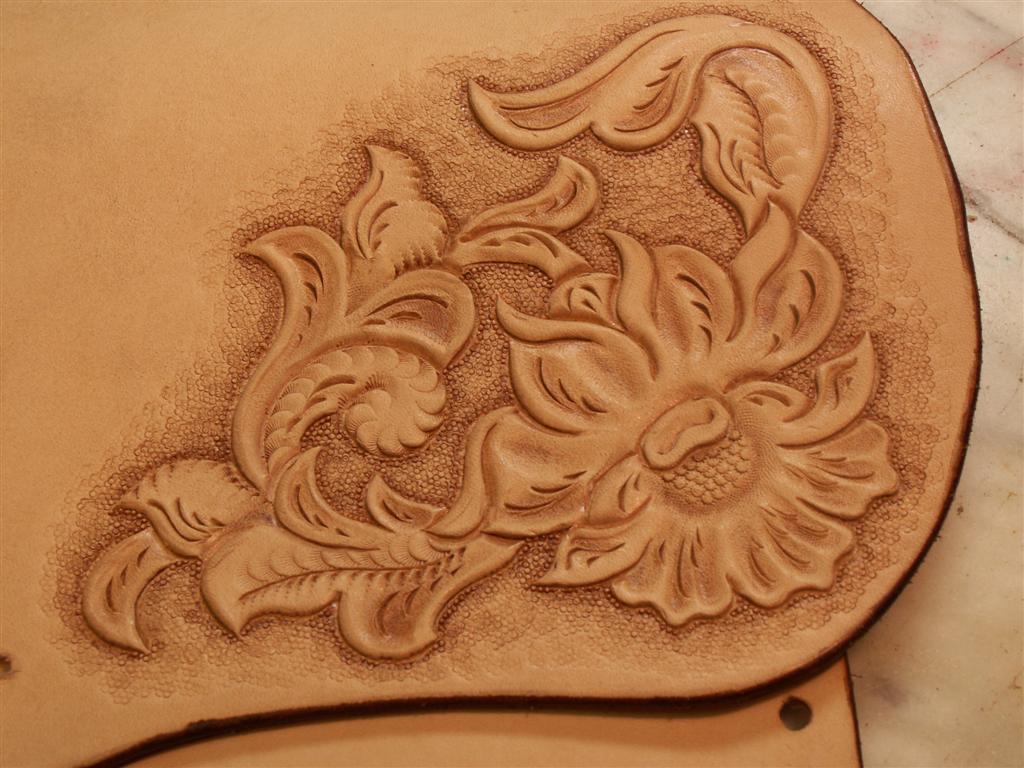
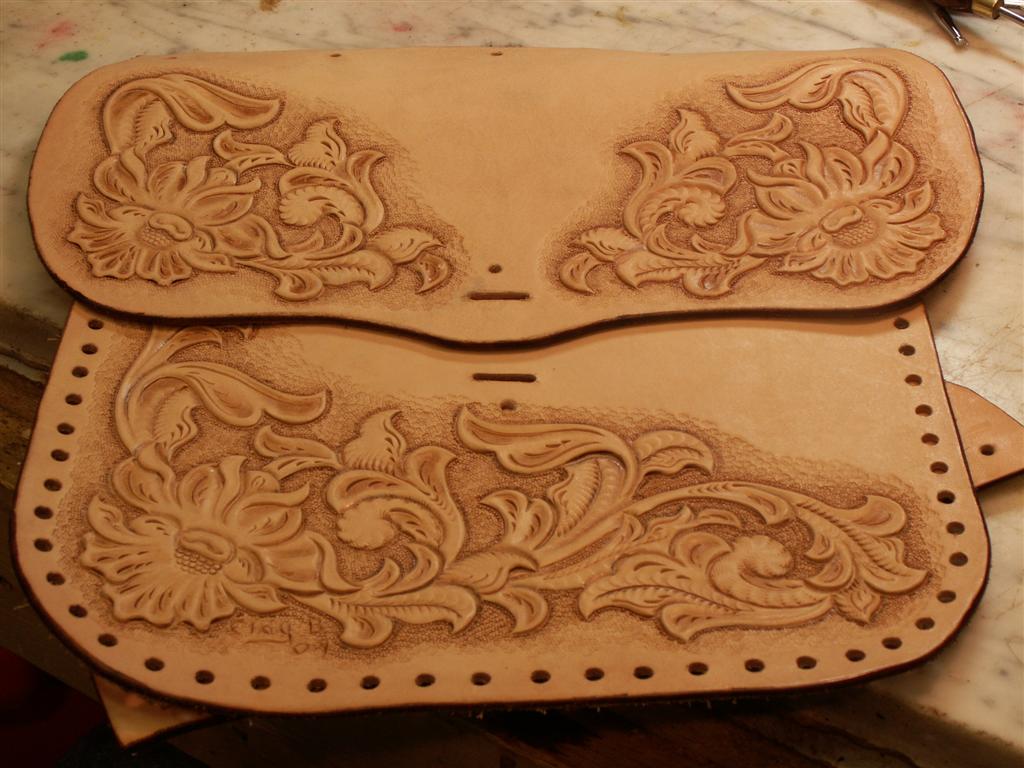
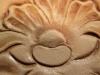
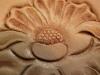
I was working on some floral carving today and decided to show a little of what I use a modeling tool to do. Mainly it's cleaning up my tooling, and shaping the leaves and petals on a carving. Here is a picture of my carving beveled and with some rough pear shading. Here's a close up of what a petal looks like at this point. And here is the same petal after blending out the pear shading with a modeling tool. This part doesn't have anything to do with the modeling tool, but using an undercutter or pro petal really brings the petal out some more. I go over almost every line in my carvings with the modeling tool to round over the beveled edges. It softens the lines and makes things look more rounded and natural. This picture shows the rest of the flower petal after the pear shading has been blended out with the modeling tool. Using the modeling tool like this adds quite a bit of time to the carving process, but to me, the results are worth it. Now if I could just figure out a way to use the modeling tool to make my decorative cuts look like Bob's.