-
Posts
1,806 -
Joined
Content Type
Profiles
Forums
Events
Blogs
Gallery
Store
Everything posted by Matt S
-
Ah sweet, I bet that'd be handy for long pieces. Best of luck with the machine
-
Looks like you've found a good couple of machines for your requirements but not a good dealer from where to buy your machine. They wouldn't get a penny of my money. How can they guarantee that machine in your workshop if they won't even guarantee it sitting in their showroom? It looks like the Singer B8B is a re-badged Seiko CW-8, from the time in the 1980s I think when Singer had stopped producing industrials and was simply re-badging Seikos. (The CW-8 is essentially a good quality clone of the 153.) I have a Seiko LCW-8 from a similar time period which is the CW-8 with a huge U-type bobbin. Fantastic machine, great quality. Parts and accessories are readily available.
-
Howstik 441 from Abbey should keep you pretty happy then Harry It works great on waxy leathers and is more economical than Evostik.
-
Hey @Colonial, good looking vintage machine there. I recently bought a very similar Fortuna. I think mine is a UA model as it has a driven upper feed roll which can be swapped for a fixed feed bar (for very fine work), whereazs the LA model was fixed bar only. Yours looks in better condition than mine, which had some rain damage. Out of interest, what's that little tray thing on your front table? Mine doesn't have that, just a bit of oak inlet into the formica/plywood table.
-
Hi Keith. You're certainly not the first to have an issue with a bell-knife skiver -- they're notoriously finicky machines. For any particular job there's usually quite a narrow window between all the various variables and it takes a bit of playing to get an instinctive feel for where it is. However, once you have it dialled in right it should be able to do that job very easily. Bear in mind that most of my experience with such machines is working on heavily waxed chrome-tanned cow leather around 2mm thick. However I have skived a fair bit of upholstery leather also, and played around with 3+mm bridle. I have my belts setup so the knife turns as fast as possible in relation to the feed wheel. This gives it a cleaner cut and minimises ripples, at least with the leathers I use. I don't know if a smaller foot would help but find, especially with "grabbier" leather", that a roller foot helps things work much easier than a "fixed" one. My feed wheel spring is usually set on... 2 of 5? About middle of the range. The old boy I bought mine off said that that works for most leathers and so far he's been right. Have you tried adjusting the feed wheel height, angle and spring pressure? Knife position? There's many different types of feed wheel available but I think the one you have will work well with that leather. Another tip the old boy taught me was to not rely on the feed wheel alone -- especially with more delicate and/or softer leathers that it should just provide a little forward inclination to the leather, and that the operator should provide the majority of the impetus. This reduces its tendency to bunch up, which can cause the knife to cut through the leather.
-

Difference between using a Larger Pulley vs. Speed reducer?
Matt S replied to tofu's topic in Leather Sewing Machines
I've run machines on 1:6 ratio before. Running at lowest speed is certainly better (especially on lower-quality servos) but the max speed is very limited. Most servos top out at 4500RPM, which at 1:6 works out to 750SPM. This is close to the top speed of certain heavier machines (Juki 441 for instance) and fair enough in those circumstances. The massive increase in power at low RPMs would probably be worth it alone, especially with big needles. However for an upholstery-weight machine that's losing a lot of speed -- a lot of machines can cope with more than 1,000SPM and many more than 2,000. Not everyone can or wants to make use of this capability but for those of us that do it's a real time saver. Imagine sewing a sofa, a boat cover or a couple dozen 6ft dog leads at 750SPM! -
Tell me if I'm talking out turn here @turbotexas but are you keeping the "trigger" down or just tapping it? Can't quite tell in your videos. My limited understanding of these old presses is that the head rises as soon as the bottom stop is hit or the trigger is released. If you are keeping the trigger down, maybe see what the solenoid it triggers is doing. If it's only actuating the valve momentarily (no matter how long you press the trigger for) that would give similar results, in my decided non-expert opinion.
-
£600 OBO
-
I take it you're not a habitual visitor to Thailand then Mike? Friend of mine had a 24 hour shore leave there once. There was a... misunderstanding by two of his shipmates. They did get the wrong end of a stick.
-
Maybe I got the wrong end of the stick?
-

Difference between using a Larger Pulley vs. Speed reducer?
Matt S replied to tofu's topic in Leather Sewing Machines
Yep, it's a torque thing. Digital servo motors like we commonly use on sewing machines can spin at a very low or very high speed. (Jack JK513 can go between 200 and 4500RPM for instance.) However the power at 200RPM is very low which isn't very useful for, say, punching a thick needle through stiff leather. Having a step-down pulley or gear transmission between the motor and the machine definitely helps. Clutch motors have a little more torque at low output RPMs than servos because of the mass that's always spinning. (Interestingly stepper motors have the same torque at almost-zero as they do at full throttle. One day I'll get around to putting a direct-drive stepper on a machine.) How you get that reduction (store boughten pulley reducer, DIY speed reducer, small motor pulley, ridonkulous big pulley fabricobbled in place of the machine's proper balance wheel) the speeds are the same buuuuuut there are other factors at play. Can you get a store-bought reducer and how much will it cost you? Does your motor take common replacement pulleys? How much space under the table do you have? What Why are speed-reducer boxes popular? Well they're not all that popular outside of our little niche. I live near London, with probably a dozen industrial sewing machine dealers, quite a few small leather-trade factories and maybe hundreds of individual craftspeople in an hour's drive of me -- and I doubt so many of them I could count on my two hands have heard of such a thing. The nearest dealer I know of that sells them is Sieck in Germany. Most industrial machines sold over here have no more than a 2:1 ratio between machine and motor. Most are closer to 1:1. -
Do we need an independent judge of this lady's nakedness? Cos I'd volunteer for that chore. Purely in the interests of Leatherworker.net harmony you understand.
-
I still reckon that's an array of capacitors rather than resistors wired to the back of that rotary switch. Sprague yellow cans, voltage ratings printed on the side, polarity bands... sounds like caps to me. Those are probably polarised therefore on a DC branch of the circuit. My hunch is that they form part of a RC time delay. Perhaps thats how the length of stroke is controlled. @turbotexas good job replacing that wiring, very neat. Did you find anything like the bottom of travel microswitch that was mentioned upthread?
-
I wonder how many of their IPs would resolve to Russia or China.
-
Ice isn't a huge problem in England. Rain, damp and lack of tea are bigger problems. I expect that the OP wanted to gain maximum headroom while keeping the roof apex below the maximum height that doesn't require planning permission (building permit). Having said that I had an issue with melting snow being blown uphill on my shed roof this year. It found a gap and I only noticed when there was water dripping off the light fittings onto my bench. @MY63 Your shed is coming along fine. Certainly looks better than what it replaced! Figured where you're putting the kettle and jaffa cakes yet?
-
Looks like a rotary switch with an array of capacitors potted to the back. Don't quite know how it fits into your electrics but worth being aware of. Do you have any sort of schematic? They were often included with machine manuals.
-
If a fingernail would take off the top finish a couch wouldn't stand up to many backsides! If you really want to take off the finish you'll need some sort of solvent -- like modern edge paints they aren't so much something put on the surface as penetrating into the leather some depth. It's difficult to see from photos but that leather looks okay. Not something I'd go out and buy probably but can't really complain about the price You have some decent size pieces. You can make pouches, key fobs, wallets, small bags -- lotsa things. Depends mostly on your tastes, skills and how the leather behaves.
-
99% of upholstery leather is chrome tanned cowhide. Quite a bit is refinished split. The idea is to get as large and uniform panels as possible for the lowest price. The quality only needs to last as long as the warranty + 1 day. What I've used varies hugely -- some is wonderfully supple stuff that feels great in little bags and pouches. Most of it though feels stiff and looks crap to me, fit only for practice and initial prototyping. Guess which I encounter more often?
-
UK and US electrics are fairly different but 3-phase will have 3x live/hot lines coming in, all individually fused. In addition there will be a ground/earth and on some machines a neutral/cold line. There will be no starter capacitor (which is usually located very close to or actually on the motor) on a 3-phase setup. In addition the motor usually gives some indication on the tally plate as to whether it's 1- or 3-phase. Are those valves/tubes inside those cans on the PCB? They could well be damaged by the move or just through thermal cycling. And if they are valves the capacitors will probably be well out of spec and the resistors may well be also. Plus side is that the electronics look fairly simple for rebuilding if you decide to do that. 3-phase to 1-phase conversions are certainly possible. I recently did this to a Fortuna splitter which was trickier than many machines as it has 4x differently specced motors that switch in and out. There's a few different approaches available these days.
-
I use a blowtorch that takes gas cartridges. However I have used an electric heatgun (like you might use for stripping paint) to great effect. Alcohol, I found, burns a little slow for my tastes but it works and burns cleanly.
-
"Matt sets himself consistently low standards..." Blimey Harry, I don't know who you've got me confused with but I want to buy him a pint.
-
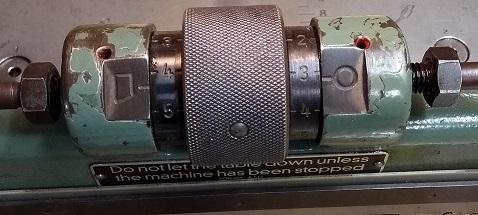
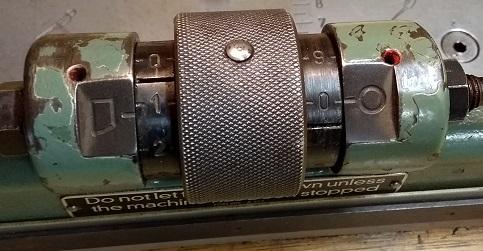
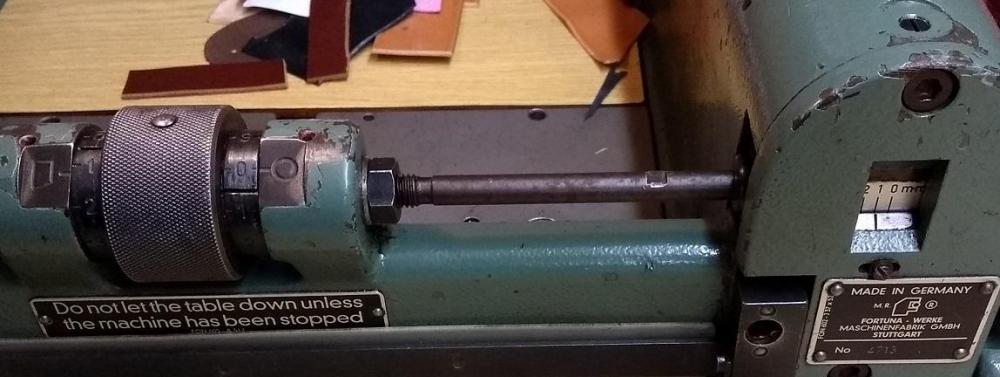
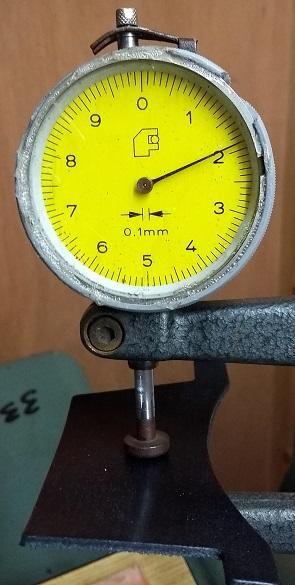
A new one would be better for sure, probably in every regard except for price. When I priced the Camoga Compact late last year it was in the region of a new hatchback. Dealer refurbished similar machines to mine are in the region of a 10-year-old hatchback. Mine cost less than a month's minimum wage. I can tolerate a lot of manual tracking/trend adjustment for that price difference! And even mine is pretty simple to switch between bar and roll -- two screws and no adjustments necessary. It's probably no surprise but I couldn't wait to try a split and yes I've put a few offcuts through for testing. Mostly it has highlighted specific areas where I need to adjust or clean the machine. Long, boring story short I've been knocking them down in turn. Not many photos as there's not a great deal of point in a string of "here's some oily rust and here it is gone" photos. Knife was pretty sharp but a few grinds (once the emery wheels were adjusted) increased the smoothness of the cut. The biggest issues were around the depth of split. In just a couple inches of distance the knife was plunging up and down. Variance of maybe +- 0.5mm which is well above the acceptable range. After getting the knife exactly at the zero-setting (its optimal distance from the feed roll) things improved a little. Figuring that the feed roll assembly isn't moving up and down as smoothly as if it were perfectly clean I increased the presser tension and my splits started being longitudinally consistent. Presser tension is a little higher than I would expect from the manual but still within the bounds of normality. Now I moved to calibrating the thickness scale. As with many such things I know that I can't just rely on what's on the dial -- I will always have to check the split piece with the gauge for accuracy. However having the scales as close as possible to the expected output would be pretty handy -- it'll let me get to it with far fewer trials. There's a coarse readout on the RHS of the machine in whole millimeters. The scale can be slipped so that was easily adjusted but the fine thickness readout (in tenths of millimeter) is on the thickness adjuster itself. I had to strip the presser assembly fairly extensively in order to fix an issue with the drive and I presume that I got them slightly out of goose when I did that, though I don't know if they were accurate when I bought the machine. The manual did not describe how it's supposed to be done so I split a piece of leather, measured its thickness, then fettled the readouts until they tallied. Not quite knowing what I was doing I made an educated stab in the twilight and loosened these two nuts either side of the adjuster. This took a bit of pen oil and elbow grease. This allowed the adjuster to be rotated in reference to the two axles on which it runs, so it reads the same as what the leather has just split to. (This was a three-handed job.) Then tighten up the nuts. (This was a 5-handed job.) Notice that there are two fine readouts -- once for when the presser bar is fitted (to the left of the wheel) and one for when the presser roll is fitted (to the right of the wheel). I have mine fitted with the feed roll. Then set for a specific thickness (say 2.0mm) and test. That'll do I reckon.
-
I use the Schick injector blades. Same price as the tiny <1" long purpose-made blades but sharper, thinner, stay sharper longer, and are longer themselves so you can move it down exposing a fresh bit of blade more times. But talking of cheap I bought one of the cheaper wooden strap cutters maybe 8 years ago, fingering that they're much of a muchness. It worked fine until last year when the short grain next to the blade split out and I couldn't tension the blade. Fair dos I thought, it wasn't expensive and I bought the same one again (price now nearly doubled). Couldn't get that bugger to cut straight. Wasted enough leather to buy 10 strap cutters.The little slit where the blade went was off-square just enough to notice if you're looking for it. Bought one of the "genuine strap cutter company" ones (double the price again) and it's brilliant. Yeah it's 3 pieces of wood and a slack handful of screws but the devil's in the details.
-
What Wiz said. This is probably not the sort of machine that you'd be looking for for those sorts of jobs. You don't have to pay new machine prices necessarily, there's plenty of machines suitable for your purposes come up at decent prices. Perhaps put that £425 to the side and put a bit away each month, you'll have the money for a more appropriate machine before long. I only know of one dealer in Wales (Alan's Alterations) and they're near Aberystwyth so possibly a bit far for you. I've bought mail-order off them a couple times. That 45K looks like it's in pretty good nick considering it was built in 1950. I have noticed though that there's an important screw missing, which is the reverse length limiter. Maybe the seller has it in a drawer, maybe not. Worth knowing though. BTW does that seller have anything else listed? Looks like there'a a few other machines lurking behind the 45 in those photos but I can't find the listing on FB marketplace.
-
It's probably fitted with the old-fashioned clutch type motor. They have worked for a long time and are still quite popular in full-time factory work but technology has surpassed them for casual users. I've replaced all of my sewing machines' clutch motors with servo motors, which are far quieter and energy efficient but most importantly controllable. You can get a basic servo motor for £100-150, but I'd avoid the very bottom end. They're fairly simple to retrofit -- mostly bolts to unto and do up -- but some will need a few holes drilled in the table or more serious work. The old clutch motor will weigh maybe 20-30kg so be make provision for that before unscrewing the last bolt. You'll probably also need to replace the belt which on a 45K will be the old fashioned round leather kind -- you buy a length, cut to size then join with a big staple. You can get modern plastic ones that you join the cut ends with heat that look weird on a vintage machine but work great. If you're not confident fitting a new motor and checking over this machine yourself you might need to get an expert in to do it. Do you have much experience working with industrial machinery? Remember that the 45K is a very old fashioned kind of machine. These are about as far away from a modern domestic sewing machine as you can get. There are essentially zero safety features (powerful enough to break fingers), there are no push-button controls and the machine head alone weighs about 30Kg. Put it together with a table and old clutch motor and you can probably triple that. They work fantastically and keep going for 50 or 100 years but they aren't exactly plug-and-play. That's part of the fun of course Can you post photos or links to photos of the machine?


