Troy Burch
-
Posts
406 -
Joined
-
Last visited
Content Type
Profiles
Forums
Events
Blogs
Gallery
Store
Everything posted by Troy Burch
-
Merry Christmas to you and yours
-

New Wallet Idea I'm Trying
Troy Burch replied to Chief31794's topic in Purses, Wallets, Belts and Miscellaneous Pocket Items
It'll probly be in the same place you lost your cap, coat and gun. lol -
Sheridan Style Pic Frame
Troy Burch replied to IngleGunLeather's topic in Floral and Sheridan Carving
That looks really good used as a matte. It is mean't to be a stand alone frame, I have the complete pack of patterns for them. Nice tooling. Troy -
Leather Deer Hide Shirt
Troy Burch replied to leatherwytch's topic in Clothing, Jackets, Vests and Chaps
spelling... it's important. -
Your going to have to keep your work area very clean. I too had a spot in our rather large living room because of my disability but it wasn't long before the dust, some oops, smells, etc forced her to evict me, lol. It did workout though now I have a little 12x16 shop full of goodys and were both happy. She even helps me clean it sometimes.
-
Sheridan Style Pic Frame
Troy Burch replied to IngleGunLeather's topic in Floral and Sheridan Carving
Country could you post a picture of what you've done. I'm a little confused, what you carved is a picture frame, the heart cuts out for a picture to fit in. Are you saying you got the frame framed? -
Wiz, I was wondering If it makes a difference where the needle is located when the machine is switched to reverse, and does the machine have to stop before changing directions? Thanks Troy
-
JLSleather gave you some good advice. Get the Figure Carving Finesse by Al Stolman, it will greatly improve your carving technique. You will be very glad you did.
-
You Never Know What You Are Going To Get In To
Troy Burch replied to taintedelephant's topic in All About Us and Off Topic
No I'm not jerking anyones chain. Everyone knows sunlight will darken leather, but I can tell you from experience light bulbs will also. I came home with a new side I'd picked out myself and it was a very nice and clean piece of leather, left it rolled up and laying on a table where the only light was coming from ceiling fan light. When I unrolled it about 2 weeks later there were dark streaks on the edges and thru the middle of the roll, had to work around the two different colors. -
You Never Know What You Are Going To Get In To
Troy Burch replied to taintedelephant's topic in All About Us and Off Topic
Welcome. A word of advice, put that leather in a dark place or wrap a blanket or something around it. It will darken where the light gets to it and when you unroll it you'll have light and dark areas. Good luck and happy carving Troy -
Looks like dry rot and thats never a good thing.
-
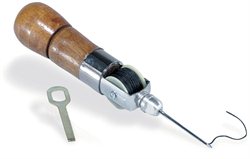
That hair tool is used after the 902 beveler to make the finer hair cuts, it can also be used for feathers and such.
-
How To Achieve This, Threads Of Different Colors
Troy Burch replied to kidinsky's topic in How Do I Do That?
You can sew it easy enough by pushing the needle with blue thread thru the hole and looping around the white thread and pulling the cross up in the middle of the leather the same as a machine stitch. A sewing awl might make it easier to grab and pull the bottom thread but unless your going to do a lot it may not be worth the trouble.
-
Another Sling Done For Christmas
Troy Burch replied to Jaymack's topic in Gun Holsters, Rifle Slings and Knife Sheathes
nice job -
Lol, yes sir! I kept my Boss even after I bought the Adler. I've got a 7 year old red headed grandaughter and at times she's a real pain in the butt, but at the end of the day I still love her.
-
Customer Asking For A Piece Without Makers Stamp (On The Back)
Troy Burch replied to Coho's topic in Leatherwork Conversation
Doing piece work for another manufacturer is a common thing, but I'd have serious issues with someone wanting a finished product unbranded. -
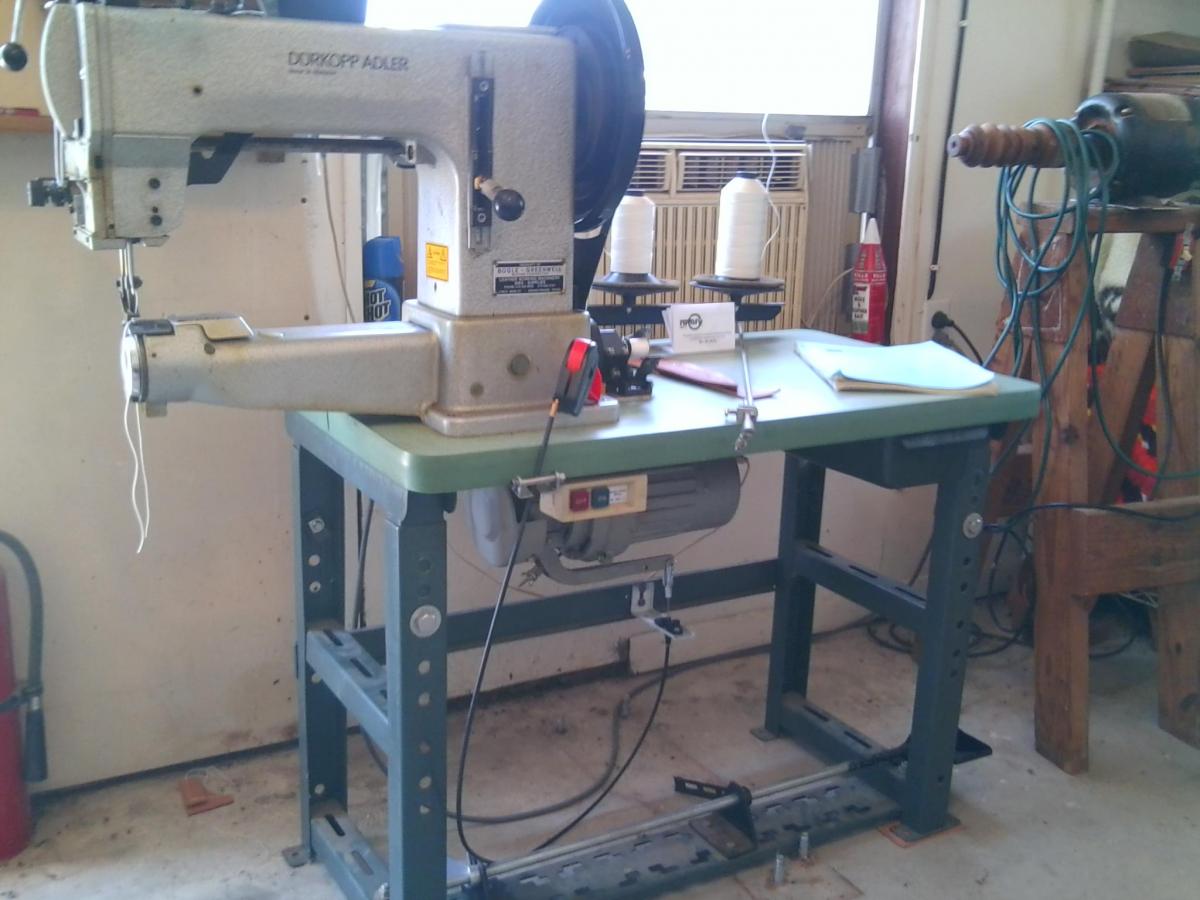
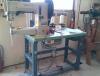
I don't know if it's lawnmower or tiller or what, I went to a lawn equipment place and picked out one in the parts department that fit in the palm of my hand. It is spring loaded so I can throttle the machine like you would a foot pedal. Get a strong bracket, the first one I used was springy and wasn't very controllable. Get a small yoke that fits the arm and your in business, I drilled a hole in the neck of the yoke then ran the cable up and out the side an filled it with epoxy. Make everything as stationary as possible, the less slack the better the control. I'm able to use my thumb and index finger along with my other hand to work the leather which is more than you can do with the Boss. I just slid the foot pedals and bar out and moved them out from under the machine so I could get under the arm with a wheelchair. About 20 bucks and in about 2 hours I was sewing. Good luck Troy
-
The Boss will keep you mad and frustrated until you learn how to workout the little quirks and operator errors. After the learning curve it'll be a decent machine for you, at least mine is for me. I'm wheelchair bound with no use of my legs so I know your problem. But don't rule out the electric machine there are ways around that. With a servo motor it can be slowed down enough to use a hand lever instead of a foot pedal. Here's what I did to mine, no servo but I can control it fairly well.
-
How I'm Gonna Sew A Box From Individual Parts Of Leather
Troy Burch replied to Lillian ADju's topic in Sewing Leather
Al Stohlmans book How to make cases gives step by step instructions. -
Thanks Tom. The figure beveler F902 made by craftool may not be the one he used but it makes the exact bevel. I've got 2 of them, the old model is a little smaller and fatter the new model is longer and slimer. The new one will be the one you want. I use them a lot and when I seen the new one I bought it because I knew it would do better and it does.
-
It's not a big deal but I'm curious why I sometimes need a moderators approval to have my post shown? Have I done something wrong somewhere? Thanks Troy
-
No it's not a pear shader. It's a sharp pointed figure beveler, Tandy has 2 of them. I'm not sure of the number of the longer and slimer one that appears to be the one he used. The other is #902 which does the same markings but a little shorter and a hair wider. If your not in a hurry I'll check my tools tomorrow for the other number.
-
I've never used the easy carve but I can tell you not to rewet anymore than you have to because it will take away from the depth of the tooling. When I'm ready to stop tooling I lightly spray the back of the piece and put it in a plastic bag or plastic wrap and put it in the refrigerator, the water content will equal it's self back out so it ready to start carving when taken out the next day. This method will also cut down the possibilty of mold spots.
-
Which Side Is Which On A Snake Skin?
Troy Burch replied to KalL's topic in Exotics, Reptiles, Furs and others
I use the same neat-lac well clear-lac method as well, and it works pretty good. I live about 30 minutes from Tandys warehouse in Fort Worth and they keep a stock of rattlesnake skins there. They are even in the sale flyers they send me sometimes. I haven't bought from Tandy in a few years so mabye they've quit. I do believe they're listed in the older catalogs I have. Thanks for the Springfield tip. By the way I was browseing thru the picture gallery the other day and your work is really good. Troy -
Which Side Is Which On A Snake Skin?
Troy Burch replied to KalL's topic in Exotics, Reptiles, Furs and others
NV Leather Worx, where do you buy rattlesnake skins? I buy at tandy and they flake like crazy.