


The Major
-
Posts
531 -
Joined
-
Last visited
Content Type
Profiles
Forums
Events
Blogs
Gallery
Store
Everything posted by The Major
-
Welcome aboard! Glad to have you.
-
Very cool
-
Please keep in mind. I did not recommend mixing it with water. Just use a damp sponge (this is not mixing it with water). You are not trying to dilute the antique medium. You are using it as a sort of barrier, much like a resist would. The sponge is not going to contain that much water. You are correct in saying it is "spirit" solvent based, however it is not a true petroleum solvent. It contains benzine and terpine as its base. Also as you go along the solvents will remove most of the water anyway. I made this recommendation to aid in controlling the amount of media you are using. This is what works for me. You will get hundreds of answers on how to do things. the trick is finding one that works for you.
-
Oh no, they offer free shipping. Although I wonder how the quality of the hides are. When they call the hide firm, it concerns me a little.
-
Well, I'm no expert but I will offer what I do. First off, don't feel bad about the gloves, I have 2 boxes within arms length and almost never remember to use them. When you are on a roll, your on a roll. I use a sponge to apply my antique. Lightly dampen it with plain water. Dip the sponge in the goop and go (You really don't need to use a lot of it). I don't worry too much about it drying as I go, as my next step will remove the excess. Once you have completed going over it once, take another sponge with some water and soap (I use my casing solution as it is only water and dawn). Do not overly soak the sponge. Go over the project removing the excess. Now wipe it with a rag to remove any surface moisture. If it is not as dark as you want, go over it again using the same process. This method takes a while especially if you are really trying to change the color. But with antiquing you are really not supposed to make drastic changes, that is what the preliminary dye work is for. You are just supposed to be adding some character. Finally, stop trying to antique your dog. Spray paint works much better!
-
Very cool. I love the look of the lettering.
-
You could also check out your local fabric stores. They often have accessory patterns which include purses, wallets, etc.
-
I see. Thanks. I understand now.
-
Welcome aboard. Nice looking work.
-
IFoLG 2008 Show in Columbus, Ohio
The Major replied to Art's topic in Special Events, Contests and Classes
I'm there. Hope to run into a couple of ya'll -
All I can say is YOU ROCK. Thanks a million That would be perfect. Please let me know The tank bib he wants does not have the cut out for the instrument panel though. So that is not tat big of a deal. The thing I am confused about is how it attaches to the bottom of the tank. I am not sure how the tank mount looks on this bike. Or do the bibs attach seperately to the frame rail via a velcro loop or something.
-
Anyone out there able to help me find a pattern or dimensions for a bib for an FXR tank? Please...
-
Awesome.
-
-
Greetings all, Just to let everyone know. I have added a carving solution to my product line. Similar to the casing solutions available through tandy and others. Functions like Dawn in water, but makes water even wetter. Dilute 1 part to 20 parts water for carving, and 1 to 10 for embossing and molding. Available in 8oz bottles and quarts. 8oz bottles are $6.00 each plus shipping, and quarts are $24. Gallons are available upon special request. I have attached the label which has more detailed information. Please contact me off list for ordering info. Sorry folks, US shipments only. Thanks for the time. velvet_carve_qt.pdf velvet_carve_qt.pdf
-
I need to take more pictures of this thing to answer all the questions. Will post more as soon as I have them. But No I did not use a core. Between the 8oz thickness of the leather and me hardening it a little, it is fairly rigid. Also the back is not sewn, I did a 1" lap seam secured with barge. I'll get some more pics up soon. Thanks for all the compliments everyone.
-
new wallet
The Major replied to chocolateducttape's topic in Purses, Wallets, Belts and Miscellaneous Pocket Items
Nice job. -
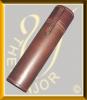
Howdy all. Haven't been around much. But here is a tube I just completed for a customer in Canada. It is a document tube to hang on her belt. Measure 13" tall and 2.5" round. She didn't want any tooling, so plain it was. Whatcha think?
-
WOW, that is really all I can say. Great piece.
-
Now that is one nice looking seat Beeze. I would agree with David and tell him if you dye it black his butt will fall off.
-
After your finishing, give it a couple coats of Pecards leather dressing.
-
You need to skive the backer piece to a feather edge. glue the pieces down and sew.
-
Wicked cool. Can't wait till its done
-
First Handbag
The Major replied to bevo's topic in Purses, Wallets, Belts and Miscellaneous Pocket Items
Nice looking bag. -
Nice. Keep up the good work. If I can add one thing. Those edges look kind of sharp. You might want to round them off slightly. But all in all nice.
