-
Posts
2,221 -
Joined
-
Last visited
Content Type
Profiles
Forums
Events
Blogs
Gallery
Store
Everything posted by Uwe
-
Maybe you turned the stitch length to “0”? A little quality time with the manual may help: https://www.manualslib.com/manual/364311/Singer-111w112.html#manual This is how the feed regulator on your machine works:
-
You’ll have to adjust your budget. Machines with longer, thinner arms cost more than $3K new. The Durkopp Adler 669 is a very capable machine, as shown in this video. Apparently it’s preferred by makers of fake designer bags.
-
Well, this short paragraph in the manual linked above contains all the information needed to time the hook and set needle bar height. The step by step is really the just same info, slightly reworded. 1. Set stitch length to 8 spi 2. Turn hand wheel until needle has risen 3/32” from BDC 3. Loosen hook driving gear and adjust hook position to align tip with center of needle 4. Loosen needle bar clamp and adjust needle bar height so that eye of needle is 1/16” below tip of hook
-
Bummer about your screw heads. Some screws have loctite (essentially cyanoacrylate super glue) applied to the threads. Acetone (nail polish remover) will dissolve super glue. Heat will also break down the glue. Getting the perfect screw driver for that particular screw head helps as well. I’ve made a trip to the hardware store in the middle of a repair job on more than one occasion to get a better screw driver. I personally like electrician’s screw drivers since they have flat, parallel sides on the tip. Most regular screw drivers have angled sides on the tip that tend to push the driver up as you turn it. Try to position the machine so that you can really lean on the screw driver as you turn it. If you get the screw out, don’t keep using it - get a new screw instead.
-
So here’s the video of how I adjusted my machine to center feed dog movement inside the throat plate opening:
-
The machine in that last video has a TOTALLY different feed mechanism. That machine is indeed close to a Singer 153, yours is NOT. Please stop looking at Singer 153 documentation to figure out your machine’s feed mechanism, it will just confuse you. I’m making a video right now on how to center the feed dog movement in the throat plate opening. Give me a chance to finish that.
-
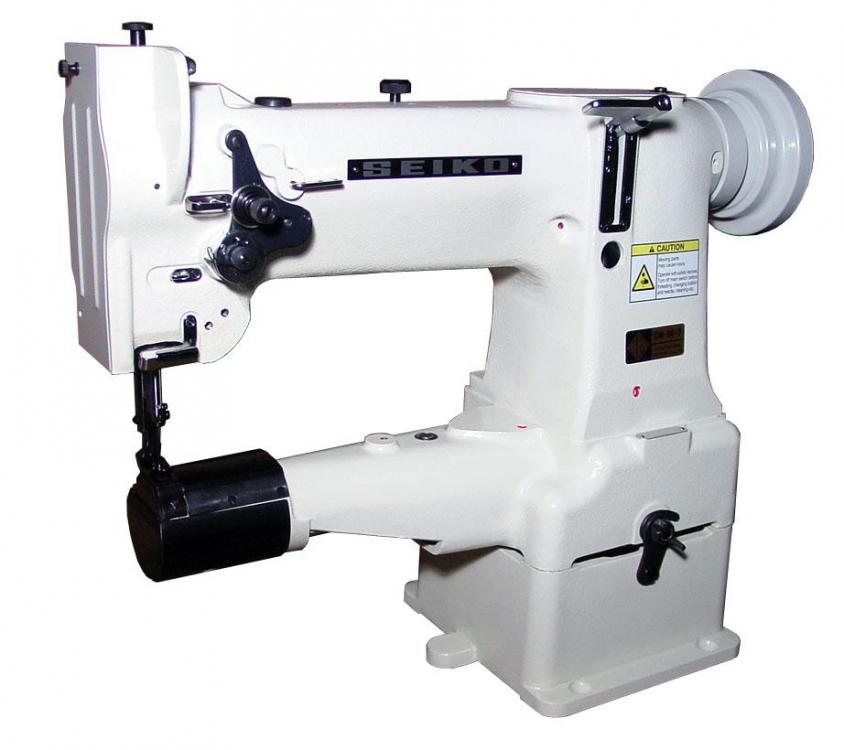
I’m guessing the Consew 287R is the same as the Consew 227R , but with the added automatic lubrication bits. So, the Consew 227R appears to be a Seiko CW-8B design, and the Consew 287R is a Seiko LCW-8B design. The feed mechanism and basic adjustments should be the identical on these machines. I have a Honbo HB-8B machine, which is yet another clone of the Seiko CW-8B design. It came with a manual that has an adjustment section for hook timing etc. - but the adjustments section is entirely in Chinese. I scanned my printed manual into a PDF and I’ll try to translate key sections into English using Google translate. I’ll report back . . .
-
That’s a step in the right direction. Thanks for the pictures. I’m willing to bet money that this is a rebadged Seiko LCW-8BL design. Let’s use this parts list a common reference: http://www.seiko-sewing.co.jp/wp-content/uploads/2016/10/PARTS_LCW-8BL_8BLV_8BL-1_8BLV-1_1.pdf
-

ADLER 205 is dropping stitches, fraying etc.
Uwe replied to HazelB's topic in Leather Sewing Machines
What size thread is that? It looks quite hefty in the photo. Your needle may simply be too small for that thread. Is that your normal needle/thread combination? I would also check for burrs that can easily fray thread. Every braking needle may create a burr in the foot, feed dog, etc. I check for burrs by running thread through holes (foot, feed dog, separately) and pulling it back and forth with my hand, changing angles in a full circle. If the thread frays, you have a sharp edge somewhere that needs to be smoothed or polished. I use abrasive cord to “file” inside holes smooth (after removing the part from the machine) I’d also double check hook timing to make sure it hasn’t slipped. Do a few very slow, hand-turned stitches on a very small piece of leather. Flip open the hook cover and just observe how the hook picks up the thread and makes a knot. Try reverse, too. You may need to remove the needle guide and spacer , and crane your neck to see what’s going on. It would not be the first machine that came back from service with a screw that’s not tightened quite enough and comes loose soon afterward. Something may have slipped, causing timing problems. You may need to remove feet and throat plate to see how the hook and needle dance together. Also look at the needle height. If the needle is too low, the hook may still pass the needle in the scarf area, but the needle guard (really just a surface on the shuttle driver) may deflect or collapse the thread loop that the hook is trying to catch. You may need to temporarily remove the needle guide and spacer plate to observe this as it is shown in the videos below. I made some videos a while back that show the stitch formation on that machine. They give you some idea what to look for and do a sanity check. The needle height in the first video is actually too low (but it still made a stitch) Note how the eye of the needle goes below the edge of the needle guard (the line where the vertical part of the needle guard transitions to the angled part.) The vertical wall of needle guard “covers” the eye of the needle, which is incorrect. In the second video the needle height is correct and the eye of the needle stay just above the edge of the needle guard the entire time.- 5 replies
-
- thread frating
- dropped stitches
-
(and 1 more)
Tagged with:
-
Before we go any further we really need to understand exactly which machine design we’re working with. The feed mechanism on a Singer 153 is totally different from the Seiko. No meaningful adjustment advice can be given unless we know what machine design you have. Please post some pictures of the whole machine front and back, and a few detail shots of the internals behind the covers.
-
Is your stitch length the same in reverse? Is there any play when you try to move the needle bar back and forth by hand? It’s possible the feed mechanism is out of balance, thus increasing stitch length in one direction and reducing it in the other direction. I still don’t know exactly what your machine looks like. I can’t find a parts diagram for a “ Consew 287R” online, or much else for that matter. I’m guessing we’re talking about a rebadged Seiko CW-8B-2 like this:
-
Try making some stitches in cardboard or thick paper without thread and measure those hole distances. That’s kind of the best case scenario for max stitch length - without anything slipping or stretching. (I made a stitch length measuring template that you can download and print out if you like: http://docs.uwe.net/slg.pdf ) Observe the feed timing one more time. The descending needle and inner foot should arrive at the top of the throat plate at the exact same time as the rising feed dog from below (this is a kind of reference position.) There should be no more forward movement at this point - needle, feed dog and feet should all start moving towards the back immediately after that reference position. If this is not the case, your feed timing may need to be adjusted. Try a few slow, hand-turned stitches with material and threaded needle. Closely observe how the material and the needle move. If the needle enters the material before it reaches the very front of its movement, that will result in shorter stitch length. If the material moves forward under the foot while the knot is being pulled tight (thread take-up lever at highest position.) that’s another problem that reduces stitch length. Too-high thread tension may pull the material forward as it’s pulling the knot into the material. In general, the thread tension should not be higher than really necessary to make a good stitch. Increasing foot pressure may also help alleviate that problem. But here also, the foot pressure should not be higher than really needed to firmly hold the material in place. Different materials range from very sticky to very slippery, causing differences in how well the material can be moved or held in place. Thickness of material and force needed to pull the knot into the material also play a role. Try one needle size up to make it easier for the thread knot to get pulled into the material. Vinyls tend to be elastic and close up the needle hole around the thread again, veg tan leather on the other hand does not tend to close up the needle holes again. Vinyl and some leathers is also somewhat stretchy. If you stretch the material as you sew the stitch line will shorten again afterward. When sewing, don’t pull or push on the material, just guide it with a light touch. Let the machine do the feeding. Otherwise you may introduce other problems if you pull the needle one way or another while it’s trying to do its job.
-
Can you please post a few photos of your machine? It appears to be a Seiko design, not a Singer 153. One thing to check is how much the needle actually moves at the throat plate level. Rotate the hand wheel so the needle is at throat plate level at the max front position. Hold a ruler next to the needle and flip the reverse lever, observe how much the needle actually moves. Sometimes the max stitch length is limited due to incorrect feed timing. A short close-up video of the feed dog and needle movement is the best way to judge that. Some machine designs allow a mechanic to purposely limit the max stitch length for projects with small-opening throat plates, etc.. This avoids accidentally damaging the machine if the operator could select a larger stitch length than the installed gauge set allowed.
-
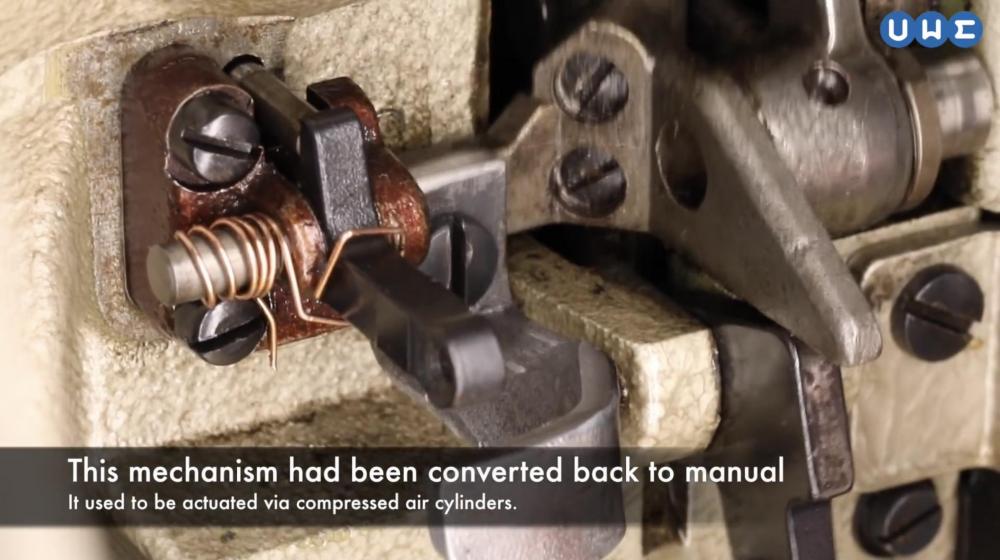
The tension release mechanism is a bit complicated on the Pfaff because it allows several different configurations. I had to make a few parts including a custom spring to convert a machine that originally had pneumatic controls back to manual controls. I’m not sure this will really help you, but here’s what mine looked like: This video shows my modification in action at the 7:40 mark:
-

Looking for a postbed sewing machine for sewing bags
Uwe replied to Parfektionisto's topic in Leather Sewing Machines
I have two Durkopp Adler 268 post bed machines, one single needle and a double needle. They are among the nicest post bed machines I’ve worked on (The Pfaff 1295 is just as nice.) The DA 268 is a very good design and generally easy to adjust and maintain. Common wear parts like feet, hook, etc. are readily available OEM and aftermarket. Throat plates and feed dogs are harder to find for post beds in general, mainly because that type of machine is so rare. Some internal parts like the main shaft are becoming increasingly hard or impossible to find new for these machines. Make sure the machine is complete and serviceable. I’d also recommend looking for a second parts donor machine. Just a few new OEM parts will cost you as much as an entire parts donor machine that can supply dozens of good OEM parts. -
Binding is tricky business and often frustrates even experienced craftspeople. For the Adler 269 class of machines, synchronized binder parts are available. Synchronized binding means the binder moves back and forth synchronized with the feed dog, making it easier for the feed mechanism to pull the tape through the tape folder. You’ll need four different part sets for synchronized binding on an Adler 269 class machine: 1 Swivel arm that connects with the feed dog 2 Tape folder that mounts on the swivel arm 3 Special feed dog and throat plate 4 Special binding feet One of my favorite parts suppliers is Kwok Hing, based in Hong Kong. You’ll need to create an account on their website to see pricing and place an order. My orders generally arrived within a week to ten days. My experience with KH has been very positive over the years. 1 Swivel arm (Need to verify with KH this is compatible with 269) : https://www.khsew.com/index.php?route=product/product&product_id=1845 2 Tape folder (KHF2/3/4 or KH66, check with KH which suits your needs):https://www.khsew.com/index.php?route=product/product&product_id=747 3 Feed Dog & Throat Plate: https://www.khsew.com/index.php?route=product/product&product_id=1881 4 Binding feet: https://www.khsew.com/index.php?route=product/product&product_id=1882 The KH66 is a single-fold tape folder that I think would work well for leather tape. The OEM parts may also be available directly from Durkopp Adler, but will likely cost more than what you paid for your entire machine. This video shows the synchronized binding setup in use on a modern Durkopp Adler 869:
-
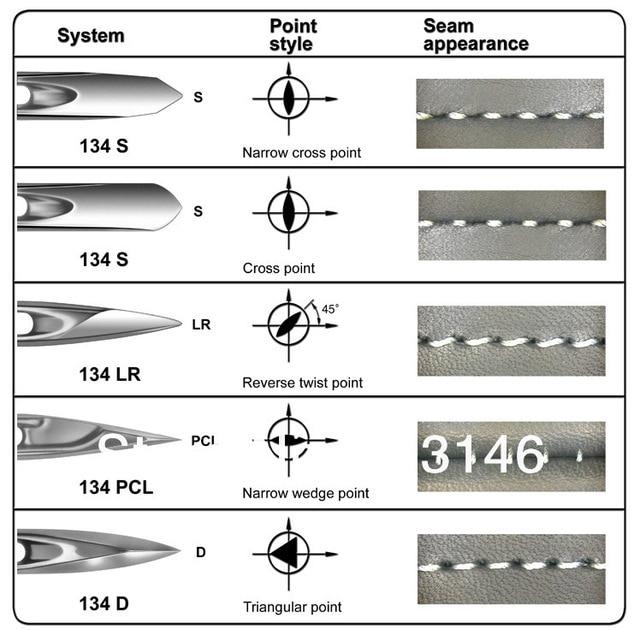
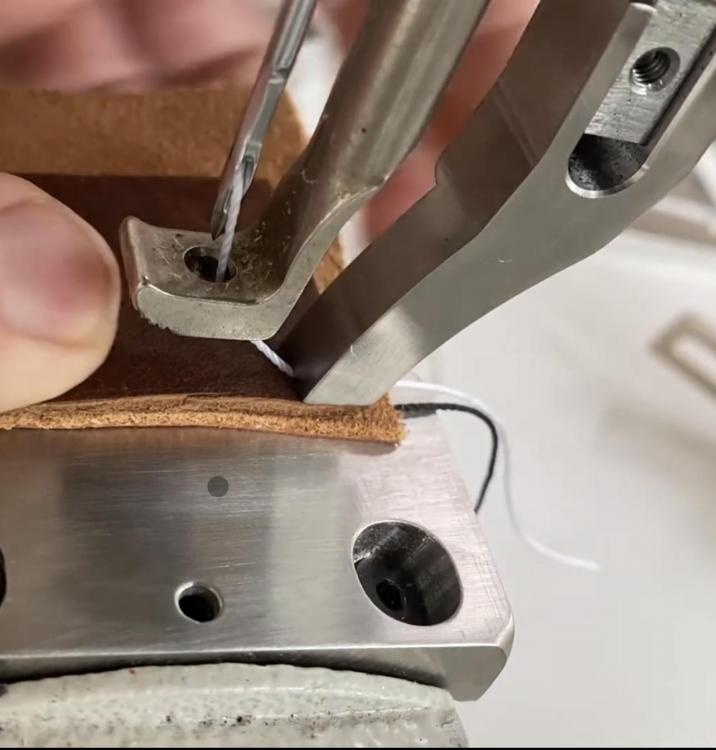
The staggered stitch line is due to the point style of the needle you’re using. That white stitch line in the brown leather is actually what many people want. Leather needles come with different point styles, each suited for a particular application. Experiment with different point styles and pick one that works for you. The picture below shows a few common point styles. The linked Groz Beckert brochure has more detail. The video below explains how that bobbin case opener works and how to adjust it. Loops on the bottom are often due to top thread snagging somewhere as it makes it way around the bobbin case. The video shows a different machine, but it has a very similar hook and bobbin case opener design. Aim for more precision when you describe your problems and use annotated photos when you can. Remote debugging is tricky enough under the best of circumstances. A picture with an arrow pointing at a screw is much more precise than “the screw ... in the bobbin area”. Most phones allow you to edit photos to quickly add arrows and text.
-

Adler 67... Is this wear, or in need of adjustment? VIDEO
Uwe replied to Kryptonite's topic in Leather Sewing Machines
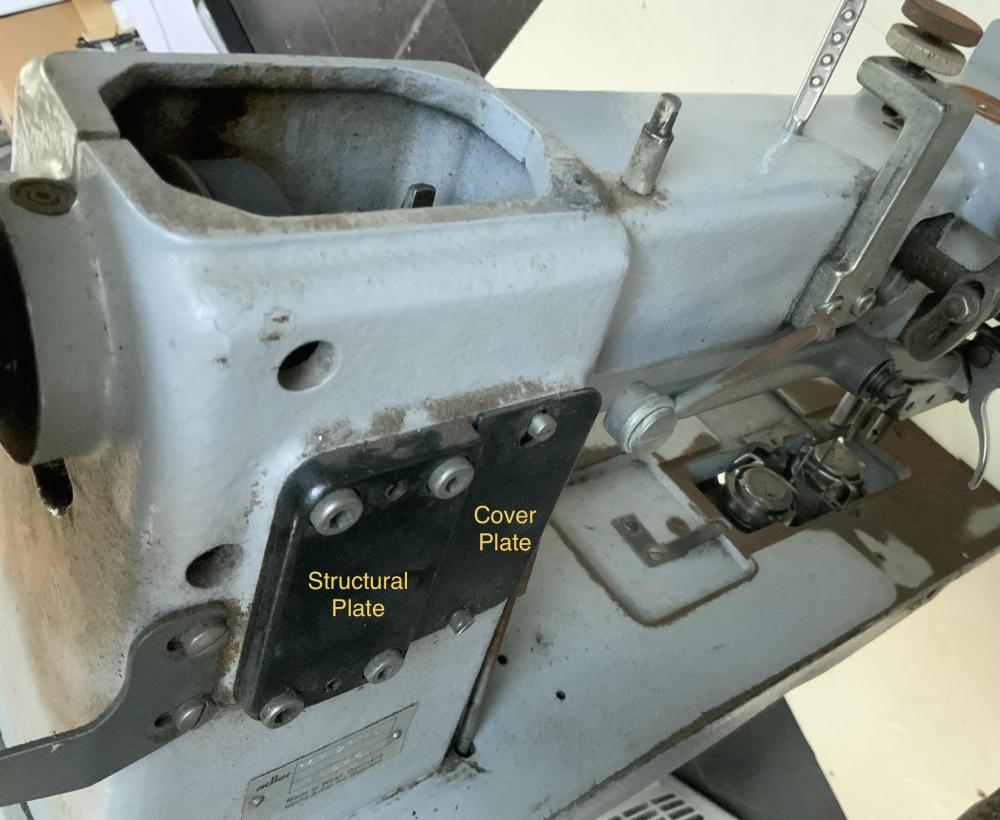
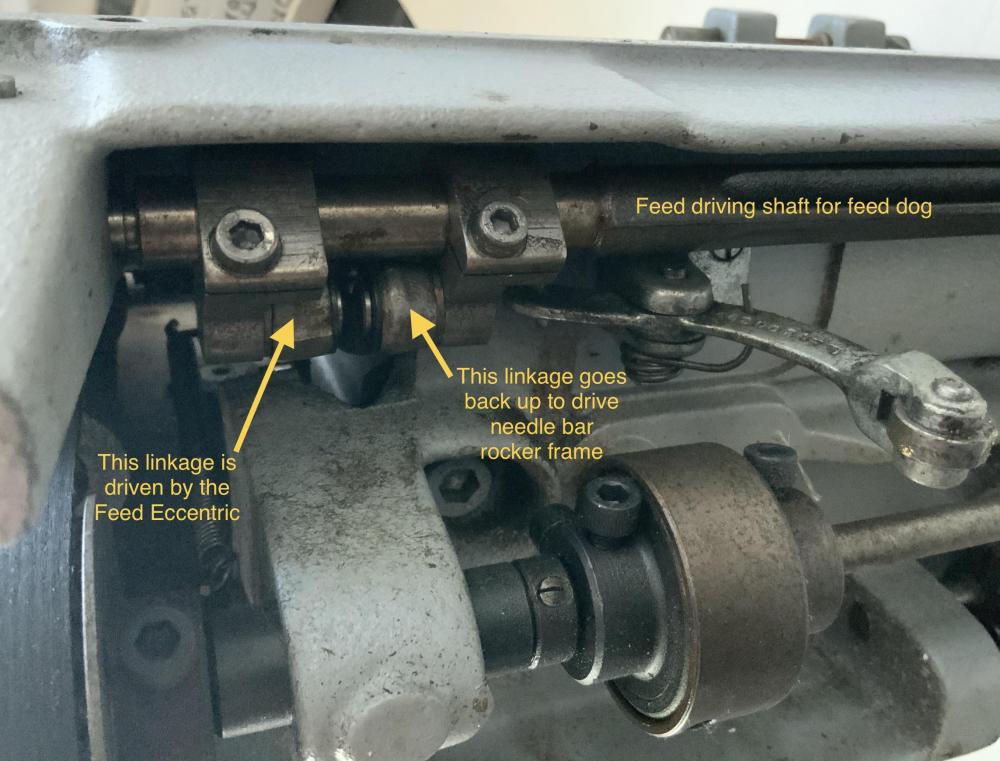
Yep, that’s WAY too much play for sure. Since that movement also moves the feed dog in your video, I suspect the problem lies in the feed driving mechanism or linkage. I suggest opening the covers on top and rear of the machine. Turn the handwheel to bring the needle bar to max front or rear position. Note all the parts that move when you flip the reverse lever up and down. Something in that chain of linkages may be broken, missing, loose, or worn. These are supposed to be very taught linkages with little play. Take video snippets of these internal linkages as you move the needle bar by hand like you did in your first video (lighting may be tricky.) Perhaps it will become clearer why these linkages move when they shouldn’t. Don’t loosen the screws in the thick plate on the rear of the machine. That’s actually a structural plate for a hinge mount that is central to the whole feed mechanism. If that structural mount plate is loose, it will definitely cause problems. On the Adler 67 design the feed movement for top (needle bar rocker frame) and bottom (feed dog) are “connected” via the feed driving shaft for the feed dog on the bottom of the machine. Note the two clamps in the picture below. One is a linkage that comes down from the eccentric feed mechanism rotating the feed driving shaft to move the feed dog. That in turn also drives the second linkage that goes back up to drive the feed motion of the needle bar rocker frame. -
-
I made a video some time ago that shows roughly what your hook timing should look like. I don’t have that Adler 269 anymore, so I can’t make any more videos.
-
Your machine is a copy of the Durkopp Adler 269. Use the Adler 269 service manual to adjust your machine. Make sure you use the correct needle system (System 134-35) , otherwise you’re really wasting time adjusting hook timing. Get ready to take some clear close-up photos or better yet, videos. Here’s a link to all the Durkopp Adler manuals for your machine: http://www.duerkopp-adler.com/en/main/Support/downloads/index.html? action=search&prop0=%2Fcommons%2Fdownload%2Fpublic%2F269_valid_till_May_2017%2F&prop1= Sometimes the documents on manualslib.com load faster: https://www.manualslib.com/a/adler+269.html On this machine design the hook timing is indeed adjusted from the rear/right end of the hook driving shaft. Also, the TechSew 2750 is a copy of the Juki LS-341, which is a totally different machine design. Don’t use those manuals to work on your machine.
-
The short answer is: no. The longer answer is: yes, technically you might, but chances of you finding all the required parts are near zero and they would likely cost more than what you paid for the whole machine. Better to buy an H3 or H4, and then sell your H2. Also, try not to bring ancient topics for a different model back from the dead. It’s okay to start a new topic if you have a new question for a different model.
- 4 replies
-
- pfaff 335
- cylinder arm
-
(and 1 more)
Tagged with:
-
The letter in the Singer model names indicates which factory the machine was produced at. You can find more information on that here. There are scores of discussion topics on the Singer 111 class of machine here on LW. The Singer 111 class has at least a dozen different sub models, with the Singer 111W155 being the most popular among leather workers for various reasons. It’s best to continue Singer related discussions in a separate topic - this topic is about the Pfaff 545.
-
If I had to choose between 4-motion feed dog and reverse, I’d go with reverse, but that’s just me. Consew 225 and Singer 111W155 class machines are nearly identical designs and, in my opinion, not really an upgrade to the Pfaff 545 you already have. Yes, 4-motion feed dog is nice to have but lack of it is not the end of the world in my book. Depending on your projects, you may never even notice that the feed dog isn’t dropping down. You likely WILL notice if the machine doesn’t have reverse when it comes time to lock stitches. You may also notice not being able to change stitch length without removing the material. Lots of people happily use sliding feed dog machines like the Pfaff 335 and Adler 69 class of cylinder arm machines for all manner of projects that don’t involve binding. Many users are surprised to learn that the feed dog doesn’t drop down on those machines. The only time my Pfaff 335 really gave me trouble feeding material due to the feed dog movement was while sewing a multilayer project that had “steps” on the bottom, which the sliding feed dog would snag on. Of course lots of people also happily use machines that don’t have reverse and they may never need to change stitch length mid-project. Exactly which features are important to you is a matter of experience and personal preference. I’d recommend getting the machine you already have working nicely and just start sewing with it. That’s the only way to really find out if the sliding feed dog interferes with your projects. Don’t get hung up on precise stitch length and feed dog movement. You can always upgrade later on and you’ll likely make much better informed decisions after gaining some hands-on sewing experience with a really nice machine.


