-
Posts
2,221 -
Joined
-
Last visited
Content Type
Profiles
Forums
Events
Blogs
Gallery
Everything posted by Uwe
-
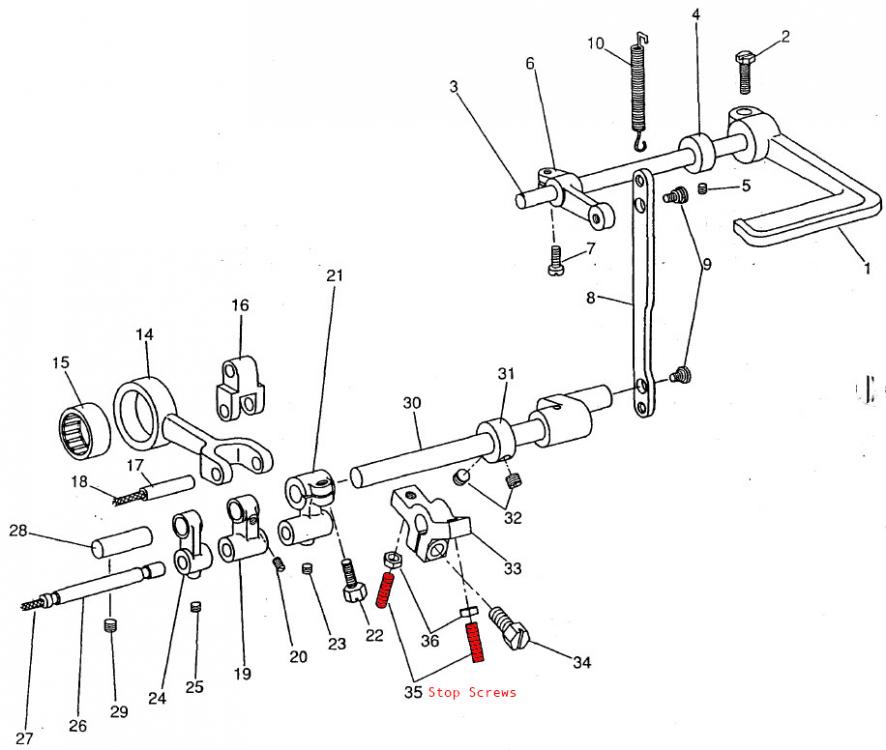
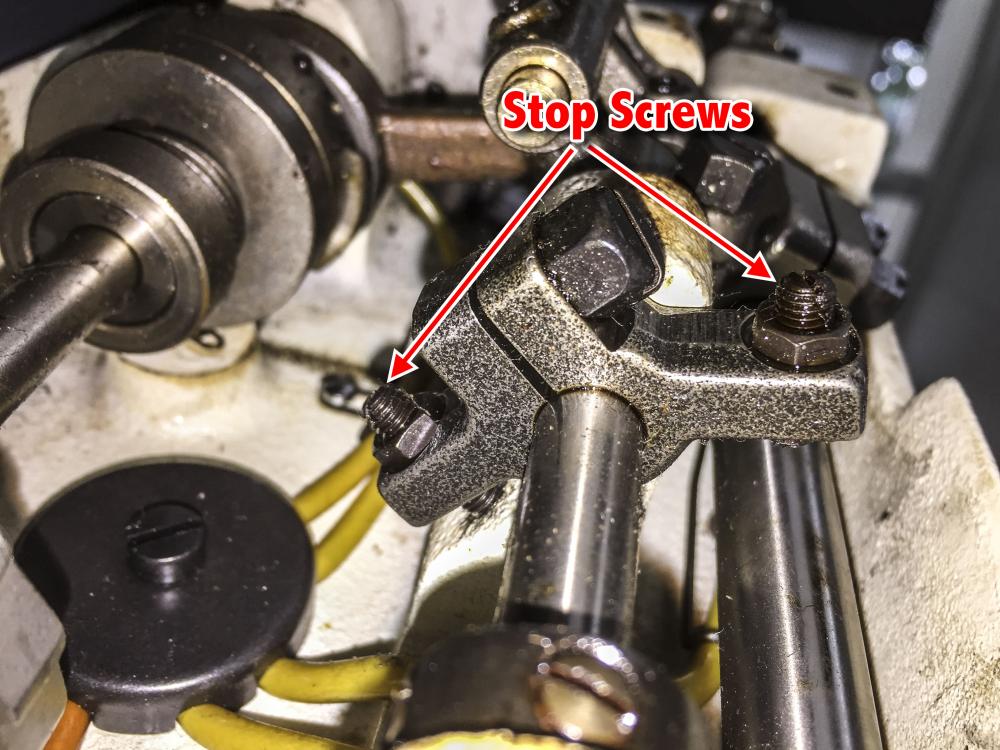
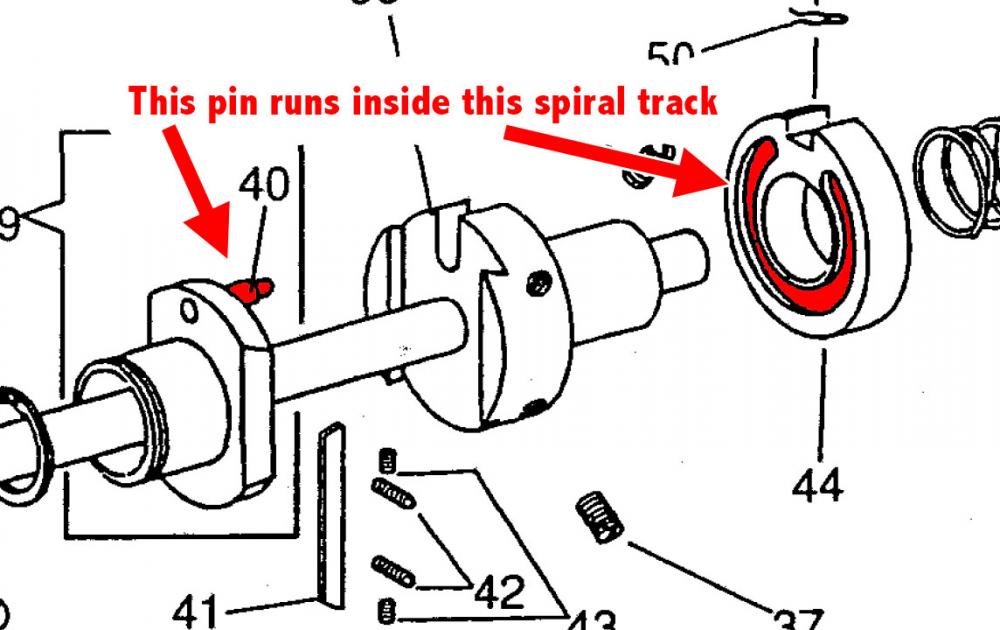
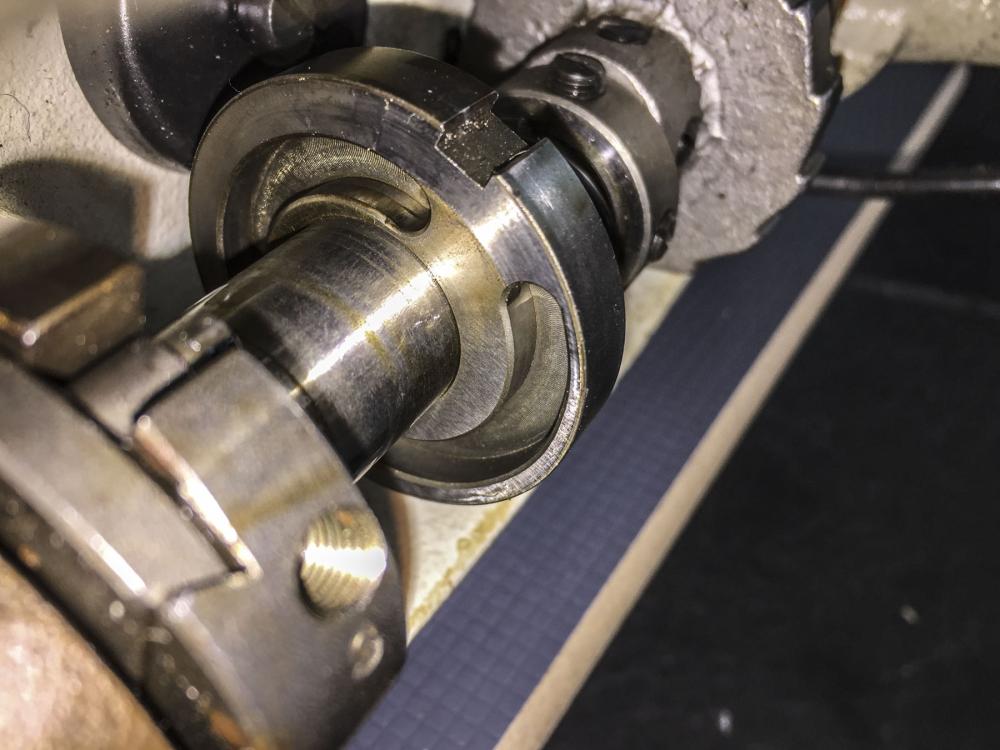
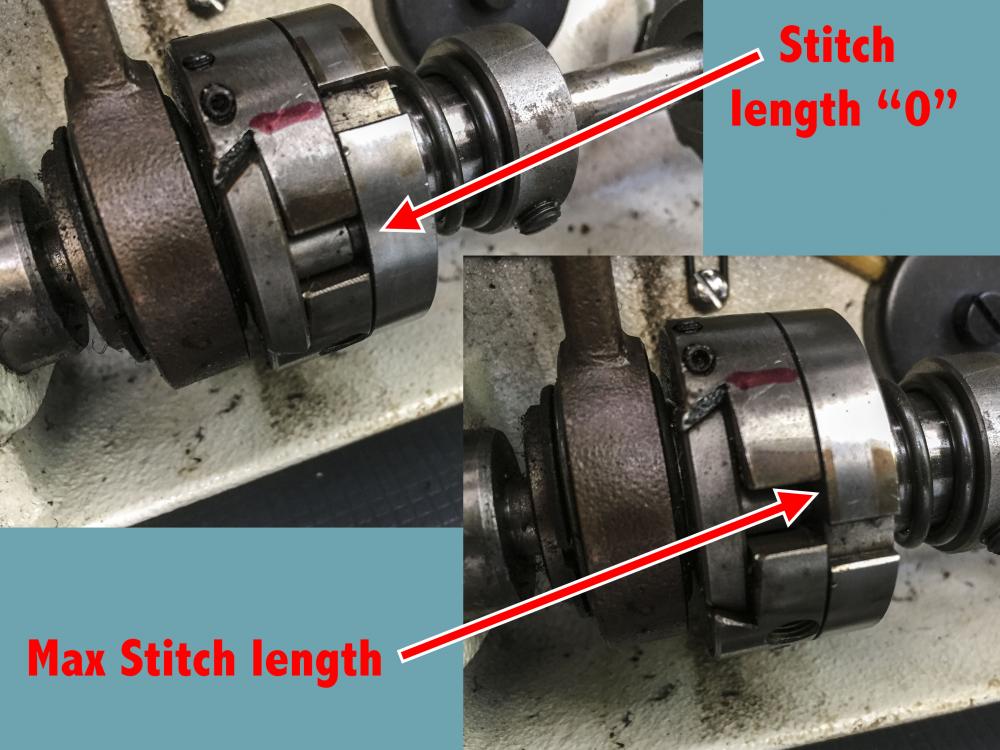
Have you checked the stop screws that limit the reverse lever movement? They can be used to limit stitch length. The bracket may have rotated on the shaft, inadvertently changing the stop limits. Or perhaps you changed the stops when balancing forward and reverse, which can results in a shorter overall stitch length. The Consew 339 is really a re-badged Seiko LSW-8BL. The pictures below are from the Seiko parts list and my Seiko LSW-8BL. Also verify that the stitch length eccentric itself has the full range of motion. The eccentric movement sometimes binds in a certain position before the pin that moves inside the spiral groove reaches the end of that channel. The two parts rotate against each other as you change stitch length. It should give about 4/5 of a full rotation during adjustment. This is hard to observe since the whole thing rotates as you change stitch length. I took two pictures of the the stitch length eccentric in both extreme positions on my Seiko as a reference. Check if the notch in the right disk lines up the same way in your machine when you dial in stitch length "0" and maximum stitch length. On my machine the two discs rotate about 4/5 of a full rotation against each other. Other machines have a different spiral track disc design, so they may offer more or less of rotation. Here's an annotated graphic from the Seiko LCW-8BL parts list that shows the spiral track and the pin that runs inside it. You can see the end points of the spiral track. I separated the eccentric discs on my machine just to illustrate the spiral track mentioned above. You don't have to take this apart to verify range of motion. I just did to see the actual spiral track on my machine and how the end points of that track align with the limits of the stitch length adjustment.
-

Need Advice About Buying/Using A Pfaff 145 H4 6/01
Uwe replied to TorqueMonster1's topic in Leather Sewing Machines
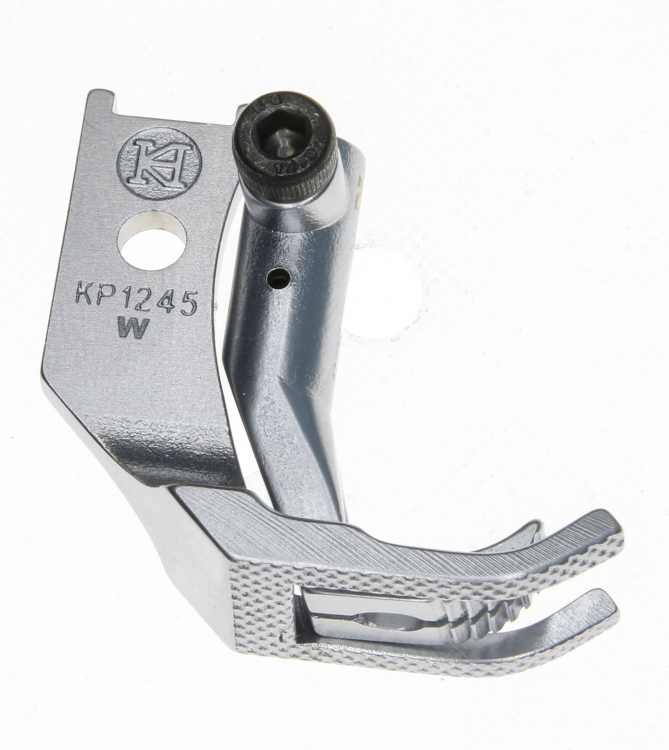
That Pfaff 145 seems like great candidate to start your upholstery sewing adventure, especially if it's ready to sew. Make sure it actually does sew well, though. That upgrade to the larger 545 hook involves a bunch of parts and they all need to be changed over. Starting out with a machine that had an incomplete upgrade will be an exercise in frustration because it simply won't work like it's supposed to, no matter how you adjust it. Good quality presser feet for the Pfaff x45 series are readily available. I'd recommend getting a set of standard feet like the ones shown below (I have a few left on clearance, check the link in signature below.) Other aftermarket parts are also available from various vendors online, at reasonable (but not dirt-cheap) prices. The Pfaff 145/545 are a very good design. The ones I've had were super smooth and a pleasure to use. If this one is as good as you describe it, it'll set a reference mark for your future machines. By the way, that large diameter hand wheel pulley provides slower sewing speed and higher (not lower) torque. For some how-to videos on sewing car interiors, visit Youtube user Cechaflo (https://www.youtube.com/channel/UCw_8PUaXqvjSq3p1lYouXzQ) - he makes it look easy. -
Just get a 441 class machine like the Cowboy 4500 and a nice flatbed attachment first. You may find it'll do everything you want to do. They're not much more expensive than the Juki flatbeds you're looking at.
-

My Pfaff 345 needs a servo motor - which one to choose?
Uwe replied to GregorVolk's topic in Leather Sewing Machines
I'd buy something made for the European market. Both Jack and Zoje are big enough brands to likely make decent motors for their machines. The best form factor of the servo motor depends on how your machine is mounted on a table. Some servo motors have all-in-one, integrated motor/controller/speed input and others are made up of three separate parts connected by wires. The 3-part motors with physically separate motor/controller/speed input usually offer greater installation flexibility and are my personal preference. I definitely recommend getting a small 50mm motor pulley for improved low speed control and torque. If you want features like needle positioning (most leatherworkers don't) make sure the controller is capable of it and includes the position sensor (it often is sold separately.) -
This topic about timing a Singer 45K may provide some good background information and a few things to check on your GA5:
-

Singer 114W103 Chainstitch Embroidery Machine
Uwe replied to GPaudler's topic in Leather Sewing Machines
@westernatelier Sorry, that Consew 104 sold over a year ago. -

Not sure what my problem is... any insight appreciated!
Uwe replied to RaptorBravo's topic in Leather Sewing Machines
The real problem may be that @RaptorBravo doesn't actually say what he or she doesn't like about that bottom stitch line.- 14 replies
-
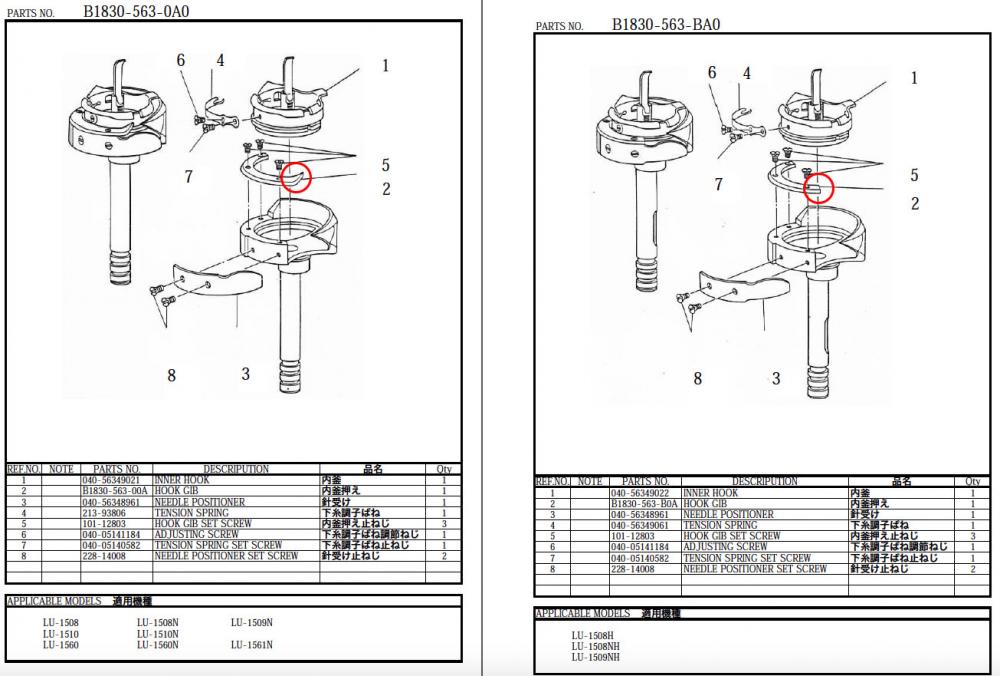
To avoid the thread snagging on the hook gib extension finger, you can try to advance the hook timing a little bit (rotate the hook a little bit clockwise and adjust needle bar height if need be.) This has to do with the timing of the thread take-up lever motion and the hook rotation. A millimeter one way or the other can make all the difference. If the hook is rotated a tiny bit further clockwise when the thread take-up lever starts pulling up, the hook gib finger gets out of the way earlier and the thread may no longer snag on it. I often adjust a machine by the book (science) and then make tiny adjustments (art) to reach the buttery smoothness of sewing nirvana. Occasionally these snag issues are also sewing speed related. Certain snags at slow motion, hand-turned speeds may disappear at normal sewing speeds due to the thread being tossed about like a lasso rope. Also, Juki now makes two versions of this hook, one for normal thread (B1830-563-0A0) and one for thick thread (B1830-563-BA0.) One of the differences between the two hooks is that the gib on the version for the thick thread does not have that extension finger. I'm not totally sure what the extension finger is supposed to accomplish, perhaps it keeps the thread from tossing about too much and risk getting picked up by the hook as it comes around again. One work-around option may be to replace just that extended hook gib with the stubby version (or modify the existing gib.)
- 12 replies
-
- bobbin
- industrial
-
(and 3 more)
Tagged with:
-
Thanks for the close-up pictures. That looks correct to me. That tension unit looks just like one I ordered some time ago. I could never get over that "ball" under the tension discs. It offsets the tension discs from the check spring unit. It seems like a part taken from a two-thread tension unit. I ended up ordering an original Juki tension unit. It's a little more money but well worth it in my mind. Alas, your tension unit does not appear to be the culprit of your tension problems. Sometimes apparent top thread tension problems are really due to the top thread snagging somewhere on its path around the hook. This may cause top thread to pulled when it shouldn't, resulting in apparent "lack of tension" symptoms. Remove the hook cover slide and observe a few hand-turned stitches. If the thread snags or snaps at any point, that may be a problem. Bobbin case opener finger position is sometimes the culprit. The thread may snag on its path around the bobbin case tab that sits inside the throat plate cutout, or it may snag on the bobbin case opener finger if it doesn't get out of the way soon enough. When adjusting the bobbin case opener finger position, be careful to avoid a bind condition as shown in this video (different machine, same concept): This is how the thread is supposed to move around the hook (and older video snipped from when I was working on timing belt issues on my my Juki LU-563 clone)
- 12 replies
-
- bobbin
- industrial
-
(and 3 more)
Tagged with:
-
I suspect the tension discs never actually get close enough to pinch/squeeze the thread and provide tension, even when the thread tension release mechanism is in the "engage" position (presser feet down.) You mentioned that you "calibrated" that thread tension release mechanism. Can you elaborate on that? The tension discs will be loose and "wiggly" when thread tension is released. They should be firm and tight and actually grabbing the thread when engaged. Just check if you can easily pull the thread back and forth between the tension discs with your fingers when the tension discs are engaged. If theres is no tension, then your thread tension release mechanism isn't working right.
- 12 replies
-
- bobbin
- industrial
-
(and 3 more)
Tagged with:
-
Telling us the model number of the machine, providing a link to the product page or a photo so we can see what "thIs machine" actually looks like would be useful. The machine is apparently a SP998 Master Insole Stitching Machine The stitch mechanism is quite interesting to watch with the hook being above the material in plain sight. It's almost like an upside-down Landis 16 mechanism minus the awl. I'm guessing the thread take-up mechanism and the big spool of thread is in the box below the curved arm.
-
Efka in Germany (http://efka.net) makes really good servo motor and controller systems. They may not qualify for "in the middle" status.
-
There's also simple spring and lever physics at work. The longer the lever, the less force it takes to move something. The more you deflect a spring, the more force it takes. In the bottom position of that wing nut, you have a long lever and short spring deflection, resulting in relatively low force/torque required to move things. In the uppermost position, you have half the lever and twice the spring deflection. So it may take four times the force (torque) to walk the feet in the upper wing nut position. Once things start moving, the momentum of all the rotating masses help provide torque.
-

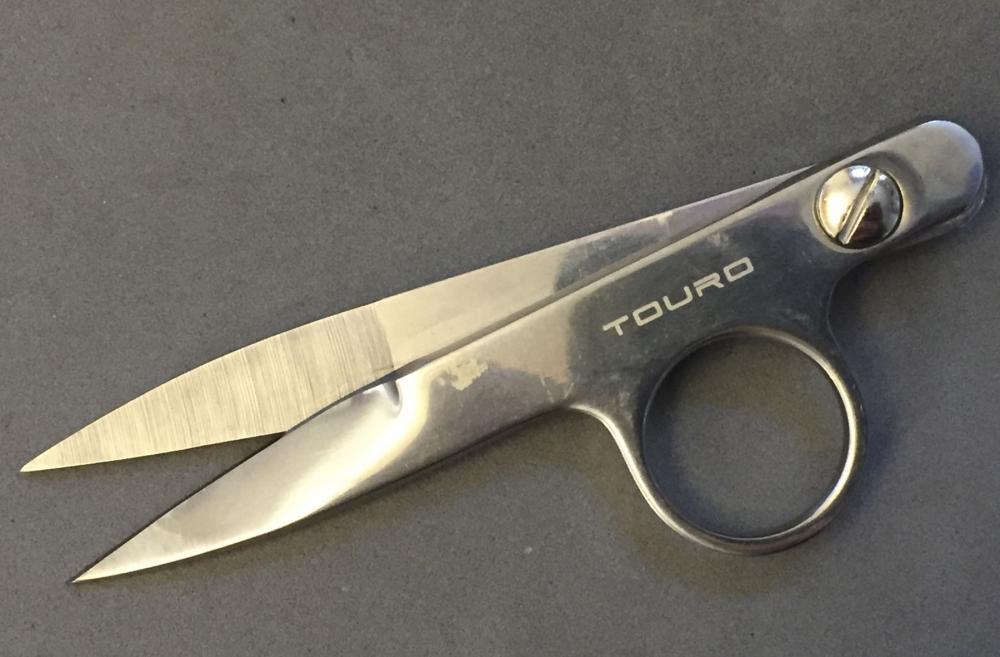
Thread trimming scissors for normal guy hands
Uwe replied to DonInReno's topic in Leather Sewing Machines
-
You'd have to drill and tap M5 mounting holes on the back of a Pfaff 145. It's doable but not everybody is game for drilling holes into their machines. The KB09 adapter bracket is the right candidate.
-
Here's the video I made about how to remove the hook on an Adler 167 and how to reinstall it. It's really not that hard and should take less than ten minutes with some practice.
-
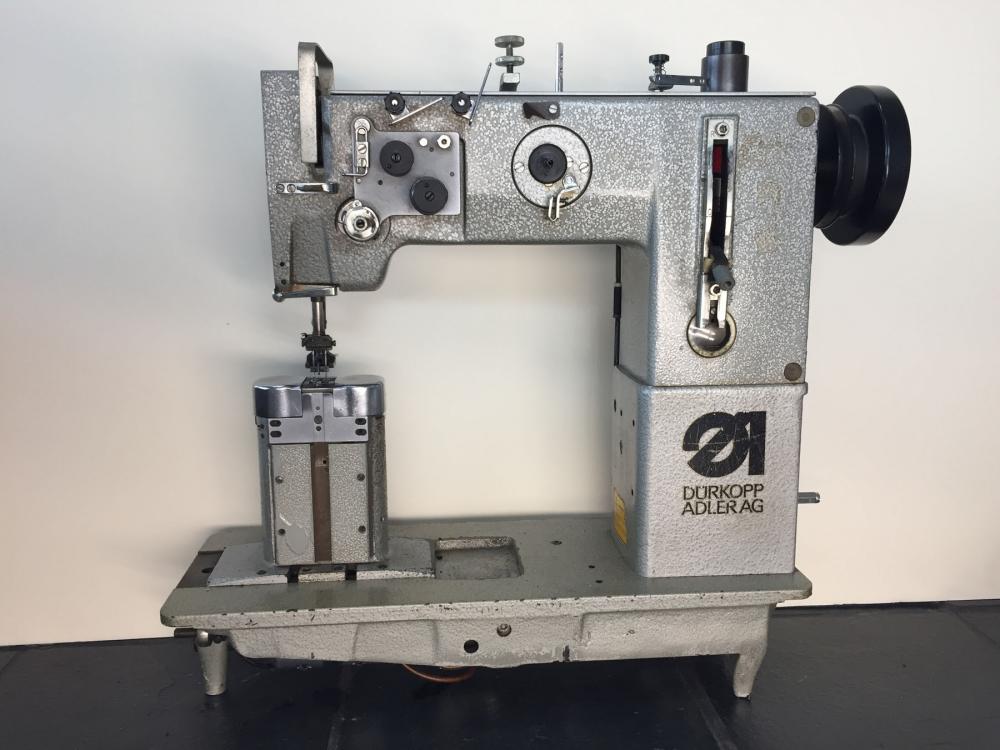
That side seam looks indeed like a candidate for a rare post bed or a super rare up-the-arm cylinder arm machine. That budget and location puts you in the ballpark of some great made-in-Germany vintage post bed machines like the Pfaff 1295 and the Durkopp Adler 268. I sold a Pfaff 1295 some time ago and made a demo video for it (throat plates are hard to find for these machines, other common parts are readily available. Presser feet are plentiful and affordable.) : I still have two Durkopp Adler 268 walking foot post bed machines, one single and a double needle. They are perhaps my favorite vintage walking foot post beds - glorious machines from a time and place where engineers ruled. Highly recommended and worth about $2K for a head (table and servo motor adds about $300.) Parts availability is generally good for these machines (except for the main shaft, of all things.) Lots of presser feet options for the single needle version. My single needle 268 is partly disassembled right now for cleaning. Below is a picture of the double needle Durkopp Adler 268.
-

Issues finding needles for a post bed SInger 136w110
Uwe replied to rk5n's topic in Leather Sewing Machines
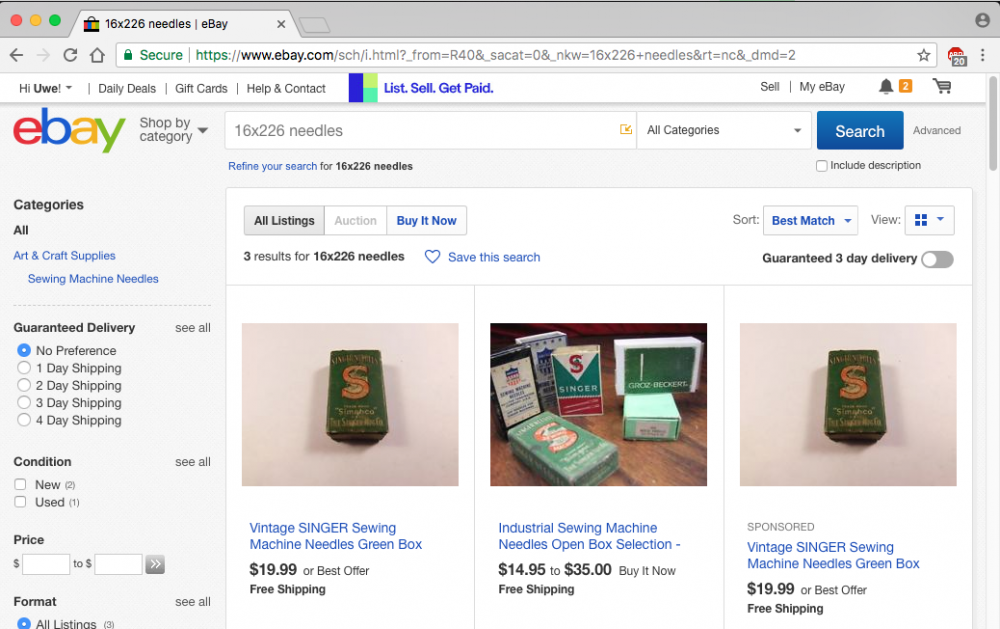
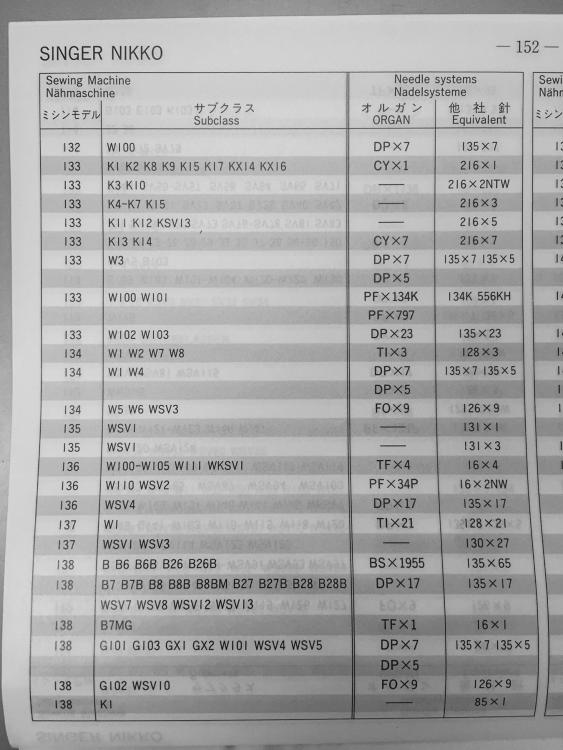
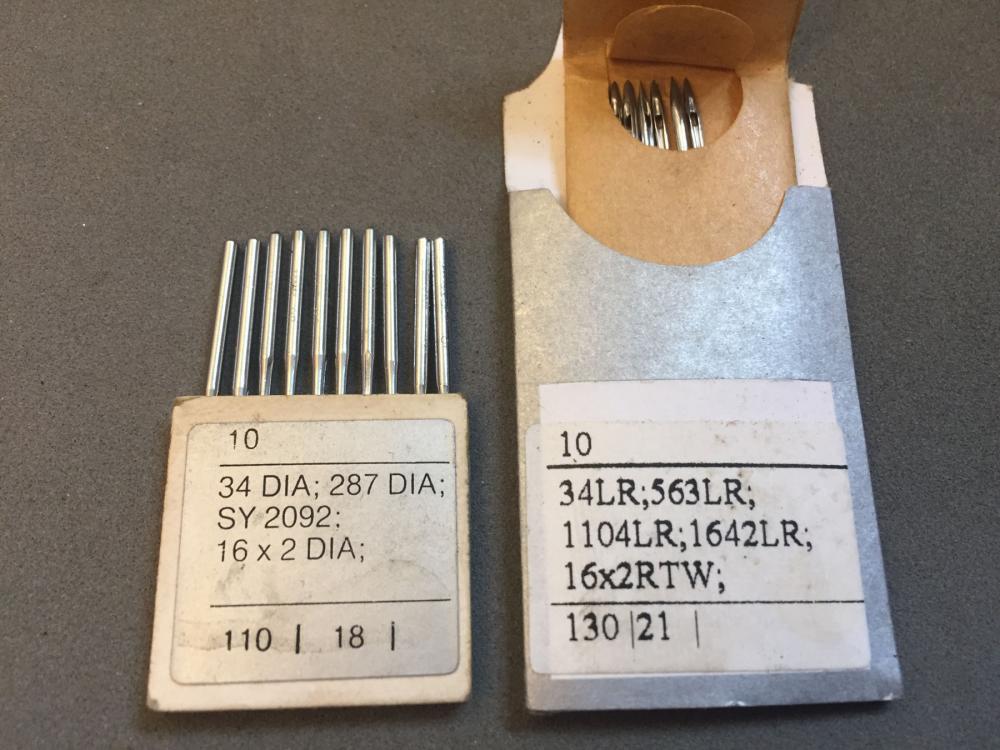
According to the Singer 136W110 manual (136w110.pdf) the machine is designed to use 16x226 needles There are currently three listings on Ebay for that size: There may be other suitable needle systems that share key dimensions. I checked my vintage needle stash, but not a single pack on 16x226 turned up. Lots of close calls as in 16x257, 16x287, 16x231, and the like, but no direct match. My Organ Needle reference booklet of sewing machines and needle systems shows the Singer 136W110 with Organ needle system PFx34P and an equivalent of 16x2NW. I have some 16x2 leather point needles. They also have 0.065"/1.5mm shank diameter (and 1.33"/34mm needle butt-to-eye distance). Those packages in turn list other equivalent needle systems one could search for. It's like some game where one clue leads you to the next one. I think a bit wiggle room inside the needle bar shaft pocket is okay as long as the inside walls are straight. The needle is going to get pushed against on side the wall anyways by the needle screw and be held in place. Some needle bars don't have a hollow shaft at all, but rather have a open valley cut into one side for the needle to rest against while being clamped in place. Changing the needle bar would be a last resort. You much more likely to find a workable modern needle system. Rather than making a needle bar from scratch, you'd be better off finding a suitable replacement from another machine. Many needle bars share the same diameter and only vary in length. Cutting off a too-long needle bar at the top is considerably less work than making a whole needle bar from scratch. Removing (most of) the post may well be required to get the needle bar out, not fun. -
The numbers in the photo above match the numbers in the parts list for the Singer 45K21-25-63-78 (45k21-25-63-78 Parts.pdf), so perhaps you can use that document as an initial reference for your machine, at least for the hook area. I've not come a across a parts list for an actual 45K53. I do have a sizable (if unorganized) stash of Singer 45K parts. I'll check to see if I'm harboring any of those suspects.
-
On these machines you can remove the hook and put it back in without changing the timing of the hook (so no need to re-time the hook unless you want to.) Even if you get the machine going as it is, it may be a good idea to take the hook out periodically for a proper cleaning underneath. I have a double needle Adler 167 that's due for a lot of things, including a cleaning under the hook. If I find time over the weekend I'll make a short video to show how the hook comes out and goes back in.
-
We can't really make meaningful recommendations unless we know roughly where you live and what your budget actually is. If your budget is less than $1K then you're plain out of luck unless a minor miracle happens on your local Craigslist. Can you show us a picture of the type of seam that the other machines won't sew well? Industrial sewing machines are often one-seam wonders, which means they're great for exactly one type of seam or sewing operation, and a compromise for everything else.
-
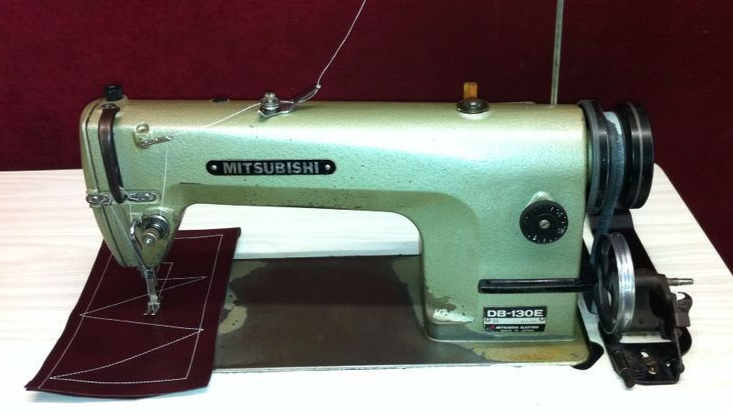
You gotta work on your googling skills, it makes life easier and you don't have to rely on others to google things for you. Do an image search for "mitsubishi straight stitch sewing machine" and look for one that looks just like yours, then follow the trail. Took me less than three minutes. It's apparently a Mitsubishi DB-130E
-

Help with thread size understanding and selection
Uwe replied to Mhicks's topic in Leather Sewing Machines
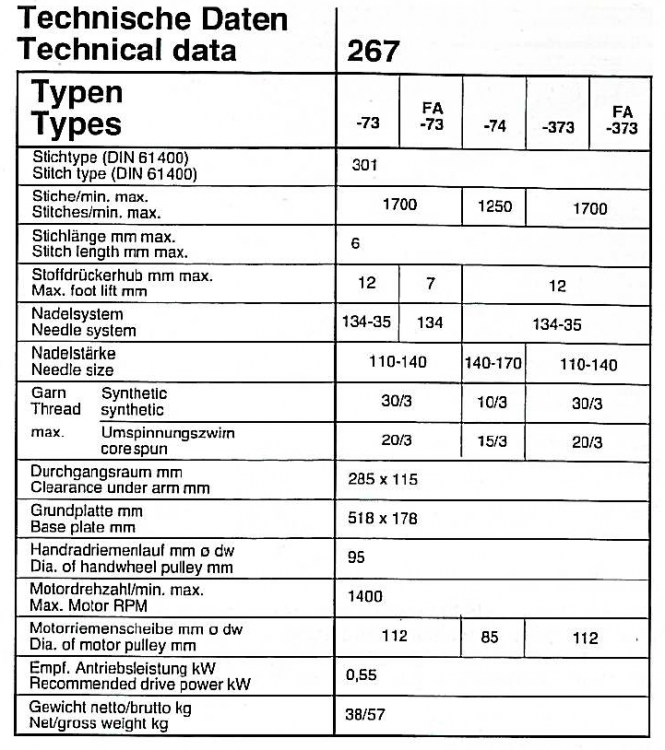
Don't feel bad about getting the thread size conversion wrong. I've been trying to wrap my head around it for years. Since the best way to learn something is trying to teach somebody else, I'll have a go at it. The Adler 267 brochure lists the specs below, which is probably where you saw the "30/3" The basic problem with thread descriptors results from the fact that while we intuitively think about thread in terms how thick the thread is, the official classification numbers either state the weight of a fixed length of thread (Ne or Number English), or the length of a fixed weight of thread (Nm or Number Metric). The tex number is the somewhat official system, and it's also based on the weight of a fixed length of thread. The Nm numbers usually include some indication of how many individual strands make up a thread. The "30/3" in our example means that the thread is made up of 3 individual fiber strands, and each strand is 30 Nm. So the total thread is really 30/3 = 10 Nm. It may feel like we should multiply the numbers (three strands of 30), but since it's a length measure, the resulting length of fixed weight of triple-spun thread is one third as long, not three times as long. That's also why 30/3 (30/3=10) is really of the same Nm length class as 20/2 (20/2=10). To further complicate things, the material of the thread impacts how thick it is, even with the same classification numbers. Most folks here use Nylon or Polyester, which I would put in the synthetic category. Corespun means the fiber strands that make up a thread are spun around a solid center filament core. Just like it's nearly impossible to convert a car's gas usage numbers from mpg (Miles Per Gallon) to l/100km (liters per 100 kilometer) in your head, the thread conversion can be tricky. I just now stumbled across a website of Ruoss-Kistler, a Swiss thread manufacturer that goes into the science of thread making in great detail. Un/fortunately it's in German. Among other great info, they have this conversion table with formulas: So our example of 30/3 thread should convert to tex as follows: tex= 1000/(30/3)Nm = 1000/10Nm = 100 tex (slightly heavier than the Tex 92 thread you can actually buy here in the U.S.) The heavier duty Adler 267-74 with the "10/3" spec calculates like this: tex= 1000/(10/3) = 1000/3.33Nm= 300 tex (slightly heavier than the Tex 270 thread you can actually buy.) In the real world, a well adjusted Adler 267-373 really does happily sew Tex 138 Nylon thread all day long, and perhaps even Tex 207 thread with careful adjustments and operation. There you have it - way more info than you asked for. But a least the whole European thread size thing is clearer in my mind now. And none of the above really tells us how thick the thread is, which is what we really want to know. -
Used machine and parts availability depends a lot on where on this planet your are located. High-quality used Pfaff and Durkopp Adler machines that are somewhat rare here in the U.S., are very common in Europe and other parts of the world. You can save a good deal of money if you can make do with a cylinder arm machine, which are much more common and affordable. It really depends on the design of your bags. If you really do need a walking foot post bed machine, wait a little, make some more bags and save up money for a good one. In the 70's and 80's a good industrial post bed sewing machine cost as much as a small car. Today they cost MUCH less than a small car.
-

Aftermarket Parts for Cowboy/Cobra 441 clones
Uwe replied to EvanBrent's topic in Leather Sewing Machines
I'd venture to say that how a machine is adjusted has a bigger impact on the user experience, smoothness of operation, stitch quality and reliability than any one particular clone vs OEM part. A well adjusted clone is likely to perform better than a poorly adjusted original Juki. I highly doubt than anybody can really tell simply by sewing with a well-adjusted machine whether it has an original Juki hook or an aftermarket hook installed. Of course no amount of adjustment will overcome a cracked casting, a rough bearing, bent shaft, or an off-center hole. Staying with the big clone brands like Hightex/Cowboy, Typical, Keestar etc. will give you a good starting point. U.S. based dealers and their respective brands get a lot of attention here on LW, but there may also be good local dealer choices in South Africa that avoid a lot of shipping expenses and time zone headaches. Having access to a good local mechanic is priceless. Instead of "upgrading" perfectly good parts with OEM versions, I think you're better off investing your money in accessories like edge guides, presser feet, and throat plates that suit your work and improve your user experience.- 7 replies
-
- cowboy4500
- juki 441
-
(and 1 more)
Tagged with:

.jpg.d60258221c476480a6e073a8805645bb.jpg)

