

YinTx
-
Posts
3,794 -
Joined
-
Last visited
Content Type
Profiles
Forums
Events
Blogs
Gallery
Store
Everything posted by YinTx
-
I just picked up a bunch of Cambell's Satin Laid Linen thread, in a variety of colors and weights. To me, it seems slightly better than Barbours, and not quite as tightly wound as Fil Au Chinois. But this is pretty subjective, I don't have information in front of me like tensile strength, etc. I like each of them, and will use them depending on the item I am making. I have stitched with Tiger also, and it is a different animal than Linen. Tiger does not have any thread smaller than 0.6mm that I know of, and most of the linens I have seen do not get into the larger diameters like the Tiger thread does. I like having the variety available to suit whichever item I am making, and thread, although expensive, is not the most expensive part of your project. However, done well or poorly it can make or break a project, in my humble opinion. To answer your questions on lengths, it really depends on the weight (diameter) of the thread. Most of the 50 gram linen spools seem to have about 250 meters of thread on them. YinTx
-
From the album: Wallets
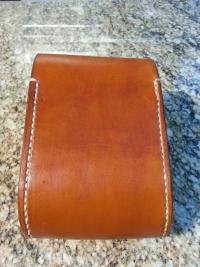
Made a wallet using two things I hadn't gotten to use yet... maybe should not have used them together, but the result was interesting. Big thread, small hole! 332 Campbell's Satin Laid Linen thread, and Joseph Dixon #10 pricking irons. Slow going for sure. YinTx© YinTx
-
splitrail, I had a similar experience lately here in South Texas with the Barge contact cement. It has been working great, and then recently in the heat and humidity, it seemed to falter. I was able to separate the two pieces, where I would not have been able to recently. I thought maybe it had to do with the age of the can, so I opened a new can, it had the same problem. In fact, when I was sanding the edges, I was able to pull the cement out from between the layers after they had been hammered together, like a rubber band. I reapplied a different glue to bond the pieces together before finishing. It was clear that the cement had not bonded to the leather fibers at all, since it came out with no fibers attached. This was after letting the cement set for about 30 minutes to be slightly tacky to dry to the touch prior to putting the pieces together. I am really inclined to believe with this experience that heat and humidity had something to do with it, but I don't see the chemistry that supports my experience. YinTx
-
I've just built an excel spreadsheet to do the work. Not the best, I've used real MRO programs such as SAP and Maximo for materials purchasing, warehouse inventory and usage, so I know what it can look like, but for someone small like me, I can't justify spending much $$ on a new program. I think some have used Quicken and other programs, but I don't know how well it works. I am very interested in knowing what others do as well. YinTx
-
I think for comparisons, everyone would have to comment on speed based on technique (punch through with chisel, awl, dremel?), leather thickness/layers, type of leather (oiled? chrome tanned? veg tanned?) size and type of thread, and complexity of stitch pattern (straight line? curves? using a nice pony or horse or holding it in your lap? Care what the stitch looks like in the end? etc.) I too would like to know how my stitching speed compares, but so many variables that it is almost impossible to compare. Unless everyone was willing to make a two layer belt 44" long out of 3 to 4 oz veg tanned leather, using a 7 stitch/inch pricking iron with an awl (stitch marking included in the time), 18/3 linen thread, and a stitching horse, then post beginning and end times with inches/hour calculated, and the end result photographed and posted, both front and backside of stitches displayed. And maybe some other variables I didn't consider in there... just sayin. My stitching has varied from 8"/hour to 24"/hour depending on all these variables. YinTx Just thought to myself: Maybe this would make a good "Keep making stuff Challenge" for June.... we could draw in a lot of comparisons then! YinTx
-
 Cool idea on the lacing for the mason jar coozie! I can see using that here in S. Texas on a hot sweltering day for a nice cold sweet iced tea... YinTx
 -
New Card Holders
YinTx replied to RStevenson's topic in Purses, Wallets, Belts and Miscellaneous Pocket Items
Very clean looking, and great stitching! I hope they sell well for you. YinTx -
 Thank you kindly, Monica! YinTx
 -
-
-
-
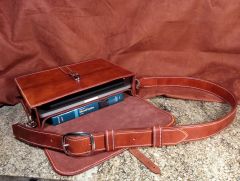
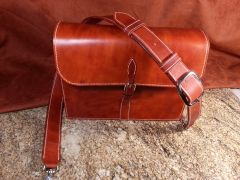
From the album: Laptop Bag
This is the fit up I was expecting on the previous image but was unable to accomplish. YinTx© YinTx
-
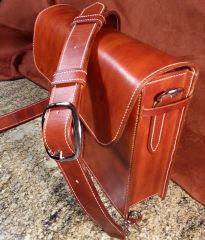
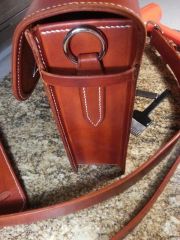
From the album: Laptop Bag
This is the gap in the bottom of the gusset that is difficult to avoid. Open to suggestions on making sure this does not occur. I did get better results on the remaining fitments. YinTx© YinTx
-
 Tugadude, It is clear I am having issues with angles and same sized exit holes. I did manage some improvements, see my comments here: http://leatherworker.net/forum/index.php?app=galleryℑ=29356 Thanks for the help! YinTx
 -
 Tugadude, Thanks. See the comments on this photo: http://leatherworker.net/forum/index.php?app=galleryℑ=29356 YinTx
 -
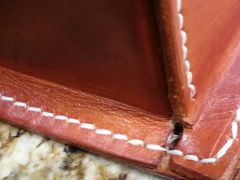
From the album: Laptop Bag
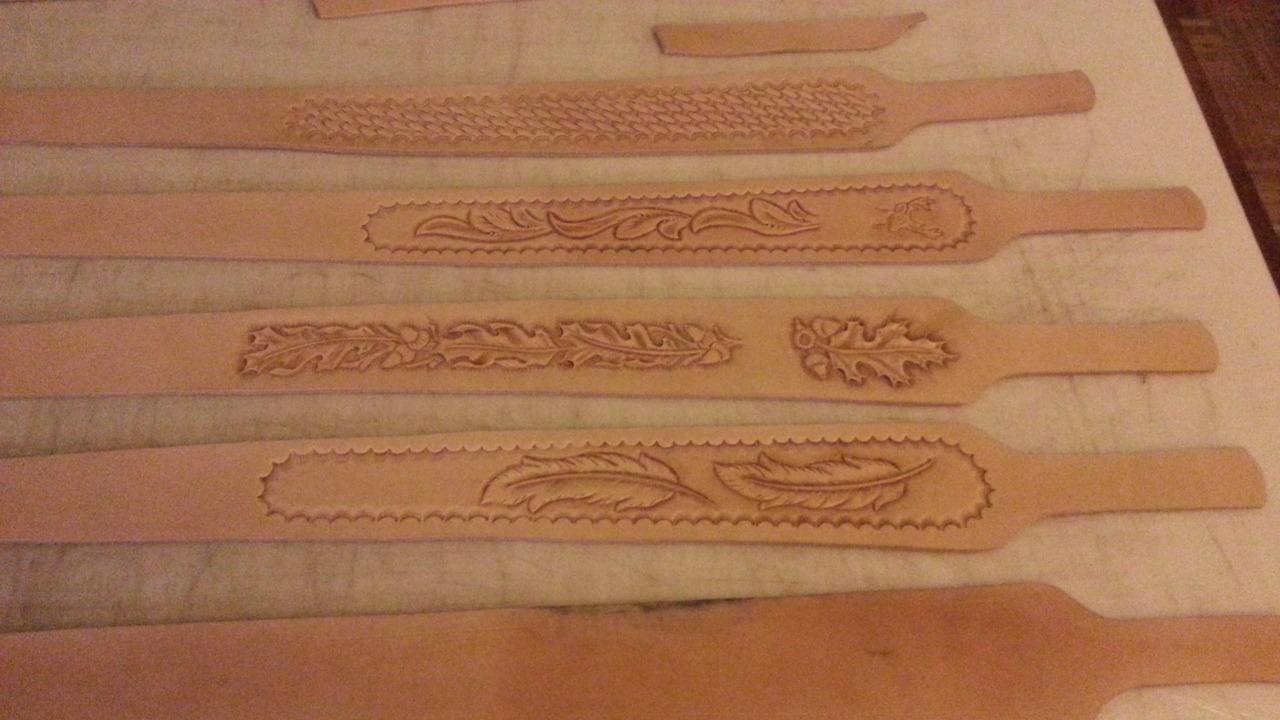
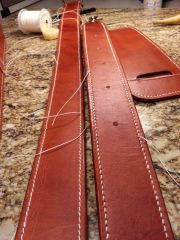
On the left, is a strap showing the reverse or back side of the stitching, prior to trimming the threads and tapping down. On the right is the front or top side of the stitching, also before trimming or tapping down. For me, this is a big improvement. There are fewer "fat" and "skinny" stitches, the reverse side is straighter, and has a much better "lay." It was obvious from the previous images that I was having difficulties keeping the awl even and exiting with the same sized holes. I made a lot of adjustments to get here, but the main things were: Increased lighting: 4 ea 100 watt bulbs seemed to help me see what I was doing better. Putting a LOT of wax on the thread drastically improved the "twisting" I was experiencing, and reduced the "fat" and "skinny" stitches. Keeping the exit hole as small as possible also helped. YinTx© YinTx
-
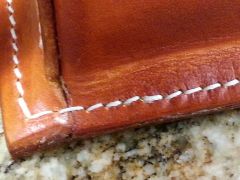
From the album: Laptop Bag
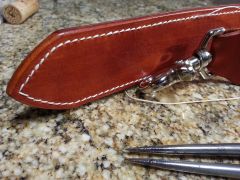
This is the back of the stitching. Still need to tap it down, but I feel much improved. YinTx© YinTx
-
From the album: Laptop Bag
All the stitching is done, still need to tap down the stitches and trim the ends and finish burnishing the edges! Happy to say I had a bit of a breakthrough today on the evenness of my stitch backsides. Not perfect yet, but big improvement. YinTx© YinTx
-
 Thats pretty cool, DC! YinTx
 -
From the album: Laptop Bag
This is an example of the contact cement lack of adhesion. Not sure what is going on here, using Barge Contact cement, waiting 10-20 minutes for it to dry before putting surfaces together. Just doesn't seem to be holding. Anyone else have this issue or know how to resolve it? Thanks! YinTx© YInTx
-
From the album: Laptop Bag
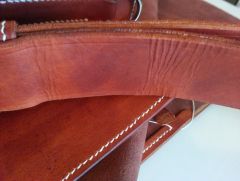
Here is the wrinkling issue I have been experience. This was bent to the curve you see, and it wrinkled as you see. I suspect low quality leather? Leather was cleaned with alcohol, dyed with Fiebings Professional Oil dye, treated with neatsfoot oil, then several coats of Aussie conditioner. YinTx© YinTx
-
From the album: Laptop Bag
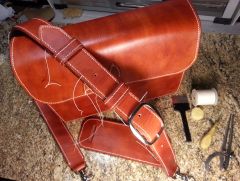
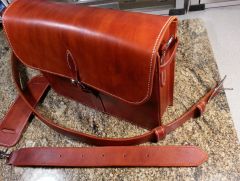
Finally taking shape. Still have to stitch the back panel and the straps, and finish burnishing the edges. Easy to see the "streaky" dye job. Will try a sponge or small rag next time to see how it goes on. YinTx© YinTx
-
I am casting the thread over the 2nd needle, which goes from right to left (front side of stitch to backside of stitch). Some stitches do appear wider than others when you are that zoomed in, I think it has to do with the amount of twist on the thread when I pull it tight. At first I thought it might be uneven tension, but when I tried to loosen a small stitch or pull tight on a wide stitch, it made absolutely no difference. Open to suggestions here, as this is one of my major frustrations! YinTx
-
From the album: Laptop Bag
Today's effort. This is a shot of the the backside of my stitching, using Barbour 18/3 linen thread. Changed technique ever so slightly, showed some improvement on the backside. Still not as nice as I'd like, but happy there is a step in the positive direction. YinTx© YinTx
-
 Thank you all for the positive complements. This is a bag I am making as a practice/prototype before I make the final version that has been requested, since I have never made one before. The leather is some pretty rough material from Tandy, with a lot of scars and marks, hence the "battle tested" distressed leather look. The dye job though was done with an extra large synthetic wool swab, and even though the leather is to blame for some of the uneven look, I can easily see my swab pattern in the light/dark spots. The only finish I have applied is Aussie conditioner. I will try the sponge and small t-shirt rag to see how it affects the outcome, thanks for the suggestion! The look is growing on me, but what I did not like is how easily the leather wrinkles permanently when slightly bent. I will have a picture of that later. YinTx