MADMAX22
-
Posts
3,201 -
Joined
-
Last visited
Content Type
Profiles
Forums
Events
Blogs
Gallery
Store
Everything posted by MADMAX22
-
Looks excellent. Great job.
-
I think this thread would be better served in the supplier subsection. If you do a search on them you may find more info as to suppliers. I dont think there are that many public suppliers. Most of them go directly to shoe makers I believe. We usually just get the scrap pieces (horse butts).
-
What operating system do you have? If you have windows you can use paint to resize the photos manually, its not overly difficult once you figure it out. Also there are variouse photo editing tools that you can download for free allthough they range in difficulty to use.
-
Looks great, may be simpler but that lettering and numbering is darn near perfect.
-

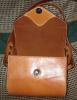
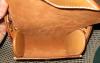
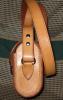
Small Purse Round 1
MADMAX22 posted a topic in Purses, Wallets, Belts and Miscellaneous Pocket Items
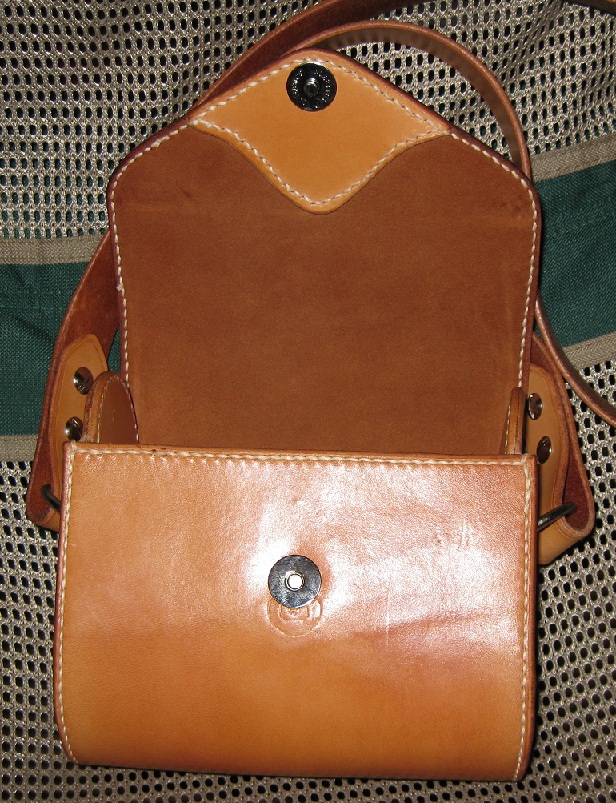
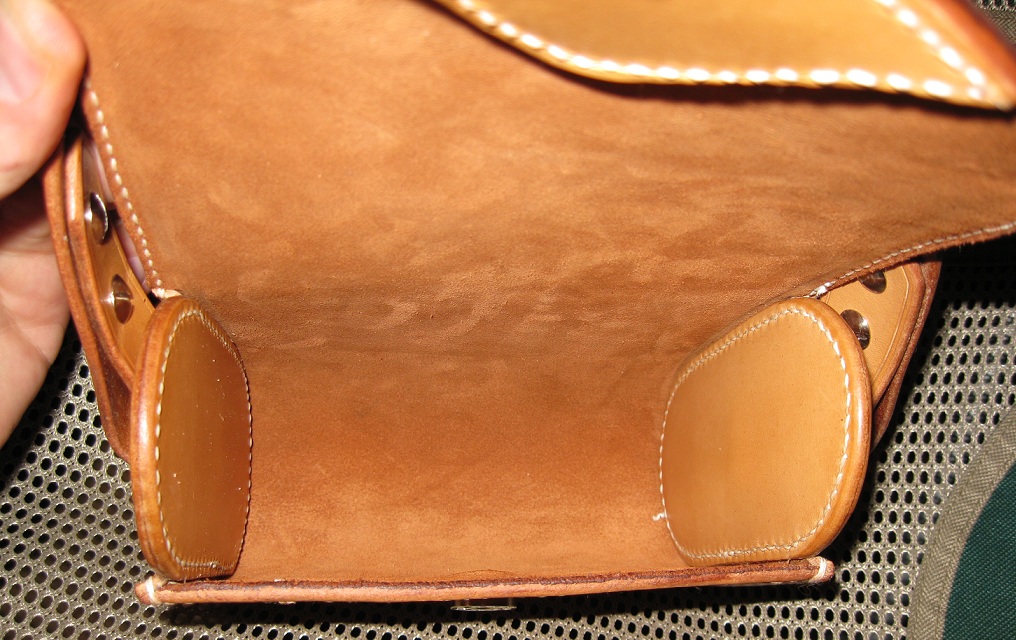
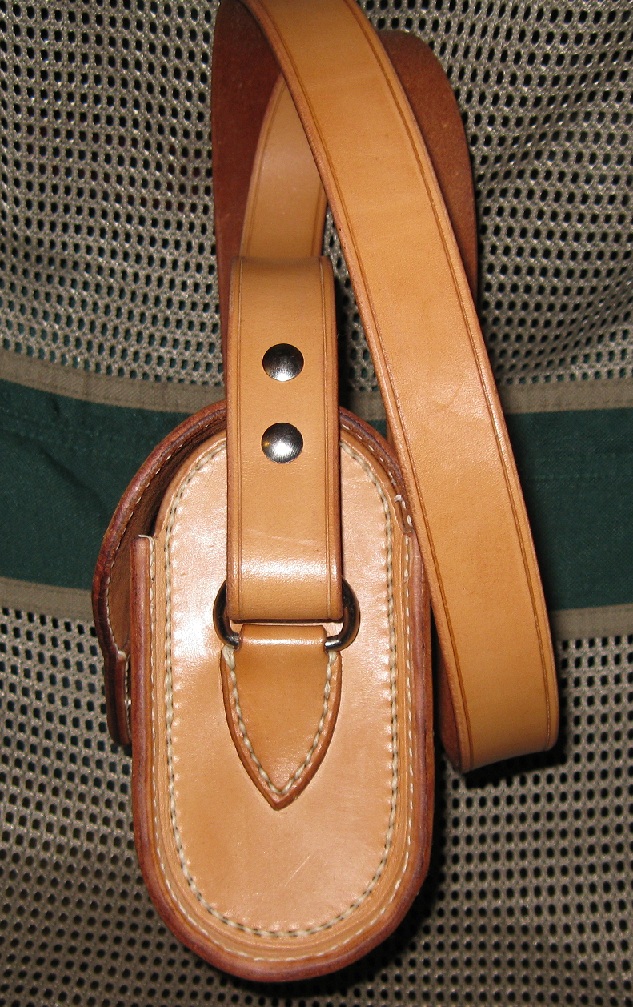
Well gave the purse thing another go. This time from scratch which has been a learning experience. Simple design. This one is gonna be for a friend of mine (friends get the trials, errors, oops, wonder if this will work projects). First big glaring error and the primary one I ran into was misplacing the darn snap keeper thing which I will highly never use this type again. I wanted a hidden snap but man these things are pretty weak. Anyways, Other things I think I need to work on the side walls as far as construction, I had in my mind what I wanted but it came out a tad different. Need to tweak the design a bit. Well its 5oz HO, hand stitched, oiled, neatlac. I did use a tad of mahogany antique on the carving (front piece actually to keep the color the same) just to bring it out a bit. I still really need to work on my carving skills. Lined it with some suede split. Which I had to cut a hole in to move the darn keeper then glue back down in that area. Ok enough ranting about that lol. Sorry about the pics but the flash was the closest I could get to the actual color it is.
-
Turned out really nice. Congrats
-
Wanna add if you are thinking about waxing your own thread I would highly incourage it. Get some rosin and bees wax and make your mix up (there are threads about it in this section), its not too difficult. When you can prep your thread without wax allready on it, it makes for a far easier threading of the needle. You can control how much wax you put on the thread and the rosin mix makes it almost sticky. The thread grips when you sew very well so it wants to stay set when you pull your stitch. Since I have started doing it this way I wont do it any other way unless I get a machine.
-
Biohazard Ben's A.s. Belt
MADMAX22 replied to NoahL's topic in Purses, Wallets, Belts and Miscellaneous Pocket Items
That turned out great, seems you have really gotten that effect down pat. I like how you left the end of the belt roughed up and oddly trimmed. really adds to the overall effect. -
May wanna get the thread moved to the proper section. Also what do you use it for? WandC is excellent stuff however I thought they just sold sides or double backs, didnt realize they even carried shoulders.
-
Thread Size And Type Question
MADMAX22 replied to Kring's topic in Gun Holsters, Rifle Slings and Knife Sheathes
Hey Mike sorry for the late reply but Kring gave ya the link to where I buy it also. -
This place is where I get mine http://campbell-bosworth.com/catalog/index.php?osCsid=dd0c03d07c09021f3e2d4987195ad393&manufacturers_id=12&osCsid=dd0c03d07c09021f3e2d4987195ad393 If you look back in this section over the next couple of pages and see the topics I started there is all kinds of info in there. I use the barbours and if I want it a different color just dip it in dye for a little while, pull it out (I use latex gloves) and squeeze it as you do then just hang it out to dry. Once it is dry I wax it and off I go to do the stitching. If you are dying after sewing it takes the dye pretty well then also.
-
Na your fine, although you may wanna wait till after it drys to cut your pattern to prevent any shrinkage affecting your pattern cutout.
-
Lizard Inlay Knife Sheath
MADMAX22 replied to MADMAX22's topic in Gun Holsters, Rifle Slings and Knife Sheathes
Understood and thanks Mike, -
For A Film
MADMAX22 replied to arbalet12's topic in Purses, Wallets, Belts and Miscellaneous Pocket Items
Oh wow. Thats impressive. -
Just my small amount of experience with holsters so there are others that will probably chime in that have been doing this far more then my couple of years. What I do is figure out my pattern, then cut out all the pieces. If I am going to slick them I will do it now. If you want to avoid the small amount of stretch that comes from slicking, you can cut the piece big enough for the pattern. Slick the leather, let dry then cut out your pieces. Once slicked while slightly damp I will do my stitching grooves also as this seems to make it cut a little easier. This can be done dry also. Up to you. Then I will glue everything together (if its a pancake style). This has to be done when it is dry by the way. I do my handstitching while it is dry. If you have your awl nice and sharp and polished up you should be able to do it relatively easy. One main reason I do this when it is dry also is any mistake, finger nail, awl haft, anything else can leave marks which some times are a bear to get out of the leather. If I sew while it is still wet I also have the problem of stretching the leather as I sew. This can cause slight ripples along your stitch line and if you arent careful I have sunk the thread too far into the leather.
-
For A Film
MADMAX22 replied to arbalet12's topic in Purses, Wallets, Belts and Miscellaneous Pocket Items
All of those look excellent. If you dont mine, where do you get your metal work at? I have not scene anything like that. -
Thats a lot of ingenious work, looks great too. Good job
-
I cut the blank, scribe my borders and do the gouge line if I am using one. Tape the back of it like I normally would and do my tooling. Then I do my dying, and whatever else I will do to color it. Glue and stitch the liner and punch my holes then edge the entire thing. Then I apply my finishes or sealers. I guess you could sew in the liner first before tooling but knowing my luck I would either screw up the liner and or mess up on the tooling and have to start over. I dont have a sewing machine so sewing a belt is a little bit of a chore so I wanna know for sure the belt is good to go before I start stitching.
-
Thanks, One thing with the border it also depends on the thread you use. I was using 6 cord for most of my belts. You can get away with using 4 cord (not sure what that would be for a sewing machine) and do your 3/16 inch border and you should be fine. Just when you start getting smaller thread toward the edge you need to be very careful with your awl hole placement and alignment.
-
Another Bronc Halter
MADMAX22 replied to Double U Leather's topic in Saddle and Tack Accessory Items
I think it looks pretty good. That stamp looks hard to master, -
Great looking seats Sawyer, really like that first one.
-
Thanks, as far as the stitching its all hand stitched, 6 cord barbours thread. The leather is about 7oz herman oak.
-
Thread Size And Type Question
MADMAX22 replied to Kring's topic in Gun Holsters, Rifle Slings and Knife Sheathes
I primarily use the barbours linen thread 6 cord on everything I do. I really like waxing my own thread and that seems to be my favorite size thread to use. I do everything by hand right now though so I cant add anything for machines. Also when I am doing inlays, the inlay portion I will use a 3 cord thread for that then use the 6 cord for everything else.