


Tugadude
-
Posts
2,656 -
Joined
-
Last visited
Content Type
Profiles
Forums
Events
Blogs
Gallery
Store
Everything posted by Tugadude
-
The main thing I noticed is that the inner and outer pieces are the exact same length from what I can tell. That isn't ever going to work if you wish to fold it. And obviously you do. The outer shell in my opinion, and this varies according to thickness of leather, needs to be at least 3/8" to 1/2" longer than the inner piece. So in mm, about 9.5mm to 13mm or thereabouts. You seem to be very cautious and wanting to draw a perfect template. Nothing wrong with that but don't let it become paralysis by analysis. I'm one of those who is pretty lucky in that I can look at something and pretty much recreate it without resorting to detailed templates such as yours. Not everyone can do that I realize. But my advice is to buy some cheap "practice leather" and just begin creating. You might be surprised how simple it can be. And still get great results. I have bought sides from Springfield Leather Co. from their discount table that have been perfect for this. I think on their website they call them $35.00 sides or something like that. They used to be even cheaper. But you get an entire side of usable leather that is good enough for actual projects and definitely good enough for practice. Some that I've gotten was extremely impressive but they were one-offs I guess and they just wanted to move them. I'm sure a leather company in your area might have similar hides. Good luck and have fun!
-
 I had the chemistry set as a kid and somehow I survived it. What is missing these days is some good old common sense. Anything can be dangerous in the wrong hands. Even pure water can kill people if they drink too much and unfortunately it does happen. I umpire little league and one of my fellow umps nearly died one extremely hot afternoon because all he did was drink water and his electrolytes got out of whack. He was out (unconscious) for several minutes, scaring the crap out of everyone there. Thank God the EMTs were able to get an IV into him and get him going pretty quickly. There is always risk when using chemicals. Some are safer than others but each and every one has its recommended precautions and handling requirements. All can be found by looking up the product's SDS, Safety Data Sheet, which used to be called MSDS, Material Safety Data Sheet. Don't know why it changed, but it did. I use them regularly in my business of construction chemicals. They literally can be a lifesaver.
 -
Visiting there is always a treat! Staff is always friendly and helpful. And way more there than you can find online.
-
Who knows? I don’t mean to be a smart aleck but you haven’t identified a specific kit. Some probably feature decent thread while I’m sure others don’t. My suggestion is to check out Springfield Leather and their Rhino Thread. Nice-sized spools for cheap and it is decent quality woven polyester thread. You also need to decide what size thread is suitable for what you need it for. what sort of project or projects will you be working on?
-
Seems a punch would be much easier but with my limited tools I would punch round holes at each end and then connect them with two straight cuts. Scalpel or X-acto Knife for the straight work.
-
I have heard horror stories both from folks who tried to clean leather coats at home and through professionals. So proceed with caution I guess. Personally I would seek out an established garment cleaner who says they specialize in leather. But I would still check their feedback, which is usually able to be done through online reviews. Good luck, they only have one chance to do it right. Edit: just occurred to me maybe a fire restoration company might be worth asking.
-
Nice! I’ve heard of box stitch but that looks like a tornado stitch!
-
10-4. Some chrome tanned just won’t burnish to satisfaction. Good luck!
-
Not sure I understand “raw but finished”. Maybe just dye the edges then burnish with wax.
-
Wallet
Tugadude replied to Tim Schroeder's topic in Purses, Wallets, Belts and Miscellaneous Pocket Items
Very nice! The colors are great and Pastor Bob is right about the detail in the flowers, it is very good indeed! -
Neat idea. And yes, thanks to God you are back here with us. As a cancer survivor myself, I empathize. We're glad to see you! The only thing that concerns me is the potential for damage to the piece. Looks like there is already a hole. Maybe you could double-up the leather where the chisels make contact? The dye job is interesting, almost give it built in patina, which in my opinion is a good thing! Take care!
-
What are Suitable Leathers for Watch Straps?
Tugadude replied to Schick's topic in Leatherwork Conversation
Danne is a member here and has turned out some incredible straps so I hope he gives his opinion. Personally I've used many types of leather with pretty good results. A lot depends on the style of strap. I don't mean that as a cop-out, it is true. For rustic, thick bands for large field watches you can get by with pretty much anything so long as it meets your aesthetic tastes. Dress watches demand thinner leathers and look especially classy on exotics such as alligator. Many of those will be padded so the top layer of leather is quite thin. There is also the method or methods used to create the strap. Are you simply going to skive the ends and fold them over? Are you going to do the same and add another layer on the inside as is often done? All of it makes a difference. I think for the average strap calfskin works well as does kangaroo. The kangaroo stretches less which can be a good thing. Let us know what sort of straps interest you. Maybe link some photos of straps which match what you have in mind and we can get more specific. Good luck, they are fun and really can test your skills. -
Manufacturer's Supply Company Bell Skiver Project
Tugadude replied to mcguyver42's topic in Leather Machinery
S.B. Foot Tanning Company https://www.redwingshoes.com/red-wing-made/rwm-tanning.html -
One of the best instruction videos on the saddle stitch
Tugadude replied to Tugadude's topic in Sewing Leather
Billybopp said: "3. When starting a line of stitches, if the starting point will be visible start 2-3 holes in and do a "backstitch" the will match what you normally do at the end of a line. It's not necessary, but at least both ends are symmetrical." That makes total sense and would be practical in many instances. I thought about that the other day when viewing a leather wallet that has become quite popular. I'll show it below. It occurred to me that the stitching on this particular design might as well all be doubled up so that in effect there's two complete lines of stitching. That way it is not only balanced, but looks the same all the way across. As it is, some might find it unattractive. And some might love it. Viva la difference!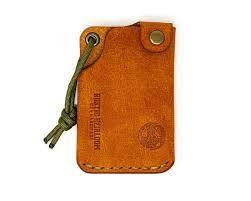
-
One of the best instruction videos on the saddle stitch
Tugadude replied to Tugadude's topic in Sewing Leather
Yes, there are different ways to do things and everyone has to figure out what works for them. Consistency is the important thing in any event. It isn't good enough to achieve good stitching "sometimes" or seemingly "by accident" and I see evidence of that in some of the projects on this forum and elsewhere. I think it is because those persons don't understand the process and/or the fundamentals. They don't get a clear picture of what is going on with the needles and the threads. Regarding point #2, the instructor does show pulling the thread downwards and towards himself so the second needle can pass unobstructed. That is key. it doesn't hurt to "check" by pulling the thread a bit AFTER the needle goes through just in case. I still do that sometimes, but not on every stitch. I can generally feel when it has possibly pierced the thread and at that point I make certain to check. The way he shows attaching the needles is the way I do it for braided thread. I find piercing the thread twice is not necessary when using braided thread whereas I do usually pierce it twice in the classic "S" configuration when using twisted thread. It makes the attachment much more secure. For those who can't picture the "S" method, here's what it looks like: I refer to it as an "S" due to the shape, it reminds me of an s. Hope it helps. -
One of the best instruction videos on the saddle stitch
Tugadude replied to Tugadude's topic in Sewing Leather
He demonstrates the method where you stitch towards yourself and with the slants of the holes pointing downward and towards yourself. That's the way I learned, based upon watching Nigel Armitage. Before I got any instruction I messed around with stitching and got so-so results. It was when I understood what is supposed to be happening that it all began to click. Then it became a process of refinement. -
One of the best instruction videos on the saddle stitch
Tugadude replied to Tugadude's topic in Sewing Leather
You are welcome. One of the details sometimes glossed over is exactly where in the hole, in relation to the thread does the second needle go. I have seen videos where the thread is pulled to the top of the hole and the second needle passed below the thread and of course in this video he shows the exact opposite (which is the way I do it). I pull the first thread to the bottom of the hole or slit and then pass the second needle over the existing thread, above it in relation to the hole. That detail isn't called out clearly on many instructional videos. At least not clearly to me. I figured it out based upon trial and error. -
Manufacturer's Supply Company Bell Skiver Project
Tugadude replied to mcguyver42's topic in Leather Machinery
I love this topic because of the St. Louis connection. Having lived here my whole life I have a sense of pride for the city. Turns out the company whose moniker is on the machine is still in business. They are in Earth City, a suburb of St. Louis. Florsheim Shoes are still around in some capacity, but a mere shadow of what they used to be as far as I'm aware. I doubt there's any domestic manufacture anymore but I might be surprised. Here's some info on the current Manufacturers Supply Co. About Us Manufacturers Supplies Company, in partnership with Europe’s leading equipment manufacturers, specializes in the complete sales & service of precision cutting & converting technologies for a wide variety of industrial sectors. These industries include abrasives, adhesive tapes, aerospace, composites, converting, foam & packaging, footwear & leather goods, electronics, medical, petro-chemical, technical textiles, & transportation. Headquartered in St. Louis, MO since 1907, with strategic sales & service locations throughout North America, Manufacturers Supplies Company offers a comprehensive range of precision cutting & converting technologies, placing great emphasis on application development, training & after sales support. Over the years, we have partnered with only the highest quality & most reputable equipment manufacturers in the world, solidifying our reputation as the leading supplier of industrial converting systems & solutions. Our vast range of technologies include: dieless knife cutting tables & waterjet cutting systems, die cutting presses, narrow web die cutting (flat bed & rotary) & laser cutting equipment, single knife & multi-shaft lathe slitters, slitters-rewinders & log winders, adhesive coaters & specialty laminators. Manufacturers Supplies Company’s strength not only lies in the high quality & technology of its partners equipment but also the depth of talented and experienced technical sales support team. The majority of our personnel are experienced in several disciplines, including mechanical, electrical and software programming. MSC leverages this knowledge base and hands-on approach to offer their clients accelerated developments of new technologies to improve their current manufacturing process. Our directive, and primary consideration, is to make dramatic improvements to our clients success by providing the latest technology available, excellent service-support and custom engineering for unique applications. -
Sanding Edges of Shoes
Tugadude replied to TomBanwell's topic in Shoes, Boots, Sandals and Moccassins
way out of my element here but I wonder if there is a way to install a speed reducer to your existing sander? -
Ran across this video this morning and I have to say it is extremely well done. My "go to" videos for helping folks learn the saddle stitch are usually from Nigel Armitage and Ian Atkinson, but this one might be even clearer. There are always subtle details you can learn and this one shows them quite clearly. Hope it helps!
-
I Started A Leather Craft Youtube Channel
Tugadude replied to lintonleather's topic in Leatherwork Conversation
I don't see any youtube bashing going on here. I spend a good portion of each day checking up on channels I follow, most of which are non-leather related. But some are. I think Chuck was poking fun more at his son than the medium itself. -
I Started A Leather Craft Youtube Channel
Tugadude replied to lintonleather's topic in Leatherwork Conversation
Good question. Perhaps a posting was deleted? In any event, in my opinion unless someone has something really unique to share, there's enough youtube channels already. Some exist to hopefully help them sell product and then there's some strictly educational ones. And there are still more that are just interesting and I'm sure folks watch who never intend to do any leatherwork themselves. Many exist in order to generate income from views, subscribers and clicks to retail sites. We live in an interesting time. -
I Started A Leather Craft Youtube Channel
Tugadude replied to lintonleather's topic in Leatherwork Conversation
Just in case anyone is wondering, the poster doesn't seem to be actively producing Youtube videos anymore. The newest is now about 2 years old. -
So nice to have you back. I pray you have success in completing the home and that you can return to leatherwork soon. You were missed as well! Charis and Shalom, Ray
-
Why not roll it over onto the gusset too?