


Tugadude
-
Posts
2,656 -
Joined
-
Last visited
Content Type
Profiles
Forums
Events
Blogs
Gallery
Store
Everything posted by Tugadude
-

Where do I go from here?
Tugadude replied to Rossr's topic in Gun Holsters, Rifle Slings and Knife Sheathes
I hope Rossr will keep us posted on his thoughts and his experiments. I'm sure there'll be a lesson for all of us in his journey. -
Welcome to the forum. My wife and I visited your lovely state last year and had a glorious time! So many treasures. I had been there on business, but it was much better kicking back and just soaking it all in. As far as being a rough hack, you can learn some tips here that hopefully will allow you to eliminate both of those words from your vocabulary. It takes patience, but once you begin to see improvements you will be energized. I know I was. Good luck!
-
I wish you good luck. And I'm sure you'll get some good advice on machines from knowledgeable folks here. I know nothing about sewing machines except what I see posted here, which is they sure aren't perfect. There's a learning curve. You have a formidable task ahead. I hope you experience success.
-
Don't know I'd want snapping turtle that close to my crotch.
-
Reach out to RockyAussie and/or Rockoboy
-
Where do I go from here?
Tugadude replied to Rossr's topic in Gun Holsters, Rifle Slings and Knife Sheathes
After thinking on this awhile I came up with literally dozens of examples of companies whose products feature a "signature" element in them. Of course there are iconic logos such as Polo, Gucci, Rolex, etc., but there are other, less obvious ones too. The little triangular-shaped accent on the bottom of the Untuckit shirts for example. Knowledgeable folks see that and know it is Untuckit brand and not a pretender. I've seen designers that incorporate a specific color into their line of products. One that comes to mind is Rachel Ray cookware, with bright orange, red and teal blue colors all around. Maybe you figure a way to introduce a signature color into your work. Or maybe a signature animal. Bellroy uses an owl on their products, for example. These sorts of "little things" seem to add up to way more in terms of making a product desireable. Every year some new designer drops a unique look and suddenly "everyone" has to have one. Just some more thoughts to consider. By the way, I didn't mention the knife. Your work is excellent and your knives are always interesting and attractive. -
Where do I go from here?
Tugadude replied to Rossr's topic in Gun Holsters, Rifle Slings and Knife Sheathes
So true about building on what others have done. There are myriad examples out there to learn from, to study and to honor by taking bits and pieces and incorporating them into your work. There is truly nothing new under the sun, yet every now and then I see something that makes me pause and go "wow", that's cool. Probably because I've never seen it before is all. When I seek inspiration I will often just google something and then click on the "images" tab on the browser. I get overwhelmed by dozens and often hundreds of photos of what I'm interested in. If you haven't, try it. Just put what you are looking for in the search bar and take a chance. Do you have a favorite color? Most people do. Maybe you find a way to incorporate that color into all of your work? When you encounter a product that has someone's "signature", take note of it and remember it, how they created it. I just did a quick search for 'exotic leather knife sheaths' This is the result...there's tons more when you scroll down.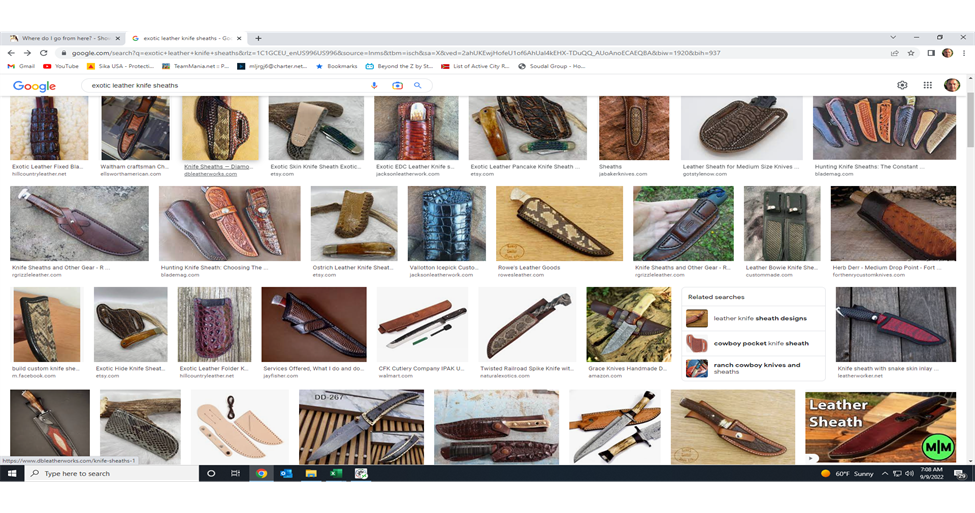
-
Where do I go from here?
Tugadude replied to Rossr's topic in Gun Holsters, Rifle Slings and Knife Sheathes
The work is nice and clean, but you might want to try adding some color to make them pop a bit. Maybe using an antique finish on the detail work, or better yet, how about using an inlay of differently-colored leather, or exotic, etc.. Create some contrast maybe. The sheath that has the diagonal bit with what looks like hoof prints could have been created with an overlay, making it look like a reinforcing strap or something. Adding depth is another way to create a unique look. Here's a unique look. Got this off of Nigel Armitage's website. It is work done by one of his students. I think the ones below are some of Nigel's work. I hope this gives you some inspiration. And that's the idea, not to copy, but to let the work of others help you develop your own look. Creating your own "signature" is a lofty goal, but it can be done. I've seen some very unique leatherwork here on the forum. Sometimes it is based upon color, sometimes the choice of leather, sometimes just different techniques combined in interesting ways. Find your look! -
Use it as an accent inlay, not an entire article. For example: (taken at random from the web)
-
I purchased some oil tan from Springfield years ago that I still have, waiting for the "right" project. I bought it because it reminded me of baseball glove leather. Same basic hand and a popular shade of tan. You might call them and ask if they currently have anything similar to that. And while you are at it, ask if they split leather for a price, I've never asked them. I understand that Weaver and other vendors do. 1.0mm would be for lining and perhaps pockets, but I wouldn't use anything that thin for the outer shell. There is no right or wrong and everybody has an opinion, but to me the goal should be to make the wallet as thin as possible while still maintaining strength and durability. When you are going to fill something, why make it thick to begin with? Just seems sensible to me that you'd want it to start out skinny and then get fatter as it is loaded. But again, that's just me, you may have a different opinion. Some skive just the outer edges of the wallet, giving it the appearance of being thinner than it actually is as a whole. That's not a bad strategy and improves the appearance of the edges, makes it easier to stitch, etc. But I found skiving easier said than done when it comes to used glove leather. As you pointed out, the interior side is soft and fuzzy. In the end I think it comes down to balance. Experiment until you find the right thicknesses to create the product you envision. And when you have to compromise, err on the side of quality and durability. That's what I'd do.
-
I've made both straps and a card wallet from baseball gloves, so I do have some experience with this. First of all, a catcher's mitt is probably going to have the thickest leather of all gloves for obvious reasons. Your wallet is way too thick. As far as the irons penetrating through, one thing to try is to punch the pieces individually. This takes patience, but is definitely doable. In fact, Nigel Armitage did a video detailing his technique. One alternative is to have the leather split so that it can be made thinner while still keeping the outer patina. I don't know how practical that is for you in your situation, if you own a splitter or have access to someone that can do it for you, etc. But it might be worth pursuing. I'd hate to try and skive that leather given its flexibility. Would seem to be a chore. The card wallet I made used leather from a fielder's glove featuring Ken Griffey, Jr.'s signature. I gifted it to my son-in-law who admired Junior. It turned out very nice but I don't have any pictures to show of it unfortunately. Maybe I can get some next time we're together. If I remember correctly I used red 1.0mm thread on it and it worked really good with the tan color of the wallet.
-
This is an excerpt from an article Nigel wrote for Leather Crafter's Forums...Nigel calls out saddlers, bridle and harness makers, but the lesson applies to most all leatherwork I think. "In contrast, a saddler, bridle or harness maker looked to make a hole barely big enough to get one needle through at a time. The idea was to ensure that the thread did not ‘ride or slip’ in the hole. If the hole was too big, the thread would ‘ride’ when the item was in use and if it did, one of two things would happen, the thread, if linen, could fur and snap causing the seam to fail. If the thread was polyester, it would saw at the leather cutting it and the seam would fail. It was, therefore, important to lock each stitch into place to try and prevent this riding and slipping from occurring. I am sure you can appreciate the dangers of a seam failing on a saddle or bridle when a horse is at full gallop and every seam is being stressed to the max. So, the secret in this technique was not the iron, it was the awl. The awl blade had a broad body and was tapered to a point, the point was sharp but the body was not. This ensured that the area of leather actually being cut could be kept to a minimum. The awl was then pushed into the hole only as far as it needed to be to get the correct size hole. Just the tip and you have a pinpoint hole, all the way to the haft and you had a much larger hole. Because the body of the awl blade was blunt, or ‘soft’ the hole was stretched by the awl body, not cut, allowing the stitch to be placed, whereupon, almost immediately, the hole began to close up. This is why only one hole at a time is made and the awl is employed on every stitch as you go."
-
Length only matters if you are going through very thick leather. You'll find that for most use the shorter ones are better because the shorter the blade, the easier to keep straight, perpendicular to the leather. My favorite awl only has about 3/4" projecting from the haft and that's fine with me. The more important measurement in my opinion is the width. And on top of that, the concept of what the awl is supposed to accomplish. In general terms, you want the smallest possible hole that allows you to get the item sewn without too much difficulty. Huge holes do you no good, making the article weaker as a result. Remove too much leather in making the hole and you diminish the strength of the leather, potentially compromising long term performance. Added to that is the potential for the threads to "ride up" in the hole, actually moving around when under stress. This could potentially cause premature failure of the thread, and failure of the article as a result. Another aspect of this is the sharpening of the awl blade. You want the point to be sharp, but it quickly transitions to a dull edge, which should be polished, not sharp. The idea is the awl should easily pierce the leather, but then simply expand the leather to create a space in which to perform the stitch. You don't want the awl sharpened the length of the blade because then it will slice a hole as wide as the blade. Not good! You want the hole to close up around the thread after it is stitched. This will happen to some degree by itself, but you can encourage it along by tapping the stitch line with a smooth hammer with a polished face. Hope all of that makes sense. Nigel Armitage has written extensively on the process of hand stitching using an awl and has also created a video on how to properly prepare awl blades for use.
-
Side pull, where to cut the leather from?
Tugadude replied to Scootch's topic in Saddle and Tack Accessory Items
I guess I'd pick the portion of the hide that exhibits the least amount of stretch. Stay away from the belly, as you've already noted. -
Side pull, where to cut the leather from?
Tugadude replied to Scootch's topic in Saddle and Tack Accessory Items
-
Seems there's room for the leather industry to get together and clean up the description of grades in order to help eliminate confusion. Adopting a global system of standards would go a long way towards helping people understand what they are buying. But, people who want to will always be able to find ways to deceive consumers. That part will never be fixed.
-
I wasted more time on more trivial pursuits than that. Videos such as that take an incredible amount of time and effort to create. I remember observing a friend in high school create a short animation video with clay figures and it was like watching paint dry. The end result was pretty cool though!
-
But, and there's always a but. I found the following article which distinguishes between how the term "genuine leather" is viewed in the U.K. GENUINE vs. FULL GRAIN? As a British company, we find ‘genuine leather’ often gets lost in translation between the UK and the USA. In the States, ‘genuine’ refers to leather that undergoes some or several layers of extra treatment. Found beneath the surface of the top, full-grain outer hide, this layer is typically split apart and bound together to mimic the properties of high quality leather. However, this layer has less memory and doesn’t hold its shape so well. So, although ‘genuine leather’ derives from the same cow hide as full-grain and is still technically real leather, it’s known to be cheaper quality. However, in the UK, the terms ‘genuine’ and ‘full-grain’ are interchangeable. They both refer to the same top quality level of leather, so whilst ‘genuine leather’ has become common code for ‘cheap’ across the pond, it means the total opposite here in Britain. For us, full-grain and genuine leather both represent the entire top grain layer. Known to be the strongest part of the animal’s hide, this leather is durable and holds its shape. Full-grain leather is also typically left in a natural state – which means branding, scars and any imperfections from the animal’s hide often show up. These blemishes affect the final appearance and even the desirability of the product, so companies will often reject sub-quality hide in favour of blemish-free stock. This factors into the final cost of the product, which explains why a smooth, flawless, full-grain leather item is generally the most expensive to invest in. Edit: The quote above is from The British Belt Company
-
Don't really have any favorites, but I guess the one I see abused the most is when something is advertised as genuine leather. Of course it may be, they aren't lying, but they are taking advantage (to a degree) of the public's lack of knowledge. At least it seems that way to me. This is a pretty good description from businessinsider.com... Genuine leather Genuine leather doesn't just mean that the product is made of real leather (which it is), but it also means it is the lowest quality of all products made out of real leather. Basically, you should read it as: "At least it's genuine leather." Genuine leather generally doesn't last as long or look as nice as higher-quality leather. You'll typically find it in belts from mall stores, shoes from lower-priced department stores, and bags or other goods in the lower price range. Goods marked as genuine leather will be several layers of low-quality leather bonded together with glue and then painted to look uniform. It's made from what is left over when the other, higher grades are stripped away for pricier projects.
-
I see what you did there!
-
Well there is that...
-
Did you buy it to tap down stitches? Or tapping layers of leather when gluing, to improve bond? Or both?
-
Are the brass accents considered part of the handle? They don't really serve as guards to prevent the fingers from slipping forward from the way it looks. They appear to be brass. The finish on them is immaculate.
-
A truly gorgeous knife. Are the grooves on top of the blade there to provide a slip-free surface for your forefinger while cutting? Or is it merely decoration? I cant stop looking at the bolsters, they are very unique.
-
I checked my two "go to" resources, Valerie Michael's 'The Leatherworking Handbook' and Al Stohlman's 'The Art of Hand Sewing Leather' and neither shows the "side stitch" on belts. Just shows there's more than one way to do things I suppose. There are other areas where folks differ, for example, to recess stitches in a groove or not. Some say it is an "American" thing. And those who say it is unnecessary point to hundred year old English saddles that are holding up just fine, sans grooves. In the end people just need to commit to doing what they think is best and let others do likewise. And of what you are doing fails, evaluate and change if necessary.