


dikman
-
Posts
4,828 -
Joined
-
Last visited
Content Type
Profiles
Forums
Events
Blogs
Gallery
Store
Everything posted by dikman
-
I see it has the second lever (next to the stitch length adjuster), haven't seen too many with that fitted.
-
Benny, I watched that last night, it looks pretty neat. An awl is probably one of the simplest tools you can make as there are all manner of things that can be used, but a bit of nous is needed. One chap on youtube made one by cutting the eye off a very long needle and pushing it into a wooden handle. It was far too long and I cringed when it started flexing as he pushed on it! There's no need to spend copious (ridiculous?) amounts of money on one - unless you must have a brand name.
-
Nice, but the main reason I bought the little one is it takes up very little space. I intended buying/building a bigger one initially until I realised I had nowhere to put it!!
-
There are quite a few vids on youtube (of course) on making awls.
-
I've been listening to it again (and again, and again....). It looks like a brush motor (I think I see one of the brush mounts in front?) so I wonder if the brush(es) are worn out or broken. It certainly sounds like something is spinning, though. Quite perplexing.
-
For a moment there I wondered what drugs you were on! Once my head stopped spinning it did indeed make me smile (it's a little like the story of Samurai swords being quenched by stabbing into prisoners!).
-
You're waxing lyrical there, young mike. As for the subject, I think the responses indicate that any manner of objects can be pressed into service. How about a heavy needle pushed into a wooden handle? Which is what the Blanchard looks like to me.
-
One interesting little fact I've discovered is that if I input a picture from elsewhere (photoshop, for example) the engraver software reduces it by 58%! A bit bizarre as it's a funny figure and took a bit of testing and calculating to prove it. The software might be pretty rudimentary, although adequate, but it seems a bit strange. It also occasionally won't print and the software needs to be re-started, no big deal, just annoying. When it prints though it's great.
-
Odd. It sounded like the motor was spinning in your vid. If that's the case then I'd say the electronics are shot?
-
Work has a habit of getting in the way of the important things!
-
Got me curious. As servos don't have a clutch I assume you meant the actuating arm that goes to the foot pedal, the idea being that when you turned it on it just went to max speed (or whatever you set as max speed) straight away. If you take the belt off what happens to the motor? Does it run?
-
Kobe 1541S alternating lift height adjustment
dikman replied to plinkercases's topic in Leather Sewing Machines
A bit different to my machines (I suspect those slotted pieces are just guides? A bit hard to see with all those fluffy bits in there). Best thing is to study the motion/movement of the feet and look at the various linkages and clamps. Try adjusting one at a time to see what effect it has, that way you should be able to set them back to how they were. These things aren't rocket science (just clever mechanical contraptions) so what can be undone can be put back together - eventually. -
It remains to be seen whether a printed mallet head is able to stand up to the impacts of heavy hammering without delaminating, but it's a neat idea. Thanks for including the .stl file, it's always nice when people do that so others can have a play with it themselves.
-
Video was a bit short (in both length and detail) but at the end like Matt said it sounded like the motor was still spinning with no load.
-
Juki LU 563- disable reverese lever spring
dikman replied to stor's topic in Leather Sewing Machines
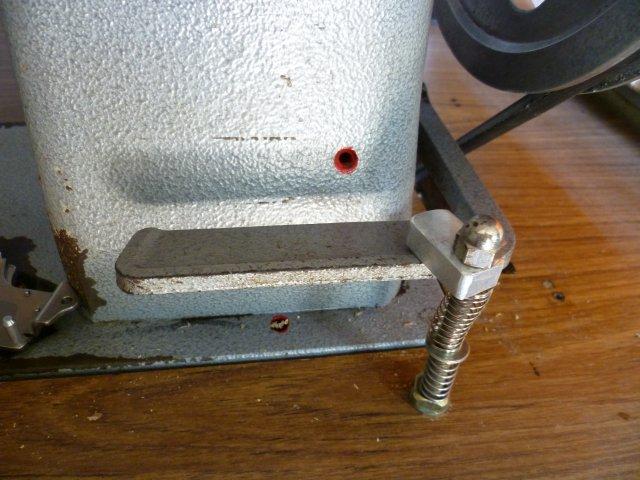
No worries. The reason I used two springs is because I didn't have one spring in my spring drawer that was long enough (or strong enough). -
Kobe 1541S alternating lift height adjustment
dikman replied to plinkercases's topic in Leather Sewing Machines
If it's the same as a Juki 1541 will these manuals help? http://www.danreetz.com/blog/2013/09/29/juki-dnu-1541s-service-manual-and-users-manual/ Sometimes it's necessary to adjust the position of the clamps on the bar that the outer presser foot is mounted to. -
Juki LU 563- disable reverese lever spring
dikman replied to stor's topic in Leather Sewing Machines
This is what I did to my Seiko, not very elegant but it works.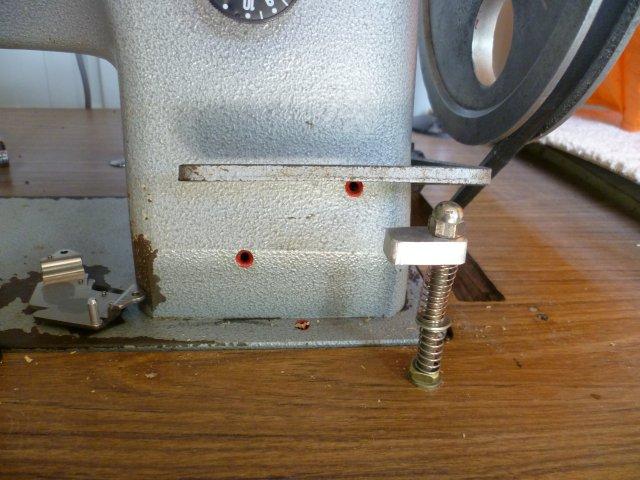
-
Can Anyone Recommend a Small Roller Foot Post-Bed Machine?
dikman replied to pgb123's topic in Leather Sewing Machines
A somewhat labor-intensive job! -
Simple but no doubt effective.
-
True, but it gives my brain cells a challenge trying to work out what was meant.
-
I'm glad YOU know what you're doing......
-
If you're talking about a new machine I suggest you contact some of the vendors who advertise on here, they should be able to supply a complete package to suit your needs.
-
Can Anyone Recommend a Small Roller Foot Post-Bed Machine?
dikman replied to pgb123's topic in Leather Sewing Machines
Post-bed machines aren't that common and it's unlikely too many on here (your average hobbyist type person) will have one. There is a vendor (Robin Industries) who has advertised the odd machine on here. They are new machines and he is overseas, but they appear to make some quite specialised machines, including for shoemaking. -
Mike, when I click on the link you provided it takes me back to the start of this thread. Pretty clever......I think? Anyhow, I always like looking at MSDS's, fun things indeed.
-
I'd already figured that out. I could mark the stack first and do it one at a time, sliding each one down the rod, but if I used diluted white glue (the logical choice) I would then have to start drying it out all over again! After leaving it overnight I checked it this morning and it felt much drier (and harder) but the whole lot had obviously shrunk and had to be tightened up again. It looks like the best way to do this type of construction is to tighten it up and then "bake" it in the oven (low heat) for a few hours, tighten again and repeat the baking/tightening cycle until it's dry and hard. Unless you live in the middle of a hot desert.