


dikman
-
Posts
4,828 -
Joined
-
Last visited
Content Type
Profiles
Forums
Events
Blogs
Gallery
Store
Everything posted by dikman
-
What size thread do you want to use? The bobbin capacity is very small as they're not intended to do long stitching runs.
-
Pfaff 335-H3 white clutchmotor vs servomotor
dikman replied to snabbaville's topic in Leather Sewing Machines
Should fit, modern servos use the common 3-bolt mounting used by clutch motors. Do you want a needle positioner? If not try and find one without it, should be cheaper. -
I added a motor to one of those cheap leather patchers
dikman replied to polyfractal's topic in Leather Sewing Machines
Polyfractal. an interesting project. As for needles, mine uses standard domestic needles, cheap and easy to find. -
That could work, for those that might swap between multiple spools - but it would be a rather large construction! Better off designing a simple single spool unit so the user could make several and fit one to each machine? 3D printing one would certainly be easier than my effort, which took a couple of days and a lot of work (and sweat, it still gets warm in my sheds at the moment).
-
There ya go! Another 3D printer project for you! As for the rubber washers rubbing, as long as the tube is rotating, courtesy of the bearing, then the rubber rotates with it.
-
I haven't tried it yet, but there's very little tension when just pulling thread off by hand. If the spool is heavy enough then the bearing rotates, if the spool is smaller/lighter with less weight and doesn't turn the bearing then it just rotates around the tube, still with very little tension. I don't think I will have to compensate much, if at all, for increased thread tension. tt, feel free to use the idea, no patents involved.
-
Bonded nylon thread 8 oz spool uncoiling solution
dikman replied to kgg's topic in Hardware and Accessories
I posted it under sewing machines, as it seemed more logical. -
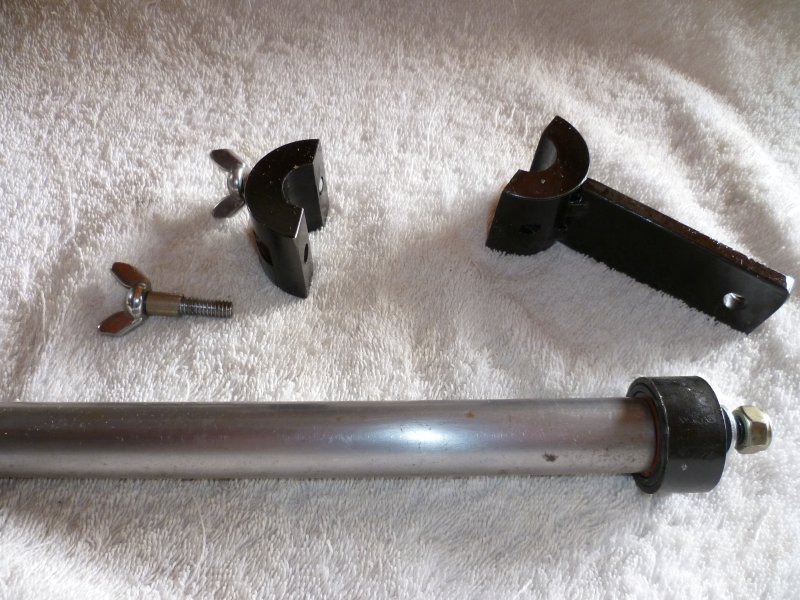
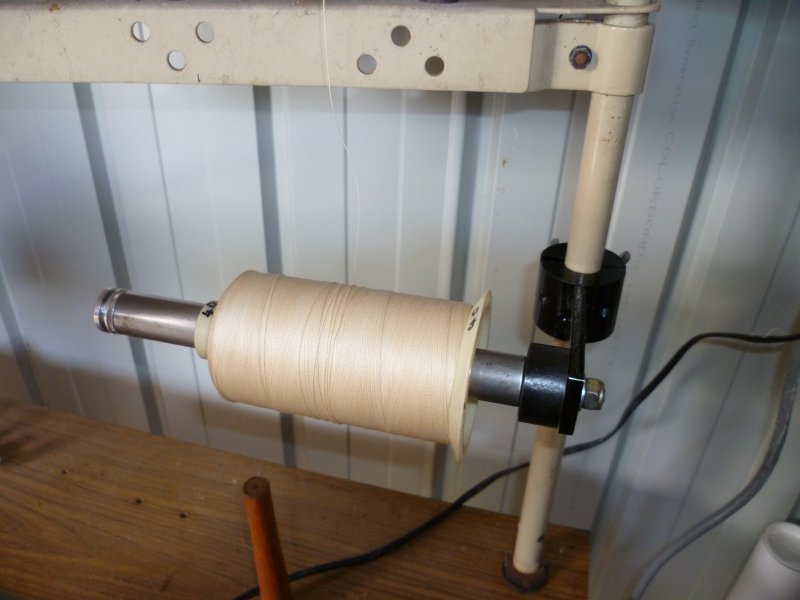
This seemed like the logical place to put this, if not feel free to move it mods. Following on from kgg's post elsewhere, I made a horizontal spool holder. The tube is a bit thin-walled steel tube that I had, a short stub was turned down to fit in the end and then that was turned further to fit a bearing from my scrap bearing box. The bearing and stub axle were fitted using Loctite bearing retainer (so they won't fall off!). A piece of thick-walled pipe was turned down to be a snug fit over the bearing, a short bar welded to the back and a bolt welded to the bar. Figuring out how to attach it to something, so that it could be moved between machines, had me scratching my head for a bit. Then I found a couple of old steel bushings from an old lathe (I don't throw things out very often!) and the inside diameter was a perfect fit over two of the existing thread supports. One was machined and drilled, cut in half and then one half tapped. A couple of screws with their heads cut off and wing nuts loctited to them gave me the clamping screws. A short bar welded to the tapped half finished off the mounting. I just need to cut a couple of rubber washers to locate either side of the spool to keep it in place and that's it.
-
Bonded nylon thread 8 oz spool uncoiling solution
dikman replied to kgg's topic in Hardware and Accessories
I would say it's more to do with convenience and simplicity (and cost!). Making a fitting that can hold multiple rolls of thread horizontally would be more complicated, and as you found if simply placed on a rod/pipe rolling friction can become an issue. I've used a length of light tube for the spool support and have a large bearing fitted to the end so it rolls easily. Now I'm trying to figure out the best way to clamp the bearing and make support that can be easily moved between machines. -
Bonded nylon thread 8 oz spool uncoiling solution
dikman replied to kgg's topic in Hardware and Accessories
I'll post it on here (assuming it works!) but might be a while, I keep getting distracted with other things. -
Recommendation - Jack Jk-561A-1 Servo Motor
dikman replied to Constabulary's topic in Leather Sewing Machines
There have been one or two posts about NPS and reducers. It appears that some servos will work with them and some won't (the NPS on my Skyrit servos won't work with any combination of reducer added). Only way to find out is to try it. -
Bonded nylon thread 8 oz spool uncoiling solution
dikman replied to kgg's topic in Hardware and Accessories
Those socks should stop the thread from dropping loose coils under the spool, but I've noticed when winding bobbins that the thread can often start twisting after the bobbin is partially wound. Unwinding from a horizontal spool should be a more "natural" thread flow. A bit like unwinding fishing line from a spool onto a fishing reel, after a while it starts to develop a reverse twist and if you're not careful you can get some frustrating tangles occurring. I'm going to modify my stand-alone bobbin winder to use horizontal spools and look at how to make a unit that can be swapped between machines, maybe with bearings to reduce drag. That should eliminate at least one possible potential problem. -
I don't think I put any water in, just threw the lot in the slow cooker, left it on low until I had crispy bits in the bottom and poured it out through a sieve. Can't get much simpler, I reckon.
-
40W Chinese Laser - Engrave and Cut Leather - Discuss
dikman replied to Billy Hell's topic in 3D Printers and Lasers
Hmmm, you made me look at my post in a completely different light........but yes, I was referring to lasers. -
40W Chinese Laser - Engrave and Cut Leather - Discuss
dikman replied to Billy Hell's topic in 3D Printers and Lasers
Mate, that thing of yours is a work of art! Considering the relatively minute size of mine and the fact it will only be used for small, short duration jobs it's not likely to be a problem for me. I've moved it down to my leatherwork/reloading shed where I can use it next to an open door, and if necessary I can stand another small fan next to it. -
Chest rig for a revolver
dikman replied to Josh Ashman's topic in Gun Holsters, Rifle Slings and Knife Sheathes
Josh, you're slipping, I found a flaw! Fifth photo, between the two speed holders, your scribed line is wonky! Seriously, very nice work and beautifully finished. -
A couple of Holsters
dikman replied to SickMick's topic in Gun Holsters, Rifle Slings and Knife Sheathes
You've obviously done something right and as long as what you're making is selling that's all that matters. -
Bonded nylon thread 8 oz spool uncoiling solution
dikman replied to kgg's topic in Hardware and Accessories
Just saw this, it's an interesting idea. I've never really liked the way thread unwinds off a spool. Might have to give this some thought. -
Yep, 3/8". I've already made an adapter to hold the stamps, now it's just a matter of refining the design. One of the presses had been modified by grinding down the "cam" part on one side of the handle and this is perfect for this job as it gives more leverage and pressure on the stamp.
-
Another possible use for one of the presses- make an adapter to use the alphabet stamps that came with my stuff. I reckon it should work.
-
Singer Industrial Sewing Machine Screws
dikman replied to shoepatcher's topic in Leather Sewing Machines
Extremely unlikely that they would be metric or SAE (or any other "standard" thread). Singer tended to use their own thread sizes. -
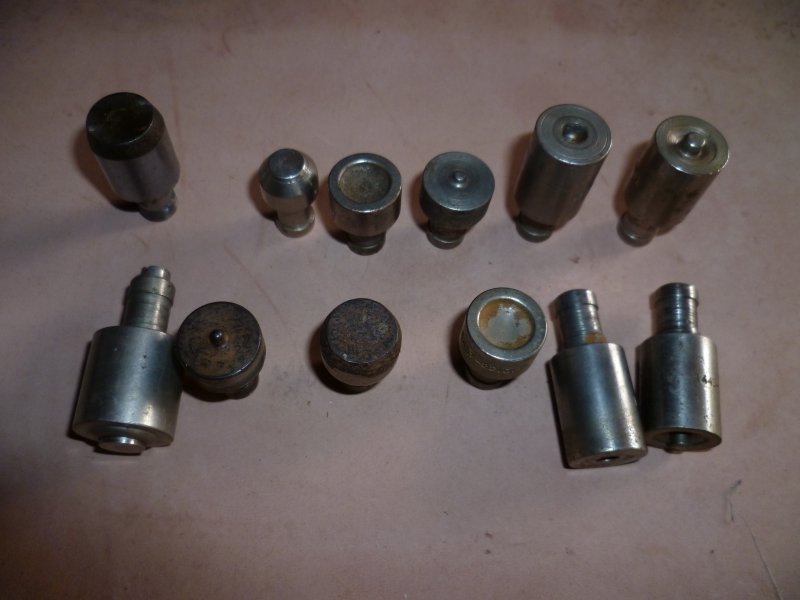
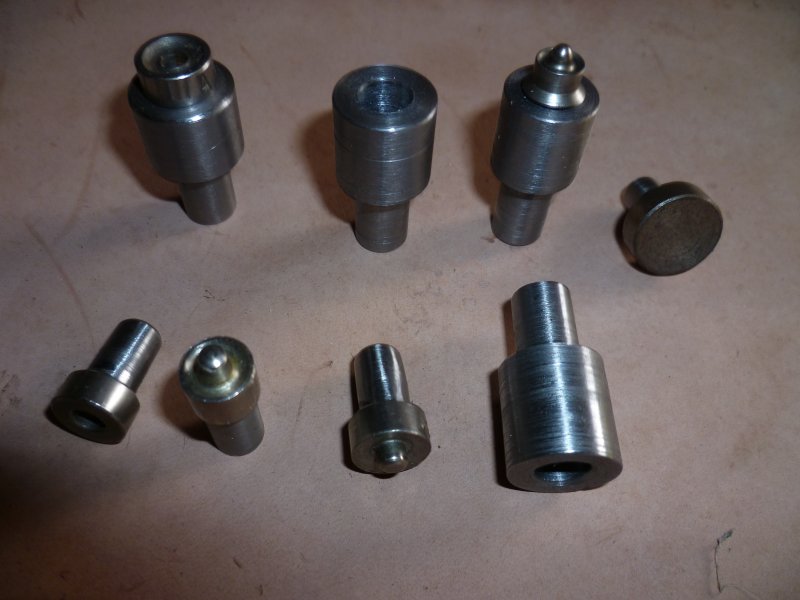
As I mentioned in another post I now have 3 x United-Carr 369 presses. They came with an assortment of dies, none of which fit any of the eyelets, rivets etc that I also got, or any of my existing snaps, rivets etc.The dies are all too big and I have no idea what they're for (see first photo). I also found a few smaller dies but these are obviously for a different press as they have tapered shanks, but some of them fit the rivets and eyelets! Making adapters to fit the Carr press wouldn't be difficult but the first thing would be to take off the tapers. Easy, just chuck them in the lathe thinks I. Slight problem, they are HARD! After wearing out two carbide cutters I ended up using a belt grinder to take most of it off then chucking them in the lathe and using the grinding belts held against them to make them round. Just have to drill and tap the adapters to hold the dies in place. (Photo 2). It's also occurred to me to make an adapter to hold an awl blade, then a press could be used to punch stitching holes through very thick welts. I hope.
-
40W Chinese Laser - Engrave and Cut Leather - Discuss
dikman replied to Billy Hell's topic in 3D Printers and Lasers
My little engraver (same as VYO's) arrived today. Plugged it in, tried to install the driver but it wouldn't install!! Tried it on another computer (Win10) same thing. Hmm. Started searching the 'net for a driver and found a few people who didn't even receive the software! Eventually found a link via a youtube vid and that worked. I'm impressed! Yes, it's very limited due to its size, but for what I'll probably use it for it's fine - and it's small, so storing it is no problem!!! Looks like it's going to be a bit of fun to play with. One thing I've quickly learned, don't engrave leather in a small room, it stinks!!!!!!!!!! -
Awl Sticks from glue in welt
dikman replied to MrLentz's topic in Gun Holsters, Rifle Slings and Knife Sheathes
Maybe we get a better quality beeswax down-under? Mine is all hard (bought from a beekeeper I know) and only gets slightly sticky when it softens under heat. -
Awl Sticks from glue in welt
dikman replied to MrLentz's topic in Gun Holsters, Rifle Slings and Knife Sheathes
Would sticking the awl into beeswax first help? It does with non-glued parts.