


fredk
-
Posts
6,000 -
Joined
Content Type
Profiles
Forums
Events
Blogs
Gallery
Store
Everything posted by fredk
-
I just spotted Le Prevo's Christmas message; Merry Christmas and a Happy New Year! This year, we will be closed from 5.30 on Thursday 23rd December and will re-open at 9.30 on Tuesday 4th January. Note that it says they will 're-open' on January 4th There is hope yet
-
Not unless its being sold to you as 'damaged' and priced accordingly. All leather suppliers should be treating their leathers with care. With Le Prevo I've bought 2nd quality, or damaged or leather with scars from them in their discounted list and I know what I'm getting. All other leathers were first rate, blemish and damage free
-
In my wax mixes I use carnauba wax, which does the same job. Better than paraffin wax? I dunno, but carnauba wax is the more traditional wax to use and mixes easier with the bees' wax Sometimes you just gotta mix it yourself. Its very easy to do
-

Stolen Throne Vertical Wallet
fredk replied to WalterF's topic in Purses, Wallets, Belts and Miscellaneous Pocket Items
most excellent If, if I did this I'd use some sort of backgrounder stamp to give the chap something to be walking along/on rather than be walking on air -
18th Century British Cartridge Pouch
fredk replied to Bukra65's topic in Gun Holsters, Rifle Slings and Knife Sheathes
I find that statement very rude. Still no picture and still not sure if you are looking for or showing -
Le Prevo never boxed the leather sent to me but they did use a lot of corrugated cardboard around the roll which was inside a huge thick plastic 'bag'. Never had any damage. Leather bought from Tandy recently had the rolls inside carboard boxes I just use weights on the leather to hold it whilst I trace the pattern then cut out. I have a few 2kg weights which do the job. You can get bar-bell weights real cheap now
-
In the UK we have a glue called Copydex. Its a latex based glue. Does what you are looking for
-
I've checked some of my unwrapped leather. The wrapping is inconsistent. Some is flesh out and some is grain out. What is consistent is that the different suppliers put a piece of brown wrapping paper over the grain side before rolling it, both leather and paper as one, like a Swiss Roll
-
Thats not a bad idea really. You can get silicone spatulas in the £ shop. Its worth a squid to try it. Probably work ok on thin glue but not on the thicker type I realised there are different shaped paint scrapers. I use one that looks like this; I got it in Home Bargains for under £2. The blade end is sharp for scraping but I filed some very light grooves in to the end, parallel with the sides, to help spread the glue, other wise the blade just scrapes the glue right off again
-
An alternative to having spread contact glue over large-ish areas, consider spray glue. We can get tins of spray adhesive in the £ shop
-
I used to use those type. Used to get them 6 for £1 but now their price has rocketed up to £1.25 each! If I need a brush I buy and use children's chunky paint brushes, 4 for £1 or less if I buy more
-
18th Century British Cartridge Pouch
fredk replied to Bukra65's topic in Gun Holsters, Rifle Slings and Knife Sheathes
No pictures I think there are more than just two originals surviving. I can think of three museums which have 18th C military equipment, including cartridge pouches -
Could be a branding. Is it burnt in? or done with a laser? I've seen cattle branded fore and aft, on the same animal In a previous life I used to spend one or two days a week at livestock sales/shows, to photograph the show winners or high priced animals with their owners for the local farming papers so I got seeing a lot of cattle. In N.I. and I guess the UK we don't have farm or herd branding in the US way. Cattle have ear tags but some farmers also brand on the hind quarters and/or the opposite fore-quarter. Its easy for the rustler* to remove the ear tag but not the branding (* yes, we have livestock rustling in the UK, tens of thousands of animals are stolen every year ) Some countries, notably the Scandinavian ones, do not brand nor use barbed wire so their cattle hides are free of scars. Especially liked by Rolls Royce and Jaguar for their leather interiors. I just checked by random choice 3 pieces of my leather One has; stamped in white ink 7 1/2, with a square next to it, which I know was the square footage of the original piece. This is what I usually see on leather from Le Prevo but. . . No.2 has 23,75 stamped in ink in the same style as your numbers. I know this to be the square footage. This piece came from Le Prevo. The use of the comma betwixt numbers indicates to me that this piece originated in mainland Europe or South America No.3 has a paper label with the bar code, stock number and square footage on it. This piece came from Tandy just 10 days ago. Can you see a comma or stop between any of the numbers on your example? If it has then it might be the square footage, if not then it might be the batch number
-
afaik that is the Batch number from the tannery. The underscores just tell which way up the numbers are
-
I can only say for Le Prevo - always VAT added at the bottom of the invoice after even the delivery charge added. Prices on their website are minus VAT. When ordering from Le Prevo I always tell them the maximum and minimum square footage I want or the approx, eg I'll tell them I need at least 15 but no more that about 18, or I need about 16 or 17. They've always come through for me
-
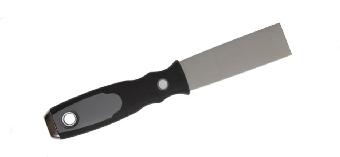
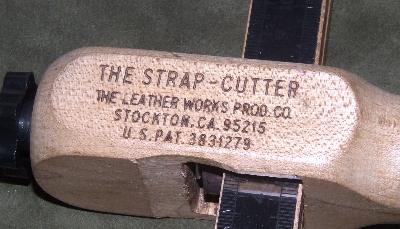
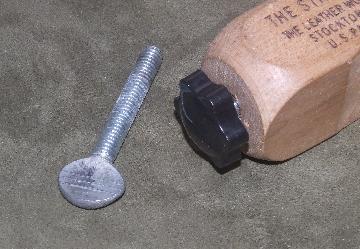
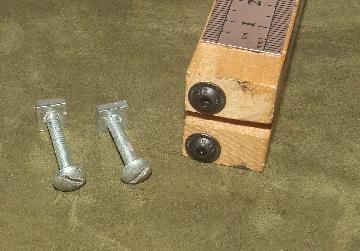
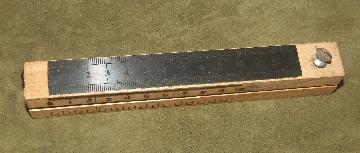
Most excellent All this talk on strap cutters, I decided to do some up-grading that I've long wanted to do on my strap cutter. I wanted to change the thumb screw to a knob and that lead to changing several other parts My strap cutter, bought from Le Prevo about 21 years ago I changed the thumb screw bolt to a knob But on doing so I had to change the captive nut to the knob's bolt M8 thread. But the original captive nut is a poor one and I reckon it was not far short of needing replaced anyways. Its on the left and the better replacement on the right The blade clamping bolts and their nuts were showing corrosion and the screwdriver slots were a bit churned up so they got replaced with M4 Allen key flanged head bolts and brass nuts and, I glued on the top of the bars a steel ruler If I can find a suitable replacement I'll change the thumb screw bolt on the bars as well

-
yes, it can happen. Has done to me on several occasions, in distant past when I worked more on vehicles. Fires were contained and dealt with quickly Has happened to me. Also magazines ink. Its not so common now though. Printers use a more fast ink than they used to but I don't take the chance. Brown wrapping paper or odd rolls of wall paper can be bought cheaply. Use the back of the wall paper.
-
For contact glue out of tin I use a 1 inch wide metal paint scraper/wall paper scraper. I also use a lot of UHU glue in a tube on small areas, it doesn't need any spreading around
-
I'm now going to bore the pants off you cos I'm going to tell you how I do it, in detail, 1. I'm most likely not making even close to what you are making but I reckon the technique still holds good 2. equipment; a deep metal tray, two or three pairs of latex gloves, a selection of bits of stiff wire bent into a long S shape with the bottom of the S turned at right-angle to the top, a wood or metal bar sticking out somewhere, diluted dye 3. put on two or three pairs of latex gloves. I find that with only one pair the dye can still get on my fingers, two pair is better, and three pair even better to keep fingers clean 4. pour diluted dye into tray 5. start feeding leather items into the tray of dye. How many items depends on the depth of the dye 6. shuffle the items in the dye, first in comes to the top, after a few moments the next one at the bottom comes to the top. Do this a few times. Takes about 2 to 4 minutes 7. start lifting dyed items out. First out should be the one first in. 8. using a hole in the item, a hole for a rivet or snap or sewing, hook on to the bottom of one of the pieces of S shaped wire. As I do so I use my fingers as a squeegee 9. Hang dyed item up on the bar sticking out of somewhere. I usually have that bar above my dye tray so any dye that drips will be caught in it 10. Allow to dry 11. if necessary repeat steps 5 to 10 I find (afair) I can dip-dye about 10 items in under 10 minutes, not counting set up time. Recently I had just one small coin purse to do and it took four dying sessions each of 4 minutes with a sponge application to get the dye right through and even
-
I reckon dip dyeing is the way to go I've not found it to be wasteful and it certainly gets the dye well into the leather
-
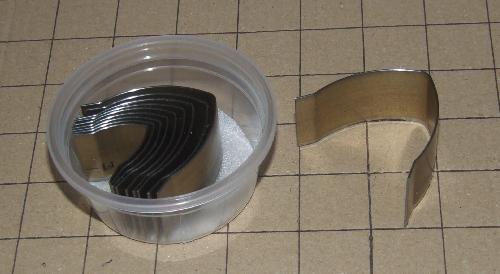
I just remembered that I have these cutters. Belt tip shapes. There are ten, from about 15mm to 38mm. I've not used them but other cutters I have I use under the ram on my press They cost about £10 a set, off ebay. PS, I didn't buy these, they were sent to me in error instead of what I wanted
-
I agree , it looks like a leaky bottle of something, such as alcohol based after-shave. Treat that panel by washing it down with alcohol or lacquer cleaner and try re-dyeing just that panel very carefully. It'll probably end up a different shade though
-
Might I suggest something? If you want tubes, go to your local carpet shop. They'll have the card tube cores from carpets. A. they are very robust and b. are about 12 to 13 ft long, so you can cut them down to size. I used them for a while. The carpet shop was very happy to give me a load of tubes just to be rid of them
-
Currently I keep my stiff leathers rolled up in large plastic boxes designed for storing re-useable Christmas trees. The boxes are about 5 ft long and and about 1 foot x 1 foot. The boxes are stackable. For my thin lining leathers, they are folded up and stored in a large-ish plastic box (actually x 2 of them). The long boxes are stored in my apartment's crossway hall and the back hall.
-
Not papyrus but birch and alder wood 'post cards' - the Vindolanda Tablets, or Letters. Thousands of them