Dwight
-
Posts
5,240 -
Joined
-
Last visited
Content Type
Profiles
Forums
Events
Blogs
Gallery
Everything posted by Dwight
-
Your work looks good from what I could see, . . . but I guess I am confused, . . . what do you mean when you say it is "running"? In the pictures, I see dark streaks on the brown and the red belts, . . . and I would guess they may have come from the resolene, . . . if you did the black belt first. One thing you have to do with any dye, . . . buff the dried object like crazy. I use an old wash cloth or piece of an old bath towel, . . . they work really well for that. Also, . . . keep one small container of resolene for black, . . . don't use it on any other color. You also need to make sure you water resolene down, I have never been successful with using it full strength. I use it at 50% strength, . . . 1/2 water & 1/2 resolene. Other than that, . . . resolene dries clear, although it darkens whatever dye you had on the item. May God bless, Dwight
-

Magazine Holster
Dwight replied to c2369zulu's topic in Gun Holsters, Rifle Slings and Knife Sheathes
Feibings Oil Dye will give as good a job as any, . . . and IMHO, . . . better than USMC as you do not have to buff for 3 days to get off the extra pigment. I dye mine in a 9 x 14 cake pan, . . . dip dye, . . . immerse for about 5 seconds, . . . never have had a problem or a complaint. As for the criticism about the direction of the magazine, . . . slant of the magazine, . . . there is no "standard", no "approved", no "best way" other than what your customer wants and pays for. I have carried a 1911 on and off since the summer of 1966, . . . the bullets point behind me, . . . the mag is indexed slanting forward, . . . and many other shooters also carry the same way. But if my customer wants to carry his or hers the other way, . . . God bless them, . . . it's their choice. Ask your customer what HE or SHE wants, . . . you will have many more satisfied customers that way. As for the black leaving color on the other clothing, . . . that is a natural trait of just about all black dyes. You have to seal the product with some kind of sealant or finish other than the dye and neatsfoot oil, . . . OR, . . . you will have rub off for some time to come. I've actually only found one dye that will not do that, . . . and it is Feibings British Tan. Any way, . . . good looking mag pouch, . . . keep up the good work. May God bless, Dwight -
Most of us dye our leather all the time. I "only" dye by immersion, . . . using a 9 x 14 cake pan, . . . and I just run the leather end to end through it like a snake, . . . it probably spends something like 5 seconds actually in the dye. On long skinny projects, . . . like yours, . . . lay down newspaper on a large flat surface, . . . lay the pieces on the edge for the first 1/2 hour of drying. I know this sounds goofy, . . . but I've had the dye "run" on belts and other pieces that were long and skinny, . . . winds up light colored on one end, . . . heavy color on the bottom end. I wear disposable rubber gloves, . . . and use only Feibings Oil Dye. USMC black gives you a super color, . . . but buffing off the extra pigment is a long time job, . . . and to me just isn't worth the extra effort. Also, . . . and I know there is a difference of opinion on this, . . . but I personally don't like working with factory dyed leather. I cannot seem to get it to mold, fold, groove, or stamp like undyed veg tan. The other factor to put into the equation is the cost of the dye. A quart of the dye I use is in the 30 buck range, . . . an upfront cost that you could apply toward the side of black leather. I've never dyed a full side at one time, . . . but I'd think it would take at least one quart, . . . maybe two, . . . and you need to figure that into your thinking. Good luck. May God bless, Dwight
-
I really like that passport case with all the stampings (??) on it, . . . "New York", . . . statue or Liberty, . . . etc. I'm curious though, as to how you got those on there. Was it rubber stamps and ink? Beautiful work, you do, . . . and if I may, . . . "Classy" describes it best for me. Things can be beautiful, artistic, and still look like cheap dime store junk, . . . but your work does not fit in that category. May God bless, Dwight
-
I use a piece of leather that I cut a tad wider than 3/4 inch. I do that so that when I pull it through the 3/4 wide slots, . . . it will not slide back. Hope this helps. May God bless, Dwight
-
Adding Thinner To Dye
Dwight replied to rccolt45's topic in Dyes, Antiques, Stains, Glues, Waxes, Finishes and Conditioners.
Just remember the golden rule of thinning dyes and/or paints. MEASURE WHAT YOU ARE DOING ! If you "find" a pretty shade that you may want to duplicate at some later date, . . . you will do well to have made very accurate notes and very accurate measurements. Dying leather is tough enough, . . . don't hamper your efforts by just throwing in some thinner and hoping for the best. I worked in a refinish paint plant for 30 years, . . . and you CANNOT believe what the slightest little change to a color formula will make in the end product. May God bless, Dwight -
Humperdingle said: "The only other finish i'd used was Tan-Kote, which is MUCH gloopier. The Resolene is almost a milk-like viscosity, so I didn't think it would need to be watered-down." I don't mean to sound harsh, . . . but you need to take some advice from some folks who have been there, . . . done that. Resolene NEEDS to be watered down. Attempting to use it full strength, . . . and not applying it correctly is what got the bubbles you left on the project, . . . that later broke, . . . giving you a product that looks very much like it had the measles. Again not meaning to hammer you, . . . but you asked what happened, . . . and that is most likely the culprit. There are probably a few bodies on the planet who successfully use it at full or near full strength, . . . but their numbers pale next to the rest of us who water it seriously. I also only use a cheap bristle brush, . . . and get very acceptable results. May God bless, Dwight
-
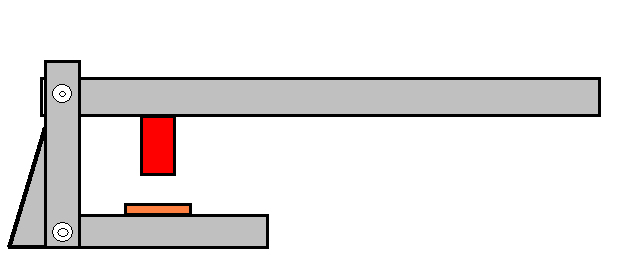
Arias, you said your dad has a drill press. That means he has some kind of a small shop. Have him help you build a simple lever press like the little drawing here. It should take a good half hour to make, . . . make it out of one 8 foot long 2 x 4 and a half dozen bolts and screws. The key to making it work right is the back post, . . . it has to be made so it will allow you to adjust for longer or shorter punches, . . . and/or you can make it for the longest and use scrap wood to lift up the punch surface for shorter punches. As soon as I get my new shop set up, . . . I'm making one of these especially for my maker's stamp. Anyway, may God bless, Dwight

-
1911 Shoulder Holster...
Dwight replied to Jimbob's topic in Gun Holsters, Rifle Slings and Knife Sheathes
The most comfortable I ever made/owned, . . . copy of a 50's pattern that hangs muzzle down under the old arm pit. Strap goes up over the carrying shoulder, . . . another strap goes around the off side arm. Muzzle sits on a sewed in muzzle piece, . . . strap holds the gun in just below the trigger guard, . . . releases with a thumb break. I believe it was a Safariland, . . . not sure, . . . but they are usually on Ebay for around 50 bucks, . . . I bought one of a different size to get the pattern, . . . made my own. Wound up making a double 1911 rig for one of my customers, . . . he absolutely loved it, . . . one under each arm. I've also made a few for horizontal carry, . . . I vacuum form them out of 4/5 oz leather, . . . pull the molding up very tight on the gun, . . . same with the stitching, . . . use a thumb break for extra retention, . . . but I just never got really comfy with them, . . . something about walking around with the muzzle pointing at people and things all the time. Much prefer the muzzle down rig. May God bless, Dwight -
Since you didn't say, I'll assume you are hand stitching, . . . which is something I rarely do, . . . and abhor the thought from the gitgo. The first thing to do, . . . let it dry, . . . never think about sewing something that was dyed within the last 24 to 48 hours. That may be a bit long, . . . but it beats the heck out of the alternative: ripping out the dirty thread and re stitching it 2 or 3 times. That gets old in a quick hurry. BUT, . . . I have also learned, . . . for my own use, . . . to add about 30 inches to a holster, . . . on each needle, . . . before I sew. At the end, . . . I'll have thrown away an extra 5 feet of thread, . . . but all the trash, dye, oil, dirt, grime, and ugly on the thread, . . . will be in that "leader" thread. There are probably a dozen other ways, . . . but that is the way I do it, . . . whether saddle stitching or using a sail needle. Works for me. May God bless, Dwight
-
Strange Holster Requests
Dwight replied to glockanator's topic in Gun Holsters, Rifle Slings and Knife Sheathes
One thing for sure, . . . anyone sure enough of his weapon and himself to go armed with a hog leg, . . . best give them respect. May God bless, Dwight -
Strange Holster Requests
Dwight replied to glockanator's topic in Gun Holsters, Rifle Slings and Knife Sheathes
Got a belt request once for one with 6 loops for .38's over the front right hand pocket. Made it, . . . sent it, . . . Proved to be too much hassle for him, . . . it's hanging in my closet now. Made him another one. May God bless, Dwight -
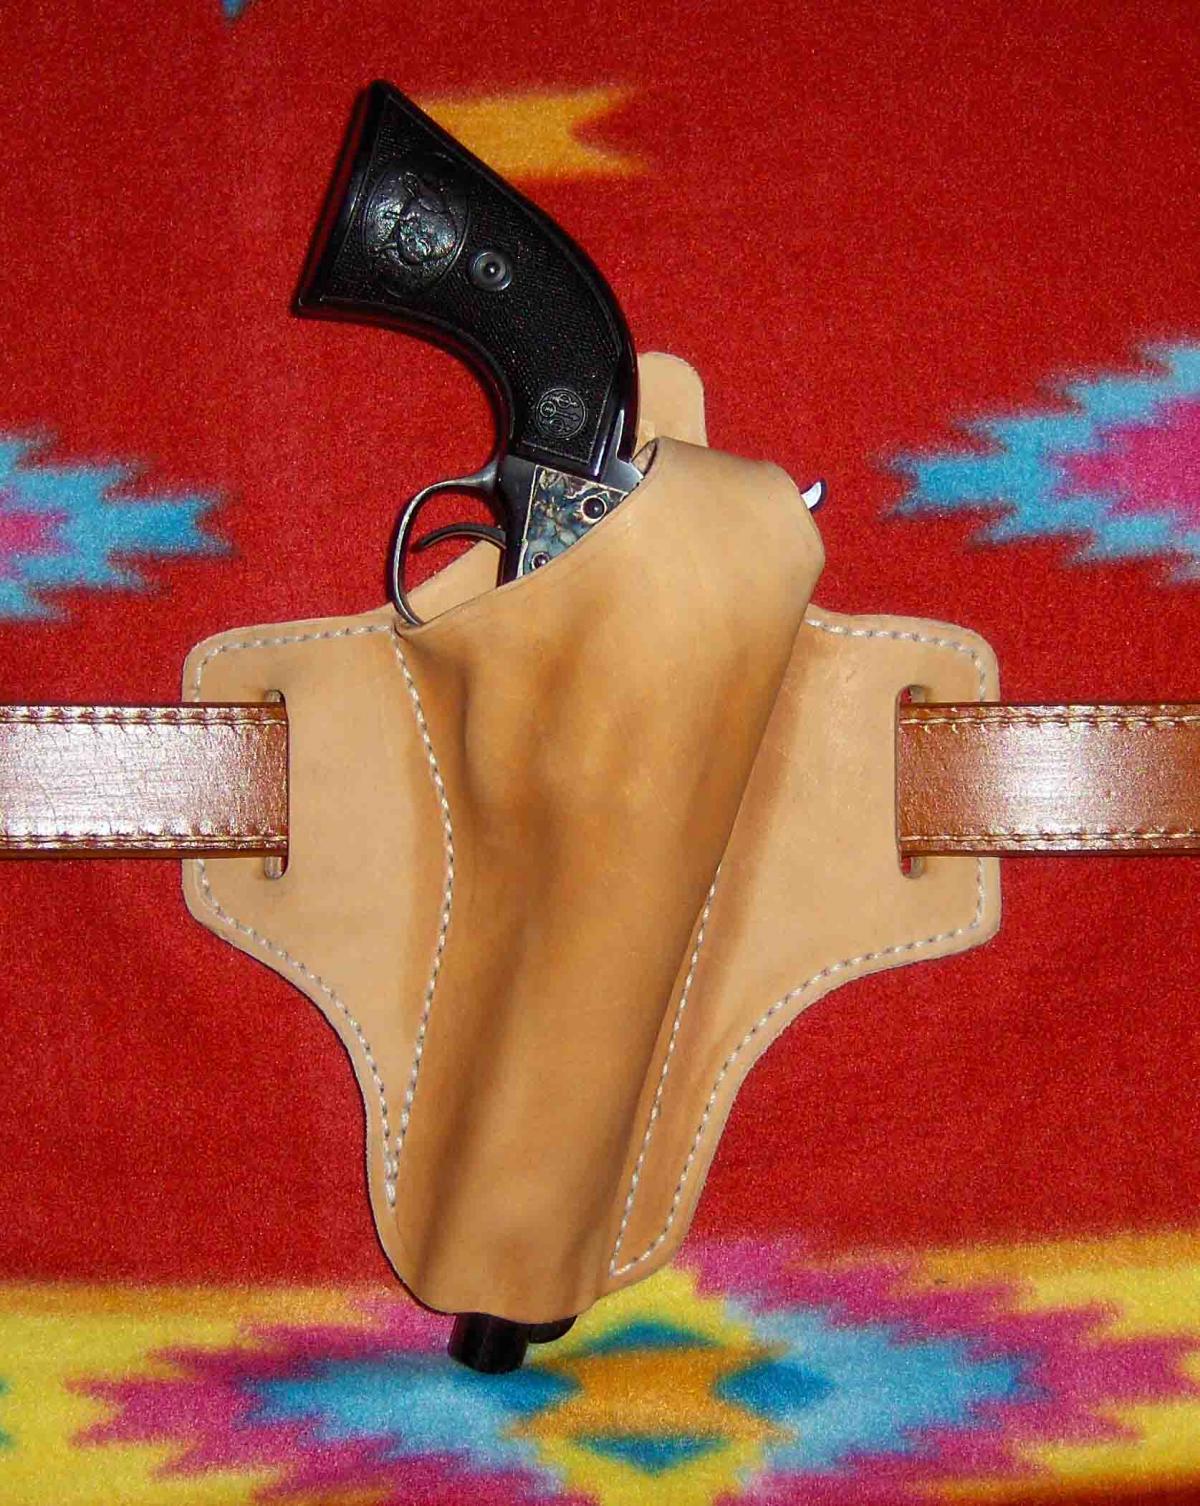
Altogether, a good looking rig. I've always liked the white stitching as a decoration, . . . it's ugly when it gets dirty, but that's life. May God bless, Dwight
-
It would surely help if there were pictures, drawings, or dimensions: but absent from those, . . . your best bet as you have outlined it so far would probably be a copper rivet. Copper rivets can come with a large flat head, . . . goes through the hole in each piece of leather, . . . has a washer affixed on the bottom side, . . . cut very closely with a pair of side cutters, . . . and expertly flattened by a small ball peen hammer on a wide steel surface. You attain the rotating effect, . . . place a thin sheet metal spacer between the two pieces of leather, . . . after the rivet is set, . . . pull out the spacer and it should rotate freely. May God bless, Dwight
-
The dye will not overly effect the molding, . . . just keep your fingers and thumbs away from the areas molded and/or stamped and/or carved. Messing with it while it is damp or wet is what will effect it. If you want white stitching, . . . on a two tone holster, . . . I would first create the holster in it's final form except for dying and sewing. That means also that ALL gluing, edging, etc. is also done. I would then dip dye the main color, . . . and air brush the second. I'd give it 24 hours between the colors, . . . and I'd have it where it is being "assisted" in the drying process. I'd then give it a coat of 50/50 resolene & water. Let it dry for 36 hours. I'd then stitch it up. Then I'd give it another coat of resolene & water, . . . especially over the thread to protect it and keep it pretty white longer. There are many other ways to do this holster thing we do, . . . but that is the process I would use. May God bless, Dwight
-
In a nutshell, . . . you can't. Smokecigars laid it out for you. I have never ceased to be amazed at how many guys wear 36 jeans with a 42 belt. You can also look at my belt page on my website, . . . tells a similar story on how to measure properly for a belt. May God bless, Dwight
-
Good Weekend.
Dwight replied to Eaglestroker's topic in Gun Holsters, Rifle Slings and Knife Sheathes
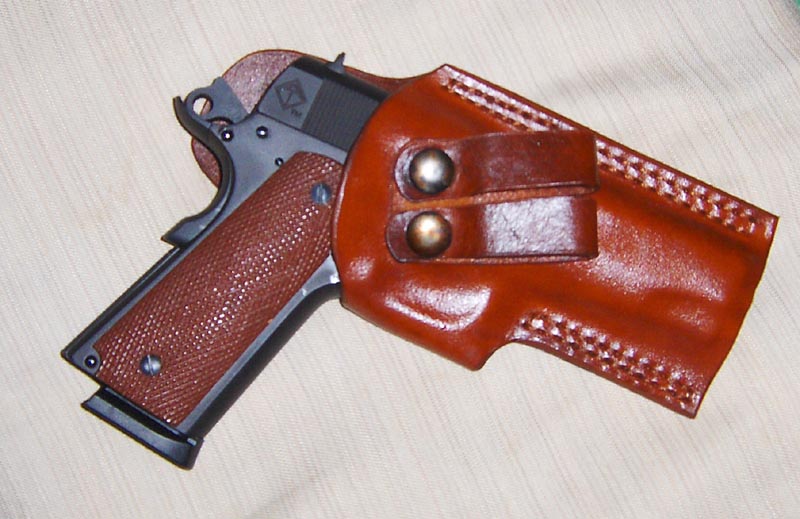
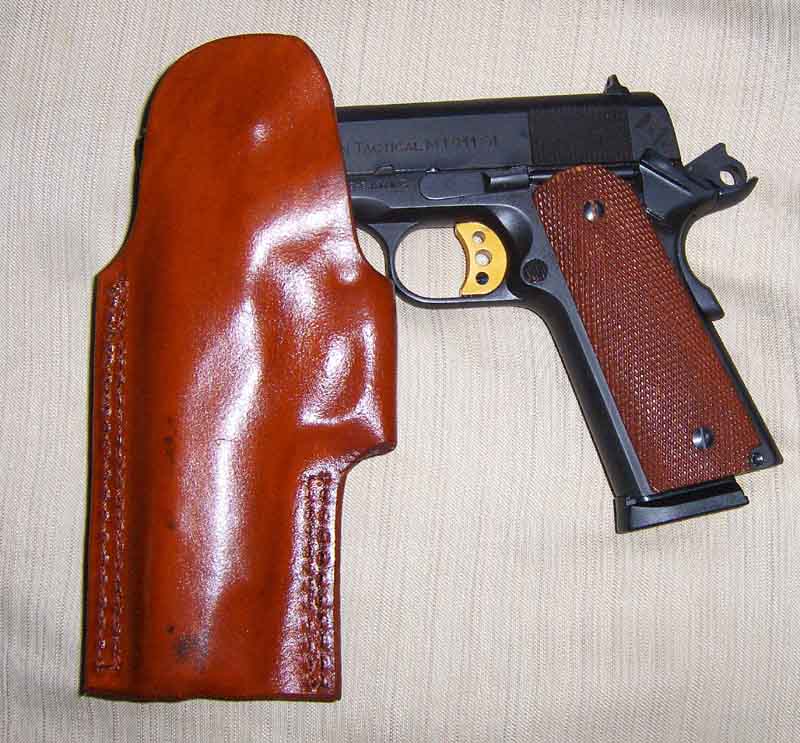
Eaglestroker, I started getting leery of using a press on my holsters, . . . afraid that one day I would pull that handle one time too many, . . . and be buying a broken gun or something to that effect. I investigated the vacuum bag idea, . . . and I am sold. My whole setup cost just under $150 and these pics show the first one I did with it. It is a modified Rhodesian style IWB, . . . and the detail is exactly what the vacuum bag did, . . . nothing added. And, yes, . . . the retention is really great. It actually was too great when I first did it, . . . had to loosen it up a bit. This one has some flaws in it, . . . so overlook them, . . . it was a "practice" piece to begin with, . . . testing the vacuum and the Rhodesian design. May God bless, Dwight
-
A Couple Of Recent Builds
Dwight replied to Ran's topic in Gun Holsters, Rifle Slings and Knife Sheathes
Good looking work, . . . but can the next pictures be on the kitchen table? We've got plenty enough snow to go around here, . . . woke up this morning to another 2 inches or so, . . . May God bless, Dwight -
Getting My Feet Wet
Dwight replied to Jay Gibson's topic in Gun Holsters, Rifle Slings and Knife Sheathes
Jay, . . . do you have your firearm? If so, . . . which one, . . . I might be able to find a pattern if you are interested. May God bless, Dwight -
Sorry, Zooker, . . . the only videos I've seen were the Bianchi ones, . . . which were three VHS tapes, . . . probably not 2 hours each, . . . but VERY thorough. You have to kind of overlook the obvious plugs for Tandy, . . . they certainly had some $$$ invested somewhere in the videos, . . . but all in all, . . . really good. He sewed his cartridge loops on, . . , I punch and lace mine, . . . he used a set of calipers for his stitch lines, . . . I use a gouge, . . . and when he was all done with the rig, . . . he dunked it in a bath of neatsfoot oil, . . . which I just don't do. All of the cowboy rigs on my website were created using his techniques. But he shows you how to make the proper curve in the belt that will keep you from coughing and your gunbelt winding up around your ankles, . . . he goes through the pattern process for both the belt and the holster, . . . honestly, I cannot imagine anyone being any more thorough. May God bless, Dwight
-
Several folks on here do holsters with a two tone effect, . . . or even three tone. If I were doing that, . . . the base color, . . . the main color, . . . I would dip dye it, . . . then use the other for accents. As a matter of fact, . . . I have a project to do later this year, . . . and that is the process I plan on using on it. It will be a light saddle brown with black highlights. May God bless, Dwight
-
John Bianchi, . . . of Bianchi Holster fame, . . . made a three tape VHS demo on how to make the rig you want to do. It is probably out there on DVD, . . . It is an awesome teaching exercise, . . . may be available on Ebay, . . . well worth a 40, 50, or 60 dollar price tag, . . . just in the leather you might save by using his process. I only disagree in a couple of areas, . . . nothing that makes any major difference, . . . I just do a few things a bit different, myself. From what I could see, . . . your patterns look OK. May God bless, Dwight
-
Just another way to do it, . . . do all the tooling, . . . then dye it with Feibings black oil stain, . . . not USMC black. The USMC is a great dye, . . . but it leaves so much extra pigment on the product, . . . it takes forever for me to buff it off, . . . and I can never get it all buffed out (like it want it) from any carvings or stampings. I would then burnish the edges, . . . coat it with a 50/50 Resolene finish, . . . and buff that out. IMPORTANT: let the Resolene dry 36 hours or so. Then I would get a full pot of coffee, . . . a couple of doughnuts, . . . some small brushes, . . . and Eco Flo paint the right colors, . . . and commit myself to painting the other colors on, . . . very painstaking, . . . very slowly, . . . but it comes out nice, . . . This is a painting I did that way on a holster for a friend. May God bless, Dwight

-
Ruger Blackhawk Pancake
Dwight replied to George B's topic in Gun Holsters, Rifle Slings and Knife Sheathes
Good job, George, . . . It's been a couple years, . . . but I made one "back when" for a fellow I think in Colorado. It actually was one of the easier ones I've done for a revolver, . . . I used my single six to mold it, . . . he seemed very satisfied, . . . and kept the thumb break. One thing for sure, . . . if someone ever pulled out a single six as his CCW, . . . I'd be right good and careful of him. All the folks I know who have em, . . . they can use em, . . . forget that spray and pray stuff. May God bless, Dwight
-
Part of the reason I dip dye is to make sure I don't get blotchy spots. BUT, . . . having said that, . . . I have found in some cases, . . . not all by any means, . . . but in some cases, . . . applying the Resolene finish that I use will take care of the problem. I cannot answer why, . . . just know that it happens sometimes. May God bless, Dwight