Gymnast
-
Posts
294 -
Joined
-
Last visited
Content Type
Profiles
Forums
Events
Blogs
Gallery
Store
Everything posted by Gymnast
-
Need supplier of needles for vintage Singer 111W113
Gymnast replied to jjs111w's topic in Leather Sewing Machines
As far as I can see, a 135x17 have a "but to eye" length of 38.9 mm The 190 needle have got 44.5 mm so it is 5.6 mm longer or 7/32 inch longer This is a supplier: https://www.thethreadexchange.com/miva/merchant.mvc?Screen=CTGY&Category_Code=NDL-190 -
I suppose I earned this reputation And based on the number of people seeing this video, I am not the only one.
-
I made a video about this comparison of these two vintage presser feet one normal foot and one food with a notch. I included a little more explanation and drawings than given above. I suppose the result is significant for those of you using a sewing machine without a walking foot. I did not make a comparison to a foot not hinged. People in this thread rightfully rejected the first results when the feet was not exsactly the same. I suppose and hinged foot may easier climb a "hill". But do you see a reason when to chose a hinged food and when to chose a non-hinged food?
-
It seems that Big Dog Forge on youtube did try what you like to do, and the result there is impresive to me considering the price of the parts. This chineese patcher seems able to handle pretty thick stuff. Big Dog Forge do also need to use his hand on the wheel now and then while stitching, so the speed control is not perfect there, but much better than the other videos using the domestic motors with no extra speed reducer. I like a controlable speed down to 10 stiches/min, but I suppose it is just me.
-
Interesting project with this Chinese patcher. I just looked at two youtube videos, with the use of some domestic sewing machine motors on this patcher, and the speed control seems not that convincing. One of them used a very bad pedal that have 3 speeds (off, half speed and full speed). With such a domestic motor, I think a speed reducer may help. I am not sure, that the motor that you suggest have that good speed control, but it ramps up the moment like on a domestic machine. This video indicate the difference of a brushed servo motor and a brushless servo motor: However I do feel somewhat nervous, that the high power of the servo motor may damage this small patcher machine. Perhaps that you should use a belt that can slide with ease.
-
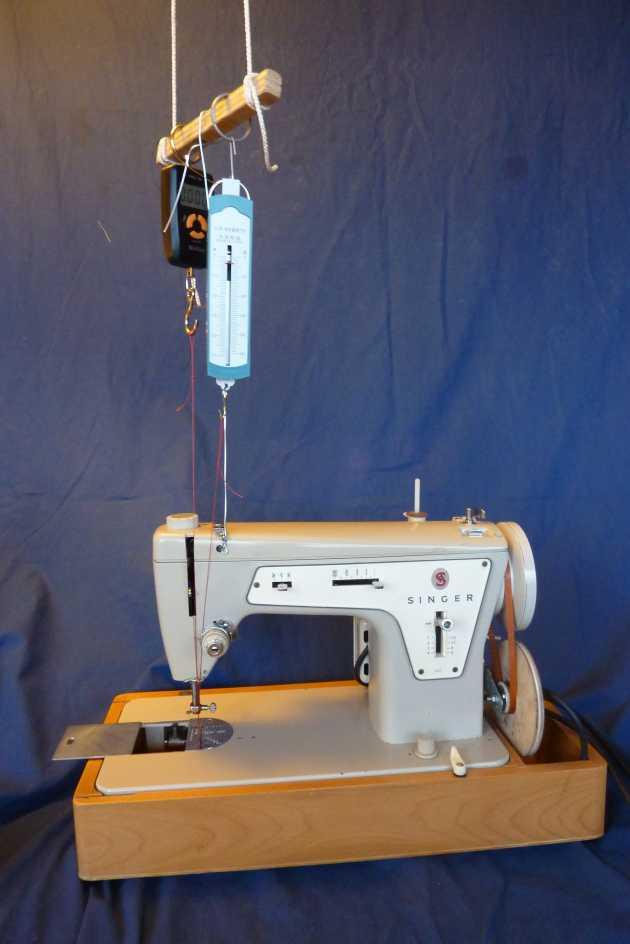
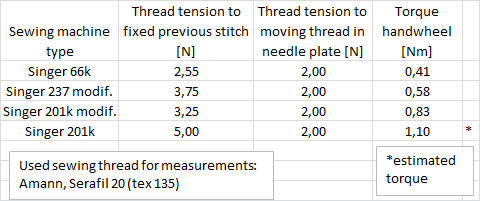
I have tried to make a small video about the modification of this class 15 shuttle hook. It got no more information than already given above in text above, but I suppose the message get better clarified: https://youtu.be/80WASgbKIX4 And then I continue my reputation on being a nerd on measurements and numbers: After the modification above, I tried to make a measurement set-up to give some figures related to the thread friction in the shuttle area. It looks like this: One end of a thread is attached to a digital dynamometer with no movement and the thread goes down through the needle plate and around the hook. This end simulate the thread attached to the previous stitch. The other thread end is attached to a moving spring dynamometer and it simulates the thread comming down the needle grove through the needle eye and to the hook. When I advance the machine and the hook, you see the indicator of the spring dynamometer move down, and you can measure the two thread tensions. No needle was used. The thread length was adjusted, so the position of the hook at measurement corresponds to a needle eye position of about 3 mm above the needle plate. The difference in the two thread tensions indicate how much friction is applied by the hook thread U-turn, but also some other friction. Furthermore I measured the torque on the flywheel by removing the belt and by use of another dynamometer. I tried this test set-up on three vintage domestic machines, and got these results: I am sure, that the improvement in grinding the edges of the class 15 shuttle hook could have been measured this way. So the figures above is only after the modification. I did also try the measurements with thinner thread, and then the thread frictions became less significant.

-
What is the right bobbin thread tension?
Gymnast replied to Gymnast's topic in Leather Sewing Machines
Well, now people that like to share these bobbin tension values can do it. I use these spring dynamometers, and I think the most significant benefits have been to diagnose tension problems faster and fix them. It it is much faster than a lot of test sewing. I have had problems with tensioners giving variation in tension including once with a shuttle tensioner. When you search this forum and look for problems with tension or helpers suggesting wrong tension - I think you get over 1000 posts. -
What is the right bobbin thread tension?
Gymnast replied to Gymnast's topic in Leather Sewing Machines
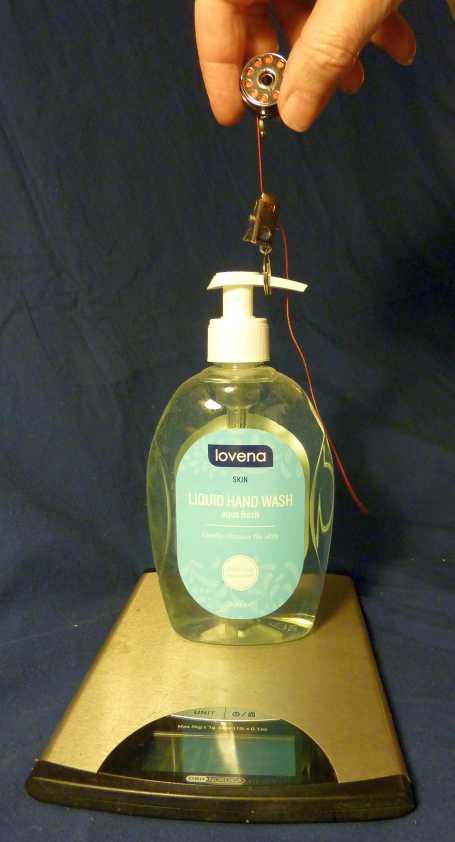
Thanks for this reference. I got another reference that recommend 21 gram-force. I think most domestic machines use a V23 thread for garment. I tried to measure the force from a bobbin case a similar way using a digital kitchen scale, where I look for the weight loss on the scale: However I do see some variation in the measurement depending on how I hold the bobbin case. With some care I think this kind of measurement is useable. Many households got a digital kitchen weight today. But it seems to me that measurement by a spring dynamometer on the thread from the needle plate is a more accurate measurement. I do not agree, that a spring dynamometer is a special tool. It is not that commen in a home, but most people have used them in primary school, and they are cheep and easy to understand and fast to use. Thanks for your comment, Constabulary. I like to get some opposition, and it helps to bring forward a good debate and arguments. In my view it is very fast to use a spring dynamometer and bring back the tensions to a privious desided tension. When I do the test sewing, it will normally be spot on again. Without use of the dynamometer I would typically need 5 tests and itterations by test sewing. So I think the use of the dynamometer is a faster way. And yes I like numbers PS: My mother had a Husqvarna 2000, and I learned to sew on it as a child, but I did not know this about the cams.
-
What is the right bobbin thread tension?
Gymnast replied to Gymnast's topic in Leather Sewing Machines
Yes, I think you always need to test on test pieces of real fabric or leather to adjust your tensions to the result you want. However, when you have used your machine for something else, and you go back to the same kind of work again, you can limit your amount of trials by using an instrument to set your tensions. I did read your refered thread about tensions and results and i just read it fast again. I think it covers many interesting subjects, and many issues of mostly top thread tension. I believe that the bobbin tension in most cases do not vary that much. However the top tension can vary a lot due to how heavy the fabric you are sewing and your aim at getting a ballanced stitch. The weight of the filled bobbin and bobbin case of my class 15 type is about 0.18 N. So a drop test ensures a force somewhat above this value - typically 0.25 N for me. The weight of a larger bobbin case and bobbin will of cause increase this value. When you try to measure the tension by holding a boobin case by hand and pull the thread of by the dynamometer, I can get rather big variations in figures. The force is dependent of the direction of your pull from the bobbin case and if you tuch the rolling bobbin. In my expierience, you get more dependable tension figures by measuring the thread tension of the bobbin thread comming up through the needle plate. For some machines it is hard to remove the bobbin case, and then you need to use this method anyway. I have not seen any significant difference in bobbin tension from a near empty bobbin and a near filled bobbin. I do not use bonded thread, and I get your point, that the coil memory in bonded thread have issues. I do not want to make this a physics class, so I will just say that the weight of 1 Pound on the earths surface is 4.45 Newton [N]. -
Show & Tell: Thumb Controller For Needle Positioning
Gymnast replied to Uwe's topic in Leather Sewing Machines
yes, if you put a switch on the wires to the motor Windings. With zero current to the stepper motor, I think most of them will provide zero torque. But it can be somewhat problematic for the electronics, when you switch on again. So perhaps the software do have a nicer way of doing it. I got a question too. With CNC machines with stepper motors, you normally can run into problems with a skipped steps. So they will have a way to go to a end stop electrical switch to reset the software and counter of steps in the sofware to make a right position. I suppose you can get similar problems with a sewing machine, when you want a needle positioner function. I think you need some other positioner on the sewing machine main shaft to reset the position counter in the software. Perhaps the positioner function shown in the video is just a command of a known number of steps forward. -
I know that most operators of sewing machines newer use instruments to measure the thread tension. They have learned some way of feeling the right tension. But perhaps a few in this forum actually do measure their bobbin thread tension. I often change thread size in my machines, and I use a spring dynamometer to adjust the bobbin tension every time. I measure it direct from bobbin case or vertical up from the needle plate hole. You can get specialized instrumentation for sewing machines, but it will normally be more expensive than a simple spring dynamometer (Price $3) designed for use in schools. I have used google to search for information. For domestic sewing machines for garment, I find a recommandations to a tension of 0.2 - 0.5N (0.04 - 0.1 lbsF). In this leatherworker forum I did find these two links with a tiny amount of information: Here one person use 11 N or 2.5 lbsF for V138 thread, which in my opinion seems a very high tension. https://leatherworker.net/forum/topic/54237-sewing-machine-set-up-problems-at-witts-end/?tab=comments#comment-347489 And in this link 4.5 N or 1 lbsF for a presumable V277 thread: https://leatherworker.net/forum/topic/31327-boss-is-here/?tab=comments#comment-229798 I normally use 0.5 N or 0.1 lbsF for a V138 thread (Serafil 20). Occationally I increase it to 1.0 N when I like the thread to lay down better and look more nice. For a Serafil 40 or V69 thread I use 0.4 N.
-
I am glad to know, that you got the problem solved by changing the thread cone. I am not using the right machine for the job, and it made me investigate some details regarding thread twisting and thread tension. It was discussed about a half year in this forum, and it may help you to use all your thread and avoid similar problems:
-
I hope for understanding by reviving this 1 year old thread. I got a few questions to the answers. @myjtp asks for a zigzag that compliments a Consew 206rb. This machine should handle a V138 and perhaps a V207 thread size. However when I look at most of the suggested zigzag machines, they seem to max at a thread size of V92? So these zigzag machines do not compliment the Consew 206rb reagarding thread size. Do you agree? Except for the Sailrite Ultrafeed types, the machines use drop feed and no walking foot. I suppose this can cause problems with tracktion, if you got some larger size fabrics to be sewn. I have used some domestic zigzag machines - Bernina 910 and Singer 237 and I observed a big difference for heavier materials. Due to traction problems the fabric can have a tendency to cause pressure on the needle forward or backwards when the feed dog is below the needle plate. At the Berlina 910, the hook goes behind the needle, and therefore this machine becomes very senitive to this needle deflection. It can cause the hook to hit the needle, hit the thread or skip a stitch. For the Singer 237, the hook pass the needle to the side, and therefore it handles these problems much better. Or this is what I think is relevant - do you think the same? Unfortunately I noticed, that for most of the industrial zigzag machines named here, that do not have walking foot, they have the hook pass the needle behind as my Bernina 910. The Sailrite Ultrafeed type machines have a similar hook as the Singer 237. Perhaps someone rememeber, that I actually succeeded in making my Singer 237 sew with a Serafil 20 thread (V138). But it may not last long for heavy work like that. I think I may have used it with this kind of work for 20 hours. @Constabulary You name the Singer 457. I noticed a domestic type machine Singer 457 and an industrial type Singer 457g. I like you to clarify.
-
Learning to sew with Pfaff 545/Amann Dominator thread
Gymnast replied to jpt's topic in Sewing Leather
Thread tension is an often debated issue in this forum, so I guess you might find some answers by searching. I suggest, that you get a few dynamometers, because they helped me a lot with such problems. Many details can cause variations in thread tension. You may find these two references interesting: -
Just for the record, some people show some creativity and use the possibilitiy of sewing plywood for their designs: https://materialdistrict.com/article/sewing-wood/ https://icd.uni-stuttgart.de/?p=16063
-
Old Pfaff 1245 with Quick-Rotan and Singer 211g766
Gymnast replied to m4rym4ry's topic in Leather Sewing Machines
I think normally a Pfaff 1245 needs pressurized air to operate. For some it is a game changer. It might be possible to dismantle this part its accessory functions using air, but It may take some time to figure it out. I agree with Constabulary, that you will need to change to a servo motor. -
Speed control by pedal force or movement?
Gymnast replied to Gymnast's topic in Leather Sewing Machines
I have tried to measure force and displacement of an ordinary foot pedal and the force controlled pedal I got. The measurement results are in the diagram below. For the force measurements, I used a digital kitchen weight. I have tried only a couple of industrial sewing machines, so i am not so sure about the normal pedal behavior of them, so I hope you can help me with your experience. I suppose you got a industrial sewing machine with a servo motor on it. When you press down the speed pedal with your foot, then first you need to apply some force before the pedal starts to move downwords. You need to overcome a spring pulling up the pedal to a stop. In the diagram you should look at the red dashed line, and for this pedal it starts to move with a pressure of 10 N or about 1 kg. When you press down further then the pedal moves downwords. At about 15 N force the machine starts to turn. In the diagram below it is when the pedal have moved about 3 mm down. When you press further down the force needed increase and the speed increase. At some position you reach max speed of the machine. This is at about 43 N force and 28 mm displacement on pedal. However it is possible to press the pedal further down, but the max speed is maintained. At some position the pedal go against a stop, and it do not move further even if you press harder with your foot. Apart from the numbers - is this text an accurate technical description on how your pedal work? Do you think the numbers for your machine is much different?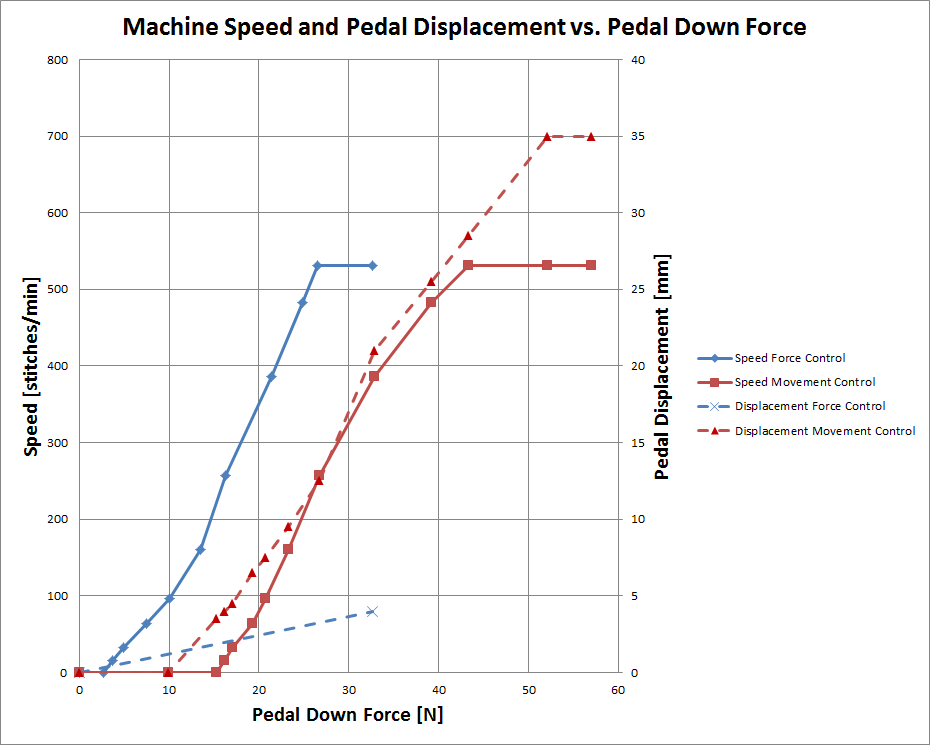
-
Servo motor running rough at low speed
Gymnast replied to DanishMan's topic in Leather Sewing Machines
In the comments of this video, I asked Stephen Feldmeier regarding the slow speed behavior of the Sailrite Workhorse servo motor. He did not feel a vibration or "rough" behavior: https://youtu.be/SOyQtt3eDLw . I know that this is subjective evaluation. A speed reducer in general will cause a higher speed of the motor. A higher speed causes an inchreased frequency of the ripple torque and then the speed is better smoothed by the inertia of the motor. -
Does anybody have some spare System 332 LLG #24 needles?
Gymnast replied to Wizcrafts's topic in Leather Sewing Machines
Just by Google I see these two German websites. But I suppose, that you need them fast, Wiz. http://euroledershop.de/de/Maschinen/Nadeln/Nadeln-332-Llg/180-7 https://schein.de/en/maschinen_ansicht/068507-110 -
Servo motor running rough at low speed
Gymnast replied to DanishMan's topic in Leather Sewing Machines
DC motors with brushes are actually much easier to control at low speeds with electronics and software. However I am not sure, that this kind of servomotors was ever made for sewing machines with an internal encoder to provide feed back information about speed to the electronics. To do this will make the production of the "mechanical" part of the motor more expensive, but the electronics and sofware less expensive. In some way, that is what i have done on my Singer 201, if you saw my video on that. -
Servo motor running rough at low speed
Gymnast replied to DanishMan's topic in Leather Sewing Machines
I know a bit about VF-drives for induction motors. When you need low speeds on such motors, then you need to implement more advanced control strategies in the software, to reduce ripple in torque. The answer here gives some indications: https://www.researchgate.net/post/What_is_the_lowest_possible_speed_that_can_be_practically_achievable_in_a_3-ph_induction_motor_through_VFD And this is a very technical document on the matter: http://www.how2power.com/pdf_view.php?url=/newsletters/1702/articles/H2PToday1702_design_TeledyneLeCroy_part13.pdf The strategies for a brushless DC motor is not that much different and they are also described. So in other words you can say, that it is possible to have a smooth behavior of the motor at low speed by adding development costs to make the software. Possibly they need to change settings in software depending of exsactly what kind of motortype the software is in control of. However this can also be an error of your servo motor, so I hope other users of the same kind of servo motor can provide you with their observations. -
If it is a domestic sewing machine (low shank), then I recently discovered this big roller feet on the market: https://www.sewingpartsonline.com/leather-quilting-roller-foot-brother-blso-lrf.aspx
-
Polyester versus Nylon thread ?
Gymnast replied to bcraig's topic in Gun Holsters, Rifle Slings and Knife Sheathes
One other important diffence in material properties are creep or relaxation. With a long time load on the thread, the nylon thread will get longer and longer until it eventually breaks. This will not happen with a polyester thread. This may not be a bad thing for the nylon thread used for high load slings, because then the forces in uneven stiched parts will better be distributed to many threads of the seams. A good source of information on these materials are from rope users and manufacturers. One source can be found here: https://www.animatedknots.com/rope-materials#ScrollPoint -
So you need to find the right guy able to make a resonable cloth timing belt. That is the difficult part.
-
Hi Chrisash. I think this thread is about sewing plywood, and we should not make it a vintage sewing machine motor thread or speed reducer thread. I will send you a pm. If some other people are interested in information about that, then please make a new thread about that, and I shall make my comments.