RockyAussie
-
Posts
3,265 -
Joined
-
Last visited
Content Type
Profiles
Forums
Events
Blogs
Gallery
Store
Everything posted by RockyAussie
-
I think it may help if we knew what country you are in and if possible a picture of the existing bag could motivate a better amount of responses.
-
 Here is another simpler one I just remembered which is more of a friction fit style. As the lid does not get used for lifting the weight the strap only needs to hold itself in place and lock the phone from coming out.
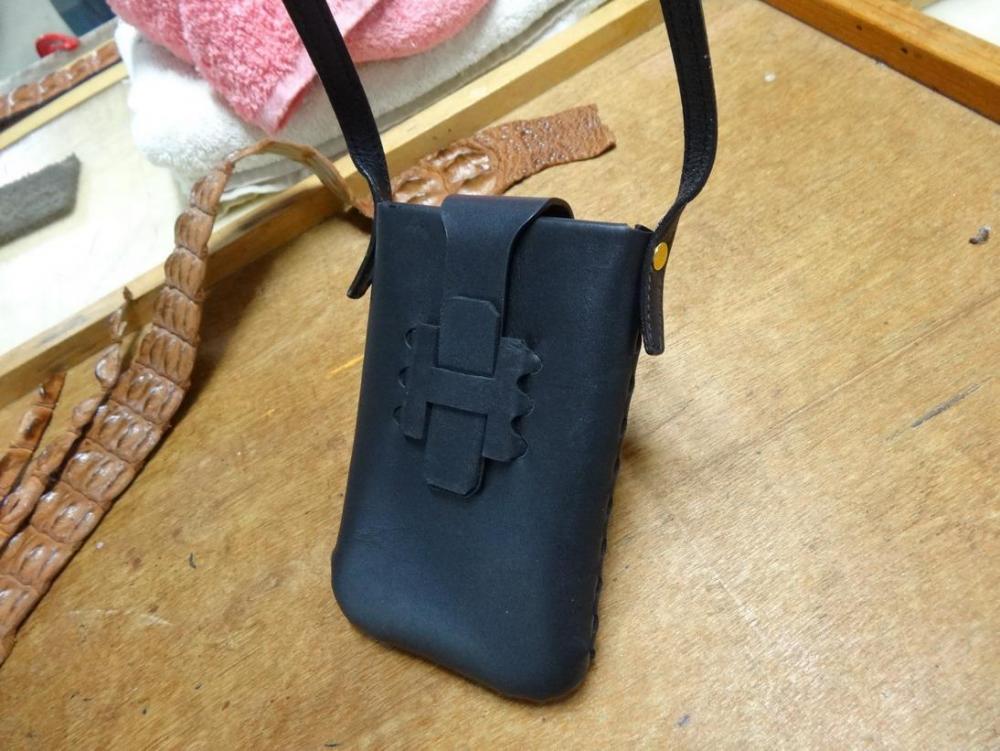


-
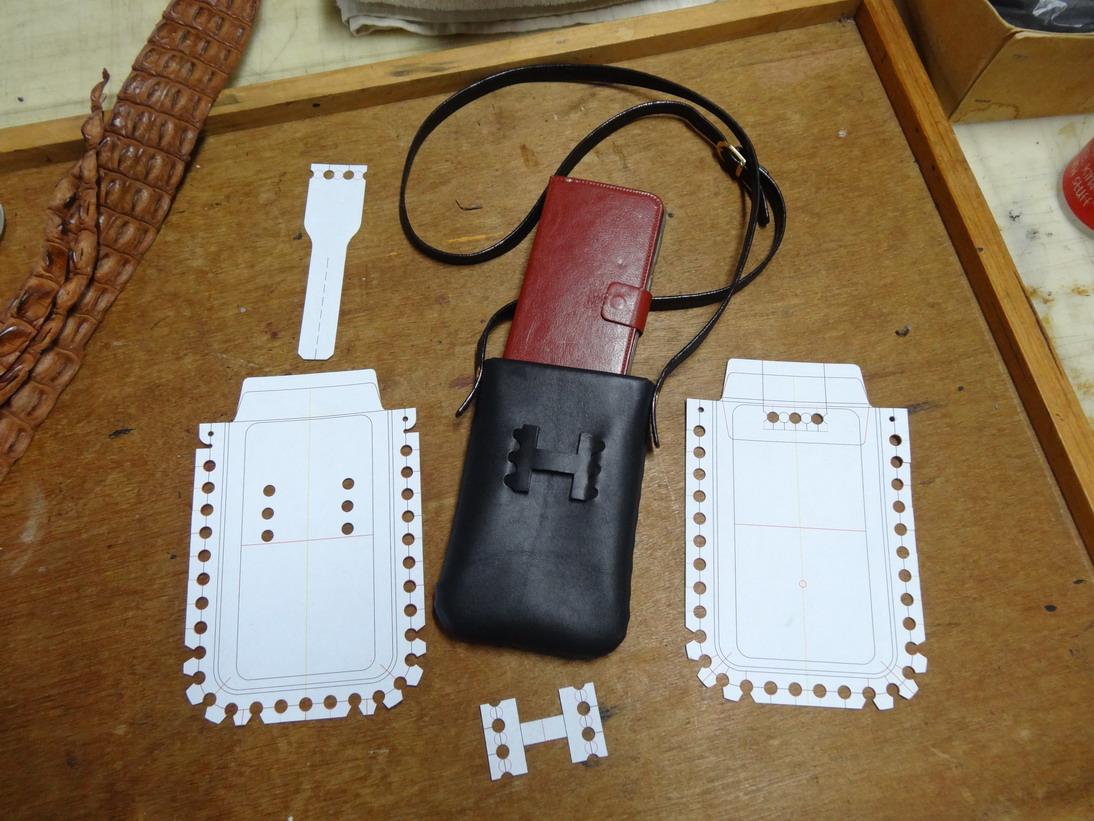
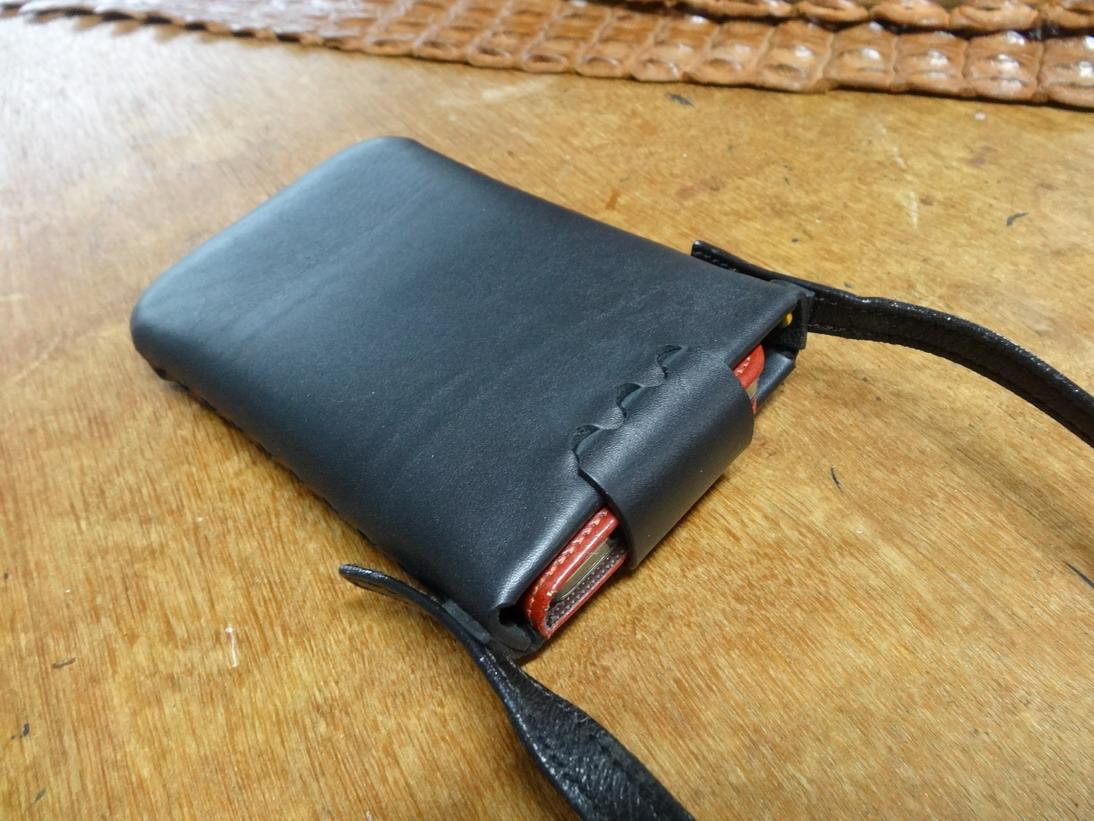
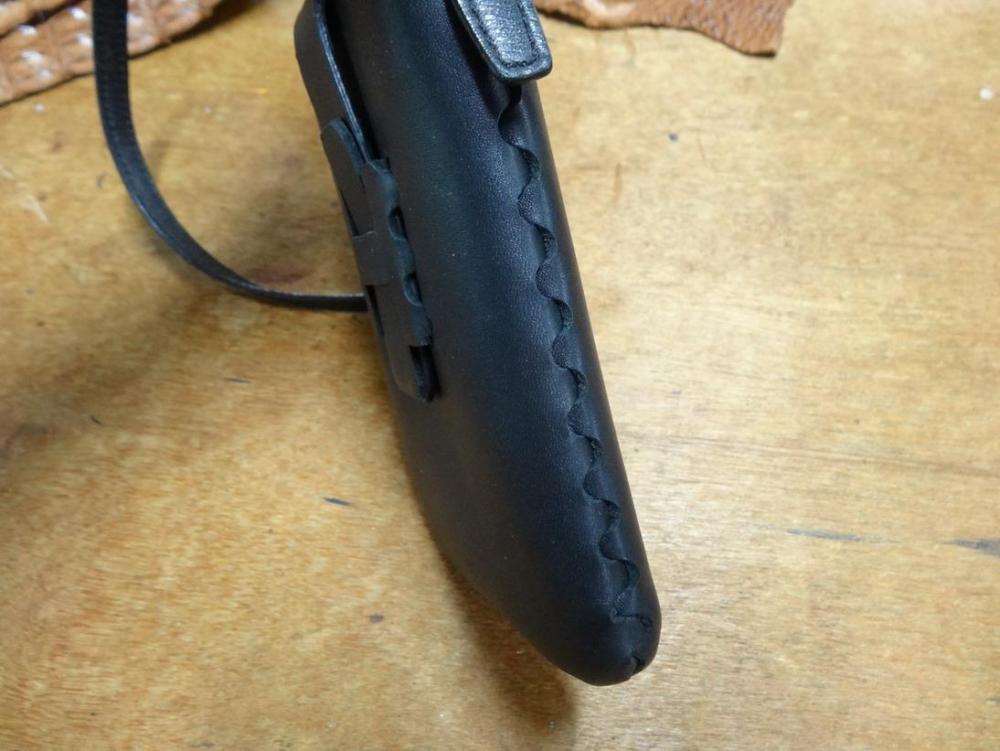
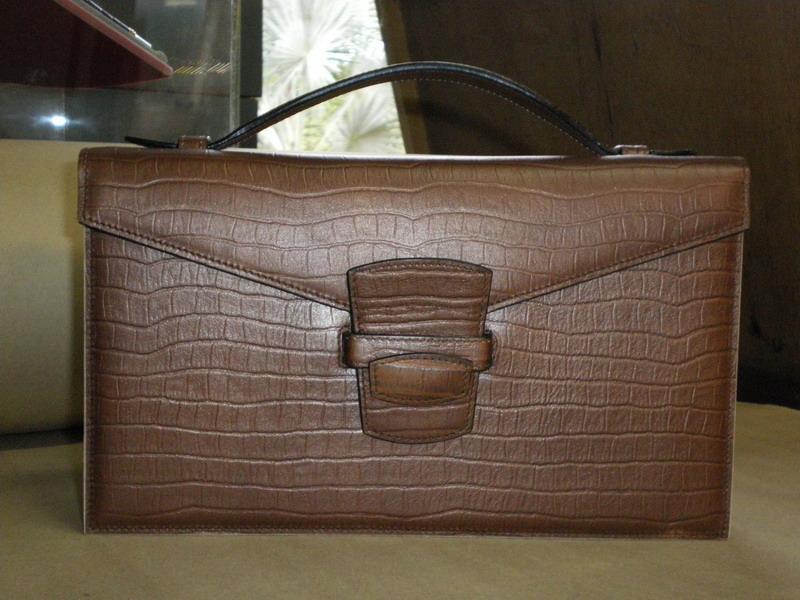
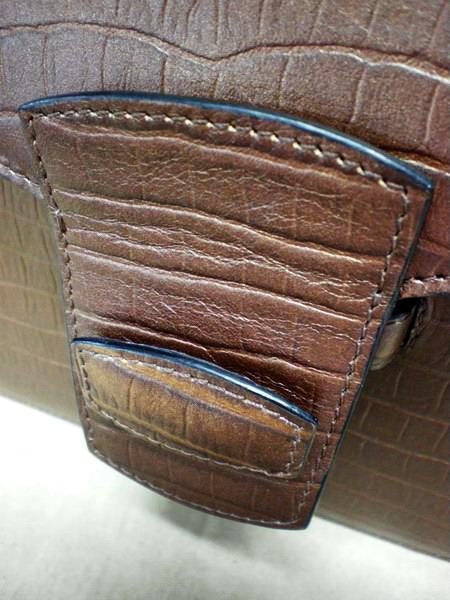
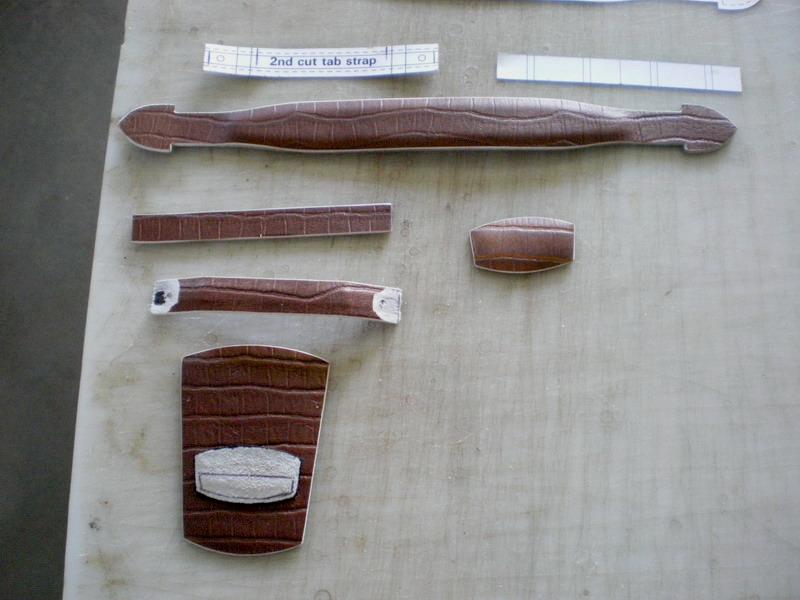
This one I designed awhile back on a prototype but takes up some making time compared to many other fittings. This pic shows where I made up a metal insert for the tab holder This shows it before attaching to the bag front piece Here it is shown attached


-
Drum thickness sander for thinning leather.
RockyAussie replied to LederMaschinist's topic in Leather Machinery
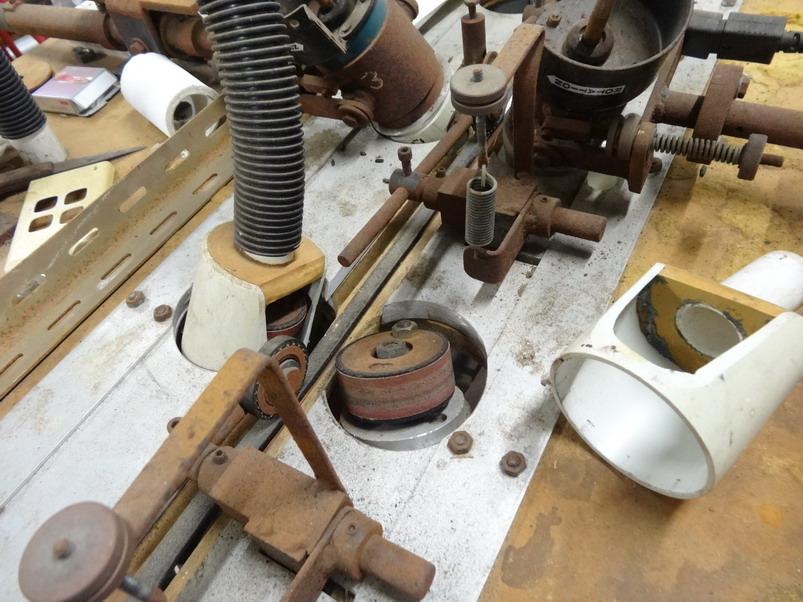
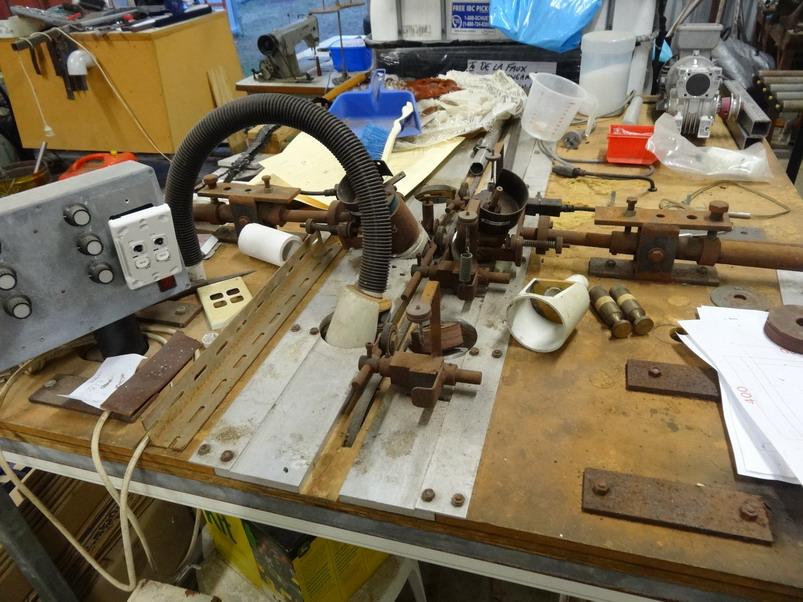
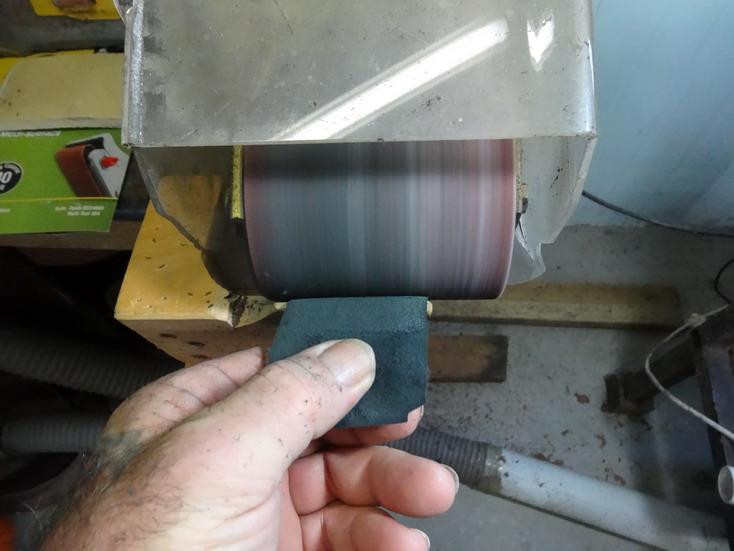
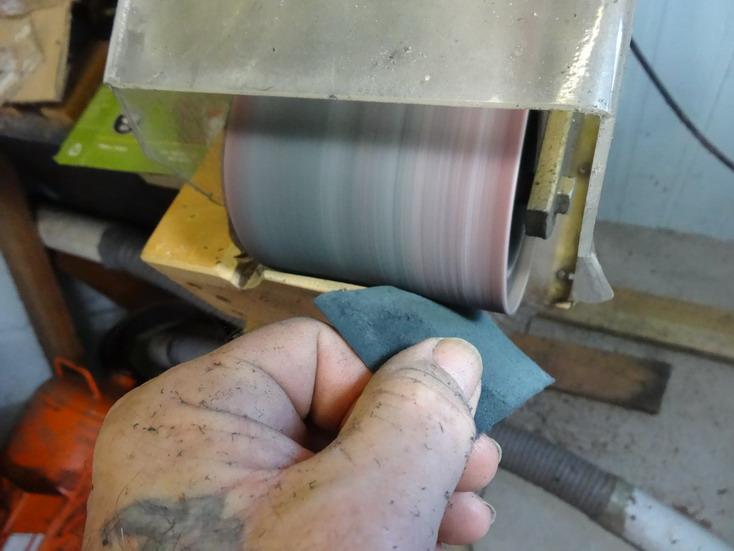
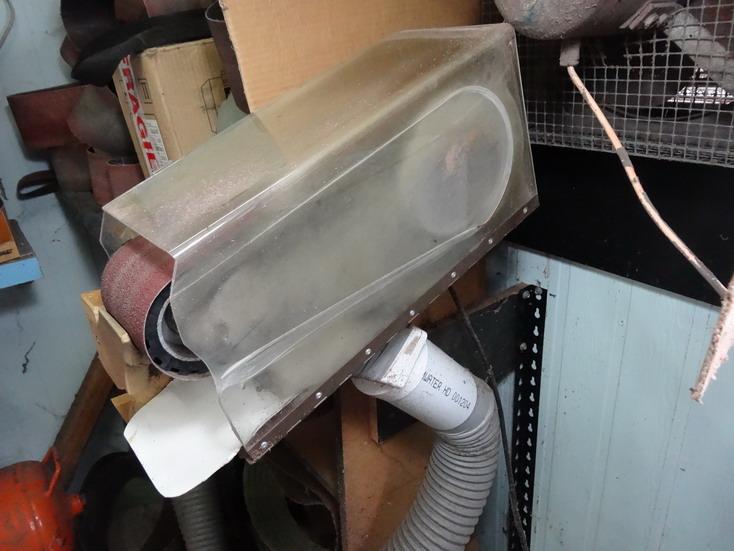
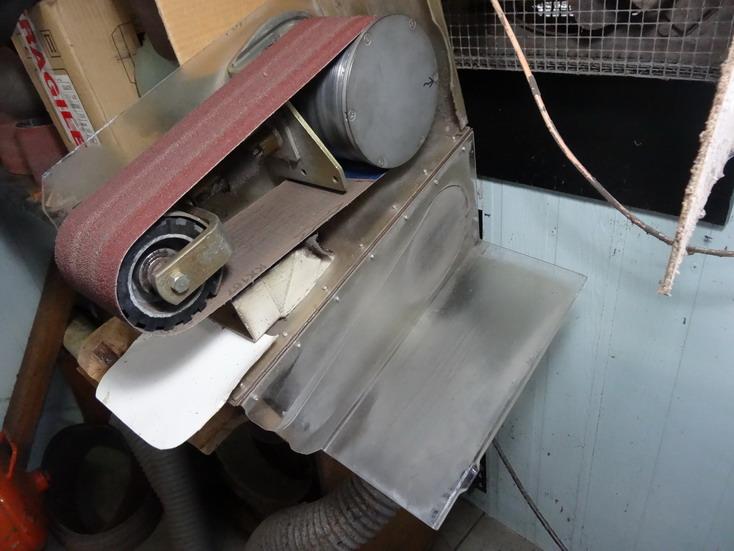
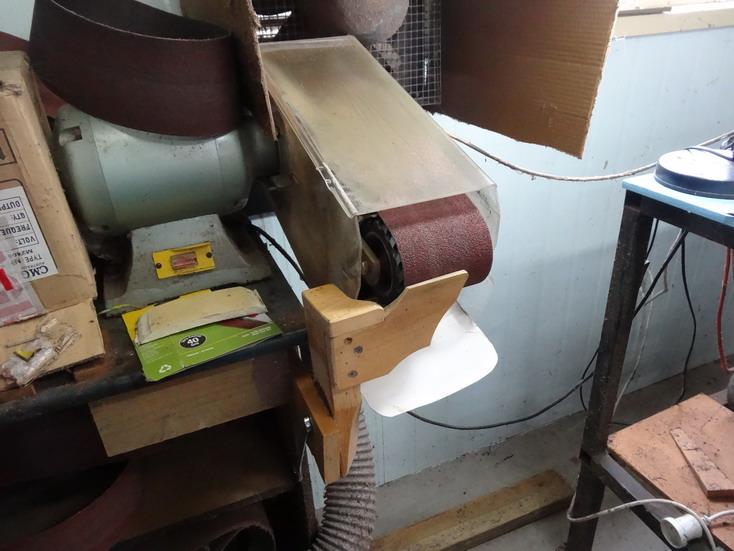
It would be interesting to find out more on the drum sander idea. They are rare as rocking horse poo here in Australia and I doubt there would be any for that lower price unless they are fit for parts only. In my experience keeping the leather under some sort of control whilst undergoing the sanding has been very challenging compared to timber. Another factor is trying to keep the job down to a one man operator, meaning not wanting to have a feed out person as well. Another machine I made many years back I still use today uses a rubber V belt to transport the belts as I sand the edges and the belt needs to be rough sandpapered on the run every hour or so of use. If this is not done the belts will shoot through and not get sanded properly on the edges. This one I can use by myself as I am able to reach over and take the belt as I feed another one in. Note at the back there is a rubber roller that sits between the sanding drums and keeps pressure down in order to restrain the belt down onto the V belt. It has a spring that is adjusted down to suit the pressure of the work. This is very little sanding pressure compared to trying to do a whole larger piece of leather. This flasher one below I have been working on does 3 different sanding jobs at the same time but has the disadvantage of being to long for a single operator. It worked well on dress belts edge sanding but the motors were insufficient in the lower rev range for my hornback belt sanding. Further motor testing is now being done. This model I designed so that by turning a wheel on the side I could get the table tops to adjust to the wider and thinner belts with just a simple turn. It will probably be all redesigned to be shorter again to suit a single operator. I will try and load a video or 2 over the next week showing how they operate.
-
Drum thickness sander for thinning leather.
RockyAussie replied to LederMaschinist's topic in Leather Machinery
Yes that is how I have the above set up. You still have to have a way to stop it flying through as well though. Another one I have done that suits less wide pieces may be of interest.....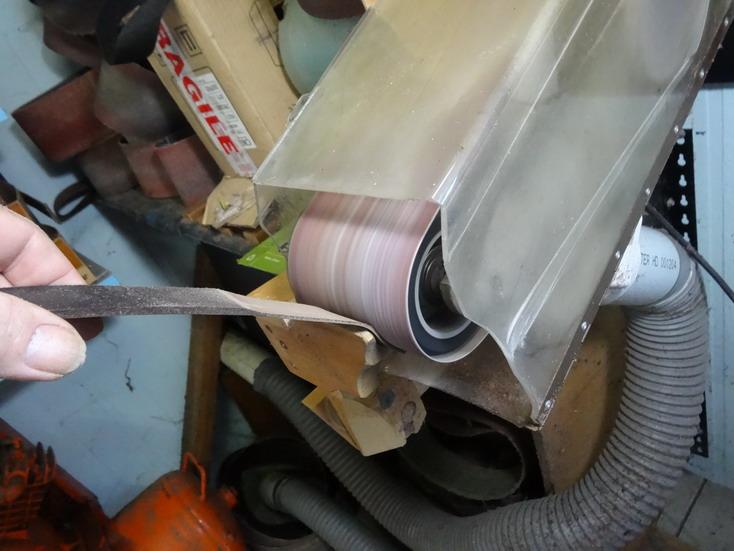
-
Tapering a welt
RockyAussie replied to SShepherd's topic in Gun Holsters, Rifle Slings and Knife Sheathes
Looks pretty good. How did the edges turn out. Are they tapered or flat? You are still adding a hold in strap yet? Just thinking that I would blunt the tip a little more to avoid in curling from getting knocked about. -
Drum thickness sander for thinning leather.
RockyAussie replied to LederMaschinist's topic in Leather Machinery
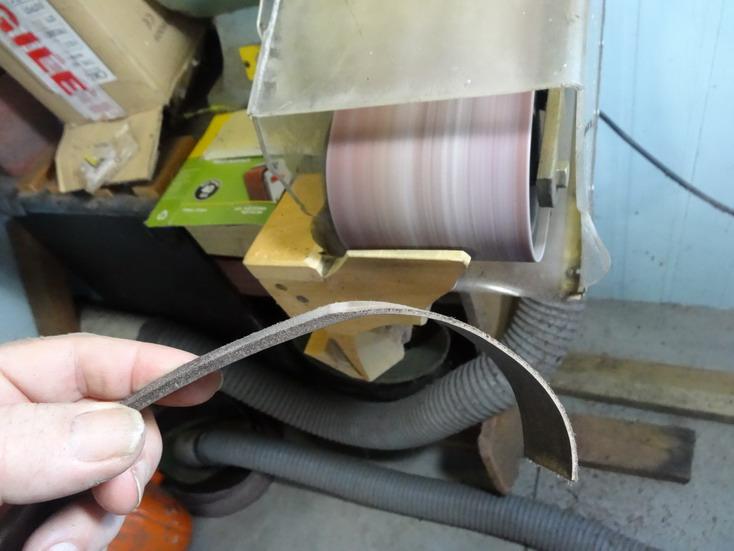
Forgive me if I am wrong as it has been many many years since I have used a drum sander on timber. I think that the timber is fed through with rollers at the start and finish of the drum sanding operation. The leather would just bunch up and be shredded as it feeds in I think. On the other hand I remember seeing some sort of a belt sanding operation at the Packers tannery for sanding the back of kangaroo skins that worked something along these lines. I have made up something for sanding the back of the crocodile skins that come in way to thick at times but that only does about 4" across at a time and the skin has to be moved around between the sandpaper and the adjustable pressing guide. It is basically a car wheel with a 5' belt wrapped around it and by inflating the tyre I keep the belt in place. That is built into a bench top attached to a 2 or 3 hp electric motor and a swing down arm that sets the thickness and is held down firmly with large magnets when operating. The magnets stop the bounce chattering you get with springs but with crocodile you get a large amount of variance with the scales and a flatter leather would be a lot easier. Here is a couple of pics that might help the explanation.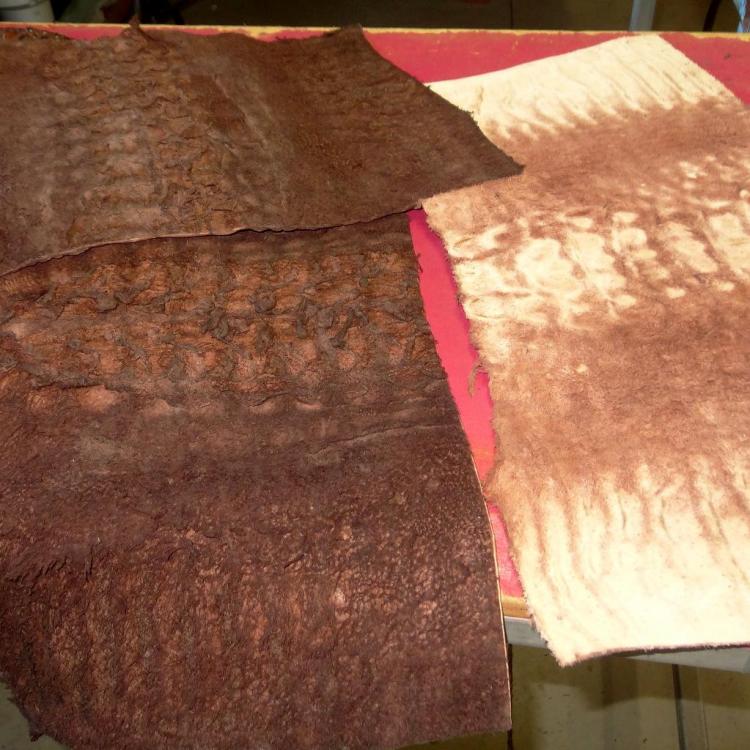

-
I stumbled on this while having a look around on the Campbell Randall web site the other day. http://www.campbell-randall.com/public/index.php/product/fav-1498c-roller-foot-with-30mm-1498-roller If you go back and have a look into the parts section, in this case the FAV parts section there is a large amount of various feet for these skivers. I have a Fav and a Fortuna skiver and have been able to interchange the feet on them so I suspect that this should fit the Cobra as well. There is also an off centre pin that can rotate that holds the feet and that may be handy to have as well. I would give it a try as I think it would work and if so the amount of other variable parts such as the feed rollers and feet could be very handy knowledge to others including sellers on here. There is a member on LW that may be able to assist as well ..... @CampbellRandall
-
WOW .......I'm in the wrong country AGAIN .That is one big source for sewing machines for a start.
-
Manual for old USMC Model 82 Band Splitter?
RockyAussie replied to Cumberland Highpower's topic in Leather Machinery
Is it made by Comoga? The reason I ask is shown in this link -
Tapering a welt
RockyAussie replied to SShepherd's topic in Gun Holsters, Rifle Slings and Knife Sheathes
Sounds right and looking pretty good so far. -
Welcome to the forum @Kippler75. I hope that you find the help that can be gained here rewarding. I look forward to seeing some of the leather work you and the others at Kariokor can produce. Regards Brian
-
If the contact cement is still fresh from being applied then yes a flame will light it all up. I have over the years had this happen a couple of times. Once the glue has dried off, normally overnight it is alright.
-
I am not familiar with chrome excel so I need to ask if it has a hard top surface? Softer leathers tend to be easier to work with when it comes to machine stitching. The smaller needle @kgg may help a little as you should be able to reduce the foot pressure some and get less distortion from the dog feet and hole. A smaller needle will pull out easier. I would also try a softer thread than the nylon as they should allow it to sit down and suck in a little better.
-
Weekender Bag
RockyAussie replied to AndyNext's topic in Purses, Wallets, Belts and Miscellaneous Pocket Items
Looks well done Andy -
Bulk order of 1100 luggage tags
RockyAussie replied to AlexLeather's topic in Marketing and Advertising
@AlexLeather Leigha, I would answer them immediately and ask them what kind of details like embossing (logo and extra wording like Made in USA) that they would like. Putting up the customer page which has their contact section for the world to see may mean they get inundated with other offers now. I would also make contact very quickly with Mike Batson and get his help to close the deal if a deal can still be done. I am sure Mike will work with you to enable you to build up your business in this regard. Mike has a very large assortment of leathers as well as the equipment to do this sort of thing. Personally I think the price on veg and the burnishing and stitching should put the price closer to the $8.00 or a little more. Machines I would use would be a clicker press and the dies, a glue machine along the lines of this 992 in this link - http://www.omacsrl.com/en/products/992-gluing-machine and a burnisher and a good sewing machine. Best of luck and .....Make contact NOW. Having a tag saying Made in the USA could be a good move for them considering that their page looks good and the product as well but I doubt that any is made there. Many sellers here like to hide where the products are made or like to give the impression that the are made here in Australia. -
Can someone make a pattern for this wallet
RockyAussie replied to Fcapela's topic in Patterns and Templates
If you would like to post some pictures of the pocket pattern you are using at the moment I may be able to advise how to fix. How thick is the leather for these pockets you are trying to use? -
Overwhelmed by leather Sewing machines
RockyAussie replied to Starwind0's topic in Leather Sewing Machines
That does not give enough information for me to say which is best. I would like to see some pictures of the type of products you envisage making. I make all of these products but what machine I use to stitch a wallet that I make and what someone else here uses to make the wallet they make could best be done with different machines. I would totally rule out the large long needle machines and consider these 2 mostly as long as you are OK with 138 thick thread as the thickest. The main thing from there is to consider whether the smaller 1.7/8" diameter cylinder of the Techsew 2600 is better have than the extra 1/8" thickness of material the CB-341 Cowboy can sew through. The cramped table can be altered and should not be considered a problem. The type of wallets you can see on my website I prefer to use the smaller cylinder but I would often like to have the extra lift as well. If you think you would be doing thicker products than me I would go for the CB-341 -
Hey Geoff, I answered a fair bit on this in a recent post you may find helpful in this link -
-
Bulk order of 1100 luggage tags
RockyAussie replied to AlexLeather's topic in Marketing and Advertising
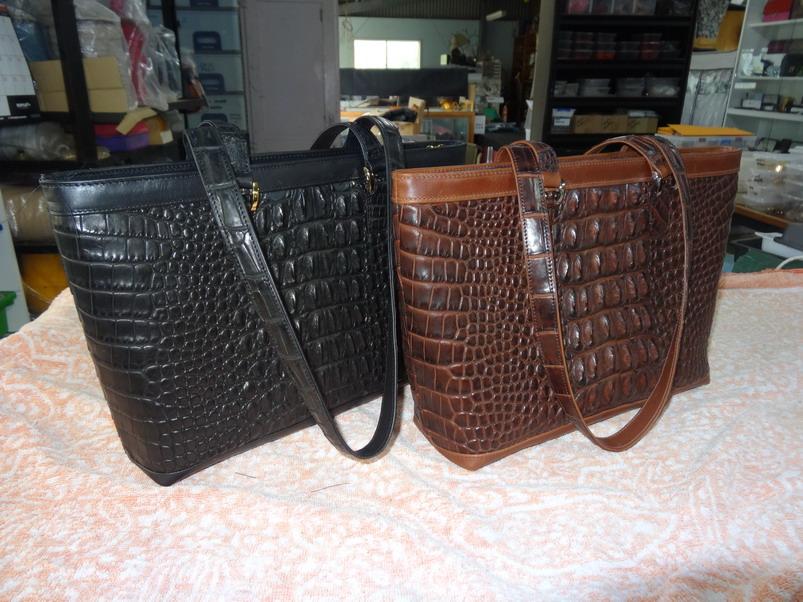
As you have not done bulk manufacturing of this type and do not have the equipment I would recommend posting a picture of the product in order to get advise on the machinery types and advise as to how it can be done quickly. In order to keep the customer I would get someone with the equipment and expertise to do the job or many parts of the job and add in a percent to make it worth your while handling the job. Once you know how it all pans out then you can consider what parts you can take on with whatever equipment you then decide to get. Here is one version that we make here in bulk and they require a lot more machinery than you mentioned.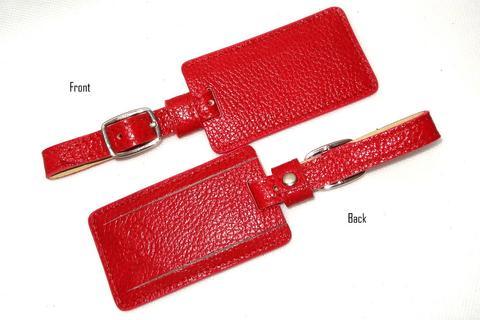

-
That is my dog "Wild Harry" under the trolley doin his thing. Could sure use some more help here though
-
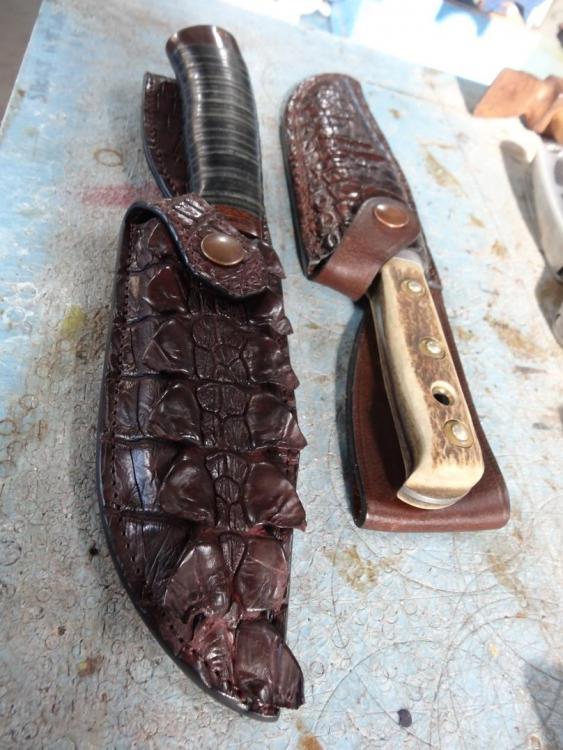
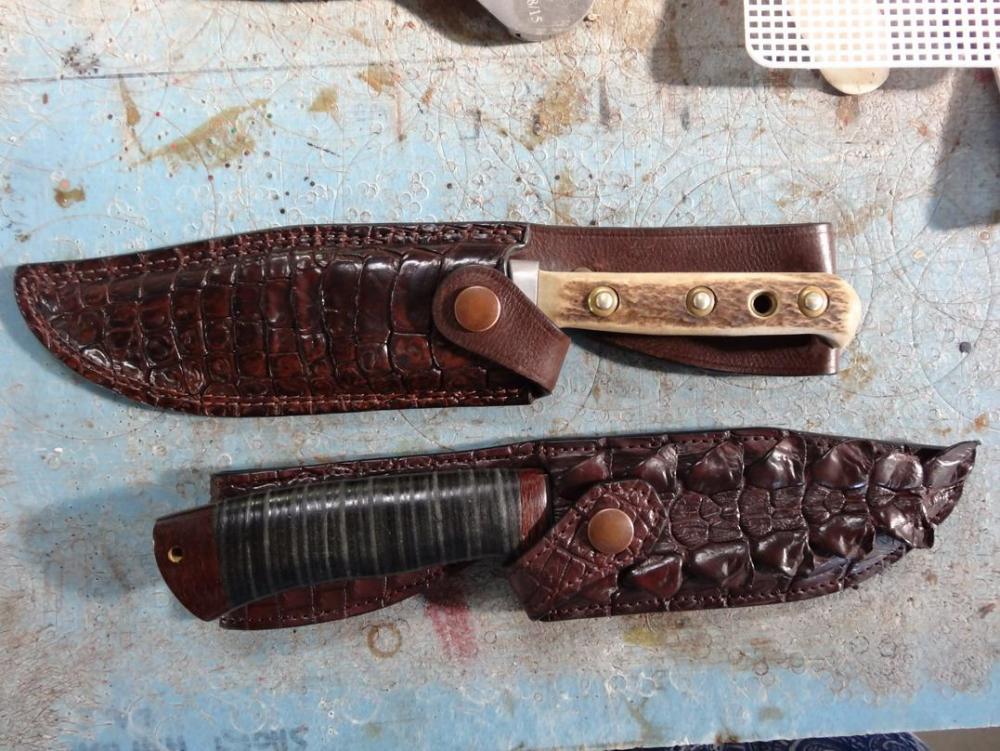
Knife sheath
RockyAussie replied to Dave Richardson's topic in Gun Holsters, Rifle Slings and Knife Sheathes
Yes they are but sometimes only on the blade side. They taper thinner to the outer edge but are thick (about 3/8") where the blade touches inside. The welt would average 1/8" on the outside but be thicker up near the finger guard. Next knife I get to do I will take some progress shots and post them. -
The needle may be angled a bit far to the front but the direction in the pictures is orientated in the direction you describe as far as I can make out. Needle scarf to the right facing the hook which is to the right.
-
Knife sheath
RockyAussie replied to Dave Richardson's topic in Gun Holsters, Rifle Slings and Knife Sheathes
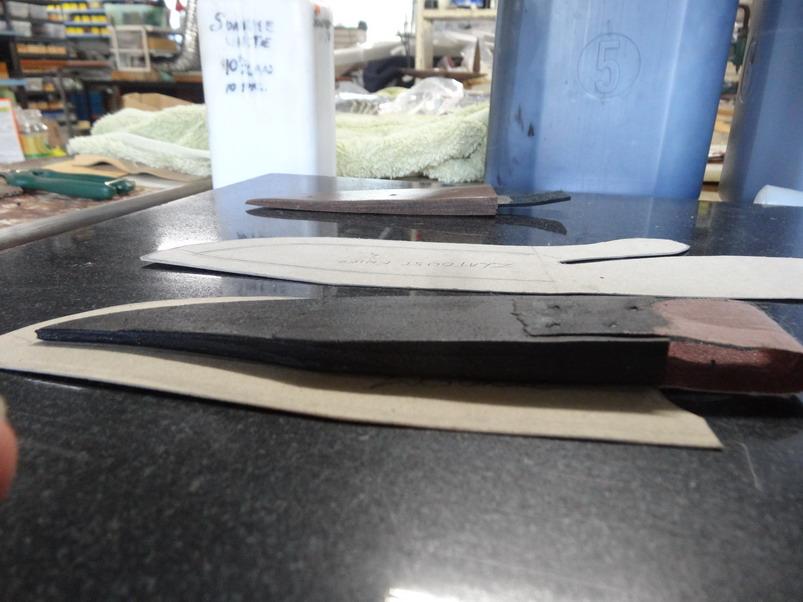
My first thought was holly smoke that is thick but after a bit I reckon I can agree with your decision to go thick. After looking at some of the other pouches I started to wonder about why the pouches I make don't suffer this thickness problem. Just the way I worked out to make them years back I guess. I went and had a look at the google images and yeah they are built different mostly it seems. After I make up my pattern I wet cast the top piece separately and form it over a leather built up shape that I make up out of leather beforehand.(couple of pictures below) On the backing piece after I cut out the shape I build up a welt onto it and then sand it down thinner on the outer edge and a lit less as I go down toward the tip as well. After the top piece has dried out some overnight I then glue attach it to the backing and welt and trim it down to suit the backing shape. After that I sand up the edges some and then go on to stitch it up. I just though to mention it in case it was of any interest. Also I believe not putting the retainer around the handle can sometimes help the shape as well This shows the typical pattern and the built up knife pieces. They get nailed down onto a end grain board to start so I can nail down a strip of stiff veg around the outer edges after i have the leather top in place over it. This one shows the side thickness better I could not find any pictures here that show the side edges much good but this one should give you the idea I think. The thickest part on the outside at the top would be about 10mm (3/8") in total but on the inside welt at that part would be close to 10mm where the blade rides against if it touches. This sort of shape <. I have never had anyone report back to me whether they have ever cut through any stitching or had any other problem with the pouch either. What I make can be a bit expensive sometimes and that could have a factor in how they look after them perhaps but on the other hand if I was a purchaser I'd be back pretty quick if there was a problem.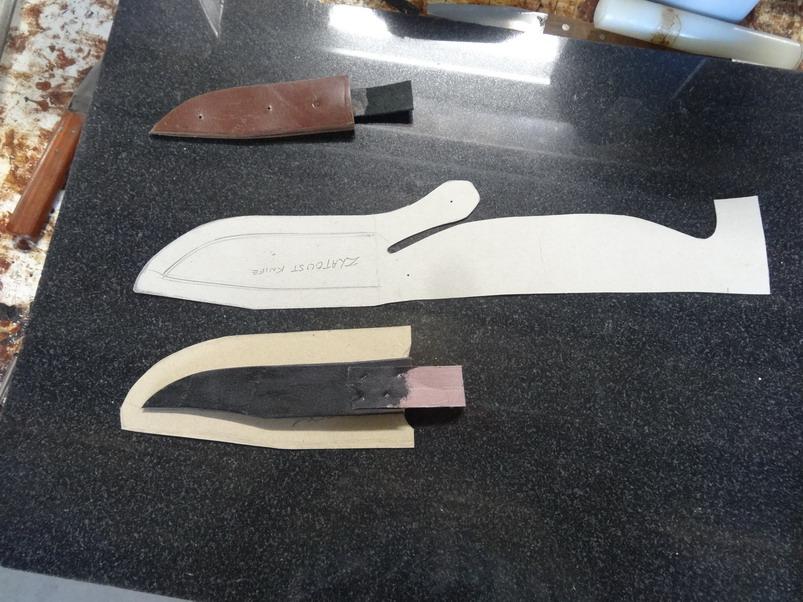

-
Hair-On Deer Hide Suggestions
RockyAussie replied to TargetRockLeather's topic in Leatherwork Conversation
If it is of any help I found that you can use the electric hair cutting trimmers with the different plastic spacers to trim the hair down to a lesser height and it works not too badly. Over here they call them buzz cuts I think. I'm not sure as I have been cutting my own hair with scissors for many many years and that's pretty rare as well.