


HENDREFORGAN
-
Posts
105 -
Joined
-
Last visited
Content Type
Profiles
Forums
Events
Blogs
Gallery
Store
Everything posted by HENDREFORGAN
-
Speaking as one who is still utterly confounded by the "numbering system" used - I can understand the mechanics of these things just with the numbering system bore some resemblance to that - there is some truly great info given in answers . . thanks guys!
-

Asking For Quality Mallet / Maul Recommendations
HENDREFORGAN replied to ContactCement's topic in Leatherwork Conversation
With a maul - or "impact resistant hammer" - there are three things to consider. 1. The size/weight of the striking head 2. The material the head is made from 3. The length of the handle. Whilst a traditional leather rawhide mallet set in cast metal on the end of a piece of hickory may be "pretty" they aren't indestructible and actually just about the worst thing you can use when either the head or shaft starts to come loose. So I looked for and then replaced mine over time with "alternatives" from other market sectors. One of mine is actually a heavy white nylon or PTFE head mounted in an aluminium head and handle that is really a car body panel beaters tool and another which is smaller and lighter with a resin head set in hard plastic with a nylon handle is a tent peg hammer. They have worked just fine for many years . . and both were very cheap. The weight needs to be not enormous but heavy enough to do the work for you . . whatever tool you use it should do the work and not your arms. You may find that you prefer for accuracy holding the maul nearer the head too, so buy one that's balanced for a shorter handle. -
I don't want to sound defeatist but welding or brazing may not work, we had a similar thing happen on our early 20 C Singer 136w 104 post stitcher. The trimming blade works off the side shafts and is held by a casting which, ending in a cleft, is held tight by pressure from a large machine screw. One too many adjustments meant that, after many decades of load, the casting broke and right through where the bolt went too . . not unlike yours. I asked an engineer friend to braze it - he's good at that - but that repair lasted barely days. So I had another engineering friend TiG weld it with the correct welding rod - he's good at that - but the repair only lasted a few weeks. In both cases the welded seam simply came apart along the original line . . the damn lump of cast iron simply refused to be stuck back together and accept even limited load. Finally I had one of my engineering pals above machine up a whole new replacement in steel but, and do note this with your own Singer, he found he simply couldn't find the exact thread pitch to match the original machine screw . . my new piece has an M8 hex key headed machine screw instead. So what I'm saying is that of all the above the repair you should try first is the drill and tap physical plugs that permit the original break line to sit back together tight . . if that fails you can still try welding and/or brazing . . but once you start with those if the repair fails you'll be further away from what you wish than you want.
-
Well . . I'll say this. Until seeing the photo of the "American Straight needle stitcher" . . I thought our German Frobana bent needle side sole stitcher on it's original equipment cast pedestal was a significant visual statement . . it's now been well beaten into second place. The thing is unless you can reconfigure your use of these highly specialised machines to something that is relevant to you then they have, through no fault of their ability to do the job for which they were made, become simply interesting items to look at? We make . . "adult toys" . . and the limited throat of the Frobana but it's ability to deal with seriously tough material means we use it for edge stitching "impact toys" . . . the other 80% of our business though is done by hand or on more conventional industrial machines. BTW? Come back Wiz? To somebody who joined this forum for good eduction your posts are right up there with some of the best.
-
From what we've now seen inside our 205-370 the oil wicks seem to break down into two groupings, pipe cleaner style wicks inside small diameter pvc tubing and "fluffy purple caterpillars" wrapped around the final destination of moving parts. Providing your always using the correct grade of oil delivered through the plastic grommets then the former seems maintenance free . . it's them damn "fluffy purple caterpillars" that are the problem and, being where you want the lubrication to do it's job, not something that is wise to ignore. The manufacturers would have chosen this material "on spec" but what they failed to take into account is it's fragile nature. We're not sure we've cleaned all of the bits of "fluffy purple caterpillars" that the machine has chewed up and distributed as a fog of purple fibres exactly where you DON'T want the damn stuff. We would think a good quality felted wool would be no issue, flexible and able to soak up lot's of oil, it's cost would be so cheap you could replace the whole lot for so little money . . and yet it's value to keeping your machine well lubricated is priceless. We're still looking for a vintage long spouted oil can small enough to poke into our machine/s guts . . . I'll take the trade off with making the "fluffy purple caterpillars" redundant by using "Number One Eyeball" to actually see the oil is getting to the right place. We will though ensure the wicks in the tubing are moved to where that system will still deliver oil to somewhere useful.
-
There are many animal hides that can be used for what you wish to make but the most common "generic grouping" title is Nappa leather which is sometimes labelled as aniline leather. Hides that fall into this group, which though technically lambskin, may also include goat and some calfskins too. All will provide you with a genuine hide that is soft and easy to work.
-
Buried in our old browser favourites may be some useful links, did find that a few were happy to share their construction techniques. Leave this with me for a while.
-
Gritzner vs. Frobana sole stitchers
HENDREFORGAN replied to Vinculus's topic in Leather Sewing Machines
I think "Irish linen" would be a good way of describing whatever old and unlabelled stock we've put in our Frobana and the jobs we set it doing also require a heavy stitch, indeed it's a form of top stitching that this machine seems to produce nicely. We don't use the optional cutting blade on ours that would otherwise help hide that . . presumably you would do the same yourself then? The other thread we replied to some time ago was answered by somebody "Down Under" who both knew this machine and may have made or sourced parts for it. http://leatherworker.net/forum/profile/71895-rockyaussie/ -
205-370 refusing to take 794 system needles?
HENDREFORGAN replied to HENDREFORGAN's topic in Leather Sewing Machines
@Diyer . . @Uwe . . Thank you! We felt it in our bones that something wasn't right about our 205-370 and that the question of why was it fitted with the wrong needles might be an indication of other issues . . your comments, together with another of Uwe's excellent videos, is unparalleled help. Now we a direction to follow with our servicing. We are relative newbies to industrial sewing machines so a 205-370 is just a bit "jumping in with two feet" but I think our experience may mirror many other members. You know when you buy second hand that it is "buyer beware" but if the machine has come from a commercial and/or factory environment and is provided with "test pieces" you do assume that it's working within limits? What you somehow never assume is that commercial use has been less than standard or that the machines use wasn't anywhere near maximum tolerances? This machine may be a heavyweight but it's also a bit of a "Gentle Giant" and we think it's likely you can give it abuse and get away with it? Anyway . . ours was/is not in anyway set up properly yet, not only it's previous owner, but also us did sew with it. @Diyer We too have noticed the pipe cleaner . . we refer to it as "The Purple Caterpillar" . . and responding to a thread from @Uwe sometime ago asking about how we replaced it? Our 205-370 seems to have eat a lot of it's "Purple Caterpillar" . . indeed we also notice that the "oiling disc" ( 204 15 005 0) behind the shuttle/hook is well crumpled. Honestly? We're looking for an old fashioned oil can with a long, fine tubular spout so that we can do it all manually each month. We'll report back when we've taken the advice here to the sewing machine and - hopefully - fixed this issue. -
Gritzner vs. Frobana sole stitchers
HENDREFORGAN replied to Vinculus's topic in Leather Sewing Machines
Do you know I have no idea what the thread we use on our Frobana is? Due to the fact that we use it on very heavy projects I'm not even sure it's not technically "butchers twine". It's more than I mm diameter and a very heavy multiple twist. It's uncoated but then with the Frobana having an oil bath fitted it's well "greased" in use. About the only problem we do have with the machine - and we've used various grades of thread so we know it's not relating to one size - is the ability to set thread tension is . . well . . not exactly "state of the art". Expect to have to set and re-set this on your machine and don't assume that it wasn't properly re-conditioned. -
Gritzner vs. Frobana sole stitchers
HENDREFORGAN replied to Vinculus's topic in Leather Sewing Machines
I have a Frobana Side Sole Stitcher which - very rare - is mounted atop it's "original equipment" pedestal. Bought from a retiring cobbler about 30 years ago, fortunately a good number of new needles, spare shuttle/hook assembly, front plate, etc. Didn't have a motor though as the local safety people condemned it. Over the years I've used it by hand but, getting older now, will put a motor back. Originally a clutch motor controlled by a foot pedal on the pedestal but, seeing our 205-370 power it's way through thick hide easily despite seeming to have a rather small induction motor, I reckon the newer motor system will work. Quieter and safer too. Remember with ANY idea to table top mount these that the flywheel together with some of the internal operation does pass about 50 mm to 75 mm lower than the bottom of the sewing head casting? Then there is the crank handle too . . really very pleased ours has it's purpose designed pedestal with a parts drawer too. It's used mainly for sewing down the sides of "straps" - we make "adult toys" - but we also use it to sew thick rubber to thick (10 oz +) veg tanned hide and it does that in it's stride. Obviously it's very narrow "throat" is what limits these machines but, it does fit our needs, and I'm sure it'll do the same for yours too? The "side sole stitcher" was a purpose made tool for shoe making. The needles are now almost impossible to source BUT, set your machine up and sew slow, and they'll last for ages . . their size has one advantage . . you can hone that point sharp again by a lick on a wet-stone. Do have an original owners manual in English so, if you get one, let me know and I'll do you a copy. Look too for this machines mention in threads on here? Some interesting comments. -
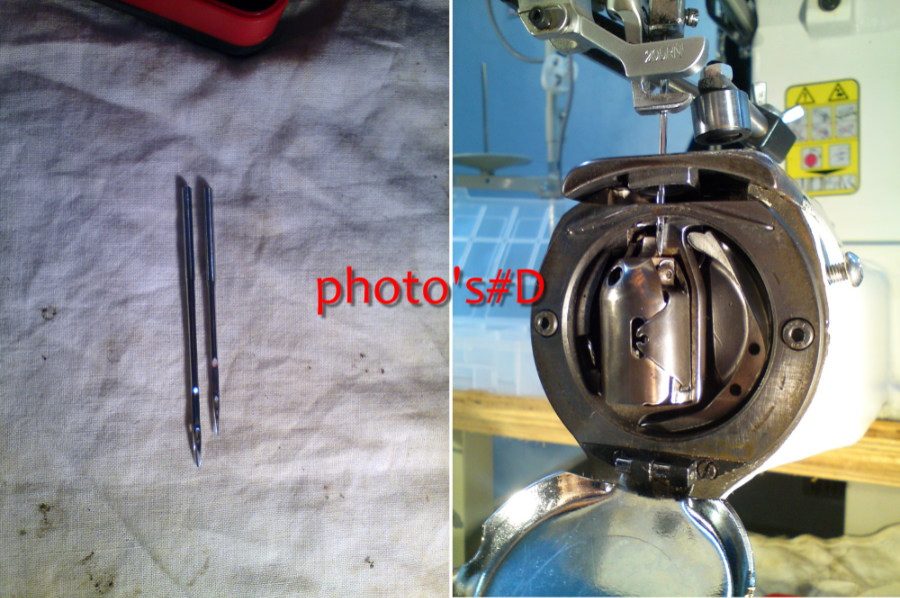
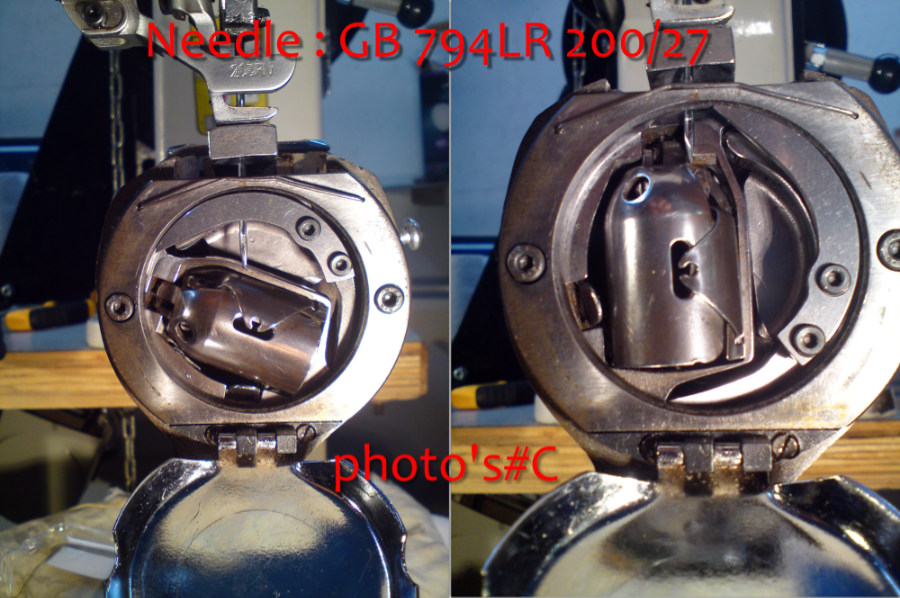
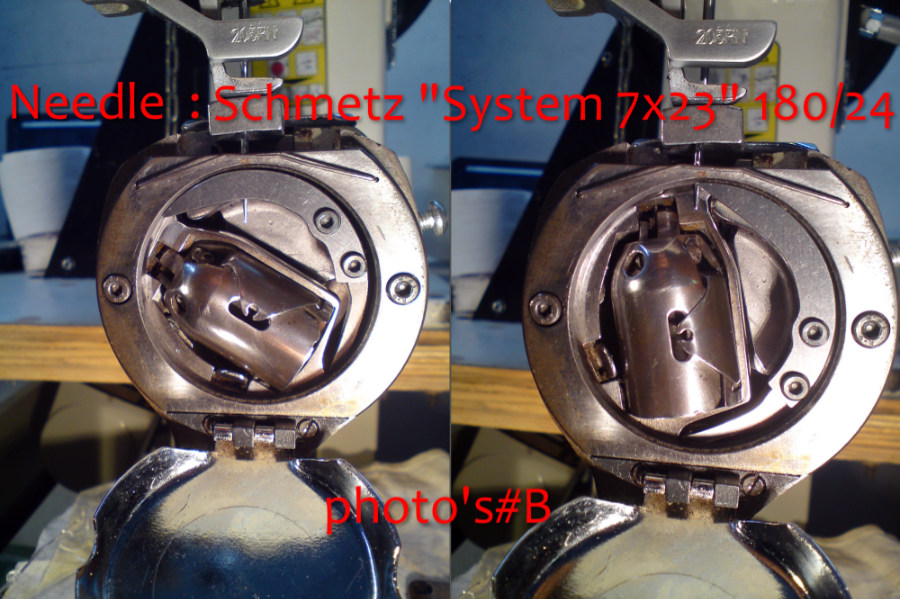
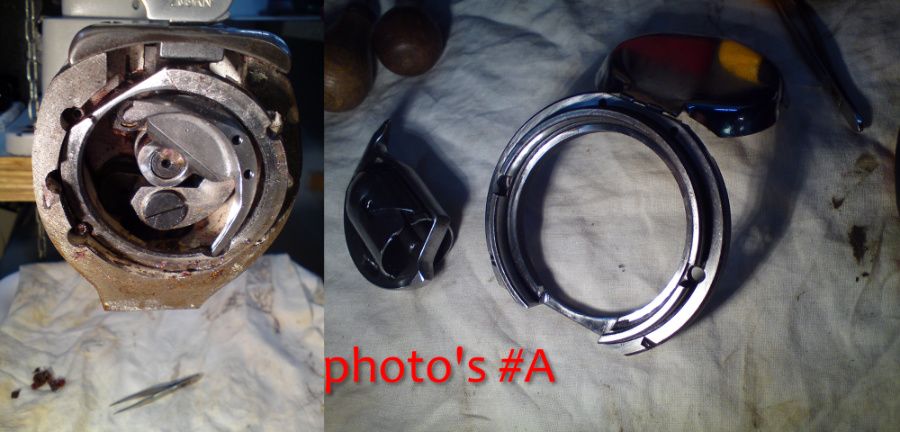
We bought a second hand 205-370 last Autumn and it's been more than a bit of a hassle getting some parts, needles, etc. for it here in the UK. They're truly quite a rare beast here. With some other work getting in the way before we put "The Beast" to full occupation it's not been until the last few weeks we've been using it regularly . . and we've hit numerous issues . . but the one that has us stumped is that it cannot use the "794 system" needles! WTF!!! That is the chosen, recommended size - indeed only size we think - for this machine. We didn't pay much attention to the needles the machine came with at first, the machine was fitted with a fat one used to produce the grey upholstery hide sample it arrived with and the opened and unopened packets of needles in it's drawer were round point for clothing only. We believe the previous owners used the 205 for work of a lighter nature than what it is capable of and what we bought it for, we need to use the 205 for heavy harness leather work, this machine is only one of two worldwide that it the ultimate for this work and we do know it's strength means it'll still sew when others will grind to a halt. So any issue with needles is worrying. To that end we purchased various points of new needles of the correct size for the 205, this machine uses the 794 range, no other "system" is recommended. We then also sourced the correct, heavier "button twist" type of thread that is OK for the 205 and we need for heavy leather-work. We fitted our first needle and set up the machine to sew only to find that the first needle broke almost immediately, another fitted showed instantly that it's diamond point was burred over. We checked that we were fitting the needles correctly - we were - and our timing, etc. was spot on. It is then we looked in more depth at the needles the 205 came with. They were a completely different system. The one fitted for the leather sample was a Singer 250/27 whilst the packets in the drawer were Schmetz "System 7x23", they were all size 180/24. These are all too small, technically, the 205 was showing it's great aptitude to be tolerant we think. Popping open the cover at the end of the cylinder arm we fitted a new needle and moved it slowly by hand. The needle, a GB 200 leather point, was TOO LONG and it's point was first glancing off the bobbin shuttle and then colliding with the swing hinge for that part. So we fitted one of the 180/24 needles and that cleared all obstructions. So now we know why this 205 came with the wrong sizes of needles. But the 205 is designed to use ONLY a 794 "system" needle. The pair of us took time out one day to fully go through the 205's whole needle and shuttle/hook assembly carefully taking notes and photo's and we hope eventually got some answers. A few of these photo's are attached beneath our text, "A" shows that we're missing the two ring spacers and that the inner ring is simply pushed too far forward . . by it's four springs maybe? "B" shows the needle size that came with the machine passing the bobbin shuttle whilst "C" shows the "794" hitting the same part. "D" shows the two needle sizes side by side and a better view of the "794" hitting the side of the bobbin shuttles hinge . . the inevitable happens each time. This is where we think this 205 is "going wrong". The Machine's bobbin housing sits too far forward and is not spring loaded as it should be, this is totally proven by some of Uwe's video. The grub screw in the side of the cylinder arm which locks the mechanism is not performing as it should it almost misses the inner ring completely when it's required to hold that assembly - so the bobbin housing may be in the wrong place. Incidentally the one shown in our pix is a temporary machine screw replacement to help it work . . the fitted grub screw has a chamfered point. There are also two spring spacers missing and the four small springs behind the hook assembly may also be wrong too. Whilst the needle/hook will collect the bobbin thread the correct needle collides with the bobbin case and, when the smaller incorrectly sized needles that came with the 205 are used, whilst these needles don't hit anything they do drop lower stitches from time to time. Needle too short? This may also be why the two needle protection spacers originally fitted are far too big at the pair totalling 3.60 mm, they don't as such effect sewing but they do an important role in sewing heavy work. They prevent the needle breaking under deflection by weight, so this 205 has the maximum spacing . . was this to try and solve the mechanical issues breaking needles? We would VERY much appreciate ANY input to solving our issue from fellow forum members . . thank you.
-
Thank you for that heads up and, following the meeting on the 23rd, it does appear that the closure plans were dropped prior to the meeting itself. Another report here . . go half way down page : https://www.museumsassociation.org/museums-journal/news/15022017-birmingham-walsall-drop-proposed-museum-cuts However, the venue isn't in the clear yet as perhaps indicated by the comment : "It has also agreed to keep the leather museum open at its current venue while seeking out new commercial opportunities to maximise its income." OK . . . so best advice then is go NOW and as many times as you can then.
-
To my knowledge there are very few clicker press makers here in the UK, most wholesalers are now importing Italian or Chinese made units. We're considering one of these machines and the design of unit you have hasn't been seen at all in all our searches . . never seen one with the pillar at the end. The fact that you can have 3 phase supply in North America that is the same voltage as UK single phase really doesn't help, does it? In the UK, and in Europe too I believe, three phase is from 380 volts up to 415 volts. Our cable colours are as follows : UK and EU Single phase : Live is BROWN, Neutral (return) is BLUE and Earth (ground) is YELLOW/GREEN and UK and EU Three phase (2004 on) are LIVE PHASES are BROWN, BLACK and GREY, neutral (return) BLUE and earth (ground) YELLOW/GREEN. Prior to 2004 the colours were LIVE PHASES were RED, YELLOW and BLUE, neutral (return) BLACK and earth (ground) either YELLOW/GREEN or plain GREEN. However just because a machine was made to accept THREE PHASE power doesn't necessarily mean that, within the unit itself, those extra phases were broken down to a SINGLE PHASE for an electrical item to work. We have a commercial steam oven we use for moulding leather which is THREE PHASE supplied yet some of it's components are SINGLE PHASE taken from an internal board. Whether at the motor or - ideally - the clickers incoming socket . . count the number of wires . . five or three?.
-
According to documentation the Council aren't supposed to be sitting down at meeting and deciding this until February 23rd . . can you say please what you are basing your report on?
-
Given that one main reason for oil tanned hides is to provide waterproof boots and shoes one can see why it might be a bit overly waxed compared to almost all other veg-tanned finishes . . but surely even when used for shoe manufacture it wouldn't be "oily" . . image just how often you'd be boiling your socks! Something doesn't sound at all correct with your purchase, have you asked the supplier for assistance? Is it truly oil tanned - which often has other additives to the process - or is it actually oiled hide? The latter is a post tanning process which is designed to heavily lubricate usually older, dry hides. Whichever is used the leather will be a veg-tanned and for that to exude excess oil into another piece of veg-tanned hide is an indication that your purchase wasn't "fit for purpose". Only thing I can suggest is pack your piece between layers of tissue paper under a bit of pressure and keep changing that till no oil appears . . . then ignore that hide again for projects unless you're into making leather Wellington boots.
-
Adult area on Leatherworker.net
HENDREFORGAN replied to Johanna's topic in Announcements and Administrivia
Most grateful if you would add me to this list . . many thanks. -
Cutting Leather - Getting nice round corners
HENDREFORGAN replied to Sheilajeanne's topic in How Do I Do That?
I find that the secret to cutting precise lines, curved or otherwise, in hide is to maintain accuracy. Many when starting out, I know I did this, try to overcome the strength of the hide by cutting with ever greater pressure . . and it takes but a nano-second to make a slip and that's the piece ruined. Over time I studied how I could overcome this potential foul up and now this is my approach. Good hide has one huge advantage, it's easy to make a mark in it's surface and that can then be used to replicate further marks or cuts. So I use a slightly dulled (rounded point) awl that I'm comfortable holding as if it were a pen and draw an indented line using light pressure, then I follow this with a swivel knife fitted with a sharpened blade, finally when I have a groove deep enough that a blade tracks accurately I'll use a scalpel - not a craft knife version - a one piece stainless steel knife with a well honed edge. It's delicate point means I can easily follow previous lines. Readers will note that these techniques are little different to many used in heavily tooling veg-tan hide . . but I think that many leather-workers who haven't progressed to that work - and many aren't interested beyond stamping using commercial tools - aren't that aware of how these tools can be also put to use making accurate cuts in hide. -
I so applaude the design and reasoning process you went through, this is an under-estimated vital need in creating ALL these forms of leather armour . . and as with so much that is created for LARP the finished design, whilst it brings something out of history, always presents it in a fantasy manner . . . . I would only ever use double rows of solid copper rivets and burs though . . never tubular rivets. Sorry.
-
For some irrational reason . . I think it's due to my Nationality . . I can never pass up ANY subject on "dragons" without exhibiting my FAVOURITE "Dragau" . . .
-
Dark Havanna is second only of my favourite colours for bridle butts to London Tan. One reason why I always recommend http://www.metropolitanleather.com/index.php for, with these "standard colours", you can buy leather from them and match hides you bought from them years ago. Though these colours are in truth universal and bear other names elsewhere they are set in stone.
-
@JerseyFirefighter . . . an excellent response and you have identified the Achilles Heel of the "double cap" or "tubular" rivet . . it is possible for this rivet to appear sound but actually not be entirely correctly fitted. Hiding it's workings inside the tube means you can't offer a 100% guarantee . . oh, it's not as if you can't assemble the solid copper rivet and copper burr badly either . . but you do get to see you've failed in technique so have to chance to replace it. Even when badly applied these rivets are horrendous to remove! Even when supposedly failed they won't fail! There is one other mass produced rivet that I do use but that is down to a lucky purchase of the machine to use it correctly. The bifurcated rivet. Now, typically you see these being used by crafts-persons with no cap or with a washer around the "tails" before these are spread with a "vee headed hand punch" . . but they are really meant to be used with a cap. The "cap" appears no different to any "double cap" rivet when fitted but it's entirely different. Internally coned it spreads the tails of the rivet and then curls them under a brim. You can't do this by hand though . . you need the machine for it that does this work so elegantly. Mine is a foot operated press simply marked "British Made" and with "Size 2" but I believe it was made by Newey & Eyre who, in that companies origins, were one of the giants in the rivet world . . today the company has been sold on so many times it's name only is for an electrical wholesaler. Sad. I bought it from a private seller not sure of how to use it for GB£ 50 about 20 years ago . . today you'll not find it anywhere . . priceless. I'll try to get some pix of it up here so that readers can see why this machine is so valuable because, at least in the North American continent, it may be found under other trade names. For the moment here is a link to these rivets and caps for sale on Abbey England : http://abbeyengland.com/Store/List/0/CategoryID/419/Level/a Negatives? Well like the "double cap" you can't see inside BUT set up the foot press properly and the whole operation is more fool-proof than using tubular rivets with a hand-setter . . the other is most of the rivets that can be sourced will be electro-plated ferrous metals . . though if you can bear the cost you could use a solid copper or alloy rivet with a standard cap?
-
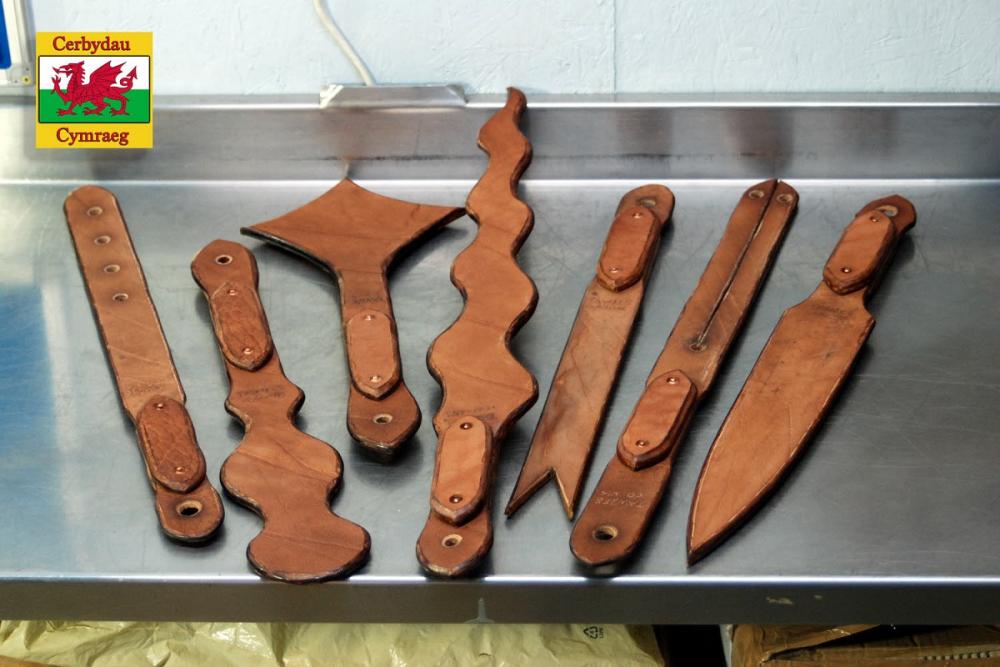
Hopefully you did this before you found your money wasted? The amount of "electro-plated" brass that gets mislabelled and/or misquoted as "brass" is one of the "learning curves" in starting out. Perennial problem you have identified . . how in a world of mass produced junk do we find even simple things like quality rivets to ensure our produce is spot on. You can find genuine brass eyelets but genuine brass rivets - sometimes copper is quoted too - are often expensive and an entirely different form of rivet if you are seeking the popular tubular rivet with cap. Be suspicious of eyelets and rivets that are quoted as stainless steel too . . s/s is a fragile material for this application and most on sale is actually nickel plated steel. This is a subject that has prompted me to use solid copper rivets - sometimes called hose rivets - in my work. Some don't like them, others might say they're a bit over-kill but I know they'll never come apart and they are genuine base metal. One of my "signatures" I suppose. The attached photo shows them being used on VERY thick hide.
-
There is now an interesting thread on here about "suede", sanding, etc and associated points of view on a not dissimilar topic? readers of this thread will find some good info on this one? From my personal point of view when I'm purchasing quality top grain hides I will ALWAYS take into account the nature of the flesh side. Care and attention and maybe a bit more spent on the leather may get you hides with a much smoother, more uniform inner most surface? Certainly you can often see hides where the flesh side is so ragged that you just know trying to sand it may prove to be a time consuming or even fruitless task . . the more you sand it the more fibres you pull loose! If the "wearer" won't be against it then, as above, oiling and waxing is often more effective.
-
Yes, having the rough side outermost and heavily waxing meant maintenance could be a lot rougher than similar polishing of the grain side. Even today if I have to re-oil old leather to rejuvenate it I'll look to work "inside out" as, with usage, the patina on top grain can form a rather effective armoured surface. Easier and quicker working from the other side. Remember too that in the days when working mens shoes were grain side innermost that was also a comfort chioce . . very few could claim to earn enough to buy socks and shoes/boots were often worn with bare feet. Along the lines of your reasoning the process of sueding is used on higher quality hides. Today we see hides that have been buffed - corrected leather - where the original grain showed defects and the buffing produces a uniform standard. Often applied to full grain leather but you can be sure some sectors of the leather industry will treat spilt leather the same to try and "tart them up" . . . which neatly brings me back to my earlier comment . . suede = cheap leather "tarted up".
