TomE
-
Posts
1,292 -
Joined
-
Last visited
Content Type
Profiles
Forums
Events
Blogs
Gallery
Store
Everything posted by TomE
-
Regarding paranormal phenomena related to cows, my brother-in-law is a retired veterinarian who used to do a lot of work at dairies. When they were implanting embryos in cows he would hold his vet tech's wedding ring on a thread over the petri dish containing the embryo. They would predict the sex of the embryo based on the direction that the ring rotated. Had to be his tech's ring to get an accurate reading. Probably another case of cow magnetism. He is a bit of a magician and story teller, which his clients enjoyed.
-
Good looking bunch of straps. Hard to choose a favorite. I like your unique artwork.
-
Looks like a winner and thanks for personalizing it for me. Last time I tooled leather was in the 1970s. I sold small items, mostly Tandy kits, in the general store at a resort where we spent our vacations. Still have my little collection of stamping tools and I use one of them - a large pear shader for molding leather straps in a rounding block.
-
I've had good luck with all of these vendors. Each has certain items that I prefer. I also use Batz Corp (hardware) and Beiler's manufacturing (leather, hardware, tools).
-

A Christmas gift for my sister
TomE replied to Thadrick's topic in Purses, Wallets, Belts and Miscellaneous Pocket Items
Looks good. Of course, working with leather is (mostly) fun too. -
I think there are 2 issues, minimizing dye rub off and producing a shine. One way to solve both problems is to apply an acrylic finish like Resolene, Tan Kote, or Mop N' Glo after dyeing and buffing the leather. I don't use them on horse tack because I prefer less shine and like to maintain the leather by regular cleaning and conditioning. Fiebings Pro Dyes have less rub off than their Leather Dyes. I use black Pro Dye with good results. Some folks start with a base coat of brown, dark green or blue then apply black. I don't find this is necessary with the black Pro Dye. After dyeing its a good idea to buff with a soft cloth to remove excess dye and to add some shine. I usually condition after dyeing. If more shine is desired I use neutral color Lincoln Stain Wax (shoe polish) and continue buffing and brushing the leather. For undyed veg tan I will sometimes add some color and shine with the Mid-Tan Stain Wax. There are lots of ways to finish your project. Try searching these forum using a Google search with the syntax "site leatherworker.net <<key words here>>"
-
@Mulesaw Thanks, Jonas! I do have that book, and it's nice to have a digital copy as well. I am always on the lookout for books on making English saddlery and tack. The electric stapler would have been a good choice, since I needed to decrease the air pressure to a minimum to avoid driving staples through the leather. We have Harbor Freight discount stores here for cheap tools made in China. My stapler cost $39 and I think it will last for as long as I need it. I already had a portable air compressor. Used to be a car guy before my wife conscripted me to be her farm hand. Keep us informed about what is coming out of your workshop. Always interested in seeing your work and getting advice.
-
I am now the proud owner of a pneumatic rivet setter and stapler. Maybe I can go into the upohlstery business. Wish I could find more formal instruction and references on building English saddles. I was told that the books by Shields ("To Handmake a Saddle") and Davis ("The Saddler") are hopelessly out of date, but I find them interesting even if only historical. Maybe the old construction methods are superior?
-
Peaked my interest. I found reference to an article entitled "Make a 3-Pad Ox Collar" in Rural Heritage Magazine, Winter 2004. https://www.mischka.com/shop/product.php?productid=17252 This issue is out of stock at the publisher, but you might find it at a used book seller or private seller. I would be interested if you turn up this information.
-
I think your thread is too heavy for the thinnest parts of the project. Not enough thickness to hide the knots. I have a Class 26 loaded with #138 thread and a 22 needle that handles a wide range of thicknesses but I don't sew anything below 3-4 oz. Needle size 22-23 is the typical range for #138 thread. I would make up some practice pieces with these same leather thicknesses, switch to a larger needle, rethread the machine, and adjust the tension until you're happy with the results. Should be able to pull the knots to the top then loosen the top tension until they're where you'd like them.
-
@Mulesaw That's a good point, Jonas. In an interview with an Olympic groom, who was retiring after working for several well known riders over the years, she mentioned that she uses dilute houshold ammonia to cut through the sweat and scum on tack before futher cleaning and conditioning. Ammonia might also clean up an oil/greasy surface caused by inadequate care. It is interesting to me to read discussions proposing to only use "natural" and pH balanced products for tack care, in light of how leather is tanned and the strength of the bonds that join the collagen fibers in tanned leather. My main concern would be removing too much of the oils and fats in the leather, but I think we have solutions for that problem.
-
@bethgay what a great story! Made my day. Hope you are well.
-
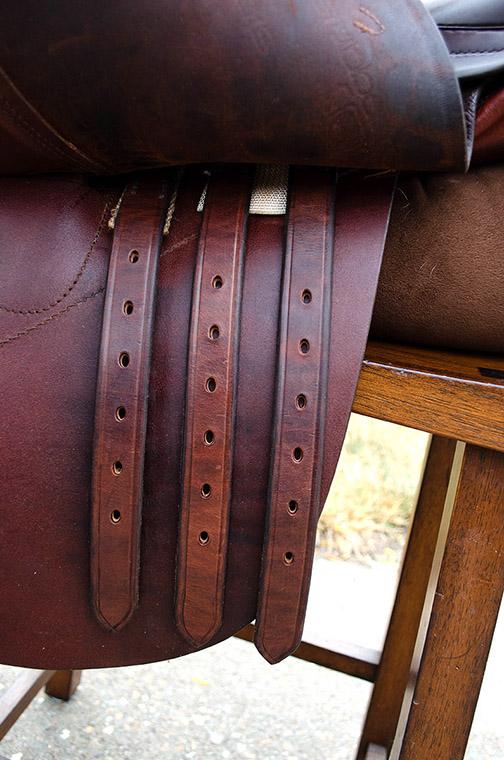
I normally charge $150 to change billets, which is what I quoted to this client. I figure about 1 hr to make the billets - edge finishing, punching 6-7 buckle holes and 12 holes for sewing onto the webs. Dressage saddles have 4 billets (~2 ft long) and jumping saddles have 6 billets (~1 foot long). Another 1-1/2 hrs to disassemble the panel, sew the billets, and restitch the front of the panel. Materials are 6-8 feet of 1" strap from the best part of the hide, some thread, and staples. Some saddles have surprises like a billet that is directly riveted to the tree. For sewing the billets, I use a single needle backstitch with doubled up 0.040" waxed polyester thread from the Maine Thread Co. The billets are pre-punched with 6 holes in 2 lines. I avoid pushing an awl through the webs so I don't cut the threads. The backstitch pattern gathers more threads per stitch on the backside when sewing leather to woven fabric. This saddle took considerably longer to completely remove the panel - cut the lacing in back, remove ~15 staples - and then to restaple and lace the panel to the back of the seat. All this disassembly was required to expose 4 staples that attach the 2 tabs on the front of the panel (see in picture above) to the tree. I think my prices will be increasing. I've seen saddlers listing a price of $180-$200 for changing billets. I messaged Stubben's saddler/service manager about this particular saddle. He said it is the most difficult construction that he deals with (PIA in his words) and he charges $300 for this type.
-
Thanks Jonas! I recently replaced the billets on a dressage saddle that had the front billet directly riveted to the tree, instead of a short web riveted to the tree. I ended up buying 3/16" solid aluminum rivets to match existing, and a dome shaped rivet setter that fits on an air hammer. Worked out fine after I practiced setting rivets. On this saddle I learned how to use a pneumatic staple gun. Decreased the air pressure to ~55 psi so it would drive the 1/4 x 3/4" staples into oak with a piece of 6 oz leather on top, without damaging the leather. Once I got it dialed in, it worked well driving staples into the plastic tree.
-
Stohlman's Encyclopedia of saddle making is a fairly complete description of western saddle making, from the perspective of someone who hasn't built a saddle. There are also books and DVDs at the Leather Crafters Journal online store. The only references I've found for English saddle making are old books. Steinke's book "Repair Your Own Saddlery and Harness is useful, but becoming rare and expensive.
-
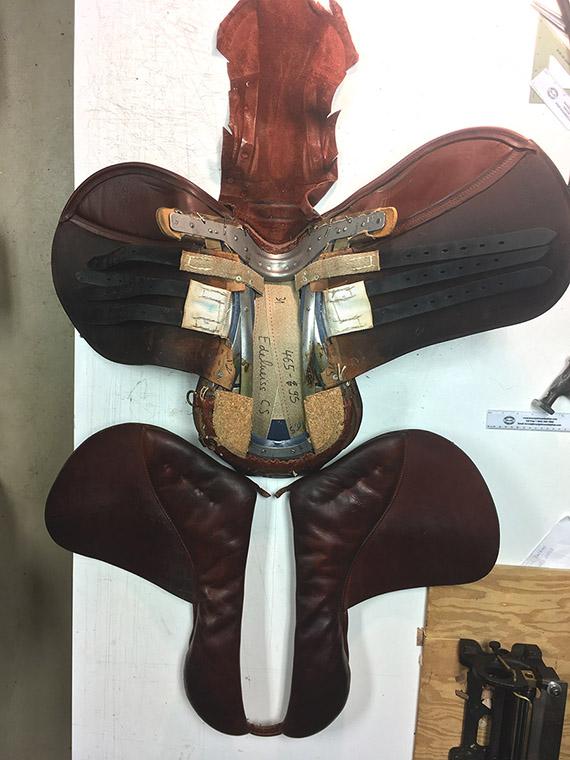
It's a tree. Traditionally made of spruce and steel. This one is a plastic material and steel. The longer webs that run lengthwise support the seat (like a hammock), and the webs running side to side attach to the billets.
-
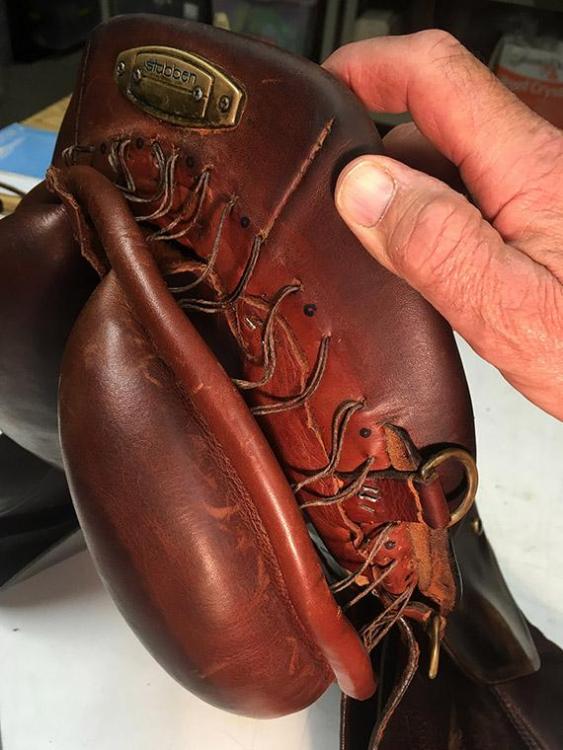
Just finished the repair today. I didn't take a picture of sewing the new billets (girth straps) on the web. In the second picture, you can see the white nylon webbing with the new billets attached. The stitching is hidden under the flap, which is why all this has to come apart to change out the billets. Jumping saddles have 6 billets but only 4 are buckled to the girth at a time. Allows for some adjustment. The 3rd picture shows how the panel is attached to the back of the seat by "lacing" with heavy thread in a zig-zag pattern. The thread is run through all the holes before pulling it tight to draw the panel tightly against the seat. The panel serves as padding to cushion the saddle on the horse's back. It is filled with wool flocking that can be adjusted (add or remove wool) to fit a horse's back. You can see the whole panel in the lower part of the 1st picture. it has 2 pockets that fit over the points of the tree (the curved metal piece in first picture with 2 leather pads on the tips of the points that fit into the pockets of the panel. English saddles are sort of like leather upolstery.
-
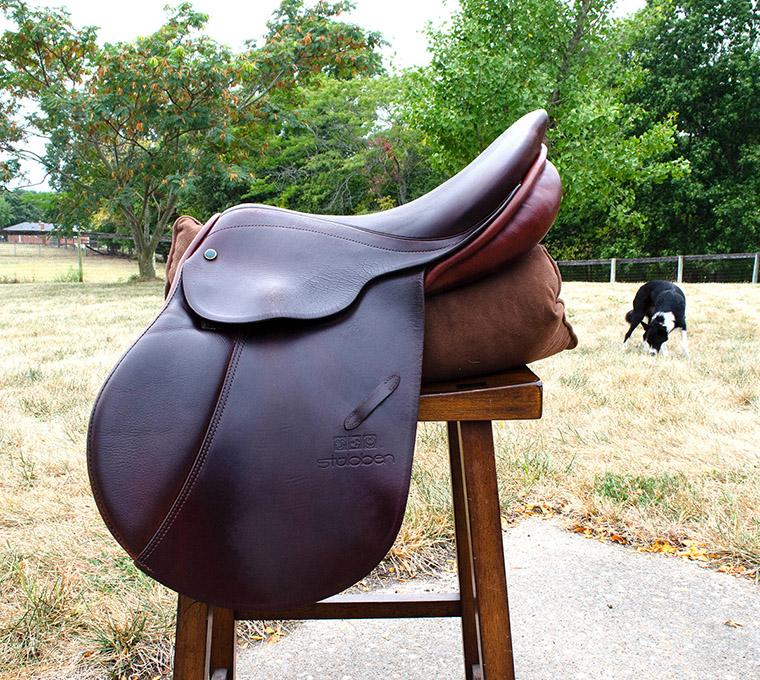
Learned something new this week. This children's jumping saddle is a Stubben Edelweiss CS that needed new billets. I am familiar with saddles that have stitching or screws to secure the front end of the panel. It is usually necessary to drop the front of the panel off the points of the tree to access the stitching on the billets. This saddle had no stitching or screws visible, so I contacted Jack Stewart who is the saddler and service manager for Stubben North America. He replied within minutes on a Saturday explaining the whole process. Thank you, Jack! To access the billets on this saddle it's necessary to cut the lacing on the back of the panel then remove staples and peel the gullet forward in order to expose staples that secure the front of the panel to the tree. Once all the staples are out the panel can be removed and the billets are easy to swap out. I made them out of 11-12 oz Hermann Oak harness leather. This project gave me an excuse to buy a pneumatic stapler to drive the 1/4" x 3/4" crown staples holding the gullet and the ends of the panel on the tree. I had already quoted a price to the client for this repair, but it was more involved than I realized. The price of an education.


-
I mostly work on English tack, but here are some thoughts. I bought a side of HO 11-12 oz latigo that is beautiful leather. I've used it to make a bridle, some straps, and saddle strings (lace). I split it to ~5-6 oz and beveled the edges for saddle strings. I think Bruce Cheaney has a video about this. Lubricate generously with saddle soap before lacing. Harness leather is another choice for saddle billets. It is strong and weatherproof. It is my go-to for English saddle billets. Hermann Oak Leather sent me samples of all the colors they make (black and chocolate were my choice for English saddles). They will sell you items that aren't stocked by their retailers without the usual 5 side minimum order.
-
Another key to feeding variabile thickness is your preparation of the transitions - skiving to create gradual changes in thickness. For 5 oz leather handbags, a bell skiver would be useful to ease the transitions at seams and junctions. The Class 26 (341 type clone) is a great climber in my experience. Makers Leather Supply has a lot of tutorials and patterns for handbags. I mostly sew heavier straps on a 441 type machine. I will add a wedge-shaped welt to the returns where the strap wraps around hardware, and skive the end of the strap to create a smooth transition. I've also found that the narrow throat plates and pressor feet that are available for 441 type machines (search these forums) provide stability and do a good job climbing a transition. The type of leather also matters. I mostly use thick bridle and harness leathers that are waxy, causing material to slip if you're not careful feeding it.
-
Small world! I bought the same knife from Amazon and have been pleased with it. I did reprofile the blade with a more shallow taper. Harry Rogers also approves of this cheap knife.
-
The plate with spikes is a loop staple. Weaver sells them https://www.weaverleathersupply.com/products/15s4-loop-staples and Beiler's Manufacturing has smaller quantities. You can also sew the loop. Sewing and blocking a loop is a higher level of finish in my opinion.
-
They don't have a website. Amish business. Call for a catalog.
-
Beiler's sells cream and golden colored veg tanned sheepskin in various sizes. I am happy with the quality of the 12 ft skin I purchased. They also have chrome tanned sheepskin in cream, golden, and black.
-
The Class 26 is a workhorse. I’ve been impressed with how well it navigates varying thickness, such as sewing hardware on a strap, and tight spots where there’s little room for the outside foot. I keep it loaded with #138 thread and use it more frequently for items that I used to sew by hand. Great complement to a 441 type machine.