


TomE
-
Posts
1,292 -
Joined
-
Last visited
Content Type
Profiles
Forums
Events
Blogs
Gallery
Store
Everything posted by TomE
-
-
Gretchen and Mike Graham, the owners of Ruxtons Trading Post in Manitou Springs CO, are experts in the history of old saddles. I would contact them.
-

Tutorial, replacing zippers in riding boots.
TomE replied to Mulesaw's topic in Shoes, Boots, Sandals and Moccassins
@Mulesaw Wanted to thank you again for this tutorial, Jonas. Followed your method for installing the zipper and it went smoothly with a nice neat result. I am using V92 thread with 2 stitch lines along each side of the zipper. My patcher has trouble accommodating the thickness of the heel so I switched machines and used V138 thread to sew across the bottom of the zipper. I need more practice sewing straight lines with the patcher, especially when sewing the far/back side of the zipper that is harder to see. However, things are going in the right direction. -
Good looking work, as always. That's a very interesting purse.
-
Thanks for this information. I will look at the check spring settings on my Class 4 today. This could be an issue because I installed the Hennigan holster plate with feed dog to provide more clearance when sewing next to a center bar buckle. I am doing a reasonable job sewing 2-3 layers of Biothane Beta super heavy (3.5-4mm) using black #207 thread top and bottom, and a size 26 S-point needle. I've had problems with loose bottom thread (loops) when using round point needles (sizes 25, 26, 27), usually when sewing 3 layers and sewing next to hardware. I did increase the foot tension considerably. With the holster plate installed there is barely enough clearance to sew 3 layers of extra heavy biothane, especially at the ends that wrap around hardware. The turn around the hardware is very springy and I'm using my fingers to compress the turn when sewing towards it. I have a silicon thread lube pot installed but I don't detect the lube when running the thread through my fingers. Maybe it's enough? I have also noticed a problem with the black thread twisting. I saw your comment in the link below about countering twist by wrapping around a thread guide post. My Class 4 didn't come with any guide posts so I guess I'll call LMC to request one. https://leatherworker.net/forum/topic/98583-help-needed/#findComment-668610 Biothane has been a curse and a blessing. I am learning more about my machine and improving my skills. As always, I appreciate the advice from you and others on this forum.
-
I've been happy with Weaver's stitching horse. This video just came across my feed. https://youtu.be/Y6VdzFQATEw?si=jBoQWbfggn9BiLd8
-
Choosing durable dog collar thread... linen, Nylex etc...?
TomE replied to LakeOtter's topic in Sewing Leather
Tapering the end of the thread works for heavy linen thread, but not for synthetics. For linen I wax the thread, ends and all, after making the tapered ends. The wax will help keep the thread from slipping through the eye of the needle. However, most of my hand sewing is done with bonded nylon thread from my sewing machine. For hand sewing I wax the nylon thread and rub the wax with heavy wrapping paper to smooth it out. I use waxed polyester thread (0.04" = 1 mm) from the Maine Thread Co for some heavier jobs like sewing billets on a saddle. For that task I double the thread, tie a knot in the end, and use a single needle backstitch instead of a saddle stitch. -
I refill a Barge quart can from a gallon can, adding Barge thinner as needed. Made a funnel from a 16 oz plastic bottle. What is everyone's favorite glue pot?
-
I've been using a heat gun to "activate" contact cement - just a brief warming of the glued pieces before assembly. Bonds well with less cement so I have fewer problems with the glue interfering with burnishing edges. For some shaped pieces I case the leather lightly and shape the leather before applying the glue, and the heat gun treatment results in a better bond when the leather is damp. I'm using Barge cement but will probably switch to Weldwood in the future.
-
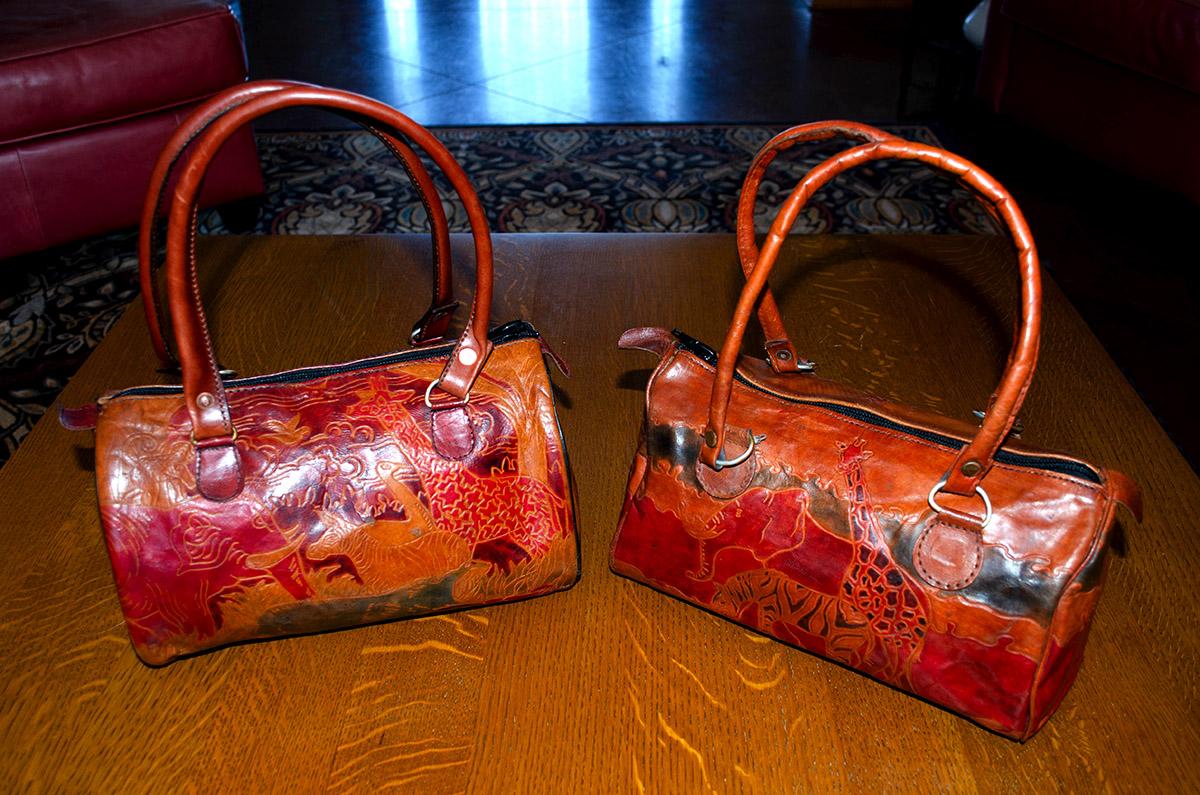
Spent some quality time with my patcher sewing these purses back together. The leather was dry, the cotton (?) thread was deteriorating, and the plastic piping was cracking. It was a learning experience. I replaced the zipper on both purses and made new rolled leather handles for one of them. I'm thinking it's easier to make bags than repair them. Maybe I will test that idea.
-
Good looking leads and collars! I like the way you sewed the chapes on the ends of the rope leads. You are motivating me to make a leather collar for our new border collie rescue. He arrived a week ago and we've been his foster home until today when the mandatory hold on adoption is over and we can officially claim him as our own. We have another border collie who is teaching him how to (mis)behave around the farm.
-
Thanks for posting! Your original artwork is superb. I especially like the belt. OK, it's a tossup between the belt and the satchel with the planets. Beautiful work.
-
The Chicago screws are a good idea - for the next one. This older client's saddle was in good shape, and I am guessing that she had taken a break from riding and was returning to it.
-
I recently encountered double cap rivets on the webs of a 25+ year old dressage saddle that was stamped Continental Walsall England. My online search didn't turn up anything specific about a maker. The client was the original owner of the saddle and I believe these were the original billets. The billets were machine sewn and I suggested that the rivets weren't necessary with hand sewn billets. She wanted the rivets. I guess they look strong. I used #9 copper rivets.
-
That's some serious stitching! Well done.
-
They might have come by the manual honestly from their Chinese friends who make the Cobra machines. Glad we're all on the same page. You got a bargain.
-
That's a beauty! I am still making friends with my patcher but find it is very handy for repairs. It seems reasonably forgiving of my lack of experience with it. Have fun. Here's the manual for the Cobra 29-18 patcher. https://cdn.shopify.com/s/files/1/0631/4000/3933/files/29-18_Manual.pdf?v=1747672941
-
I used to mess with cars before I resumed leatherwork. I had good luck with these products for leather interiors. https://www.griotsgarage.com (couldn't embed the full link to leather care products, but you can search the site for "leather"). Now I would probably clean the seats with glycerin saddle soap and a wet sponge, rinsing the sponge often to remove dirt and excess soap. While the seats are damp I would apply a cream conditioner like Bickmore's Bick 4. If that didn't restore the seats to your satisfaction then I'd find an upholstery shop to recover them.
-
Most of my hand sewing is using #207 bonded nylon that I wax. If fact, I always re-wax waxed thread before use because the wax is usually dry and flaky. I use a cobbler's wax that is a mix of beeswax and pine resin. After waxing I burnish the thread with a piece of heavy brown wrapping paper to even out the wax.
-
I've been happy with the chrome tanned billet bends from Naudin and Booth. https://boothandco.com/products/booth-saddle-strap-leather-rawhide-cow-billet The leather is stiff with little stretch. I believe it is tanned by Thomas Ware and Sons in Bristol. Perhaps it is available from UK suppliers? It seems that dressage saddles have a wide range of billet lengths and hole patterns that I like to match. My personal record is 33" billets on a Hermes saddle.
-
For me the type of strap cutter I use depends on the thickness and width of the strap. I use an inexpensive wooden strap cutter for thin leather (<7 oz) and narrow straps (3/8"-1"). The wooden strap cutter is also handy for cutting straps from small pieces of leather. Abbey England sells one that is as good as any I've purchased in the USA. I do sharpen and strop the blade, holding it with a surgical needle holder (heavy duty hemostat). For 6-12 oz straps that are 1/2"- 1" wide I use a draw gauge. @bruce johnson has some nice draw gauges that are ready to use, and a tutorial on his website about how to hold the draw gauge. For heavy and wide straps (> 3/4") I use a plough gauge that I bought from Vergez Blanchard. I did spend some time reworking the angle of the knife blade (~15 deg) and I put a small bevel on the back side of the knife to keep it from pinching the strap excessively against the gauge. It is my go-to tool for cutting lots of straps from a side of 9-10 oz leather.
-
Yes, lots of trends to follow, and with social media everyone's an expert.
-
But the shoe polish fixed everything. Her responses to the comments tell the story.
-
Lots of good choices for your projects. The Cobra Class 26 is a popular machine and there are a fair number of lightly used machines available on FB marketplace, Craigslist, etc. I bought one in like new condition several years ago and figure it will hold its value. It is quite handy for medium to lightweight projects.
-
Ideally the crank, like any noseband, simply helps to keep the bridle in place. However, it can be (over)tightened to prevent the horse from opening its jaw and evading the bit. I am less familiar with how curb straps are used.