


TomE
-
Posts
1,295 -
Joined
-
Last visited
Content Type
Profiles
Forums
Events
Blogs
Gallery
Store
Everything posted by TomE
-
I've managed to do fairly well skiving 9-10 oz straps with a bottom feed skiver by swapping the feed roller and using a roller foot as described in the post below. It now takes me ~5 min to swap the feed roller and set up for thin versus thick projects. Thanks again, @xnikolaos for the FAV AV1-AV2 manual. It has some useful information that I didn't receive with my used Techsew SK-4.
-

Leather Splits- uses, some feedback please
TomE replied to gkyork's topic in Leatherwork Conversation
Can use splits as the filler for raised leather features. I use leftover splits to test blade sharpness and to mock up different construction methods. -
View to soften veg tan straps and maintain strength
TomE replied to deboardp's topic in How Do I Do That?
I'm unclear how the straps attach to the sandals.to distribute the load. I use pure neatsfoot oil (Fiebings) and mostly Blackrock Leather N' Rich although I also like Fiebings Aussie conditioner and Bickmore Bick 4. -
Thank you all for the kinds words. Credit for the color goes to Hermann Oak Leather. This is HO bridle leather in Havana. It is a deep red-brown in daylight.
-
Rock Solid Knives might make a head knife for you. I hear good things about his knives.
-
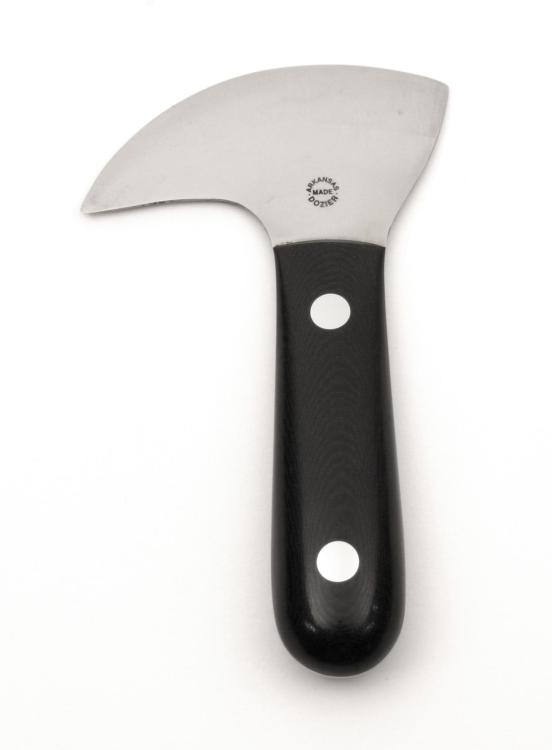
My favorite head knife is a Dozier #9. Just the right size for my hand and handy for skiving. D2 steel holds an edge. I'm not sure if Dozier is currently making leather knives. I found a used #9.
-
A rein rounder is used for any rolled leather strap that has a solid leather core - handles, halter throatlatches, rolled cheek pieces, dog collars, bracelets, etc. It is not useful if you're covering a cord with leather to make the rolled piece. A solid leather rolled strap holds it shape nicely and feels ... solid, but it is more work to make it.
-
View to soften veg tan straps and maintain strength
TomE replied to deboardp's topic in How Do I Do That?
The points of a bridle are narrow (5/8") straps that receive a lot of tension. Same for English reins. I typically use 9-10 oz Hermann Oak bridle leather for bridles and reins. Has a firm hand, which I prefer for cutting and sewing, and it softens when I oil the finished piece then rub in some conditioner. Latigo leather is another possible choice - not as dressy as some veg tanned but it's tough, weather resistant, and doesn't stretch much. The raw edge of 9-10 oz narrow straps looks clunky but it shapes up nicely after beveling front and back and burnishing the edge. Great idea to give away the initial projects in exchange for constructive feedback, which I've done for all the tack items I've made. Learned from my mistakes, made friends, and have solid recommendations for my work. -
I use Stohlman’s handle #17. A 1-1/4” strap of 7-8 oz leather wrapped around a 7-8 oz filler. After rounding the rolled section is about 1/2” diameter. Here’s a summary https://www.leathercraftmasterclass.com/forum-1/leathercraft-techniques/rolled-leather-strap.
-
View to soften veg tan straps and maintain strength
TomE replied to deboardp's topic in How Do I Do That?
The main factors affecting strength of straps are the weight and quality of tannage. The best leathers are tanned over a period of weeks by slowly increasing the tannin concentration in small increments. This produces a more uniform crosslinking of collagen fibers in the leather, and it costs more than faster methods. Hermann Oak leather is an example of quality leather that will produce strong straps. The densest part of the hide, the butt and back, will yield the strongest straps. The shoulder and belly are stretchy because of the looser structure of the fibers. Neatsfoot oil will not harm the leather if applied in moderation. Over oiling (saturating the leather) will make it sticky to the touch and spongey. It is OK to wet form straps. I routinely do this to fit pieces of horse tack tightly around the hardware. I don't know what luxury veg tan is, but 6 oz is perhaps a bit thin for a strong strap. I would consider 7-8 oz. Taking care to bevel and burnish the edges of thicker/firmer straps will improve comfort. Also skiving any ends that come into contact with the skin. New tack is stiff and breaks in nicely with use. -
Yes, bevel and do any sanding then dye/burnish the edge. If you want the edge darker, you can repeat the process and the dye will continue to soak in (edge is not sealed). I sometimes apply beeswax to seal the burnished edge, using a heated edge iron to work the wax into the leather. I don't use acrylic finishes but that would be another way to seal the project. The dye/edge solution lays down on the edge and doesn't bleed in my experience. I either use a wool dauber that has been singed to remove loose fibers, or a piece of Magic Eraser to apply the edge treatment. The smoother the edge, the easier it is to get a neatly dyed edge. The Martin's edge solution produces a hard, shiny edge on bridle leather with less effort than saddle soap/water or gum tragacanth in my experience. Bridle leather is stuffed with waxes and fats, and the resulting fluffy fibers can take more effort to burnish. Also, check out @hidepounder's tutorial on finishing edges in the "How Do I Do That?" forum.
-
I use Martin's Edge Solution mixed 50:50 with Fiebings Pro Dye for finishing edges. The edge remains permeable to dye and other treatments. I use a small rectangle of Magic Eraser held with a clothespin for dying thick (9-12 oz) edges. The Magic Eraser holds a lot of dye without dripping although I apply the dye with vertical strokes to avoid pooling or drips on the face of the leather. Once the dye is absorbed I burnish immediately with canvas, or do the first pass with a power burnisher then finish by hand with canvas.
-
I have good luck with black Pro Dye. Heard good things about Renia Absolute Black dye, but haven't tried it.
-
Lots of pretty details and impressive craftsmanship. I like it.
-
Allergies in dogs and their going off food.
TomE replied to SUP's topic in All About Us and Off Topic
She is a lovely dog! We had an alleged Border Collie, Bess, who we thought might have some Kelpie blood. She developed autoimmune polyarthritis at 3 years old and by age 6 years succumbed to long term immunosuppression with steroids to control the arthritis. She was a wonderful farm dog while the arthritis was under control. Now I have a 10 YO Border Collie that is completely blind and a 2 YO Border Collie that we recently adopted. They keep me entertained while doing chores. The blind dog knows his way around the farm, more or less, but is becoming forgetful. Guess you know what my favorite breed is. Bess doing her circus act with a weanling foal.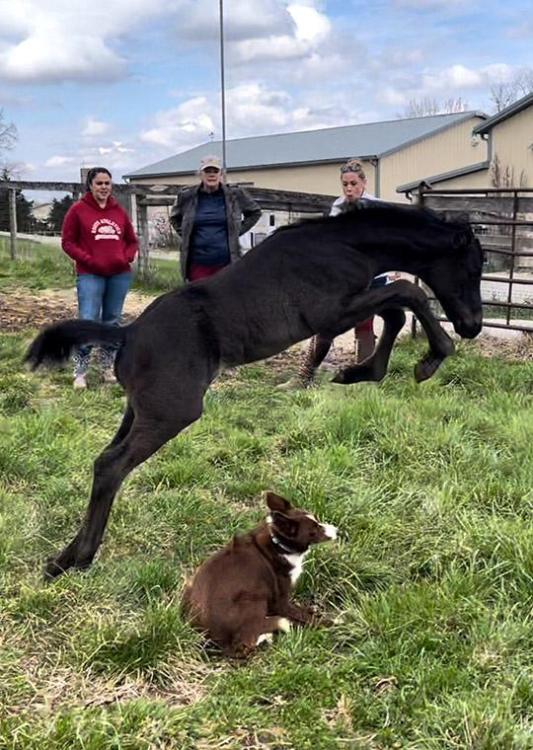
-
Replacing strap keepers on a Swiss Rucksack
TomE replied to livewire516's topic in How Do I Do That?
I use the single needle backstitch for attaching new girth straps to the canvas webs of an English saddle. The idea is that the double length stitches on the canvas side gather more threads per stitch and are more secure than a saddle stitch. The front of the sitch looks like a normal running stitch. The back side is a bit loopy. I think either the saddle stitch or the backstitch would be fine for your project. Here is a video showing the backstitch for creating a running loop (sliding keeper). -
Replacing strap keepers on a Swiss Rucksack
TomE replied to livewire516's topic in How Do I Do That?
Another idea is to sew the keeper on a leather shield (any decorative shape) then sew the shield to the bag. A single needle backstitch is a good choice for sewing leather to woven fabric. The double length stitches on the back side gather more threads in each stitch. This is one time when I pre-punch holes in the leather and use a harness needle to pierce the fabric. An awl will cut threads in the weave. -
This is a used Tech Sew that I am quite happy with. Setting up a bell skiver for anything but thin/soft leather seems to be a well kept secret, but I am having fun learning by trial and error. Took @RockyAussie's advice and avoided the top-and-bottom feed machine, which would probably outsmart me. I will also use it for thin leather - bags, covers for halter pads, etc.
-
The friend who gave me the cake of wax clarified a few things today. She uses 1 part pine rosen (not pine tar) plus 2 parts beeswax. She heats the rosen in a nonstick pan just until melted then adds the beeswax to melt. She pours the mixture into silicon baking molds to harden. So far I don't see any rosen crystals in the wax. She purchased Pine Gum Rosen on Etsy from DiamondGForest. Also, "triple filtered beewax" from SimplyBeeswaxCandle on Etsy.
-
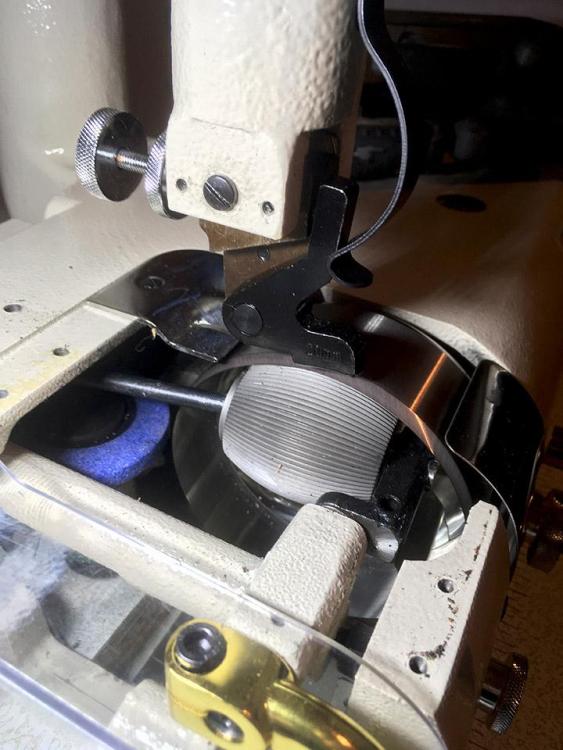
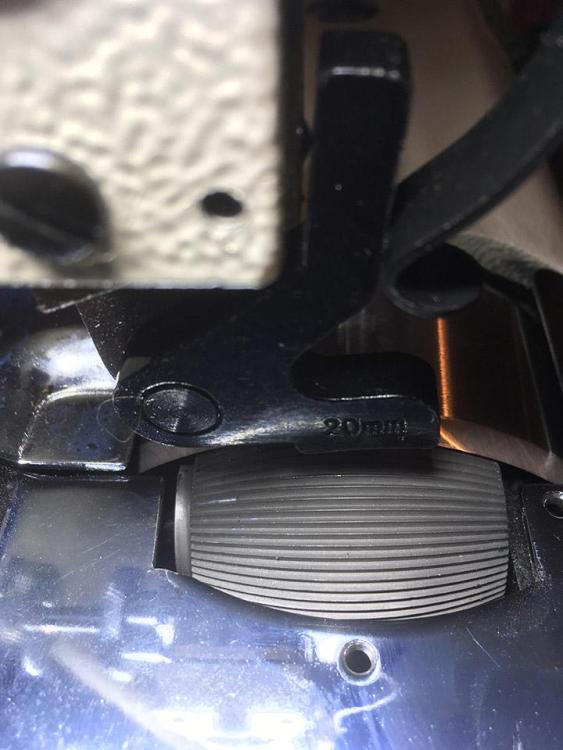
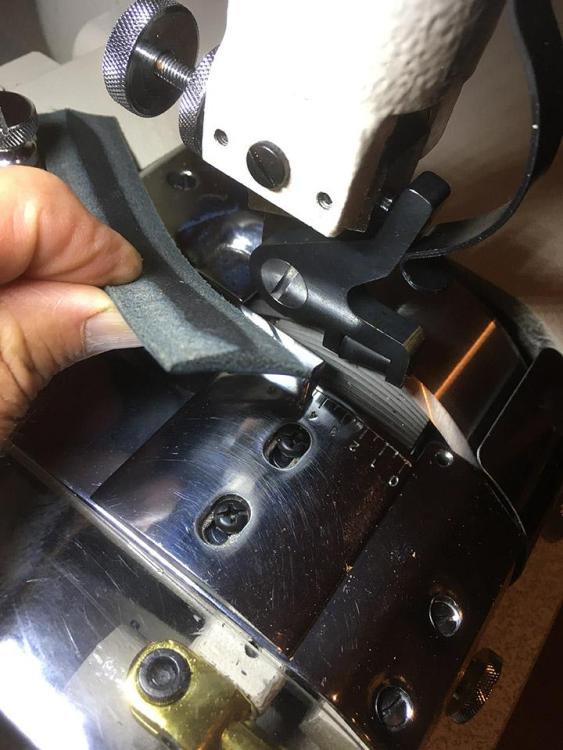
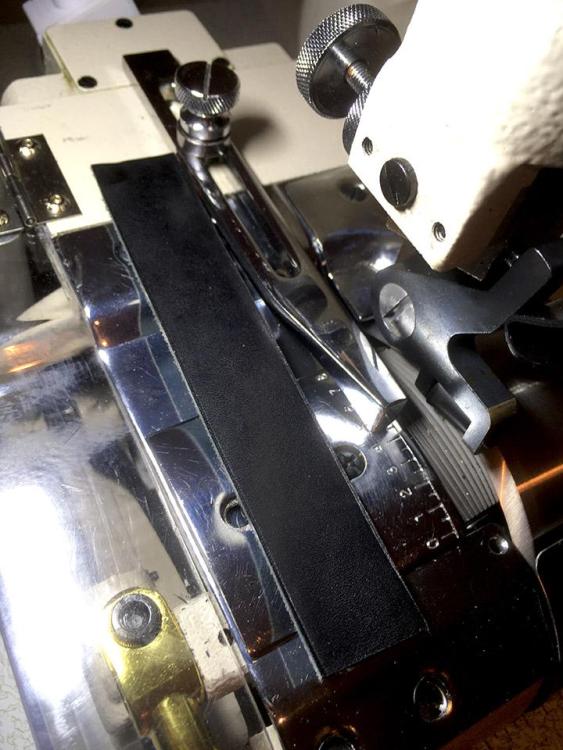
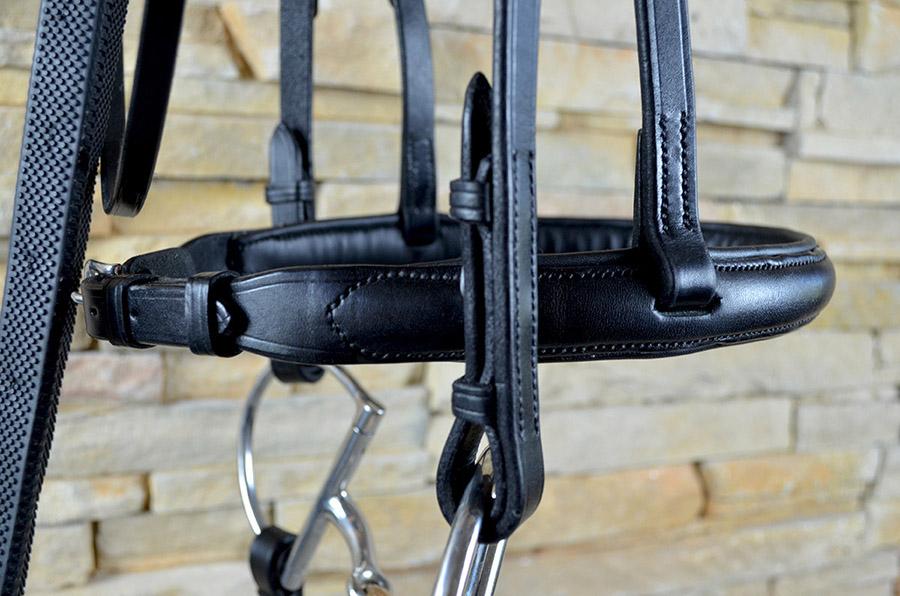
As an alternative to hand skiving the edges of straps to create swells for bridles, I wanted to see if my bottom feed bell skiver could do it to save time (10 sec versus 30 min) and produce a consistent thickness. Think I am closing in on a solution. I am using 9-10 oz bridle leather and thinning the edges to about 3 oz thickness. This is a fairly steep taper on leather that is thicker than typical for a bell skiver. First thing was to improve the feed of thick leather through the machine. I purchased a slotted steel roller drum (FAV 856) from Campbell-Randall. It is heavy and has roller bearings inside instead of a bushing. This is the "knobby tire" for my "off roading" experiment. Grips the leather firmly and doesn't clog with fuzzy bits like an emery roller drum. For thick leather I also decrease the roller drum spring tension. Had to notch out the guard plate to accommodate the flange on the left side of this roller. Next thing was to get a roller foot that would decrease resistance to feeding thick leather and minimize marking of the grain of veg tanned leathers. This roller foot (FAV 362-BC) is tapered to produce a tapered skive. It has a nifty eccentric cam in the mounting pin that gives an additional adjustment for the angle of the skive. The short length of the roller and the cam adjustment allow for a very steep angle (by bell skiver standards). I am still dialing in the setup for this job, but here is some 9-10 oz bridle leather skived to ~3 oz on the edges. This was skived in a single pass on each side. The decreased spring tension allows the roller drum to flex so the knife can take a bite out of the leather while the aggressive grip of the slotted steel keeps the feed constant. The roller doesn't leave a mark on the grain, which is of course important for these decorative bridle pieces. Here is what a finished noseband with a swell looks like. Two skived straps are shaped in a rounding block and sewn together. This noseband has a padded liner. Once I work out the machine skiving methods, the next task will be machine sewing these swells instead of hand sewing. The problem with machine sewing is the continuous taper causes the presser feet to slip along the sloped edge. Going to try angling the strap while sewing with a holster plate. Your critiques and suggestions are welcome!


-
Nothing wrong with firm leather for making tack. I associate firm temper with quality tannage. The back and butt are the firmest/strongest parts of the hide and preferable for making strap goods like belts and tack. I put a light coating of Fiebings pure neatsfoot oil on the grain side after the project is finished, let it soak in for several hours to overnight, then condition the leather to add a bit of water resistance and luster. Oiling will make the leather a bit more supple and it will break in with use. Too much oil (saturating the leather) can ruin the leather, making it sticky and soft. My favorite conditioners for tack are Fiebings Aussie, Blackrock Leather N' Rich, and Bickmores Bick 4. A quality halter is stiff when new, and the leather is tightly wrapped around the hardware to reduce rubbing and wear. My 2 cents.
-
If you look at the saddle and tack accessory items forum you will find examples including my halter methods file. HO bridle leather is firm, which I prefer for cutting and sewing. I oil and condition it at the end of the project. No need to add a liner to the pasted back of bridle leather. If you want to add padding I can give you some pointers.
-
To avoid making slanted cuts I tip the handle towards the flat side of the blade so the chisel slices straight down through the leather. Is that what you do, @chuck123wapati?
-
Correcting my comment above: The wax I'm using is made from 1 part pine resin/rosin (not pine tar) and 2 parts beeswax. She poured the molten mixture into a silicon baking mold to cool. Similar to the recipes others have mentioned in this thread.
-
Great information. Here's a DIY video for making coad. I've got to try this!


