HandyDave
-
Posts
200 -
Joined
-
Last visited
Content Type
Profiles
Forums
Events
Blogs
Gallery
Store
Everything posted by HandyDave
-
Holsters for me nuttin Fancy
HandyDave replied to Bert03241's topic in Gun Holsters, Rifle Slings and Knife Sheathes
I like the holsters. And im a big fan of the naa mini revolvers. It is my favorite firearm i own. Where did you get the grips on the mini? I have the folding grip/clip on mine and it helps hold it but its a big ugly hunk of plastic on such a clean beautiful little revolver. Also the engraving on the mini. Is that factory? I see the spider web so im thinking blackwidow model? -
Stingray holster
HandyDave replied to Garyak's topic in Gun Holsters, Rifle Slings and Knife Sheathes
Great looking holster love the sting ray but have only worked with embossed stingray so far. I hear that the real stingray skin is tough to cut and stab. Any pointers you could give as to how it is to work with compared to cow or other such mammel hides? And i see you said you work with alot of just paper tracings of the firearms? I always try to get a prop of pistol im building for but some models just aint made or easy to find. So with the semi auto's since there mostly more of a standard squarer shape i have gotten customers to send me a close tracing as well as look around online for dimensions of said pistol. Or get customer to take a few measurements and right them on tracing. And ive made several props from 2x lumber or have even done a couple with lamented stacked cardboard. These rough props want give you a boned in tight molded holster but can take some guess work out and works fine for regular fitted holsters. Thought i would mention that maybe it will help it has helped me several times. This is how i do my mag props as well if possible i get customer to send me a mag and make wood props that work just fine and i dont have to buy a bunch of mag props for 20 to 30 dollars each. -
Thanks for the kind words. I have several good customers that tell me what they need and let me do what i want with design. Of course most of my holster work is plain blacks and browns so i really enjoy when i get freedom to roam around on a piece. The pic is with my 4 3/4" ruger wrangler in holster. But customer just got himself the new heritage 6 3/4" 9 shot with the 22lr and 22mag cylinders.
-
Ive posted many times and never had any trouble sizing pics to fit on here but these just didnt want to work. Here it is finally. And thank you guys for tge assist.

-
Just finished this holster for one of my favorite customers. He just got a new heritage 9shot and told me to make him something badass. I hope my leather worker family here likes it as much as customer did. Hes one of my favorite customers because he never has his on plan for projects he allways just tells me to do what i want as long as its cool. He is yet to be disappointed. I cant get pics to come up no matter what i do it says there to big. I usually dont have any trouble. Ok after some help from you guys i got pic to show up on down a couple posts. Sorry
-
Gift For a Friend
HandyDave replied to tsunkasapa's topic in Gun Holsters, Rifle Slings and Knife Sheathes
Great looking holster. Its got a little bit of a elephant hide look i really like it. Ive also had some buffalo in the past that had a similar texture. -
First Show, thoughts and questions...
HandyDave replied to austinious's topic in Marketing and Advertising
I do several flea markets and such every year and this is a huge concern. Its sad that we have to worry about such but it sure needs to be worried about. While one is talkin to you in detail about a price or custom work there buddy will be robbing you blind. I got a good friend that does alot more shows then i do. And just last month he had a very collectible caseXX 2 knife set walk off while he was talkin to a customer. He said he didnt make enough all weekend to cover the loss he took by that set of knives being stolen. I see you mention dog collars and leashes is part of what you sell. There great items to be personalized on site. Make them up and leave a name area blank and stamp animals names while customers watch. -
When you said 2 pieces of 9 oz leather sewn together i assumed one of those pieces was your stiffner. I cant think of any holster ive ever made being as thick as 2 pieces of 9 oz together. With most snaps theres 4 pieces per set. The snap parts which is male and female. Then there's the 2 stem pieces or post i guess some call it one has a flat bottom and one has the cap thats made to be seen in most cases. The flat end sticks threw leather further cause it doesnt have that concave shape like the cap does. And if your using 2 pieces of 9 oz together i doubt you would ever need a stiffner.
-
When i do my thumbreak style holsters. I do like garypl said and hide my snap between the holster leather and the thumbreak stiffner piece of leather. I also use a bottom stem for my snap caps when i am hiding them or you might try using a bottom stem anyway threw both pieces of the leather. Since there flat and not concave like the caps are they will stick threw a little further anyway.
-
Appendix iwb glock 43 holster
HandyDave replied to HandyDave's topic in Gun Holsters, Rifle Slings and Knife Sheathes
Holstersmith.com is where i found that claw at while i was getting a glock 43 prop gun. And it is aluminum claw where as most are some form of plastic. I myself have to much around the mid section to consider appendix carry. But customer is over the top happy with it. -
Appendix iwb glock 43 holster
HandyDave replied to HandyDave's topic in Gun Holsters, Rifle Slings and Knife Sheathes
Again it depends on project and effect im tryin to achieve. But if im doing just straight colors speacially with the all black i dip dye finished piece to give me a better full dark black finish. But if im trying to get a 2 tone or speacial effect finish i use daubers and sponges. I guess every individual project has its on way i get the best results with finish. -
Appendix iwb glock 43 holster
HandyDave replied to HandyDave's topic in Gun Holsters, Rifle Slings and Knife Sheathes
It all depends on the project im working on. If im doing wet molded holsters and there darker colors with matching thread like black on black or brown on brown i usually do full assembly and stitching. Then i wet mold and dye after drying. Now if i am using a light colored contrasting thread then of course all dying and everything has to be done before sewing. I get a better finish if i wet mold before dying even with fiebings pro dye i seem to allways get some distortion or discoloration if i dye before wet molding. -
Appendix iwb glock 43 holster
HandyDave replied to HandyDave's topic in Gun Holsters, Rifle Slings and Knife Sheathes
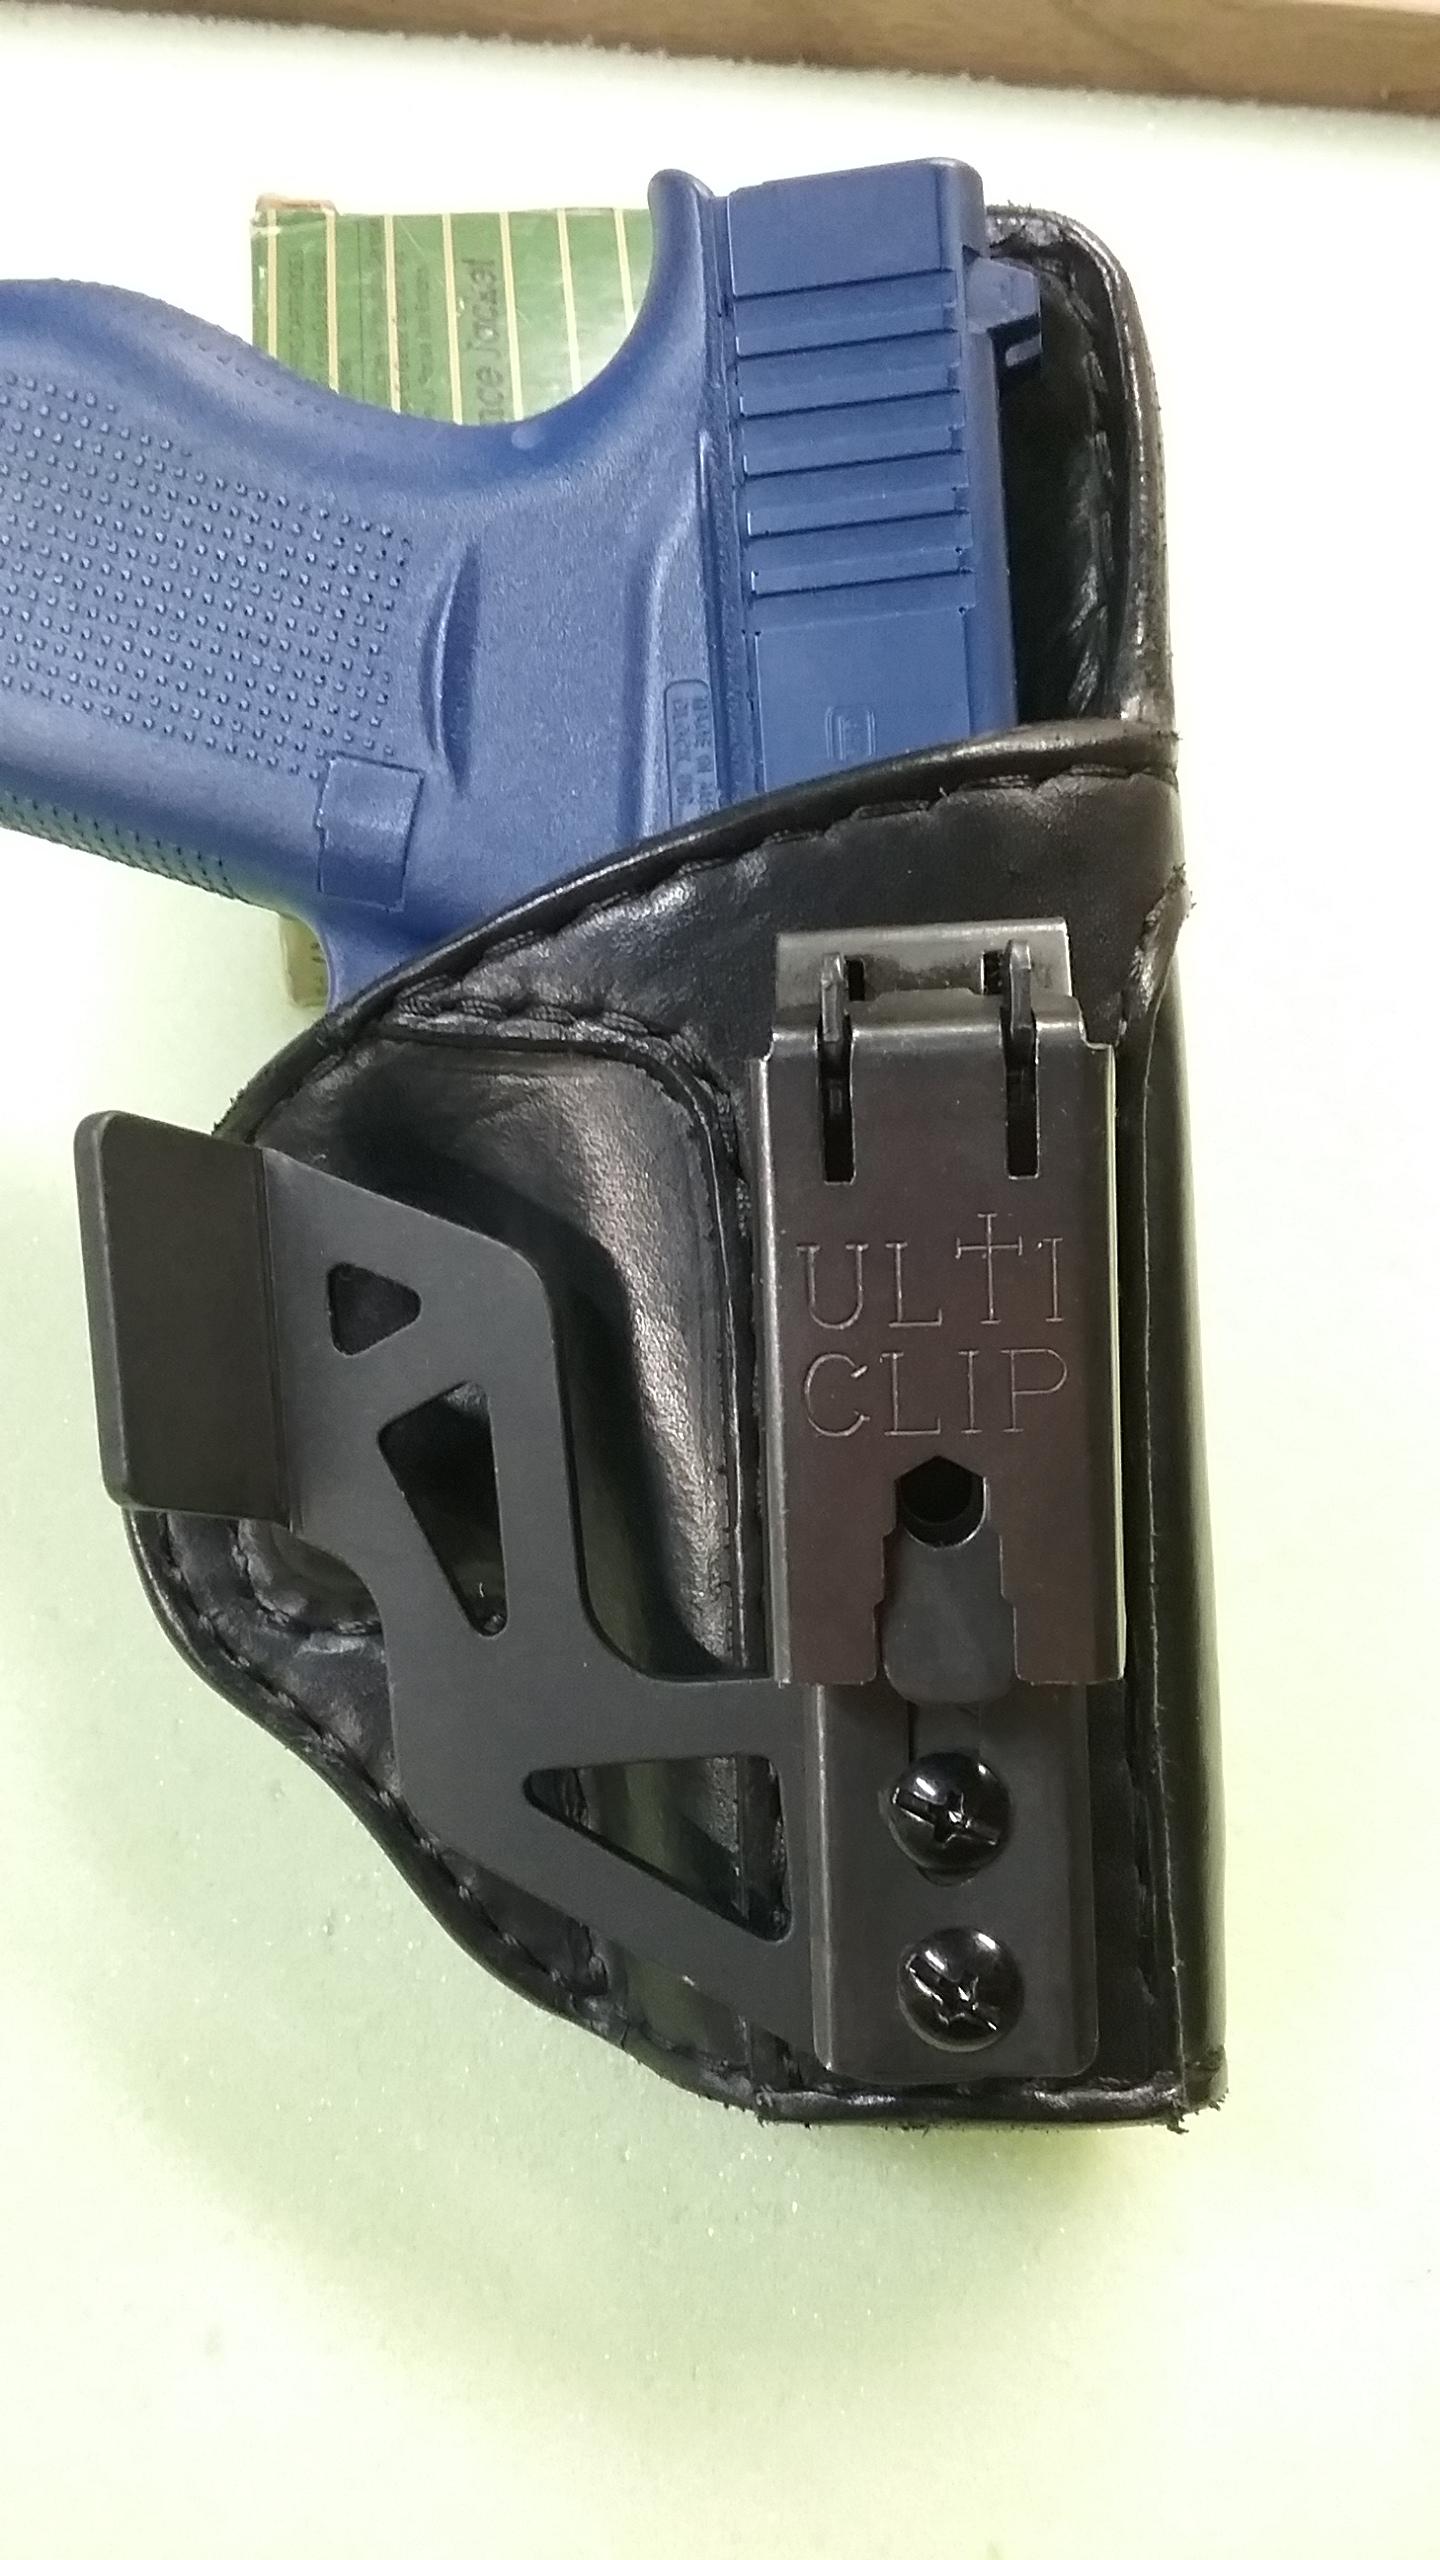
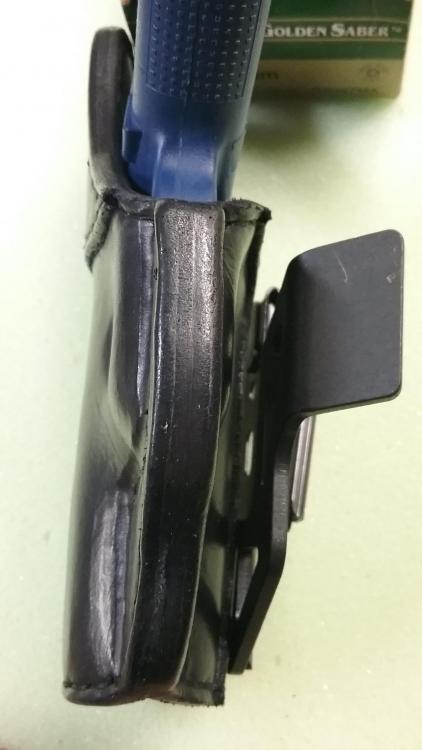
The claw from my research before making this holster is its mainly just for appendix carry. And the "claw" or wing sets inside the pants and pushes against the belt to keep the grip of pistol pushed inward a little more tucked to the body. Its more for deep conceal carry and it keeps the grip of pistol from sticking out making such a noticeable bulge or imprint in clothing. This was by customer request so i had to study what the heck it was and its purpose myself. And figuring out how to make it work along with the ulticlip xl. The claw and the clip of choice has to line up in just a certain way for it to function properly. If it sets to far back it does nothing if it sets to far forward it makes the edge of pants bulge out and pushes to much. So for the first time hearing about a claw and dang sure first time using one there was alot of figuring and i think i scratched a bigger bald spot on top of the ol melon. But i do enjoy new challenges it breaks up the monotony. I also ran the stiffner piece all the way down the slide and set my t nuts under it. That way the customer can change clips if and when it gives up before the leather does. Also the claw can be removed this way so holster can ve used as a regular iwb. I tryed to add as much versatility as i could. Heres a pic before dying the outside with the clip and claw removed.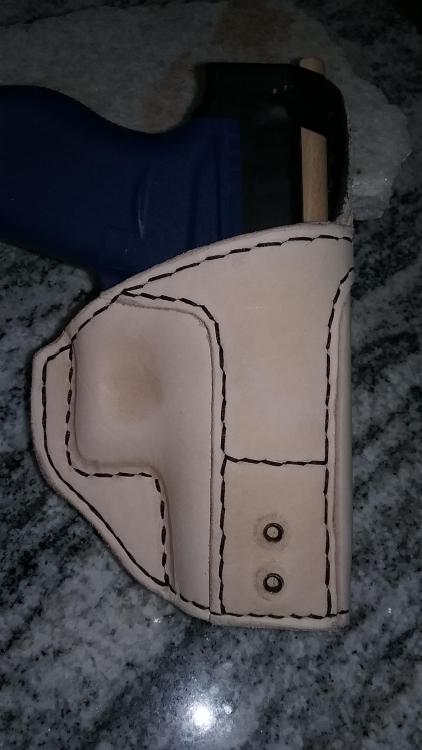
-
Appendix iwb glock 43 holster
HandyDave replied to HandyDave's topic in Gun Holsters, Rifle Slings and Knife Sheathes
-
Ive done several iwb holsters. But i didnt even know what a "claw" or wing was until a good customer asked me to make him a appendix iwb holster with a claw. I found a great claw at holstersmith.com solid aluminum instead of all the plastic ones i seen. And i went with the ulticlip xl for goin over the belt also picked up at holstersmith for less then ulticlip sells them for on there website.

-
Handstitch vs Machine for artisan pieces
HandyDave replied to Warhauk's topic in Leatherwork Conversation
I enjoy hand stitching and find it very rewarding. But i mostly do holsters and small bags and mostly just made to order so no production. But even with making several of the same item for production runs. You can speed things up even with the hand stitching and tooling. By doing small things like cutting a bunch of patterns out at one time speacially if you cut them by machine like a clicker press. And if you are doing several of the same thing you find a rhythm after a few pieces and they go together alot quicker. One of few things i make several of is can coozies for flea market sales and such. There all cut by hand tooled and hand sewn. Ill cut 20 or so out at a time tool them all then sew them all. And theres not alot of stitching on a can coozie but after the first couple i can stitch one up in about 5 minutes. And since your just starting into leather like has allready been said practice your fundamentals and practice some more then worry about trying to sell. -
There isnt no way i know of to lighten the veg tan back up in color but its still a great looking bag. If youve done put resolene on it i dont know how well any conditoner or restore product would get to the leather. I would break out a piece of lambs wool and buff it really good and let it ride.
-
I really like the frog. He just looks like a good time character. Is the case just a pocket sleeve or does it go on belt?
-
My First Attempt at Holsters
HandyDave replied to VikingKong's topic in Gun Holsters, Rifle Slings and Knife Sheathes
Great looking holsters. Speacially for first time venturing into holster work. I do several of the pancake style holsters with the added plate on front. But i mainly do it for aesthetics. Like has allready been said its a good little space to add some tooling or a 2 tone look like you got goin on with the black and brown or do the plate in a exotic leather to add some extra style. Since these are your first holsters one thing i should mention is be careful on molding to much into the ejection ports. It can cause a hangup spot for the edge of ejection port. I will usually bone in the hard lines but i dont go over crazy with molding most of retention is in the trigger guard area anyway. Just my opinion. -
belt bag thingy
HandyDave replied to Frodo's topic in Purses, Wallets, Belts and Miscellaneous Pocket Items
Great lookin foraging pouch. Ive been planning on making myself one for sometime just havent took the time to do it. I think for handcrafted nice pouch 50 is more then fair. I never understand how so many people charge those super low prices. Speacially on like etsy and such i see stuff and it doesnt look like bad craftsmanship but theyll be asking prices that i couldnt even cover material cost if my prices where that low. I see similar holsters to some i make that i need to charge 80 to 100 dollars for to cover cost and squeak out a touch of profit and the ones online are like 25 30 bucks. Then i get people calling me asking what i would charge for this or that and when i price item they allways say well i seen this or that online for half that price. I tell them to buy the cheaper item if it makes them happy. Then i tell them to keep my number if they want to so when there cheaper item falls apart they can call me but my price will be the same or more. -
Wallet with Celtic pattern
HandyDave replied to DJole's topic in Purses, Wallets, Belts and Miscellaneous Pocket Items
Good looking wallet. I really like the tooling and the pebbled red pockets. Theres only one thing i see and my eye just keeps going to it is that one bottom corner where the stich goes at angle where there aint a hole right in the corner like the other ones. My corners and intersection lines i allways stab first then feel in my holes in between. Other then that one corner its a great piece. -
Ankle holster
HandyDave replied to HandyDave's topic in Gun Holsters, Rifle Slings and Knife Sheathes
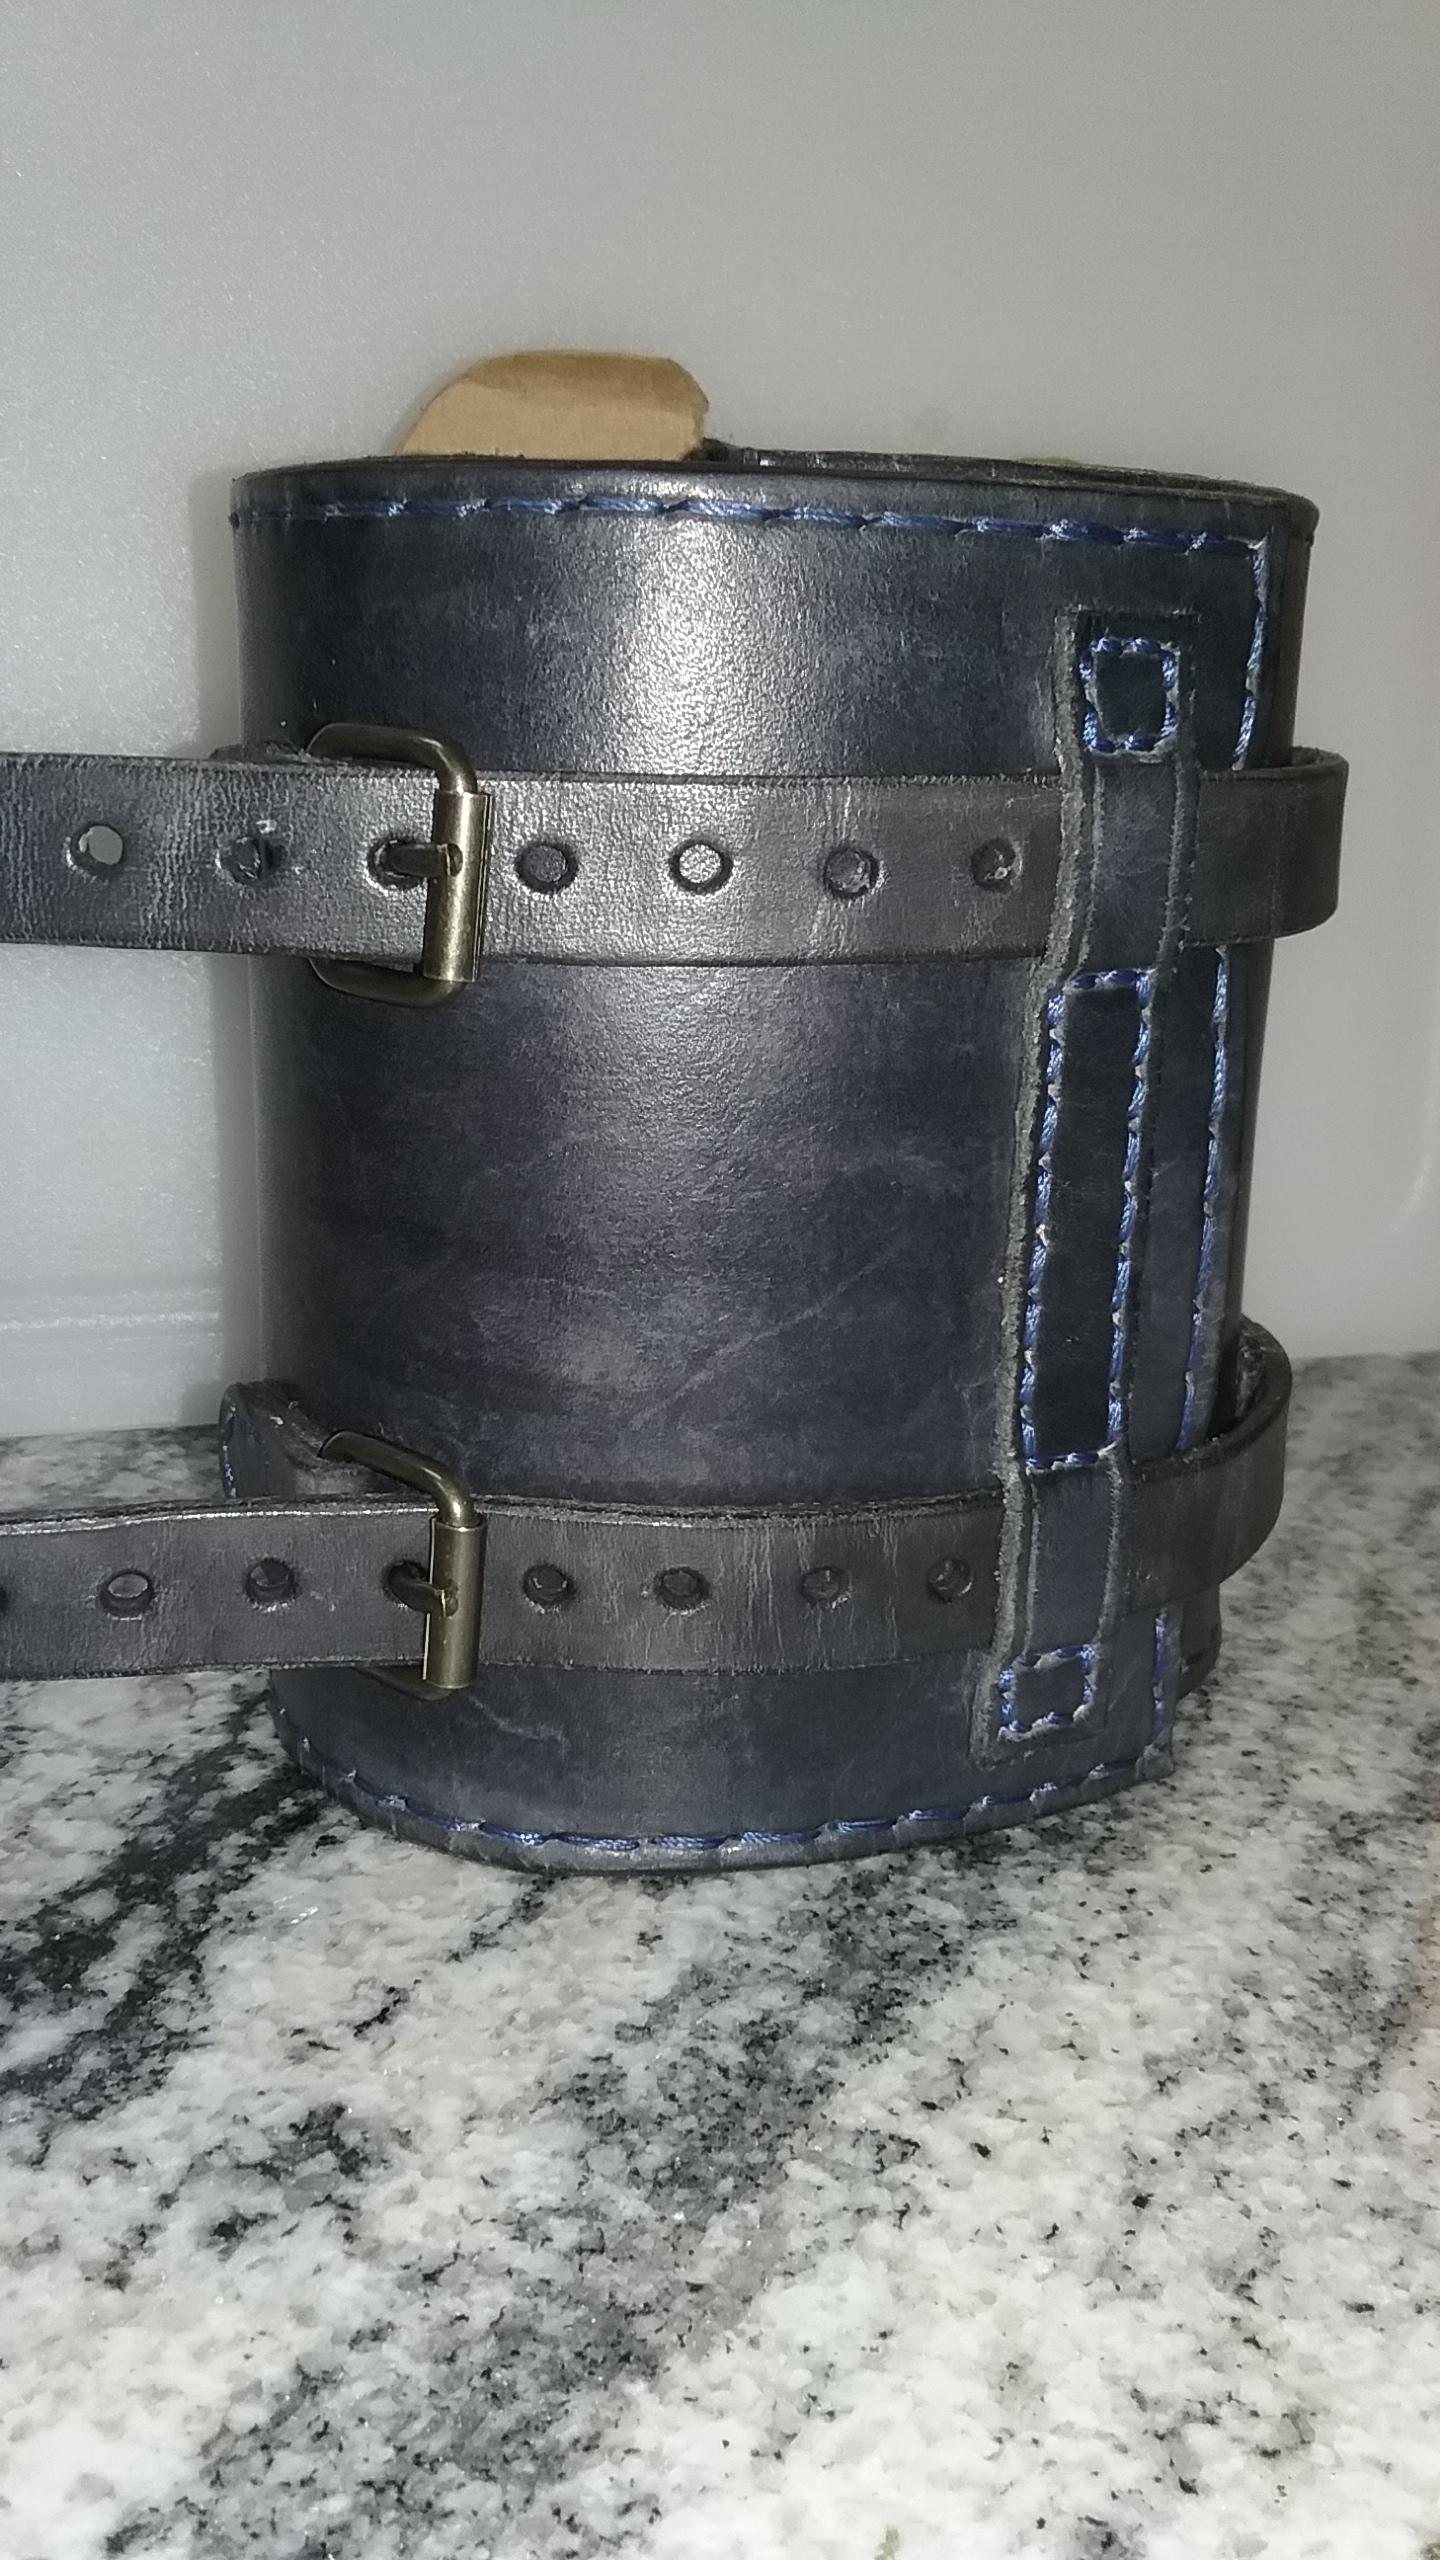
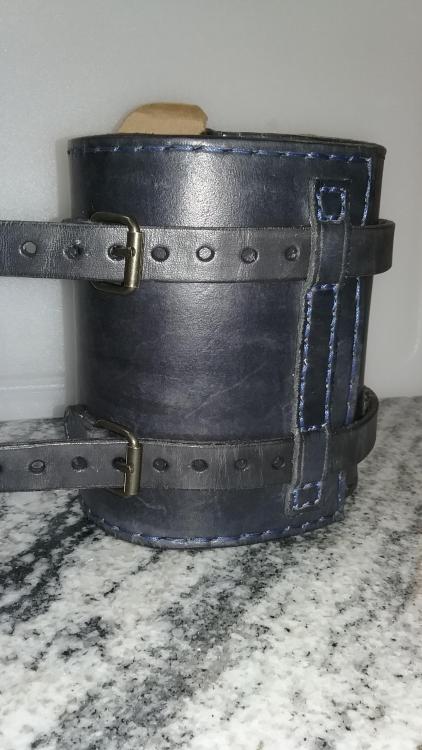
Heres another pic of whole thing layed out flat. Its still a little stiff because its new. But as you all know the leather will soften up with use. The holster is made from 7/8 oz and the ankle strap is 4/5 oz.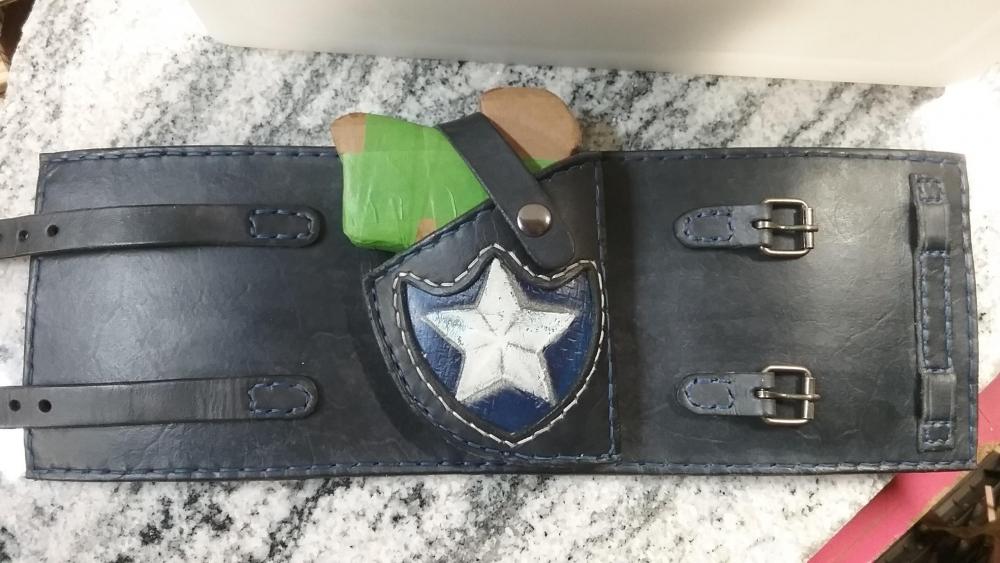
-
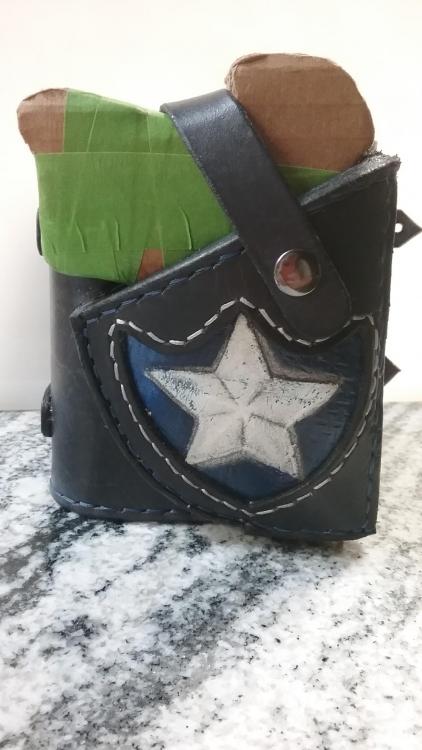
I have a customer who wanted all leather ankle holster for his ruger lcp. Hes retired LEO and still does some light security work. Ankle holster is concealed of course but the customer wanted patriotic decoration anyway. So i messed around and let the leather tell me what it wanted. Its patriotic and kind of a tribute to customers leo career and all other now and then leo's and also has a little captain america feel to it. I messed around with some thinned down fiebings pro usmc black to give project more of a stonewashed softer navy color. Did a distressed star inlay with inlay trim panel being cut out in the shape of a shield/badge. Stitched around inlay with a bright white thread and the rest of stitching around whole piece is done in a blue thread. I finished the back with thin layer of polyester padding and a soft suede liner. This is far from first holster but is my first ankle holster. More pics
-
Yaqui Slide Copy For My Colt 1911 22
HandyDave replied to AzShooter's topic in Gun Holsters, Rifle Slings and Knife Sheathes
Great work. Very rustic looking i like it. Ive only been doing the molded holsters for a little while and there was alot of reading on setting up for proper thread lines with proper distance. And there has been and still is alot of trial and error. Ive got a few holsters thrown to the side where stitch line was to tight and no matter what leather just wouldnt stretch enough to make it work. -
Ive got me several sets of unfinshed maple 1911 grips ordered. I plan on doing some serious testing and experimenting. Including some torture testing with submerging in water, leave a set outside for couple weeks and different extreme situations. With something like snakeskin thats why i added about maybe resin coating whole piece because i know the snake skin aint the toughest material for alot of abuse. What is a good sealer/top coat for the exotic leathers? Ive seen all sorts online but i like to here feom real people when i can. Ill deffently keep my leatherworking family here on the forum up to date on my findings during testing and hopefully be able to share some pics of really nice finished pieces.