DwightT
-
Posts
284 -
Joined
-
Last visited
Content Type
Profiles
Forums
Events
Blogs
Gallery
Store
Everything posted by DwightT
-
Welcome from Meridian Idaho. I'm also an old Coastie (ETN2 on WMEC 627 Vigorous out of New London back in the late 70s). I've also recently returned to leatherwork after a long hiatus and it's amazing how much I've forgotten. Your work looks like you have been able to at least maintain your skills. Nice looking work. Welcome to the group. /dwight
-
Welcome from Idaho. Leather work can be a fun hobby, but you'll find that you always need one more tool. This forum can be a great place to learn new techniques and for problem solving to cure those headaches. As for wasted leather, well there is always another way to use that bit of leather when the project goes wrong. /dwight
-
I think I'm insulted. I don't see any Coast Guard in that collection. Guess I'll have to start building some of those myself. /dwight
-
That's awesome. I have a couple drawers full of bits and pieces that I need to find a use for. Something like this would be great. /dwight
-

Rifle scabbard
DwightT replied to Pappys Leather's topic in Gun Holsters, Rifle Slings and Knife Sheathes
Yeah, but IMO it's so much more satisfying when you are done and you can give your hands a rest. Case looks great. /dwight -
Prize Winning Hand Bag
DwightT replied to Handstitched's topic in Purses, Wallets, Belts and Miscellaneous Pocket Items
Congratulations. They look awesome. /dwight -
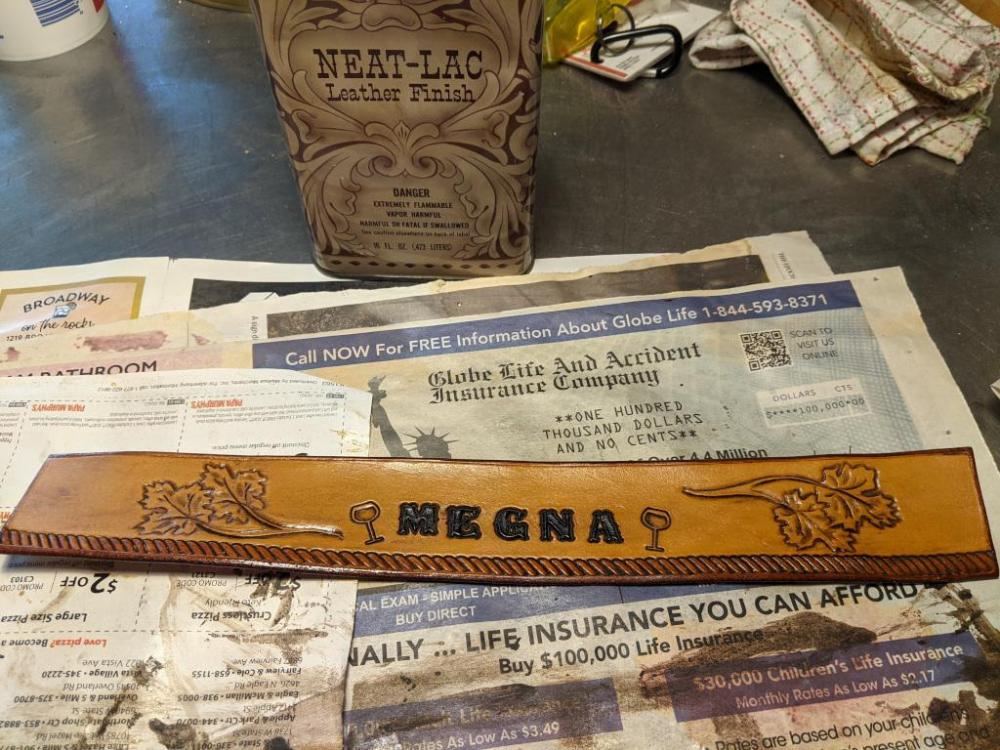
Well, I figure I should add to this. I was making a strap with a name as part of a project for my daughter. While stamping the name, somehow I managed to transpose two letters. Nothing like turning a project into scrap right from the beginning. Rather than just throw the whole strap out I decided to go ahead and finish it as originally planned. Gave me chance to try a couple new techniques that I've learned on the forum, as was as an opportunity to test run a new leaf pattern. Doing that let me see what I needed to do differently for the final strap. I'm giving her the screw-up strap along with the finished project. Maybe she can use it as a name-plate at work and see if anybody notices. /dwight
-
Conversation starter .... maybe..
DwightT replied to Gezzer's topic in Clothing, Jackets, Vests and Chaps
Personally I think that's a great idea. I usually wear a hat with a Coast Guard emblem and it's always a conversation starter when I run across another Coastie. I may have to steal your pattern. /dwight -
Well, as I said I've never really worked with CT before, so I'm probably just over-thinking the problem, which isn't really a problem at all. It does seem to scuff, but then the scuff marks can be rubbed out fairly easily. For where we are planning on using it, the scuffs won't really be an issue anyway. BTW: I love your hats. Yeah, I still have about 6oz or so of the old Neat Lac left. Until it was mentioned here I didn't even realize that the Neat Lac that is now available isn't the same stuff. Was there an issue with the old formula? /dwight
-
Kangaroo skin bag
DwightT replied to AndrewWR's topic in Purses, Wallets, Belts and Miscellaneous Pocket Items
Looks great. Must have taken a while to do those 3000 stitches by hand. My hands probably would have cramped up multiple times over. /dwight -
knife sheath Custom Knife sheath
DwightT replied to YinTx's topic in Gun Holsters, Rifle Slings and Knife Sheathes
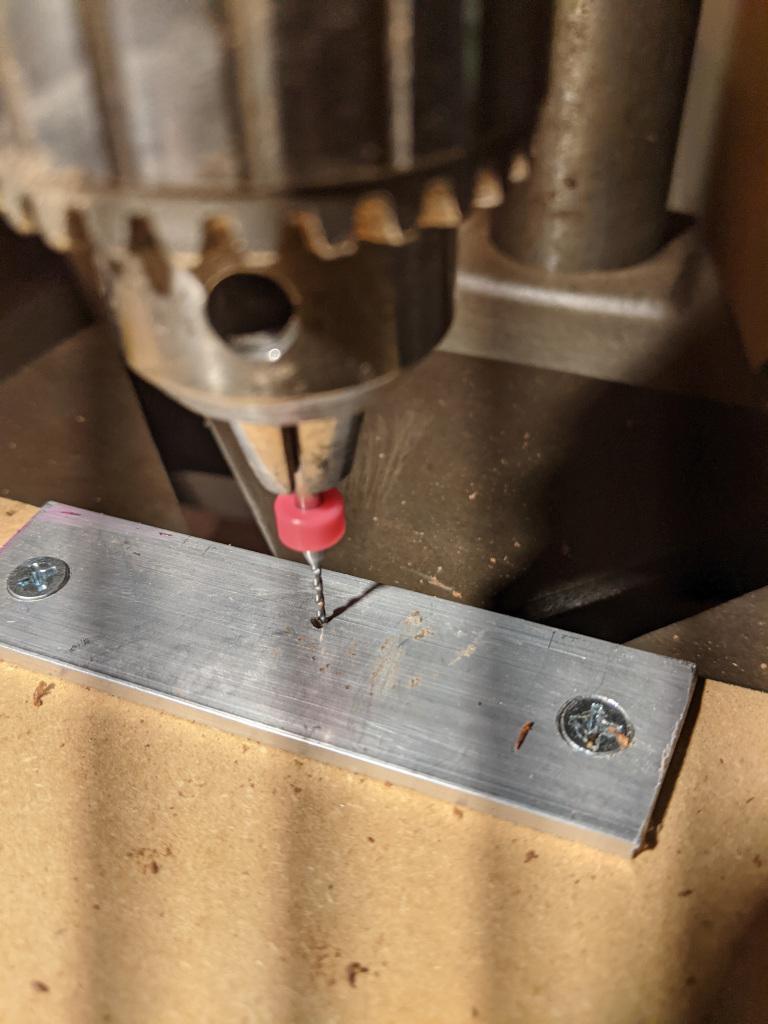
I actually came across these bits originally when I needed to do some work on some printed circuit boards. But then I figured they would work with leather too. As has been mentioned, drilling the hole first makes it easier to push the awl through. Just keep in mind that because the bits are small and brittle they can break easily. Instead of drilling through the leather and into a wood backing, I made a backer using aluminum flat stock. I drilled a 1/8" hole in the flat stock, then screwed it to a piece of particle board that had a 1/4" hole. I clamp that board to my drill platform with the hole aligned with the bit. Supports the leather and gives me a fairly clean hole. /dwight
-
Thanks. It just seemed "wrong" to not do something to seal the leather like I've always done with veg-tan, but I think we'll take your advise and just leave it be. The scuff marks don't really seem to hurt anything, so we just won't worry about them. /dwight
-
knife sheath Custom Knife sheath
DwightT replied to YinTx's topic in Gun Holsters, Rifle Slings and Knife Sheathes
FWIW: I found a set of PCB drill bits on Amazon that go from 0.3mm to 1.2mm but they all have 1/8 inch shank. I can fit them into my old drill press without having to swap out the chuck. https://www.amazon.com/dp/B08Z7JZKKD?psc=1&ref=ppx_yo2ov_dt_b_product_details /dwight -
I haven't really worked with chrometan leather before, but recently I picked up a side at the local Tandy store for a good price. My wife and I are looking at a couple projects, and she noticed that it scratches or scuffs easily. As an experiment I cut off a small chunk, scuffed it with my fingernail, then applied some Neat-Lac to it. It seems to have taken out that scuff mark, and now it doesn't seem to scuff as easily. So, is there any reason to not use Neat-Lac on chrometan? Or I guess more to the point, what is the preferred way to finish chrometan? Thanks /dwight
-
I could, but while the handle is OK, it's actually a bit smaller in my hand than I would prefer. I have an Owden awl with interchangeable blades, but they are a bit larger than what I was looking for. I'll probably just keep looking for a decent small diamond-shape awl. /dwight
-
Yep. That's them. I bought the small one. I will say that when it was nice and sharp when it arrived and only needed a quick polishing, any the holes it made were nicely shaped and small. I guess the only real problem was that the blade was so brittle that it snapped after only a few holes. /dwight
-
I'm glad it wasn't just me that found their comment strange. I know I'm no expert at stitching, and I thought maybe there was a technique that I didn't know about. That's why I didn't want to name them and malign their name over my stupidity (always a good possibility). But since I'm not alone in doubting their words, this was the "WUTA Stitching Awl Diamond Shape Awl" from WUTA Leather. I see now on their description on Amazon that they have this statement: "Use correctly:In order for you to use the awl better, When perforating, you need to use a hole punch tool to perforate first. The awl only used to assist the perforation. " Still makes absolutely no sense to me. /dwight
-
Recently I bought a new diamond stitching awl off of Amazon because I wanted something that could do smaller holes than what my current awl provides. The awl arrived, and the blade promptly broke off at the shank after poking about 5 holes. I contacted the seller, and while they refunded the purchase price, they also told me "We immediately reported the situation to our professional craftsman, who advised our customers not to directly use the awl to punch holes. Since the tip of the awl is relatively sharp, it can only be used to assist in poking holes. After the hole is made, use an awl to reshape the hole." Does any of that make sense to anybody? Are they saying that I should be using something else to poke the hole and their awl is only meant to be used to shape an existing hole? That seems like a fairly cumbersome way to do stitching, but maybe that's what needed for smaller fine-detail stitching? Am I missing something? Meanwhile I went back to my old awl, which is still holding up fine. I may not have thousands of projects under my belt with that awl, but I have poked a few hundred holes with it. /dwight
-
There's nothing wrong with just leaving it empty. Sometime simple is better and IMO adding more tooling around your image will just distract from it.
-
Yes. It's just the standard rope stamp, and then I gouged the stitching lines along the edge of the ropes. I find that helps to hide the stitching. I've even done some other projects where I poke the stitching holes on the points of each stamp. Makes the stitching almost invisible.
-
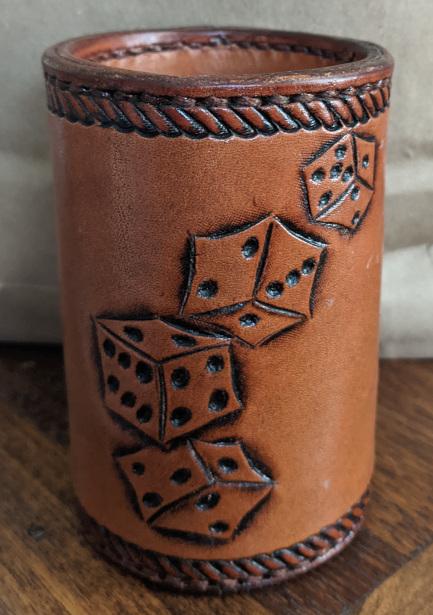
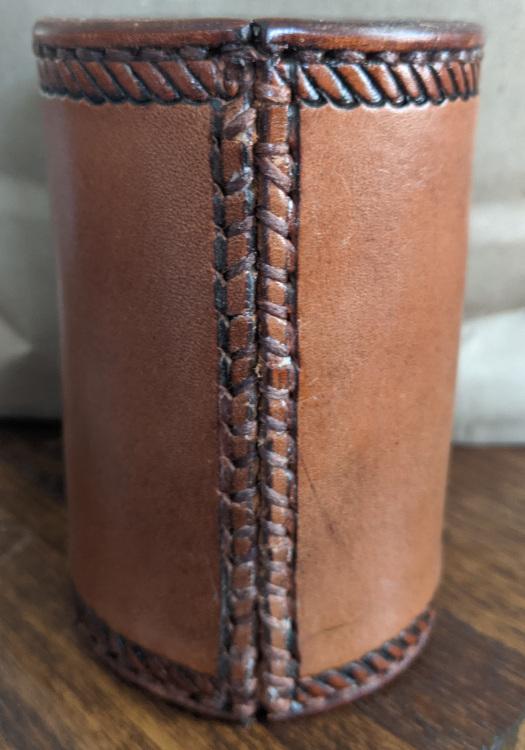
A while back I posted about some old leather that I was using and the problems that I was having with it. I had made a dice cup partly to see what I could do with the old leather and to get an idea for what it takes to do stitching on a cylinder. Needless to say my results weren't all that good. The tooling was OK, but in the process of stitching with an awl the leather would stretch or the holes would split out. Plus that was one of my first projects after being out of leather work for a long time, and I found that there was a lot that I had forgotten. Since then I've done a lot of reading on this sight, remembering some things that I had forgotten about and learning some new tricks, and I think things have improved. My wife and I are about to leave for a cruise, and she wanted me to make another dice cup for this trip. I decided to use the old leather again, but instead of using an awl I made the stitching holes with a chisel, and I didn't even try to join the edges with a butt joint where I would have to stitch through the edge of the leather. Instead I poked the holes straight through and used a two needle baseball stitch. I also finished the edges using the technique described by @hidepounder and I think the results were a lot better. In all I'm much happier with the results. So Thank You to the forum members for all the great info on this site. I hope to keep learning as I continue playing with this stuff. /dwight
-
I like the idea of bonding a piece behind the torn part. That way I won't really need to worry about matching the current color. There is already I lining on the inside of the bag, so I can position the "patch"in the middle to hide it. I'll just need to skive the patch as fredk mentioned to minimize how much it shows. Thanks. I may not need to worry another color matching here, but I'm doing some other projects where I occasionally combine old and new leather. I'll look for that dye color to make them match. /dwight
-
I think you are right. That might be the best way to go. The problem will be in the "dye to match" part. The original leather wasn't dyed to begin with. It's just 50+ years old. That aged leather color might be hard to match. Plus I would be worried that the dyed leather wouldn't age the same as the old leather and it wouldn't take long before it didn't match at all. I'm thinking it might be better to go with an intentionally contrasting color. . /dwight
-
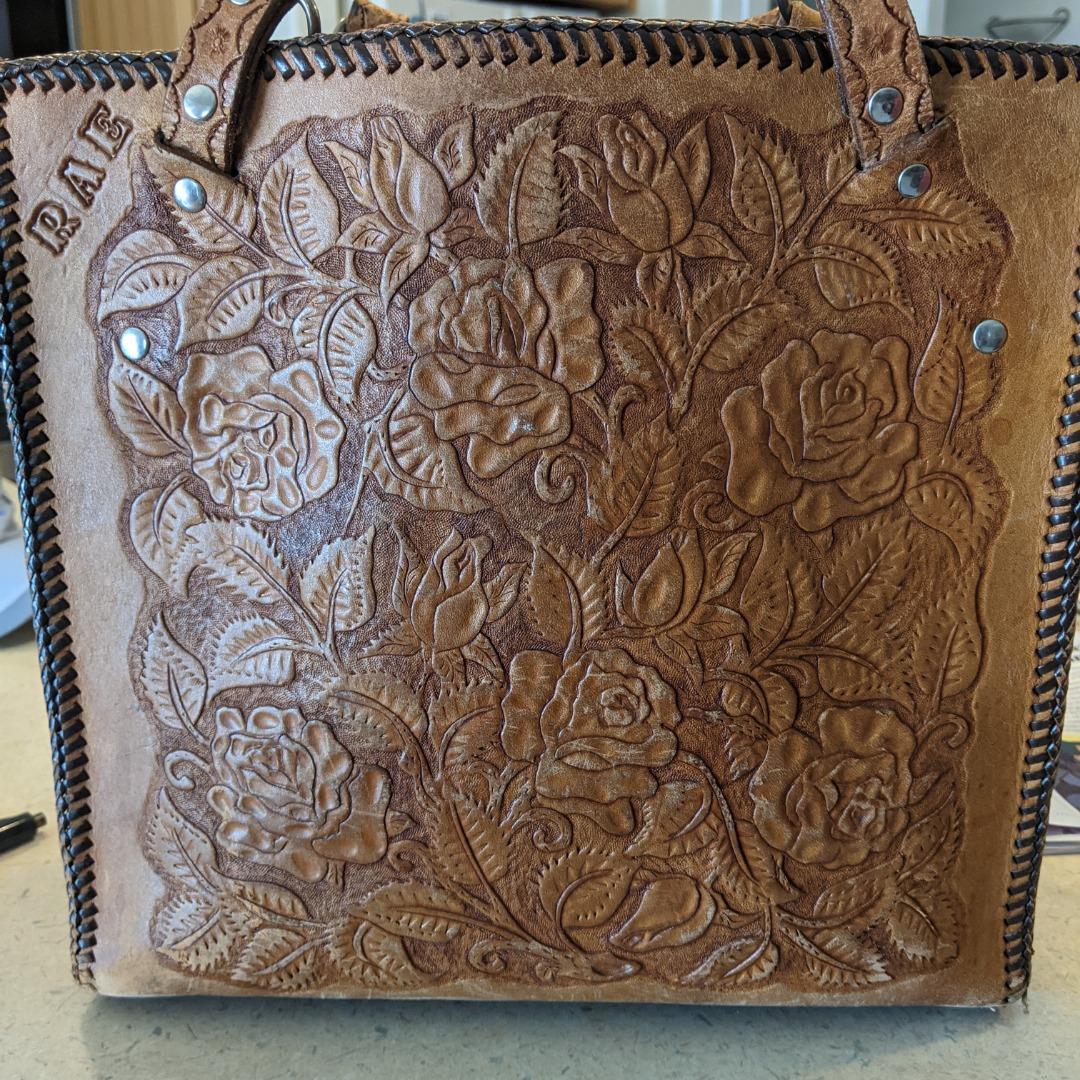
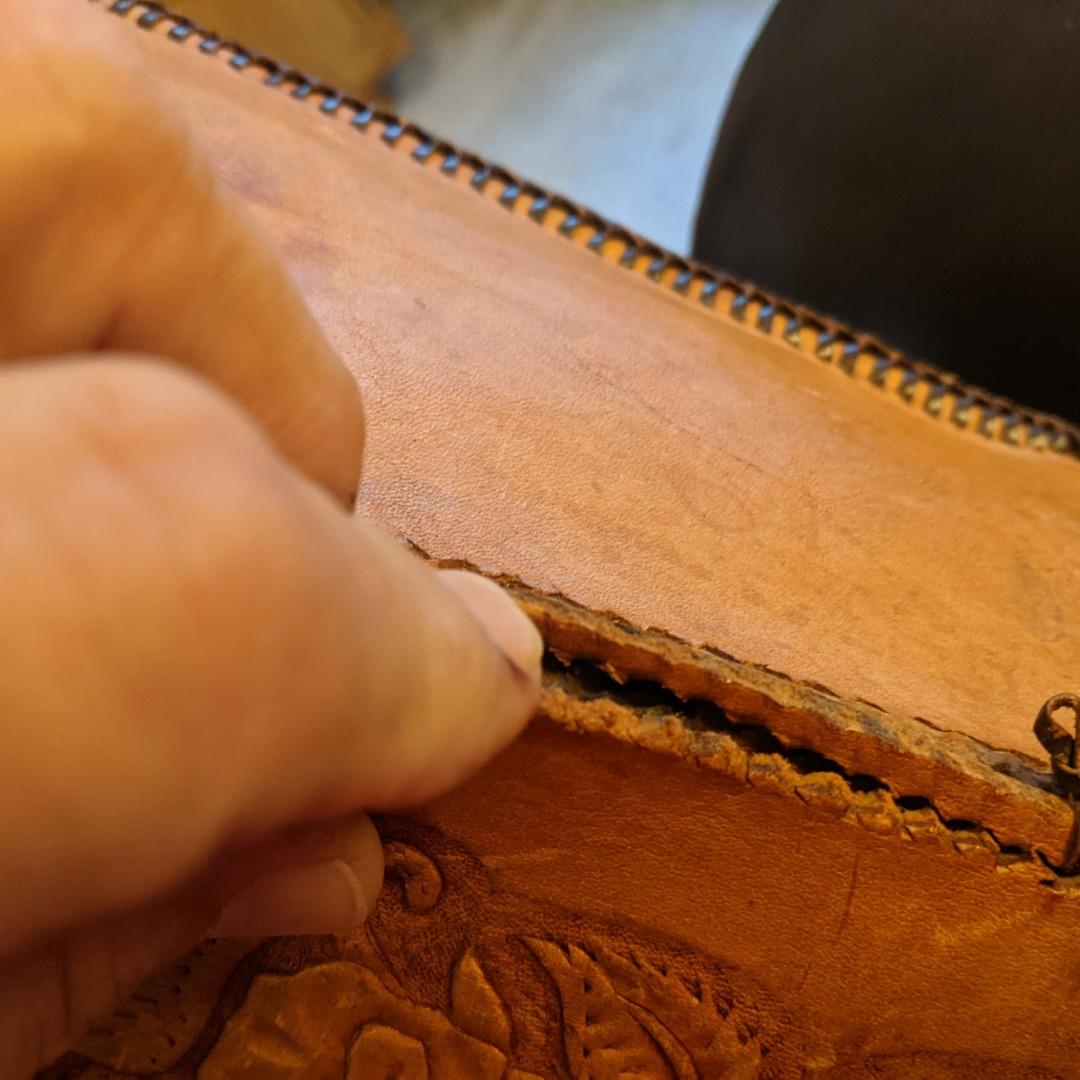
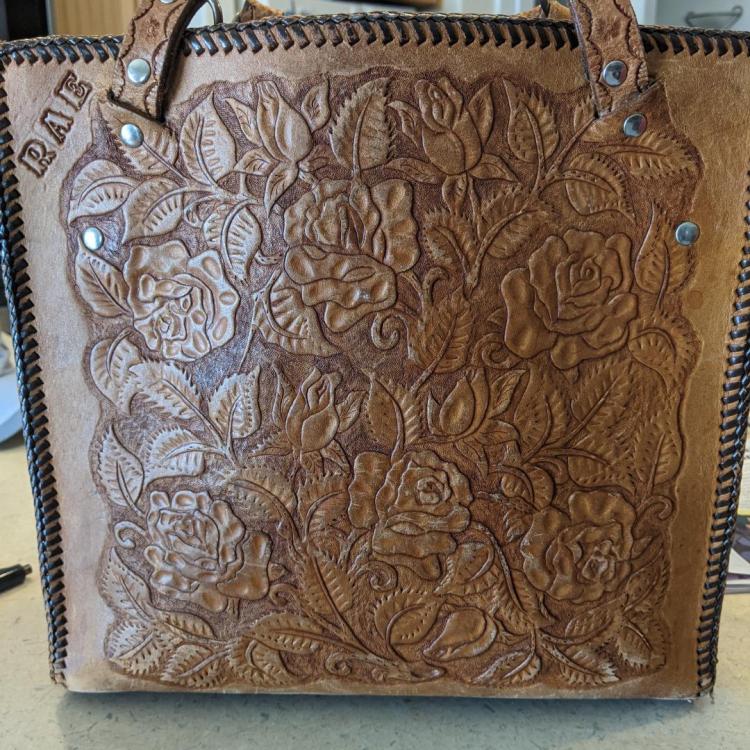
50+ years ago my grandfather made this bag for my mother. My sister now owns the bag and she asked me to clean and condition the leather. In the process of looking it over though I found that a lot of the lacing is deteriorating, so I offered to redo it. However when I was pulling out the old lacing I found that some of the leather had split at the holes: There is about a 3" section on the bottom of one side of the bag that is split like this. The rest of the leather looks OK, and the liner on the inside looks fine. Any thoughts as to how to go about repairing this? Obviously for sentimental reasons we want to try to keep the bag in as good a condition as we can. /dwight

-
Looks great. Care to share the overall design? I want to make a tool roll for my brother-in-law and I'm looking for inspiration. /dwight