


AlZilla
-
Posts
1,499 -
Joined
-
Last visited
Content Type
Profiles
Forums
Events
Blogs
Gallery
Store
Everything posted by AlZilla
-
Our friends at google say it means "Clamp for engraved signature seal". I haven't a clue and I'm not clicking the link. @Veli, the language of this forum is English. It would be appreciated if you use a translation service. Thank you. Bu forumun dili İngilizce'dir. Çeviri hizmeti kullanmanız memnuniyetle karşılanacaktır. Teşekkürler.
-
It's very odd that it'll pierce the leather without thread but just stop when you thread the needle, but the hand wheel turns. There's a cover on top right next to the hand wheel. Open it up and see if the arm shaft is turning when it won't pierce the leather. I wonder if the needle bar isn't clamped tight ... Still very odd behavior.
-
Do you mean the hand wheel just spins and the rest of the machine stops? Maybe a safety clutch problem or the hand wheel is loose on the arm shaft? If the belt is slipping, the solution is obvious ... Can you turn it through by hand when it stops?
-
So, I moved you over to the sewing machine area. I don't see any problem talking about the old Kenmore. Ask away. @cpo1wh Is it a flatbed and the guts look something like this?
-

Seems I broke my Juki-LS-341, again... (Bobbin Shuttle)
AlZilla replied to Yoshi888's topic in Leather Sewing Machines
Seems like it ought to turn. Heat from a hair dryer or heat gun and/or I'd take one or more of those screws all the way out and put some kind of penetrating oil in there. -
That is a lot of patience and finesse there. Nice work.
-
Moved this to the finishes area. For me, Blackrock's Leather N Rich works great for outdoor leather. Hats, sheaths, holsters, you name it. Even a year later, it's still shedding water and zero spotting. I'll dye items at whatever point and then the leather n rich when I'm done. Nothing else. It works for me.
-
Lots of those specialized presser feet have been around for over a century. There's a reason they endure. A zipper foot definitely lets a person stitch extremely close. In the case of a zipper foot (say on a domestic machine especially) you're well off to pair it with a needle plate that has a close fitting needle hole instead of a zig zag plate. The larger needle hole can let your sewn goods push through and mess up your stitch. You'll run into a lot of these little issues as you expand your sewing skills.
-
I wouldn't disable the brake. I want the motor to stop when I take my foot off it. I certainly wouldn't want the machine to freewheel another stitch or two.
-
I like the way the details vary where the pattern overlaps the edge.
-
Mine were thicker nylon straps. They had a loop sewn into one end that resembled maybe a dog leash handle. You made a noose thru the handle, wrapping it around your wrist and trailing down across the palm of your hand. Then the loose end wrapped around the bar and you held it in your hand. [Edit: maybe the end came back up through the loop] Maybe an inch wide?
-
Seems I broke my Juki-LS-341, again... (Bobbin Shuttle)
AlZilla replied to Yoshi888's topic in Leather Sewing Machines
I'm not familiar with that particular machine but the basic process is to roll the machine over until the needle rises about a quarter inch or 3/8" back up from the bottom. Then find whatever you need to loosen the shuttle hook so you can rotate it. Set the point of the hook right above the eye of the needle, exactly in line with the needle.. The exact measurements will probably vary for your specific machine but should be close enough to stitch. The hook should all but touch the needle. There a spec and a way to adjust it if needed. Also, if the point of the hook doesn't align right above the eye of the needle, you may have a needle bar height adjustment to make. For me, the big thing is to remove things like needle plates and food dogs so I have a good, clear view. Do it a couple times and you can do it in your sleep. -
This one took me a while to figure out and some practice to get right. It is much, much better than basically running over your lock stitches 3 times with big thread.
-
Loose and inconsistent. Definitely something going on there. I'd do 2 layers to get a better idea how it's stitching. I merged your 2 threads together since it's the same machine and continuation of the same basic problem.
-
You guys and your lace work always make me feel like such a slacker ... Nice looking work!
-
Internship and maybe a new start
AlZilla replied to Tove09Tilda's topic in All About Us and Off Topic
A friend of mine recently passed at 91. Back in the early 50's she led an all female crew, welding up bomb bay doors on some kind of aircraft. -
Looking for info on singer 150w104 for leather work and parts
AlZilla replied to outaluck's topic in Leather Sewing Machines
This often linked thread will explain the differences between types of machines and what to look for to do different kinds of leather work: -
@CWW97 Thanks for posting it here. To be in compliance with the rules, we need a picture, price, shipping info. Posted here for your reference: ========================================== Marketplace Rules 1. Post must have a clear and descriptive topic title. 2. Post must contain a complete description of item(s); make, model, condition, height, width, length, weight. color etc. Condition noted as: New, Refurbished, Like New, Excellent, Very Good, Good, Fair, Poor, Parts Only, and or Percentage of New condition, 100% being New or Like New. 3. Post must contain explanation of what item is or does. 4. Post should contain picture or pictures of item when possible. 5. Post must contain definite price in USD for the item, we know prices are negotiable but a price nonetheless. Shipping policy needs to be stated clearly. 6. Post must be modified with additional information as necessary, and marked when item is sold. ALL MACHINES FOR SALE MUST INCLUDE PICTURE. 7. Leatherworker.net assumes no responsibility or liability for any seller or buyer. Caveat Emptor. 8. Responses to ads can be accepted through the forum or privately. Email addresses may not be posted in public. Posting telephone numbers and addresses wll be at the discretion of the member. 9. Posts older than 60 days, or items marked "sold" will be archived. 10. Any post is subject to editing or deletion solely at the moderators' discretion. Members or businesses wishing to place more than 20 ads per year are requested to donate to the site to receive a "Dealer" designation. Dealers will receive preferred placement consideration and banner ads on the site's resource listings. Dealers will also be given a private forum for business or personal use moderated by Art. PM Admin for more information.
-
Looking for info on singer 150w104 for leather work and parts
AlZilla replied to outaluck's topic in Leather Sewing Machines
Here's a sort of half assed manual for it. Kind of a poor scan but has some decent information. Generally, it would not be an optimal choice for leather work. 150w104.pdf -
Congratulations on getting it working. Sometimes a long drawn out ordeal can be a great education!
-
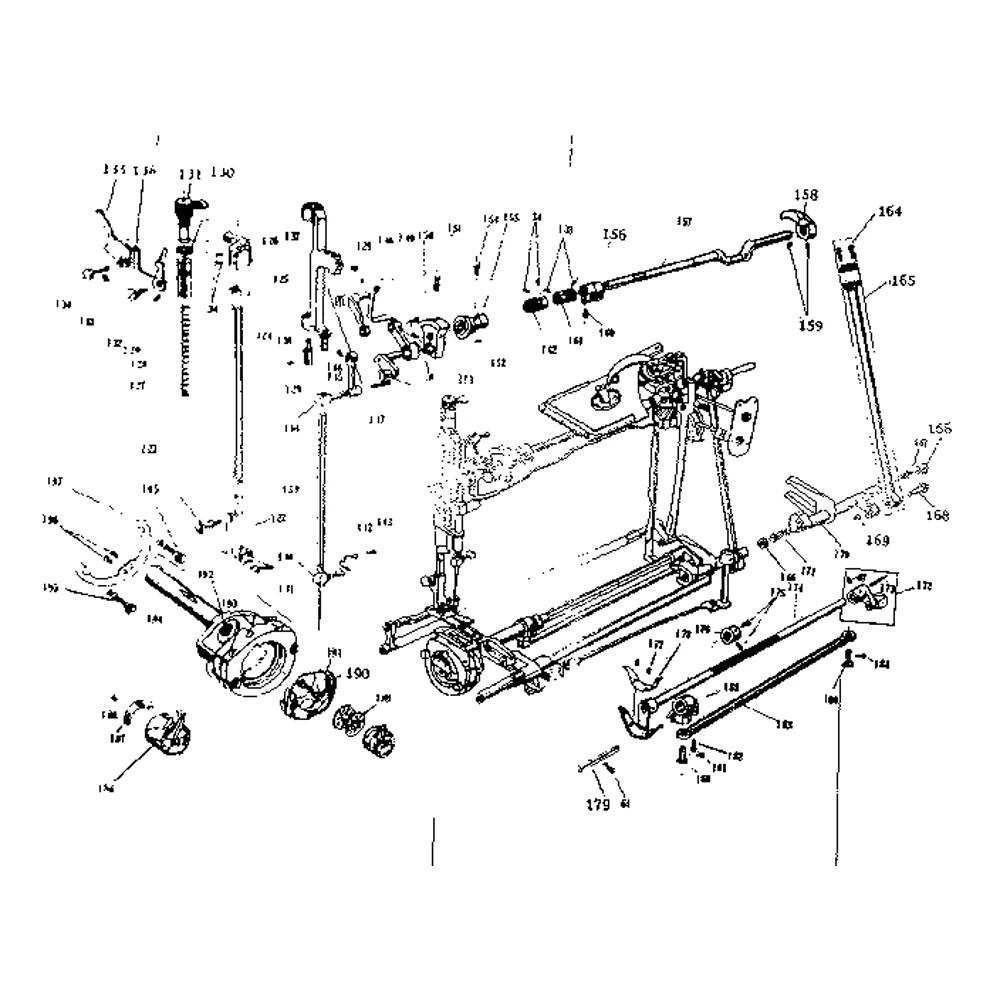
@Rogueshoemaking the G manual is specific to your machine and should be trusted as the most authoritative. I think I see timing marks on that needle bar. The top mark will align just with the needle bar bushing when the needle is at bottom. The lower mark will align with the bushing when it's in position to set the hook timing. Just as the mark starts to disappear is what I've always used. Usually it's a machined groove. I catch a finger nail in it and raise the bar until the finger nail catches. You lucked out if those are timing marks. (Bearing in mind that if your needle isn't the stock length, you'll need to adjust the needle bar height to compensate)
-
@2ndhomepacks, it would be preferred to host those pictures here instead of your shopify account. 3rd party things tend to disappear, leaving us with potholes in the forum. Not really a requirement but a courtesy to future users.
-
@kgg, good find on the G parts list.
-
All I know is what the parts list says. If you have a worn out needle you can put a micrometer or caliper on, that would be the best course. The page KGG links to above says something conflicting. What would be definitive is if you could find a parts list from Singer specifically for your G machine. I went through a similar issue sorting out needles for an old machine I have. Conflicting info but the Singer Parts list was correct for me.
-
Here's a parts list for a 236W131 that says the needle is a 128x22y. Next to the last page. My understanding has always been that the Singer machines stayed identical regardless of country of manufacture (W, G, U, etc). Maybe we found an exception? 236W131 Parts List.pdf