


AlZilla
-
Posts
1,509 -
Joined
-
Last visited
Content Type
Profiles
Forums
Events
Blogs
Gallery
Store
Everything posted by AlZilla
-
I don't have a significant lag most times but very often I get a "page can't be reached" message and the page loads a few seconds later. Both on my home DSL and mobile 5G. You may recall a few months back, we had a DDOS attack and it took the Boss a few days to get it straightened out. Maybe we're still being hammered and she's just filtered most of it out.
-
I noted the original post to alert any browsers to the new price, Beautiful looking stuff.
-
Amazon or ebay has a wide variety of them dirt cheap. I just grabbed a few magnetic based, flexible necked lights. If you have a servo motor, the box might even have a plug so it comes on with the machine.
-
The easiest is just to reply to your own post. If you like, once you do that I can go edit your original post to refer to the new and improved price. The edit window is only a short time, thanks to the spammers. They like to come back and edit their garbage in later on.
-

Teaching - Pancake Knife Sheath
AlZilla replied to lee_ofGA's topic in Gun Holsters, Rifle Slings and Knife Sheathes
Hi Lee, I suppose somebody may be willing to provide phone instruction. A more immediate solution should be one of the many tutorials available online: https://duckduckgo.com/?q=pancake+knife+sheath+tutorial&t=brave&ia=web A specific question here usually gets a good response. I'm going to flip this over to the knife sheath section and see what kind of response you get. Also going to tweak the title. -
Yeah, I saw it after I hit the submit button ... 😱
-
Bringing a neglected machine back to life (Juki LU-563)
AlZilla replied to MikeG's topic in Leather Sewing Machines
A site search for LU-563 turns up 18 pages of reading material. https://leatherworker.net/forum/search/?&q=111w156&page=2&quick=1&item=132320&search_and_or=or&sortby=relevancy -
Bringing a neglected machine back to life (Juki LU-563)
AlZilla replied to MikeG's topic in Leather Sewing Machines
That looks like a win to me. It's a pretty close clone of the Singer 111w156, if not identical. Parts and information are going to be abundant and easily found. Look for the user instructions. If the 156 isn't easily found, the 111w155 will be close enough for the oiling points. You know that journey of a thousand miles that begins with a single step? You just took that step. Welcome to the rabbit hole. EDIT: Here's the 156 manual. It'll get you started. 111w156.pdf -
Ask the client to measure his pens.
-
Bringing a neglected machine back to life (Juki LU-563)
AlZilla replied to MikeG's topic in Leather Sewing Machines
Well, the good news is that you probably don't have to take it all apart. and you might just be able to oil it and go. Some pictures would help us to to evaluate it. Maybe a video walk around. Do you have the whole machine, table,motor and all? Or just a head unit? For starters, I'd oil it everywhere metal moves against metal. All the oiling points on top, everyplace underneath that a bushing, bearing or anything else moves metal on metal. Turn it over by hand and let it sit for a day. If you have the whole setup, motor and all try running it and give it a listen. When I got my first industrial, it turned over a lot harder than any domestic i had worked with. I had no idea how tight it should have been so I erred way on the side of caution and flushed PB Blaster through everything followed by sewing machine oil. Turned it endlessly by hand trying to decide if it was too tight. I removed the internal belt so I could evaluate the top and bottom separately. After a week or so of this activity, turned out it was fine to begin with. -
Leather Weight for Lined Holsters.
AlZilla replied to Latigo Smith's topic in Gun Holsters, Rifle Slings and Knife Sheathes
Red Nichols, as I recall, recommends horse butt strips. I've been trying to find the post over on the Smith & Wesson forum where he talked about it. I'll keep looking. -
@BaroqueLeatherGal, you could tag @terrymac to get their attention.
-
Will this work for a singer 111w154 ?
AlZilla replied to outaluck's topic in Leather Sewing Machines
It takes some research but you can find cheap servos with a start speed of 100 rpms. In my case, with the small pulley and a speed reducer, I can get down to 11 stitches/minute. There's a whole rabbit trail of slow speed versus cooling. But I think at the hobby level we're not running these things for prolonged periods of time, so it's probably not a giant issue. 11 spm is ridiculously slow. -
Will this work for a singer 111w154 ?
AlZilla replied to outaluck's topic in Leather Sewing Machines
It will But you may want to find a version where the control box is separate from the motor. This way the controls can be mounted at the edge of the table where you can play with them. The style you show would require you to climb under the table to tweak any of the settings. -
Welcome to the forum! I patiently moved this to Leatherworking Conversation and tweaked the title. It's really a general question so maybe it'll get more traffic over here.
-
You're doing one of the exact things recommended for new sewists. People starting out with domestics are recommended to sew on paper until they get the hang of it. I would switch to cardboard instead of using up your leather and just keep sewing patterns without thread. Build muscle memory.
-
A lot of people sand edges like I would a table top, progressively finer down to pretty fine grit. I use my sander to roughly clean up edges with 80 to 120, depending on what's on the machine. Never hold it long enough to build heat. For the most part I'm evening up layers or cheating an edge to parallel with the stitching. I might hit an edge with 150 by hand before slicking it down. Bear in mind, I'm not interested in super slick, polished edges. But, yeah, that sander can do a lot of damage in a hurry.
-
I like the jig idea. Centered and spaced correctly, all at once.
-
I couldn't picture that shaft until I went back and looked at one of mine. Now I see it runs in the lower part of the arm! Another lesson learned for me. I, too, will have to double check where it gets oiled.
-
What are some tools that changed your leatherwork?
AlZilla replied to Kenzi's topic in Leather Tools
Is leatherworker.net a tool? It's been a great learning resource for me. -
BBC caught with its knickers down . . . .
AlZilla replied to fredk's topic in All About Us and Off Topic
Some things never change. In 1787 Thomas Jefferson called out the British gazetteers of the day for fake news: "Wonderful is the effect of impudent and persevering lying. The British ministry have so long hired their gazetteers to repeat and model into every form lies about our being in anarchy, that the world has at length believed them, the English nation has believed them, the ministers themselves have come to believe them, and what is more wonderful, we have believed them ourselves. Yet where does this anarchy exist? Where did it ever exist, except in the single instance of Massachusets?" -
Union Special machine setup installation and modifications
AlZilla replied to DMH's topic in Leather Sewing Machines
I moved this over to the sewing machine sub forum. Somebody here will know what you need. -
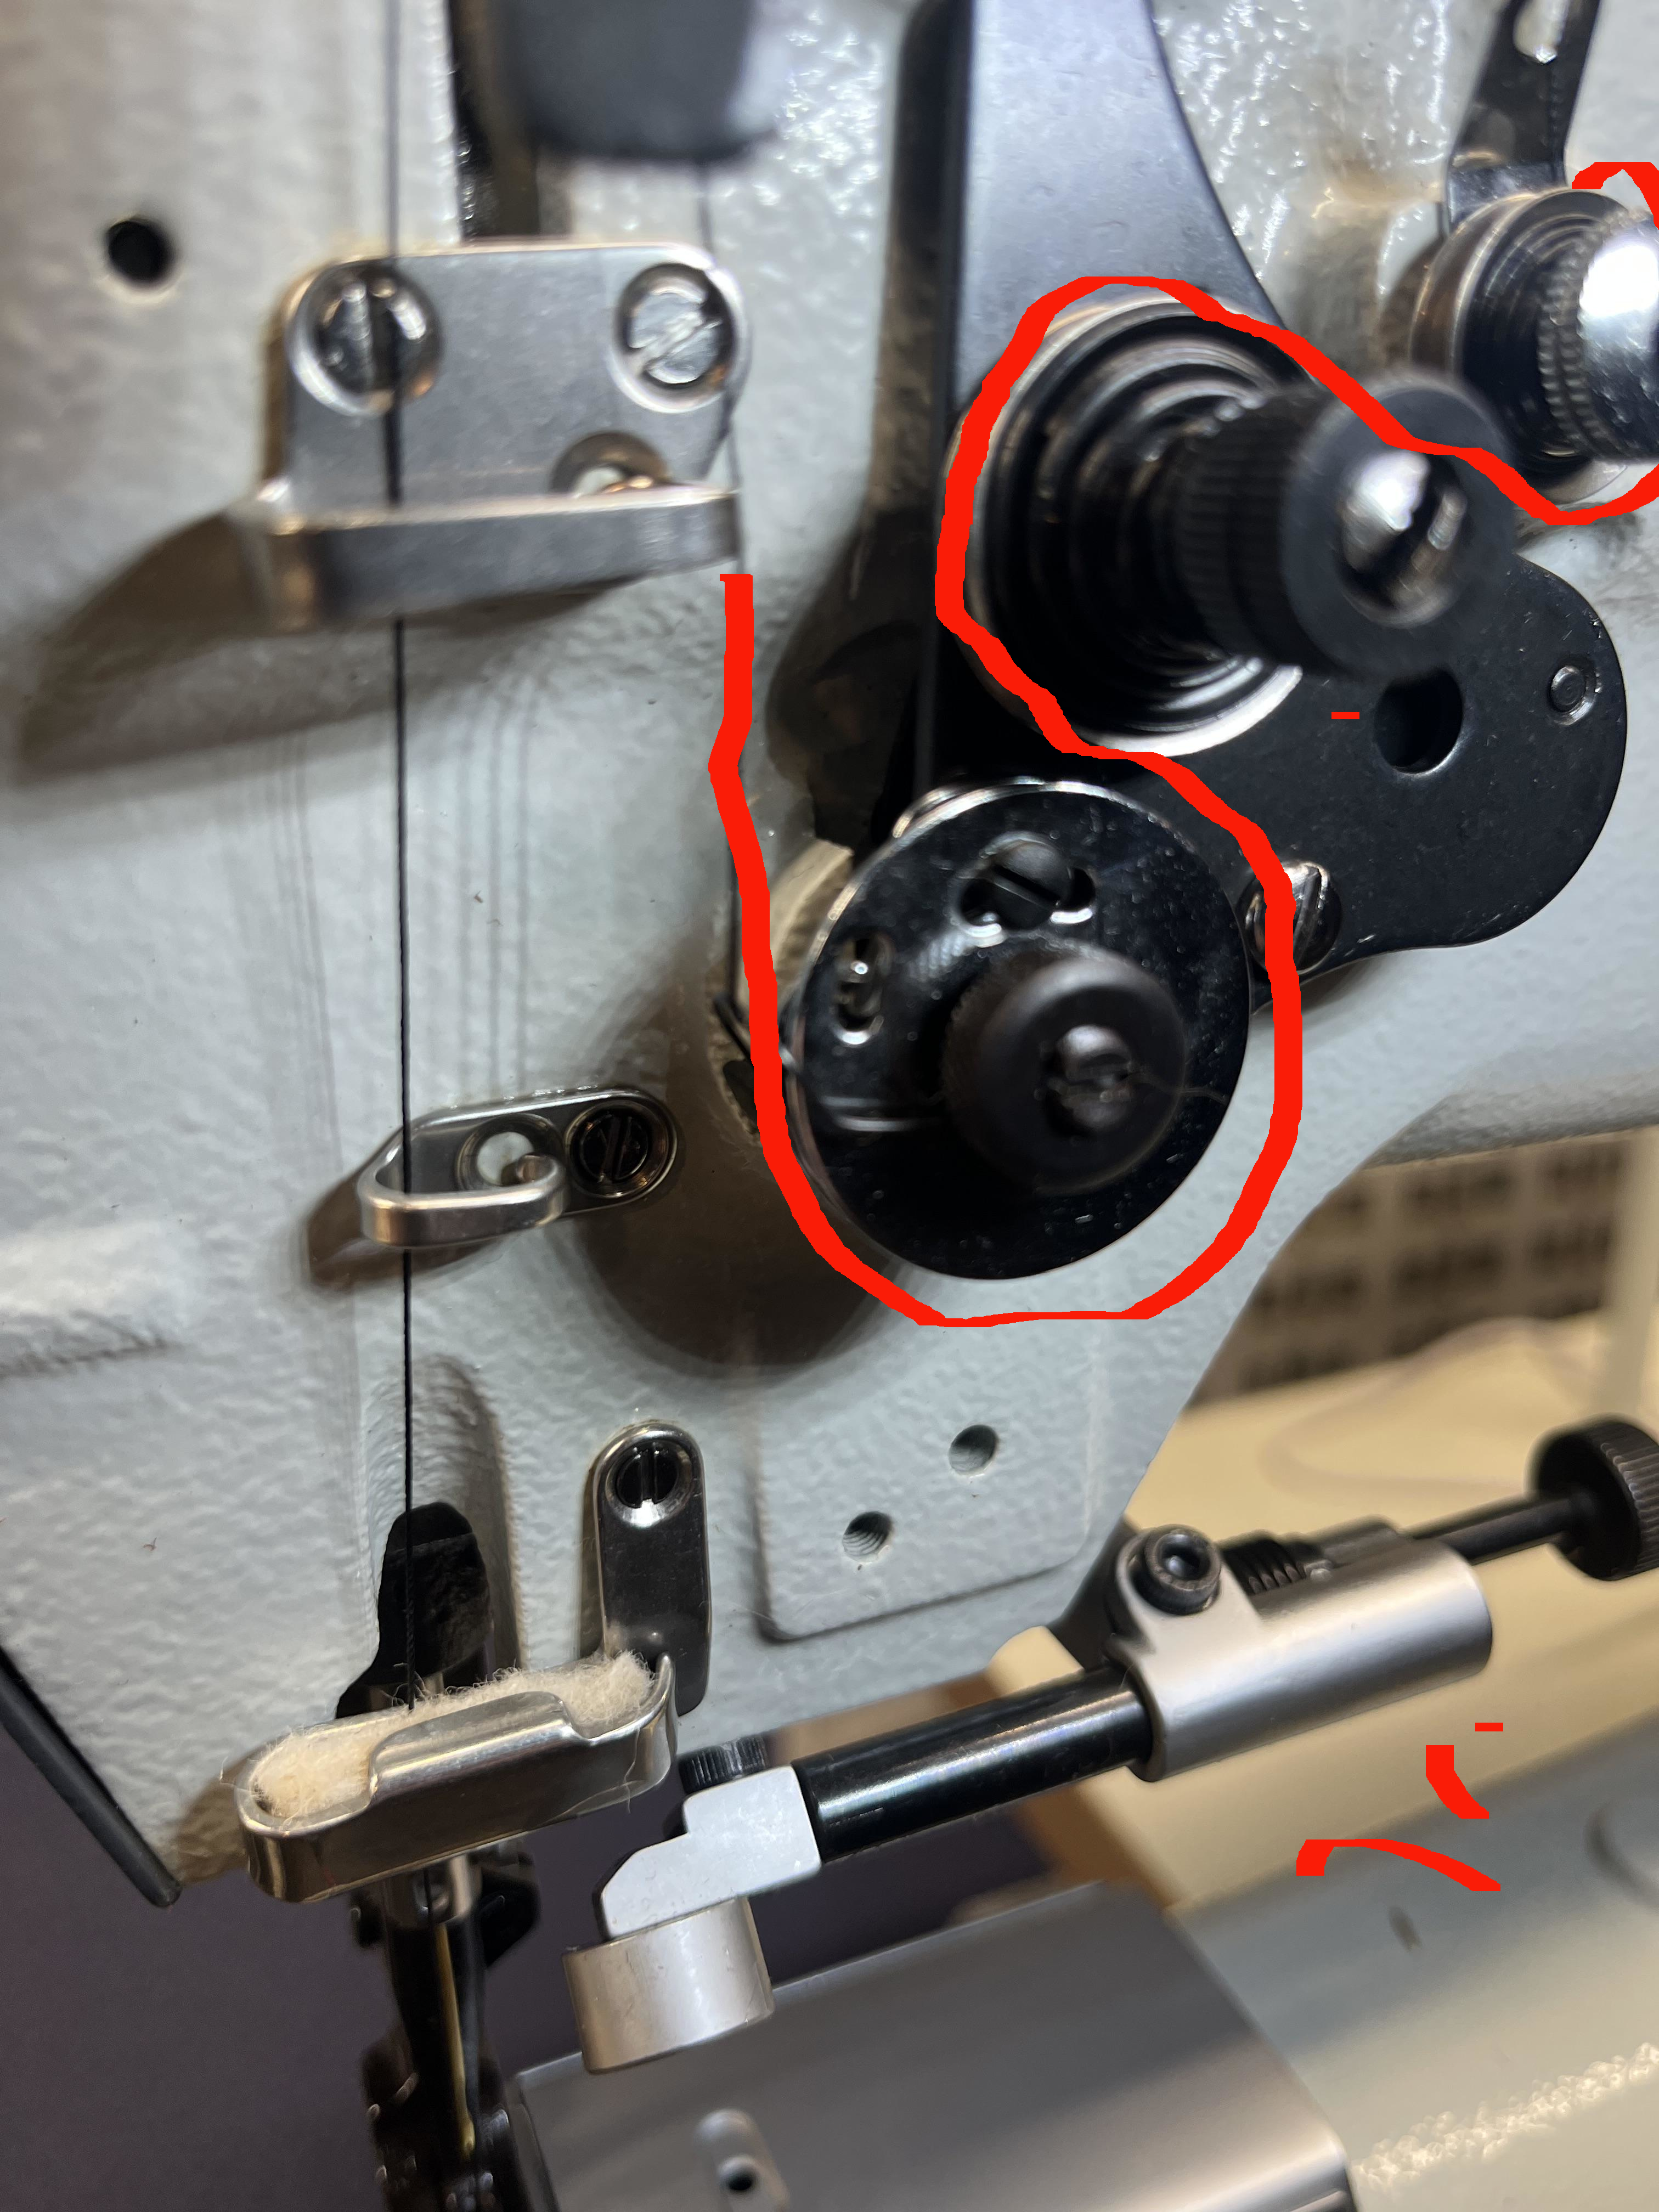
I know nothing about this machine. But if I had to make a scientific wild assed guess, it would be this.
-
FOR SALE - Cowboy CB12 Hydraulic Clicker Press - CLEAN - $2800
AlZilla replied to soulcraftgoods's topic in Old/Sold
Let's tag the OP to be sure they see this. @soulcraftgoods -
Welcome aboard. You've found the very best place on the net to learn about any and all aspects of Leathercraft. It was pretty much the first place I landed a few years ago. For the adult stuff, we keep that in the sub forum at https://leatherworker.net/forum/forum/46-oh-no-dont-stop/ You'll need the secret password to enter, which is "adult" without the quotes. The password just keeps it from showing up in the regular flow of more family friendly content. Have fun!