

All Activity
- Past hour
-
.thumb.jpg.6e903dd66163ad5672f00f144058c571.jpg)
spring flowers and good food
Northmount replied to chuck123wapati's topic in All About Us and Off Topic
We have one somewhere in southern Alberta like this, except it has a large cannon ball on the end of the chain. Couldn't find the photo last time I searched for it, so maybe it's gone, got blown away! -
My digital servo motor has the same problem...the foot pedal is still hot for about ten seconds after turning off the power. I'm thinking on how to bring it to full off sooner. So far my best approach is: Turn off power Grab hand wheel with two hands so it can't move Press the gas pedal and let the motor pulley spin to scrub off the energy I imagine with a clutch pedal one could take a gentler approach...hold the hand wheel with one hand and press gently on the clutch to scrub off the energy.
-
Excellent job. I particularly like the way you ended the pattern by extending it to the end of the belt, most just stop it at one of the "crosspoints".
-
Having never seen one in person, I underestimated the amount of distraction it can be when in motion. needle-guard-small.mp4
-
 That does it. I'll see if the chicken fat that I get is clean enough. If not, I'm dropping the idea of using it. Thank you for investigating that. I was searching on Amazon and all I found was filters for vacuums.
 - Today
-
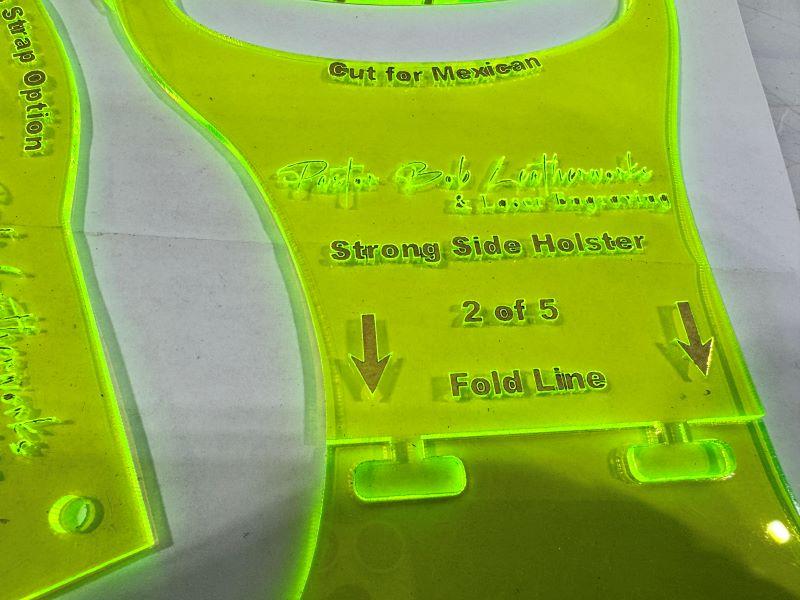
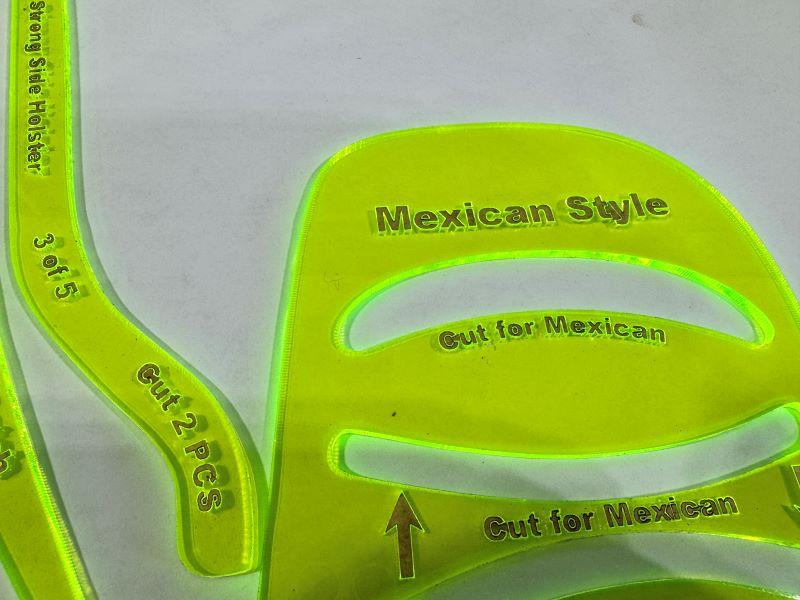
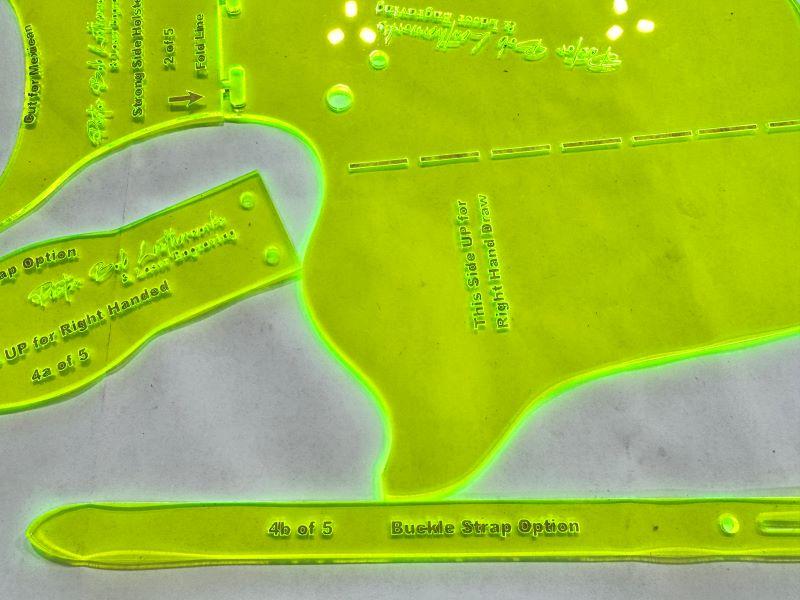
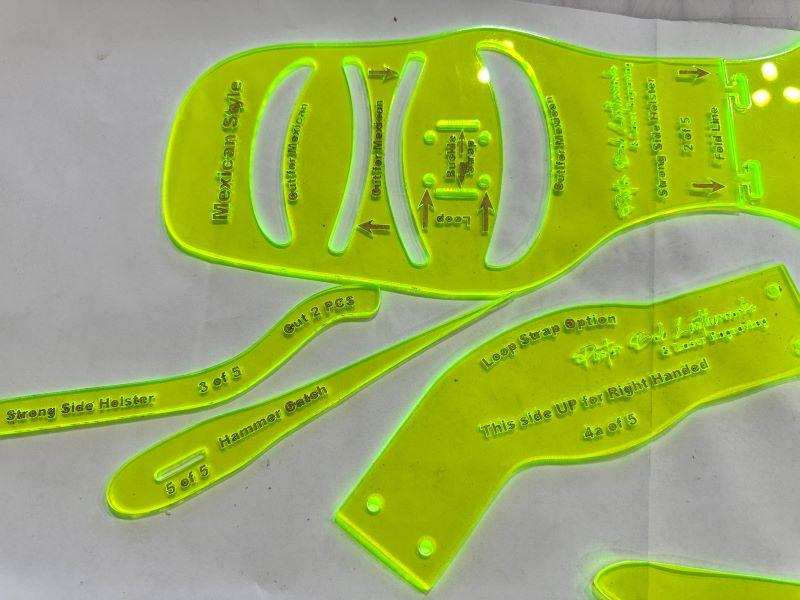
 Template is $45 plus $7 shipping in continental US. Contact me directly for sales outside US. LISTING FOR TEMPLATE ONLY. PHOTOS OF HOLSTER AND BELT FOR EXAMPLE PURPOSES ONLY. Nice acrylic template for making holsters out of leather. No more paper patterns. The template includes 1/8" thick acrylic pieces to be used to create the holster pictured. This template includes pieces to make three different style holsters; one with a belt / buckle, one with a strap across the front, and Mexican Loop style. These templates can be used to create simple, plain leather holsters or add as much tooling / carving as you desire. Materials you will need to make a holster using this pattern are: 7oz leather, glue, thread, optional are stamping tools, swivel knife, dye. This holster is designed for cowboy revolvers with 5 1/2" barrels. Easy to follow, printed instructions are included as well. Made using acrylic. An easy way to become a holster maker. Contents of shipped package: 6 pc. acrylic template Instructions
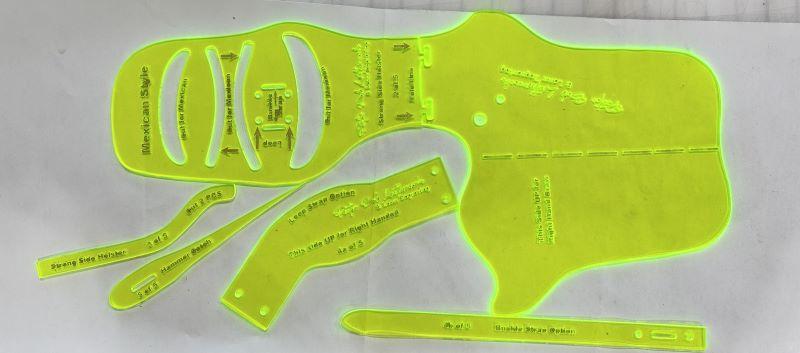

.jpg.c17f8118021f9633c1c3ba2423830a39.jpg)
-
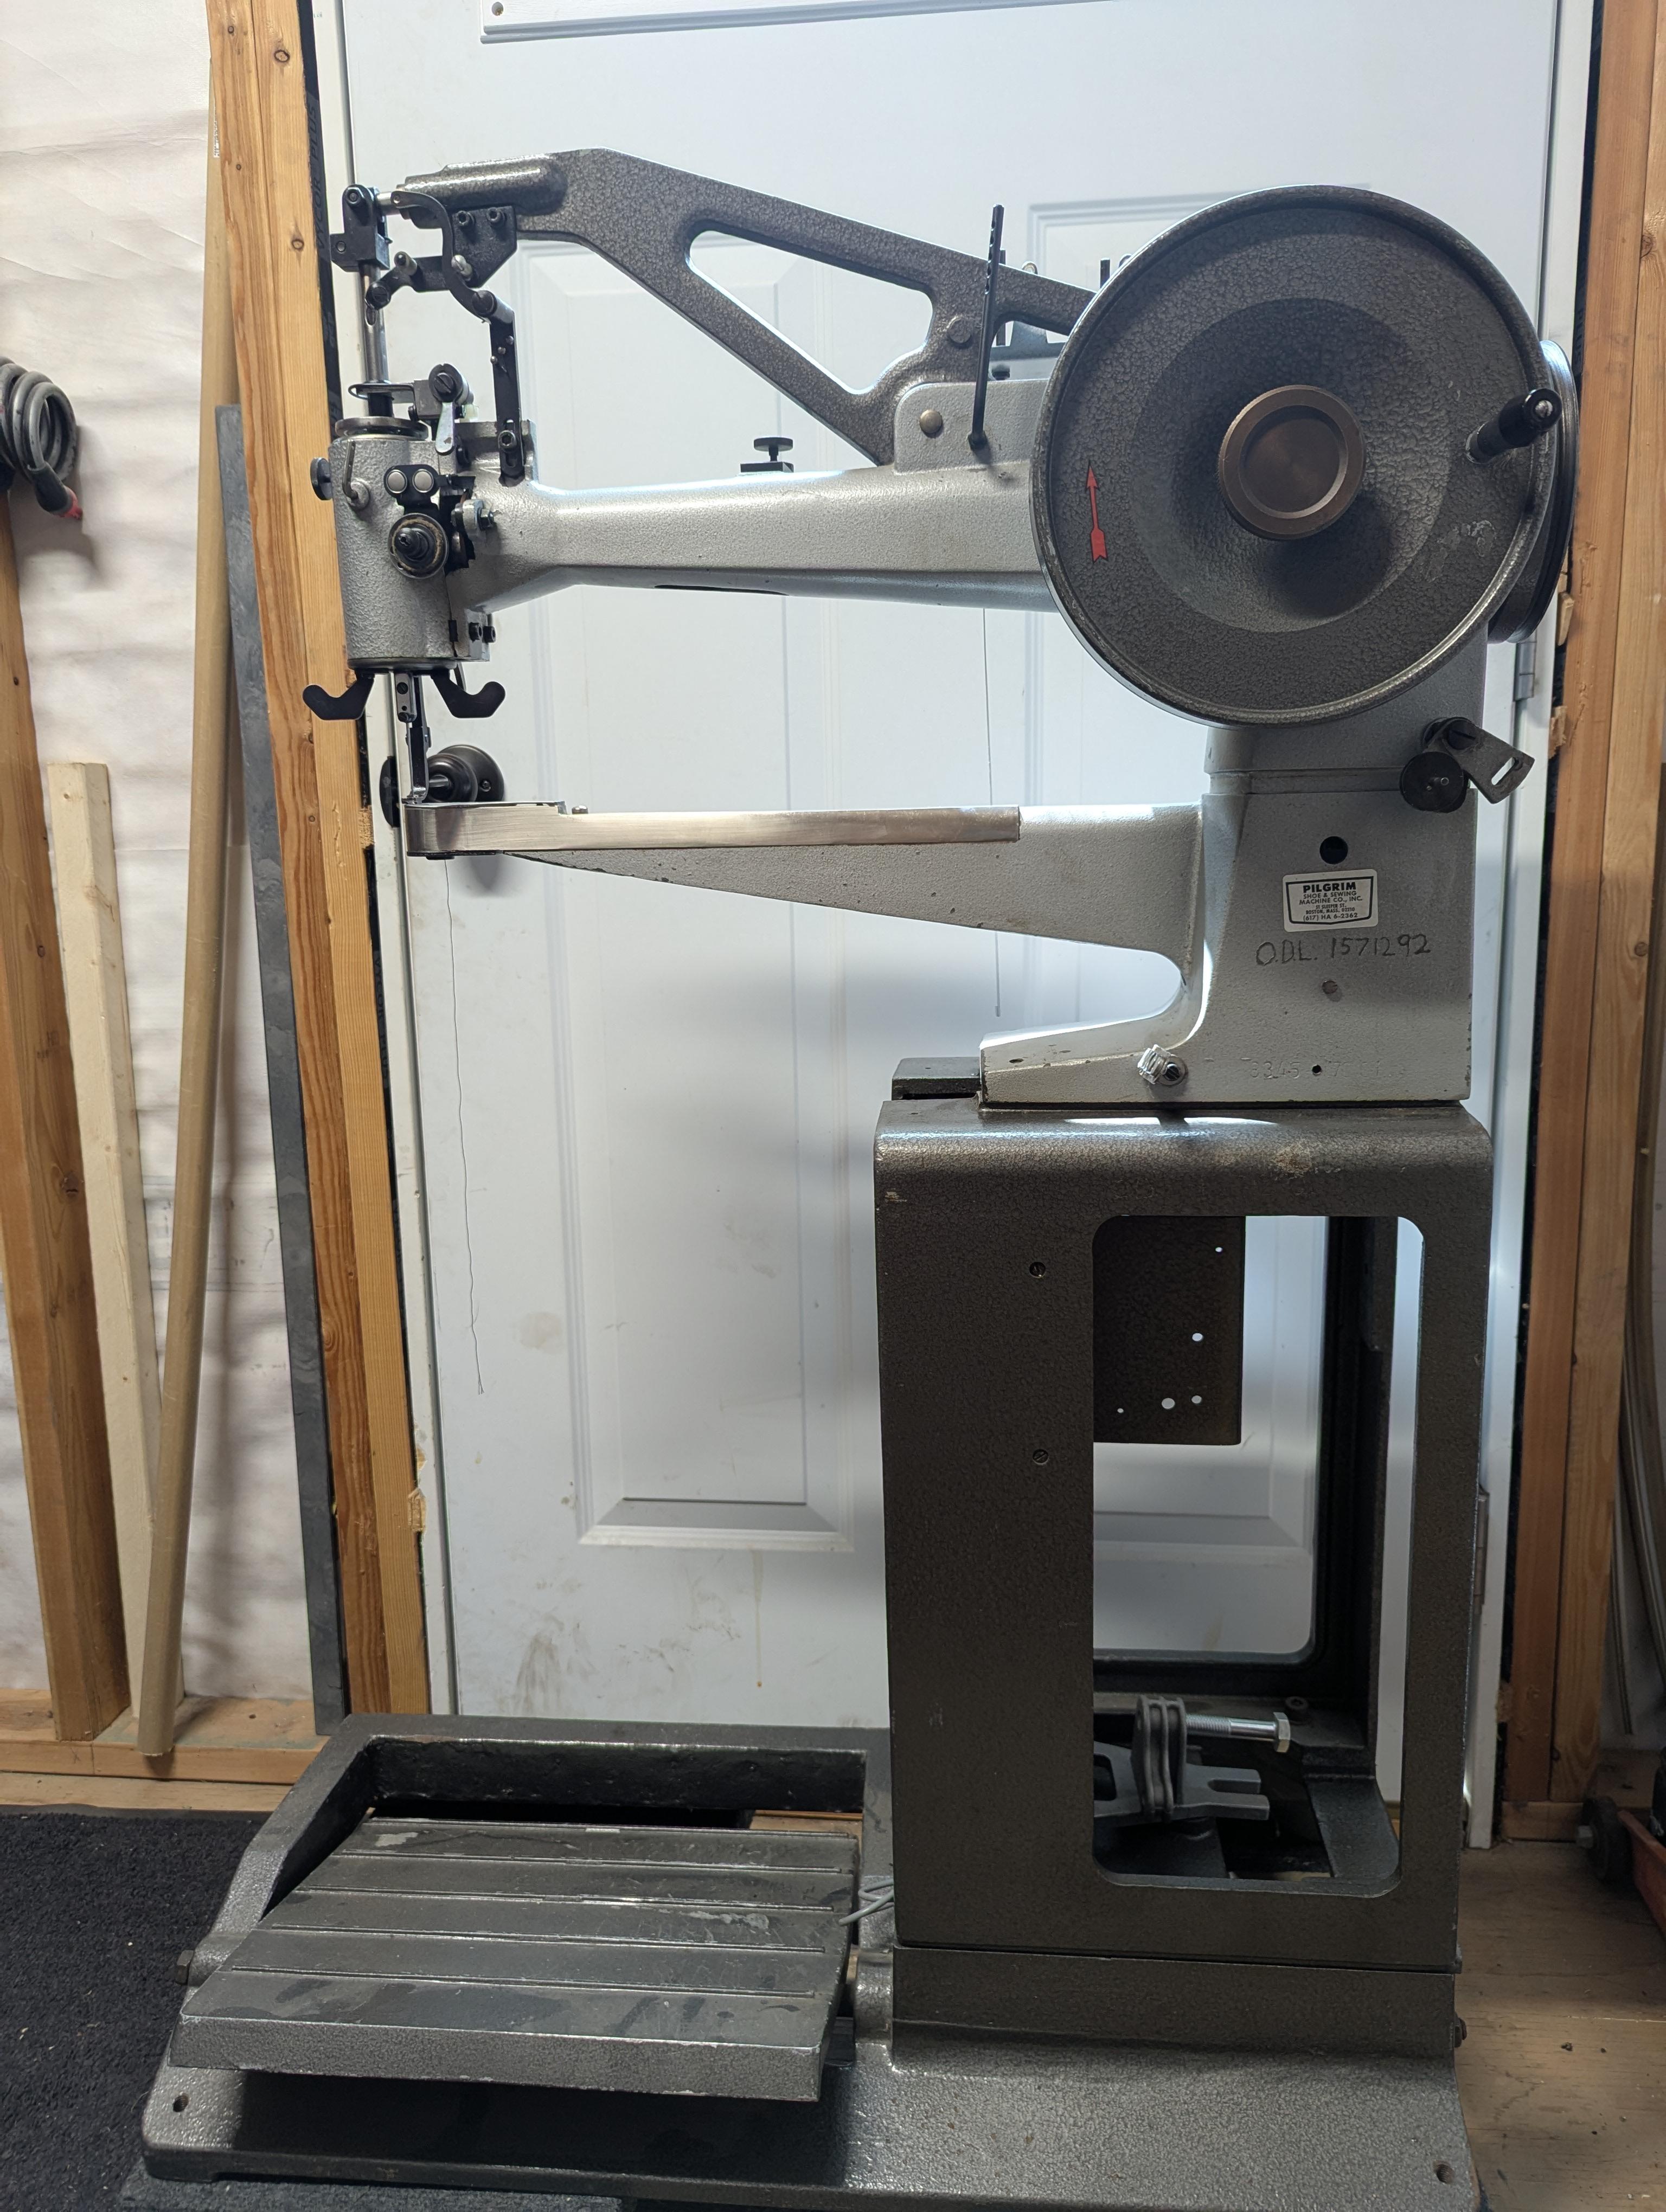
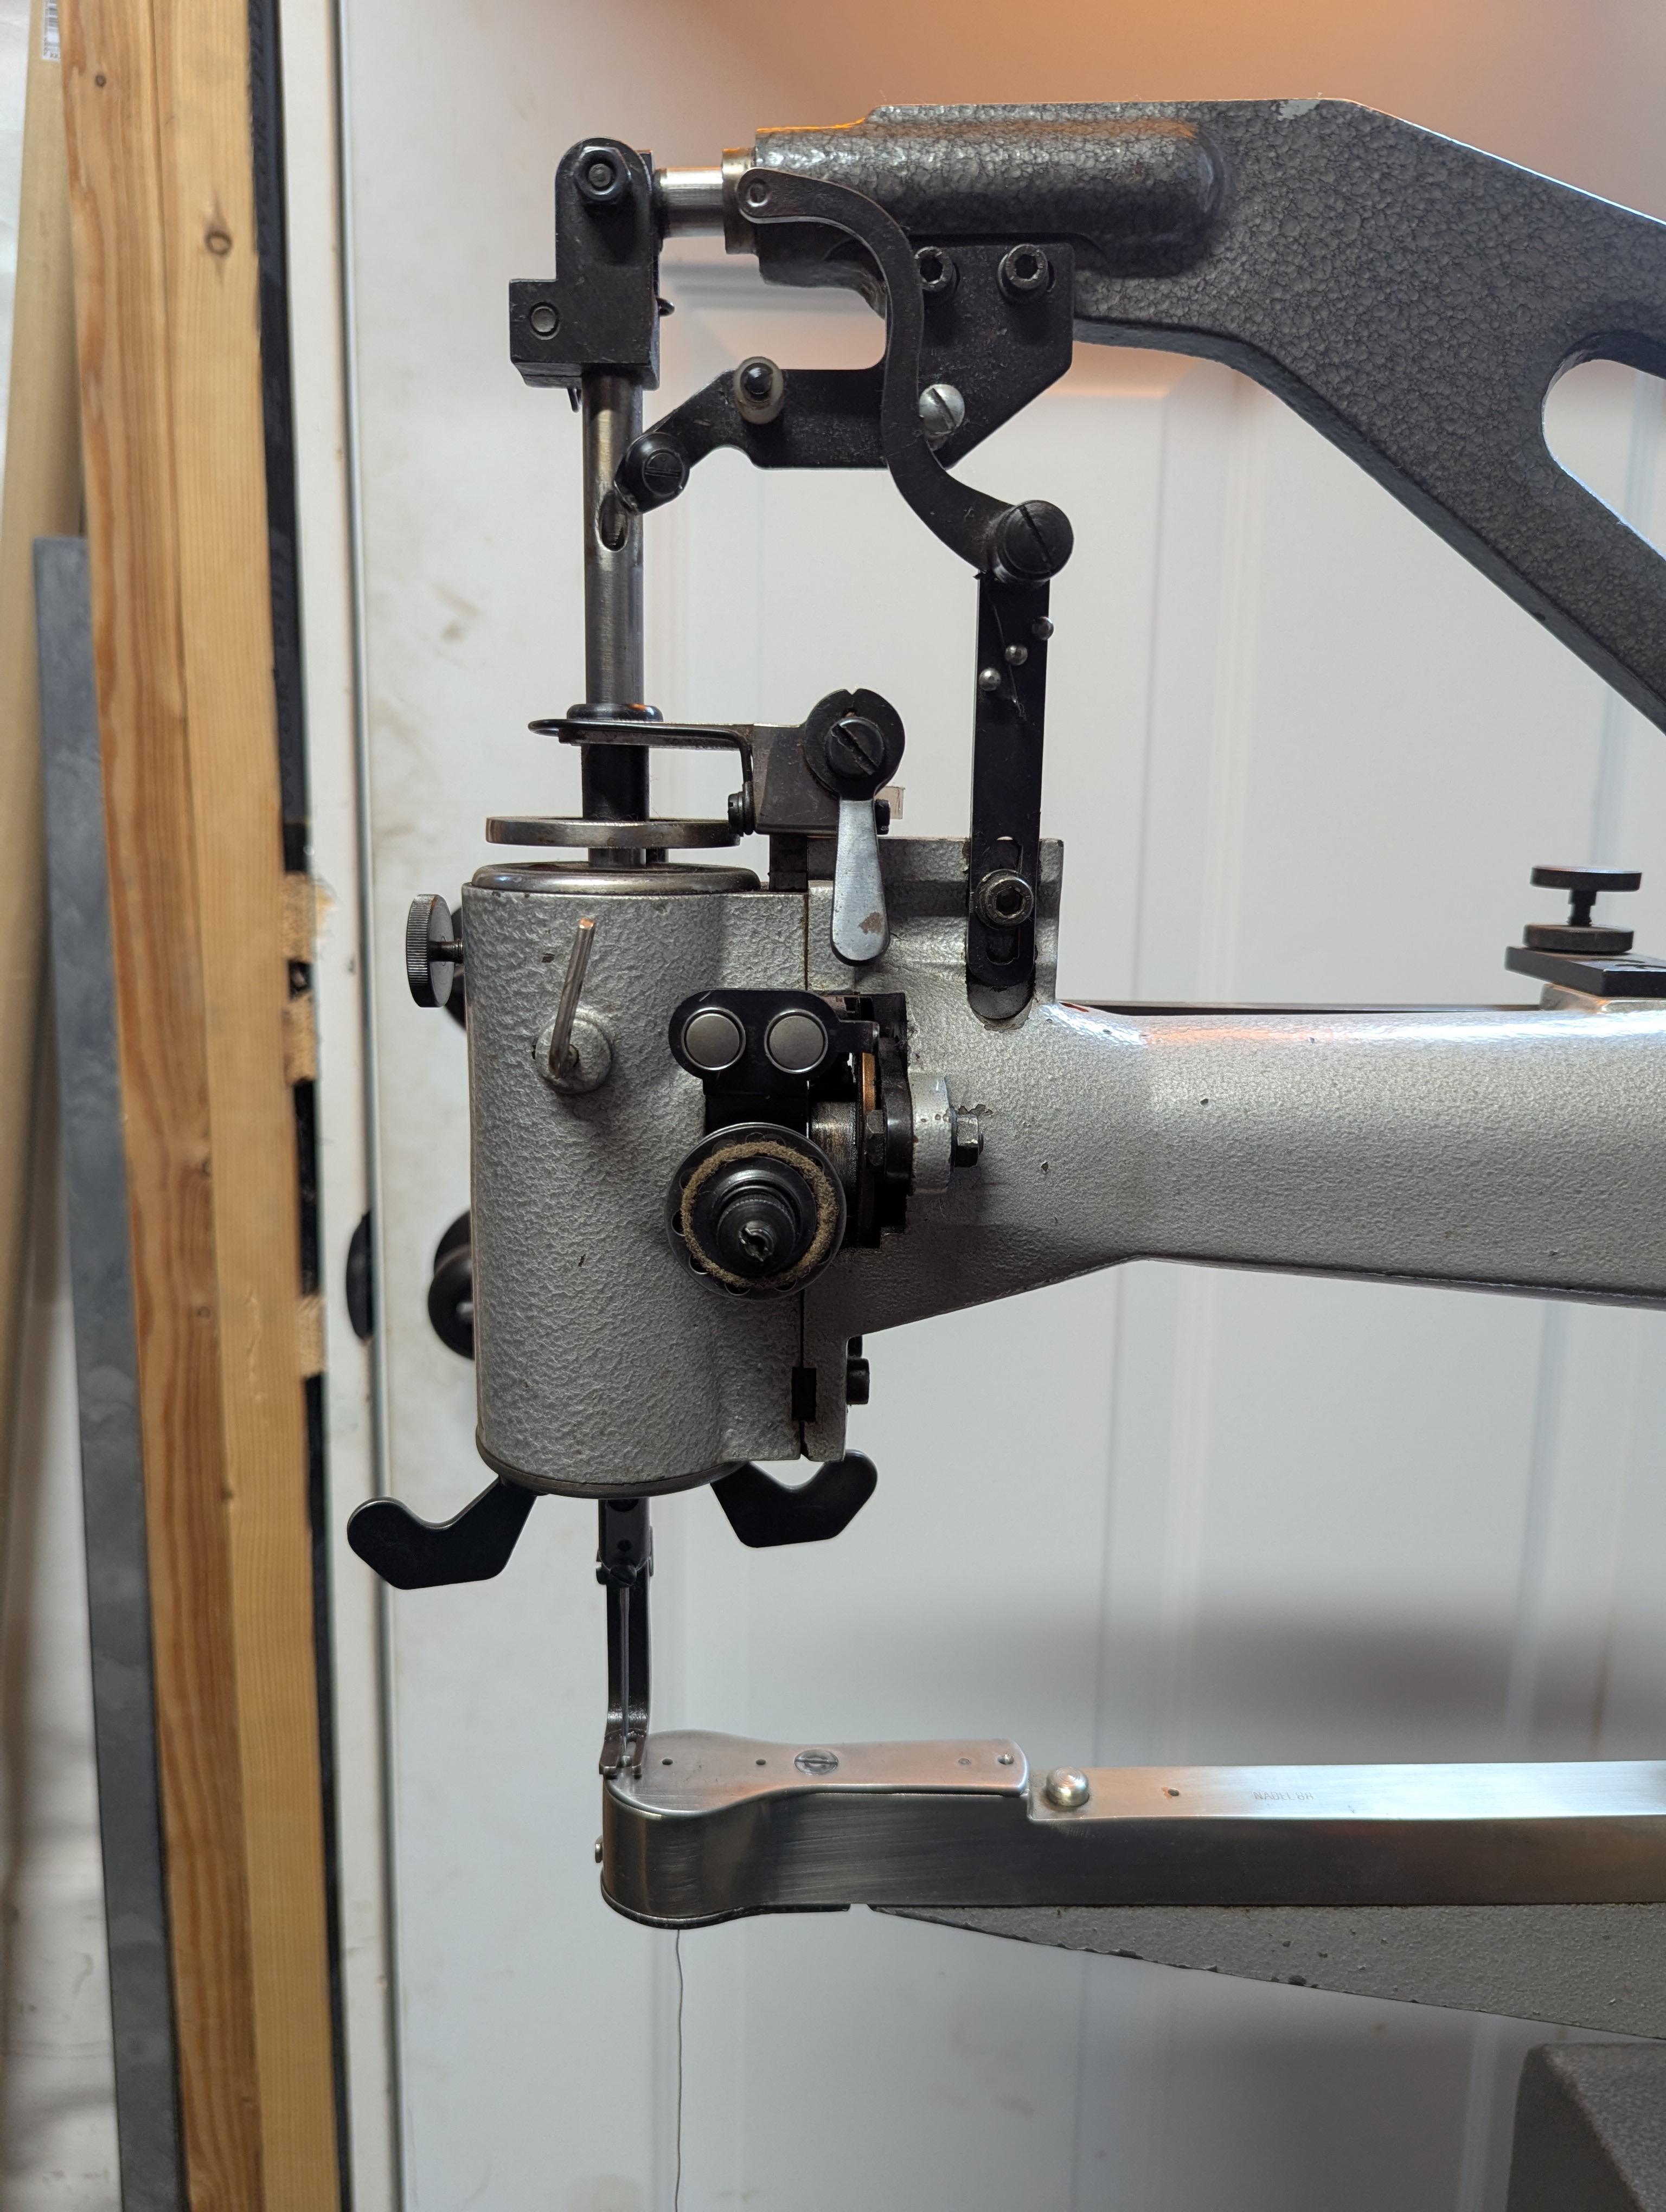
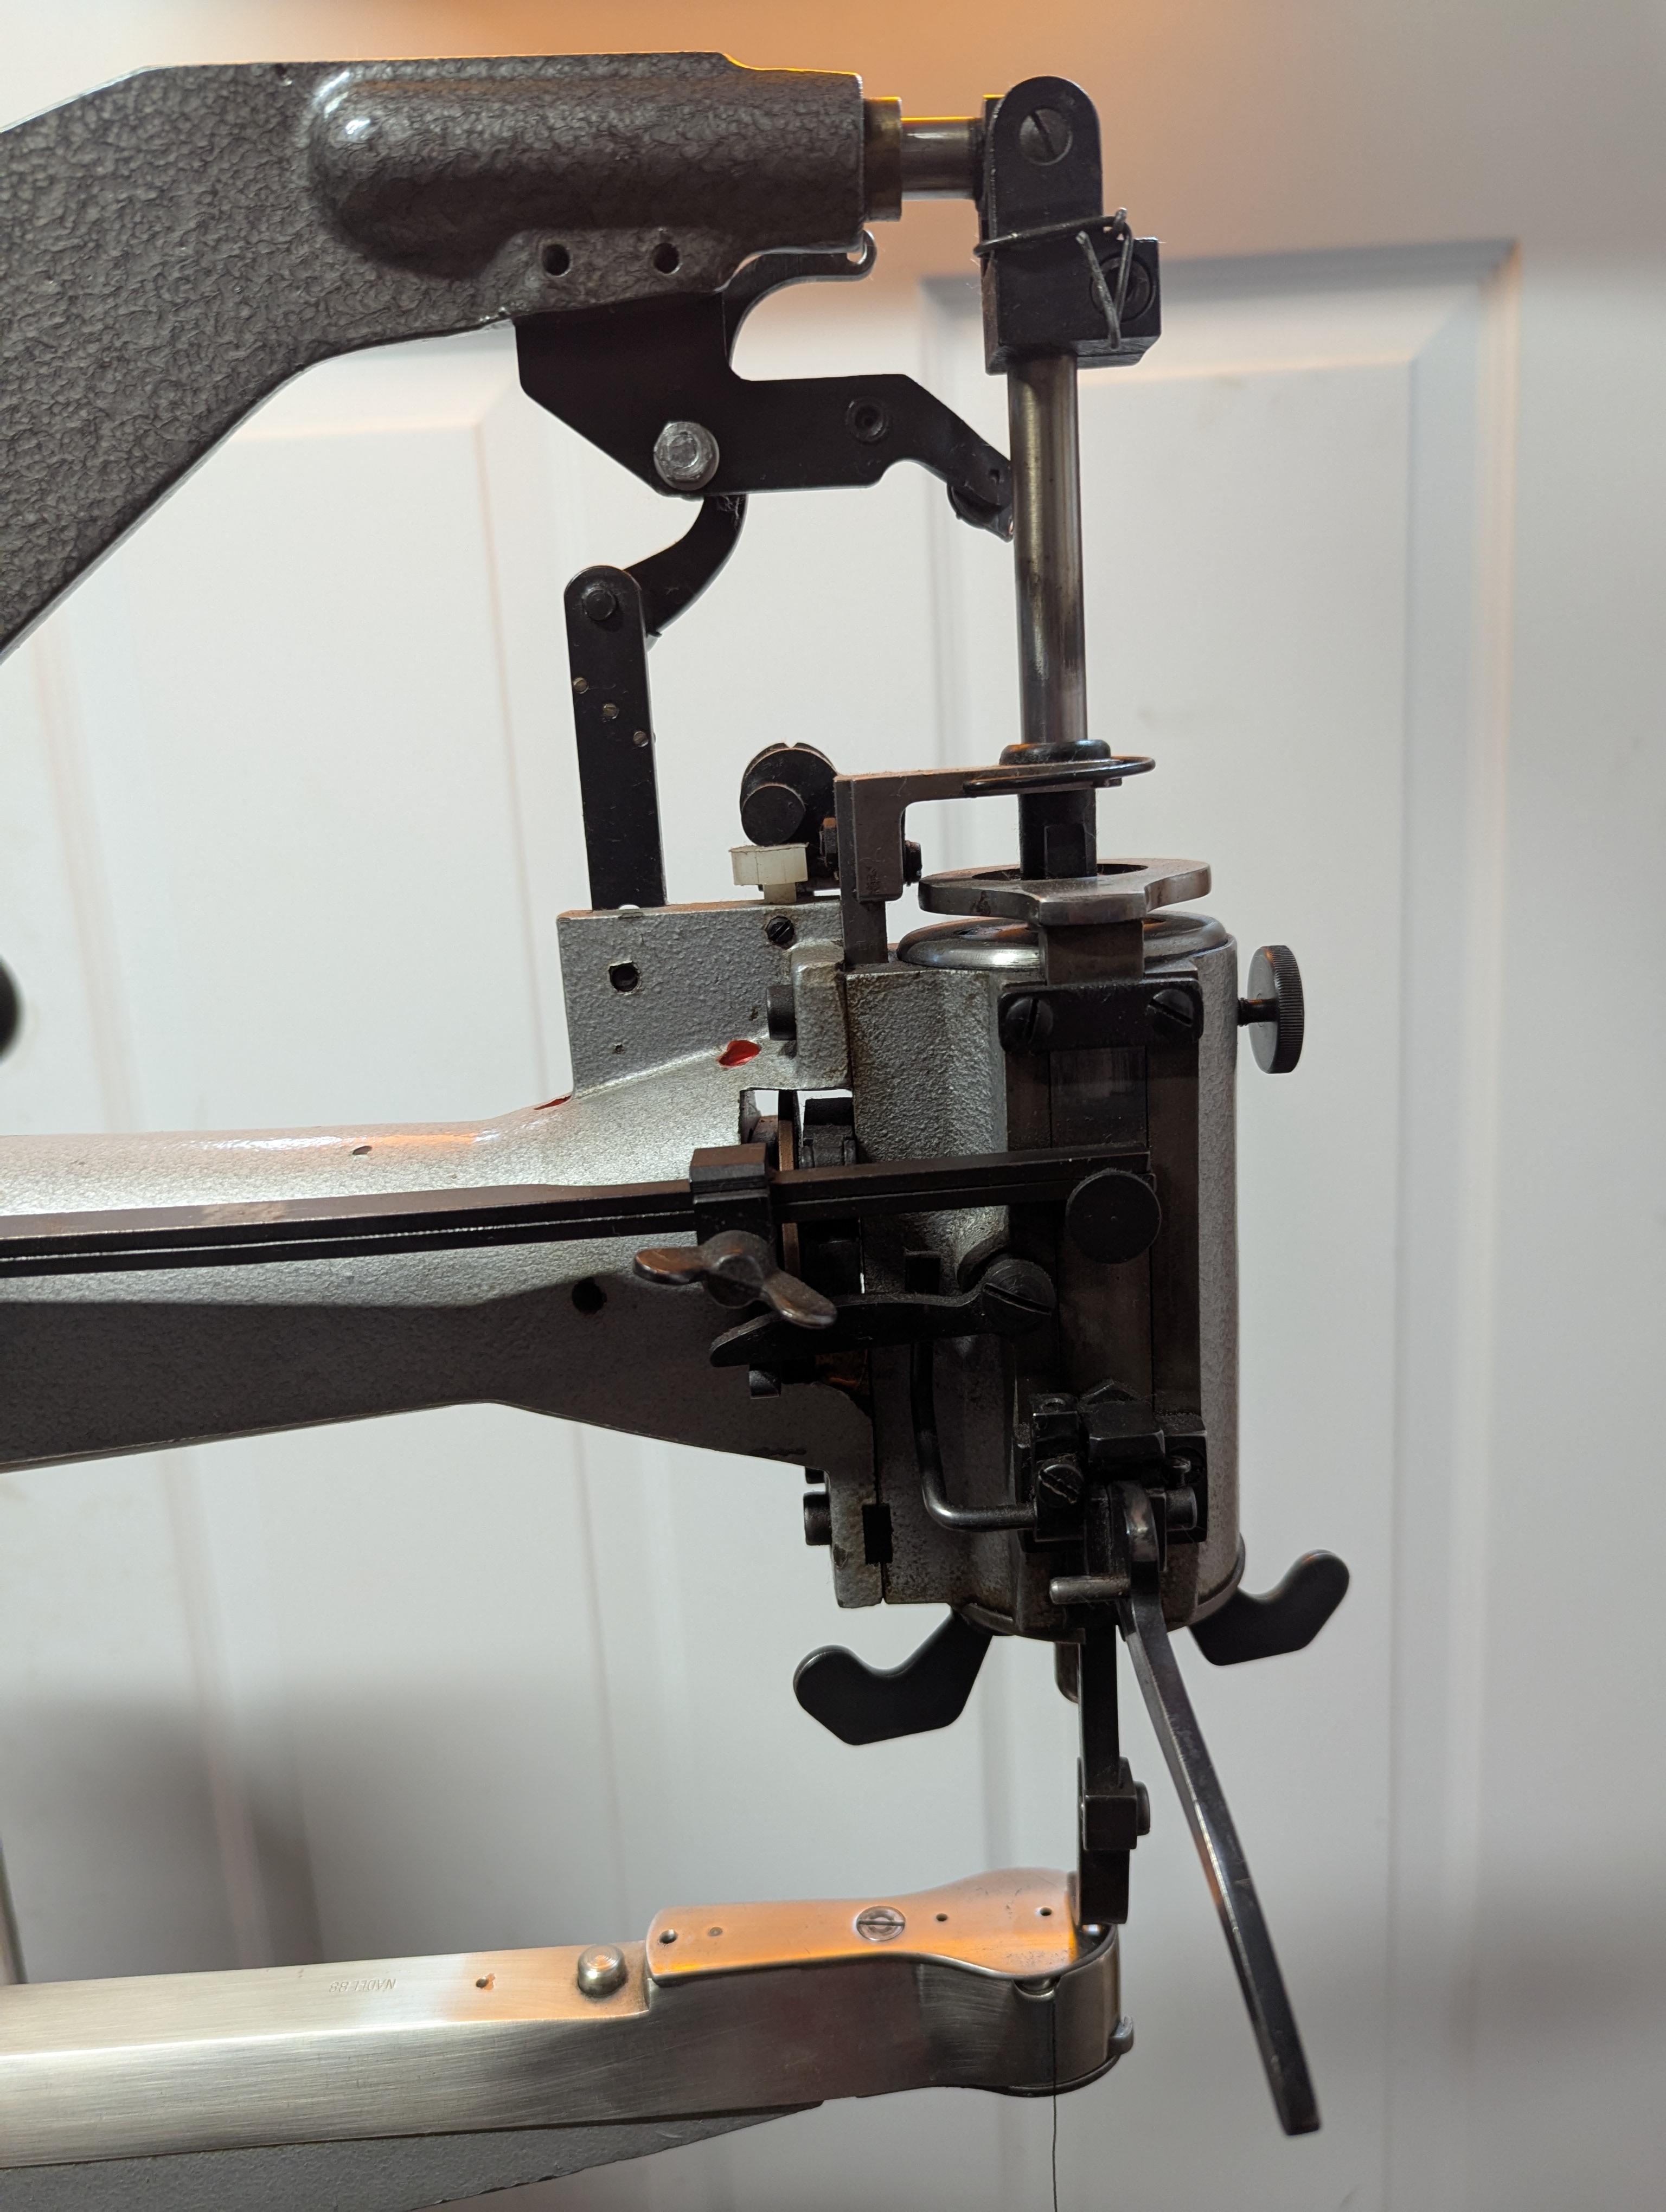
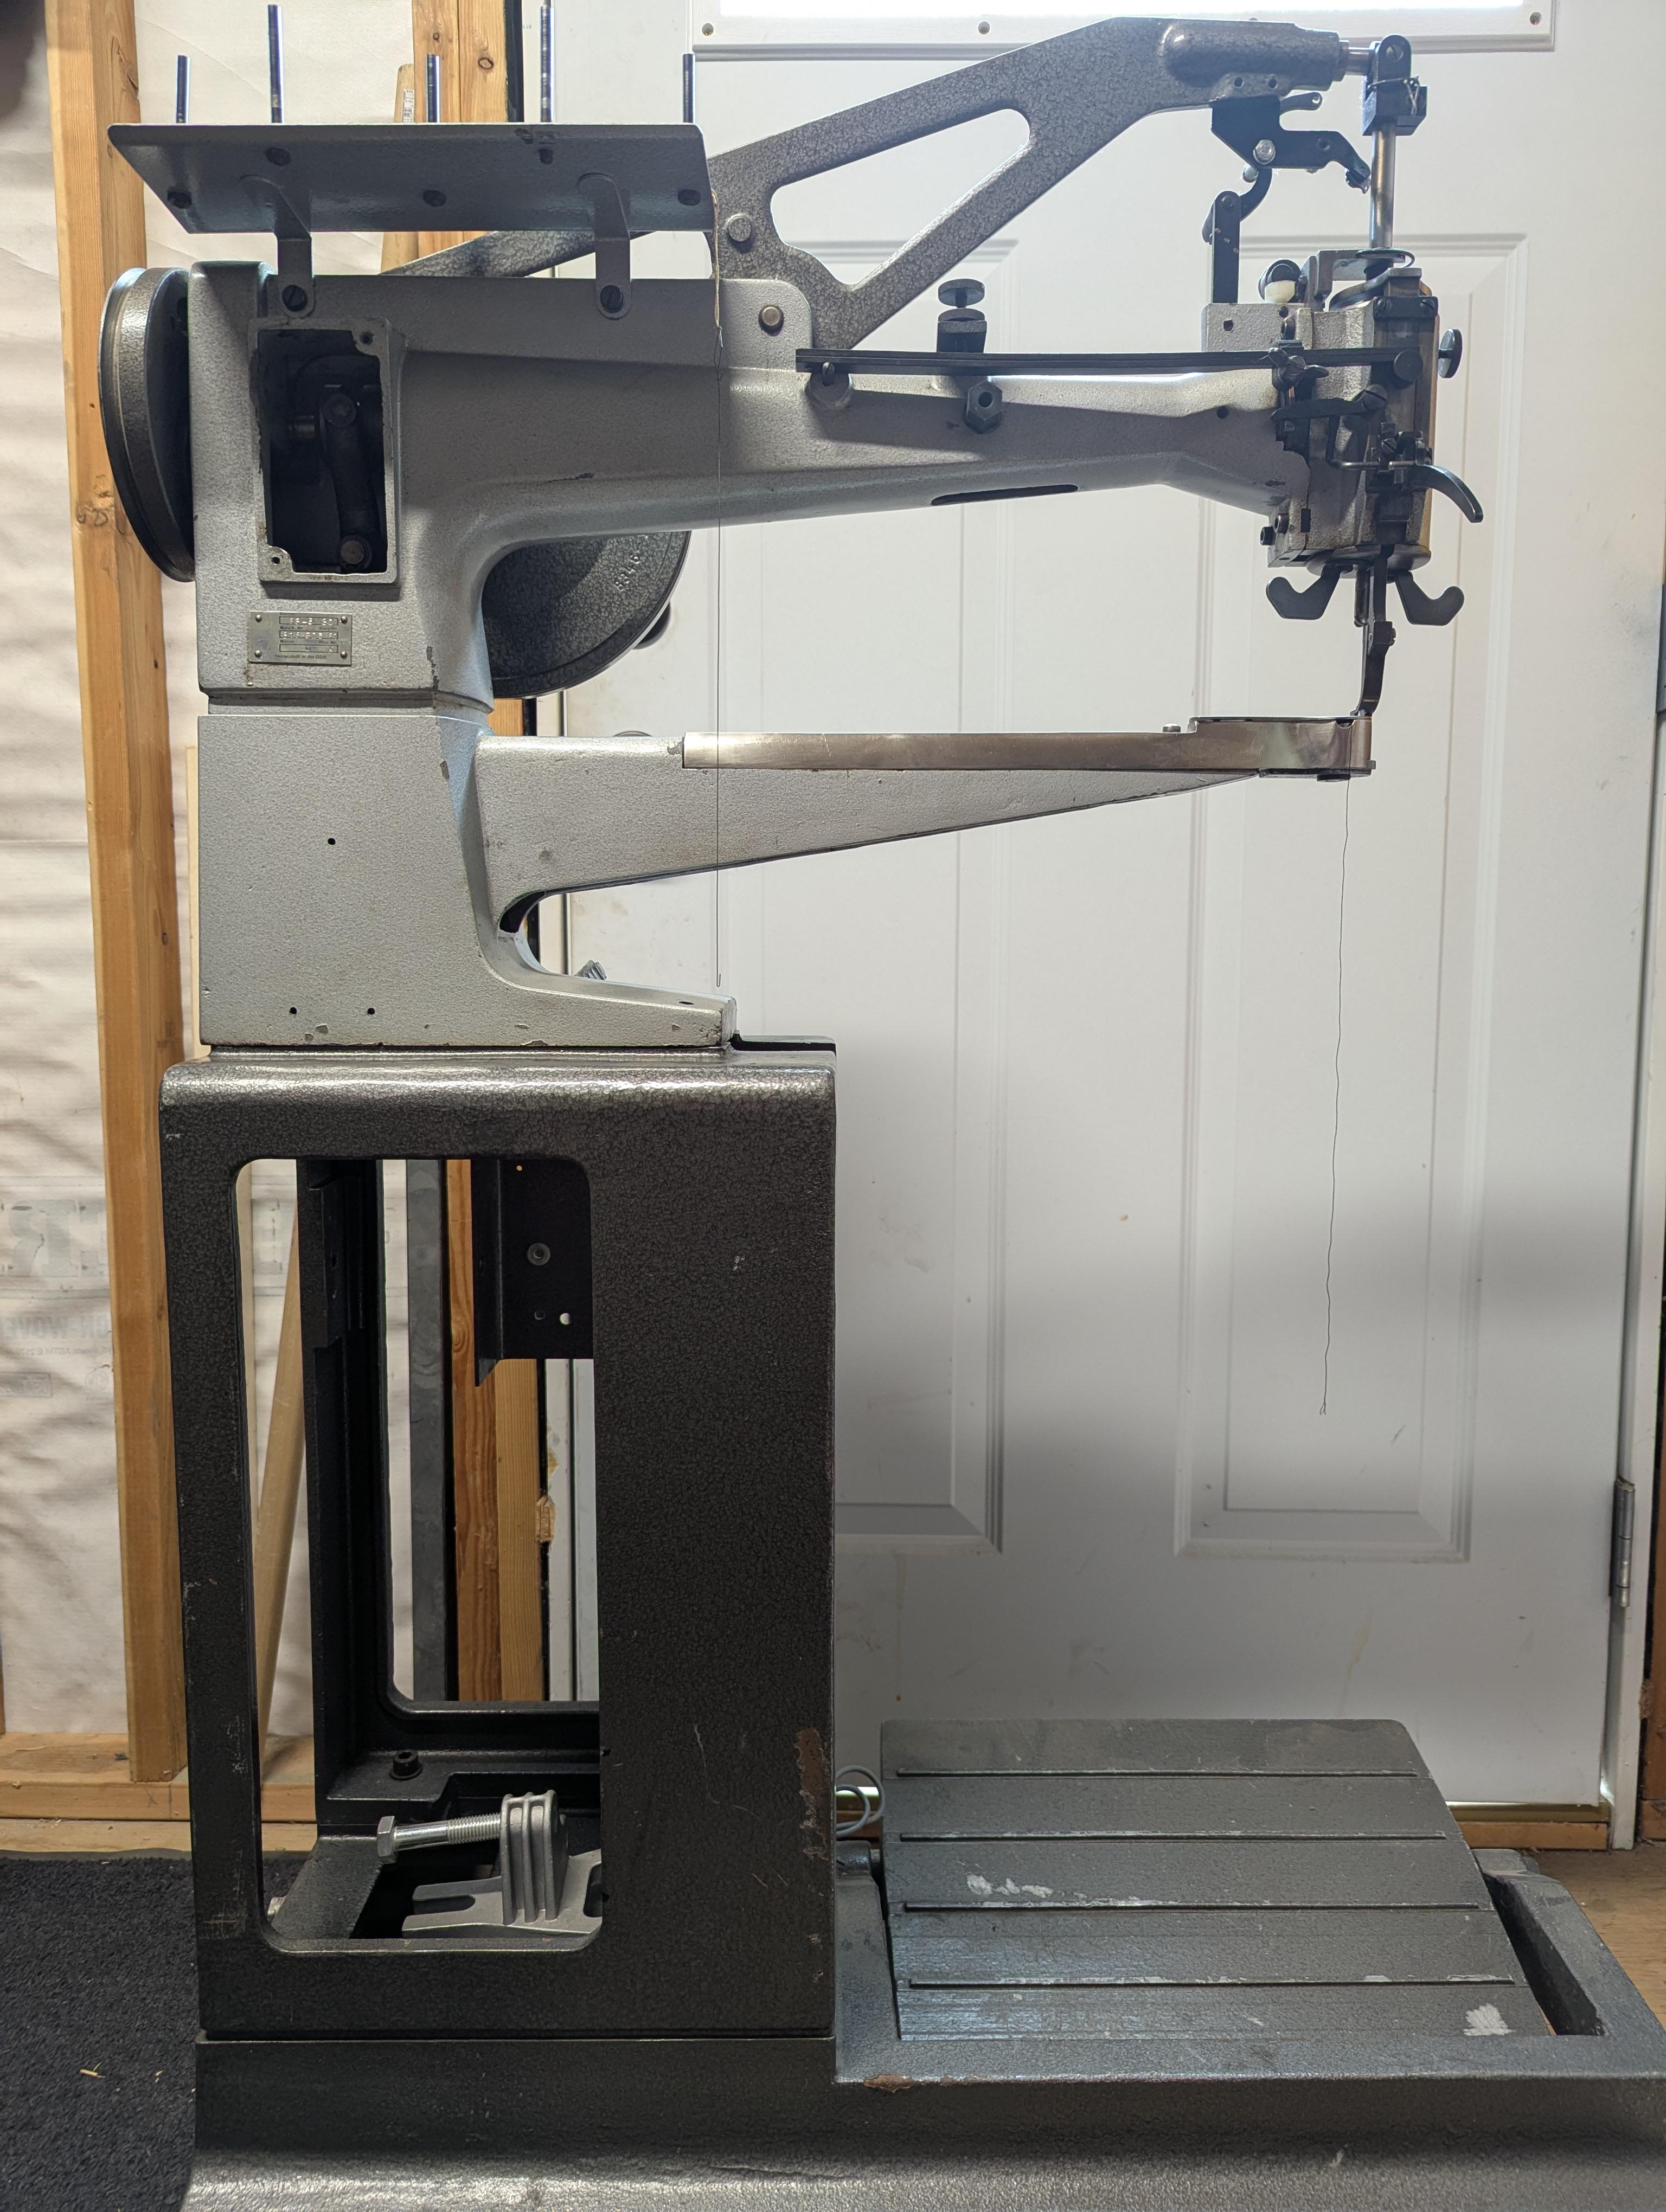
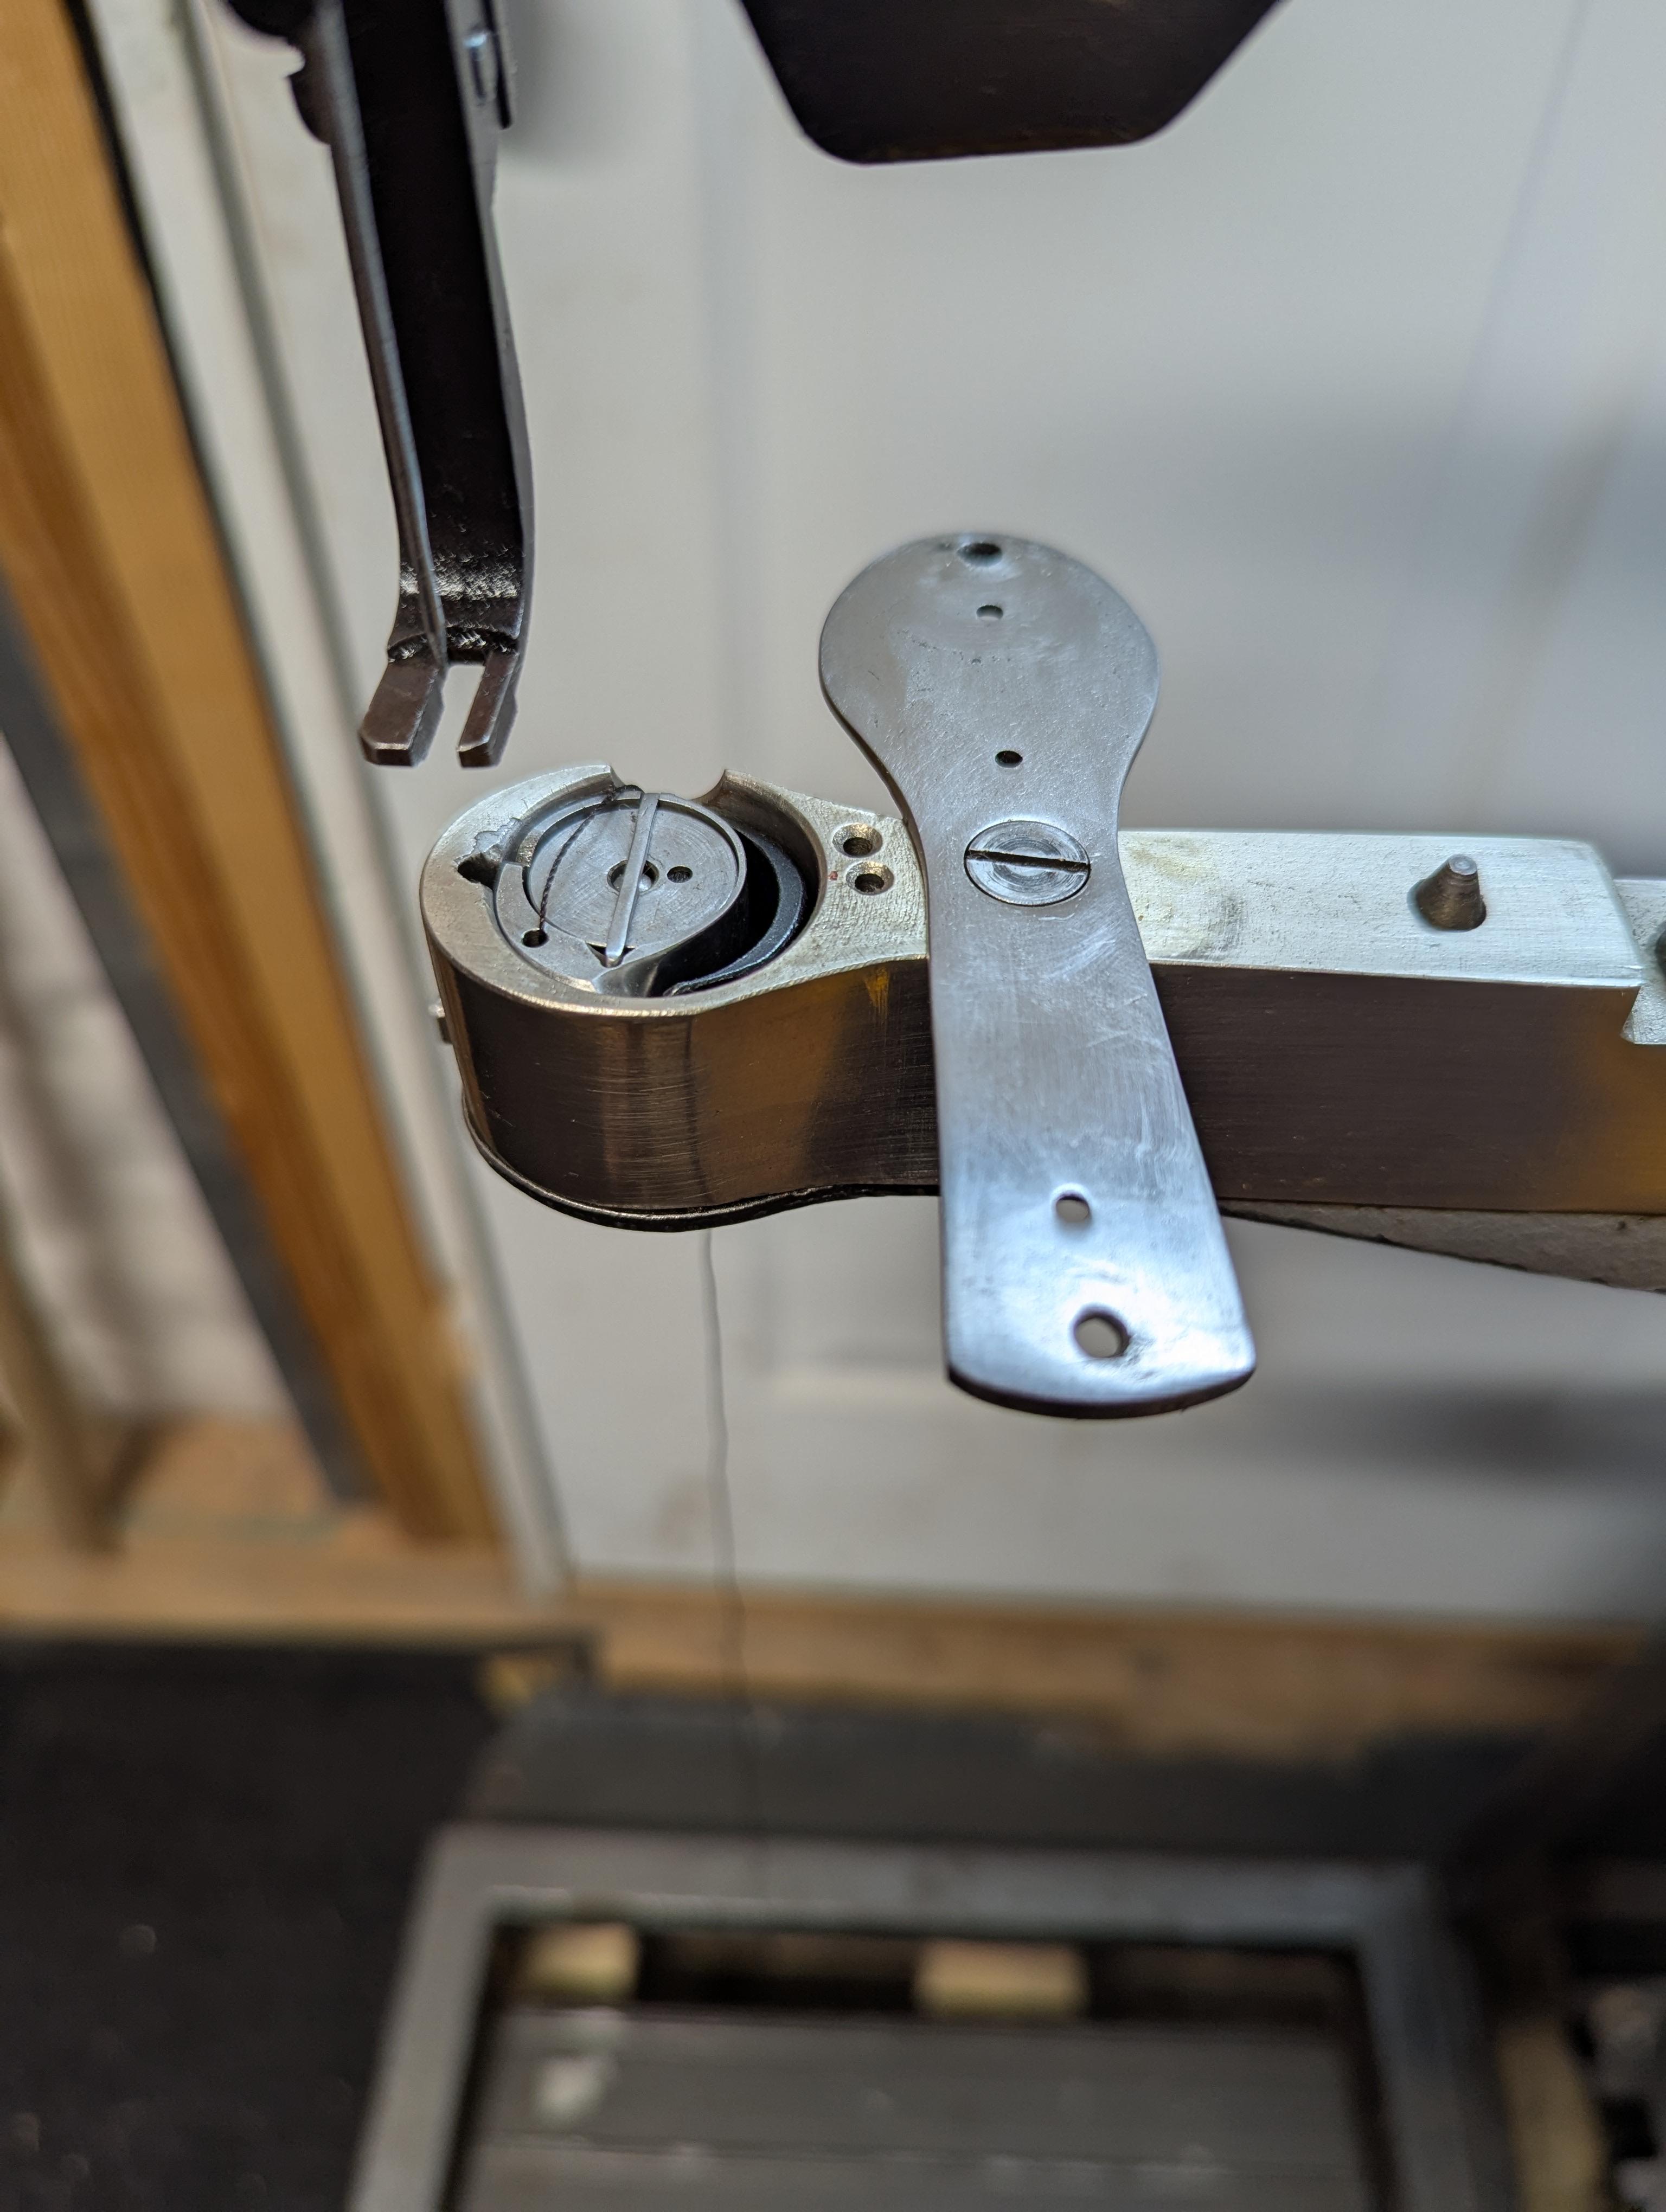
 Good afternoon all, First off, thank you all for the years of information on this site. I recently created a login and this is my first post but I've been quietly soaking up the wealth of advice for over a year. I just picked up a Claes 8436-30 for a great price and would appreciate some help getting it tuned up and ready to go. Everything seems to rotate smoothly and corrosion is at a minimum. I haven't tried sewing with it yet but am hopeful that it'll take off without much effort. I found a couple other posts about these machines and found them helpful, but would appreciate a bit more info. Also, my documentation is in German and would appreciate it if anyone could help me track down the user and maintenance manuals. It looks like it was either set up with a motor at one time or darn close to it. Can anyone recommend what size servo motor I should put on it. And how imortant is a speed reducer and needle positioning sensor? @shoepatcher, @Constabulary. Sorry for the tag but you two seemed to have a lot of great input on the other posts I saw. I'm attaching photos of the machine and the hardware it came with. Thanks in advance for your help

-

Replacing the Hook (and Bobbin Shuttle) on a Juki LS-341N
AlZilla replied to Yoshi888's topic in Leather Sewing Machines
You'll be glad you did this repair. It's not nearly as difficult as it seems. I think your machine uses Allen screws, if I remember right. If it's slotted screws, you'll want good, hollow ground screw drivers in the right size. Let us know your it goes. Maybe you'll inspire the next person. -
 Oh man, they were a lot less expensive when I got them from Amazon. I think I paid $30 ... this one is like $60: (hand vacuum filter) https://www.amazon.com/United-Scientific-Supplies-FLTKIT-Filtering/dp/B01MT3QS0P?crid=1TRHLKR70TT2U&dib=eyJ2IjoiMSJ9.y75g-i8DTumsSHCkpkGX2aO0ipGxWqsM-gyGr31RAFNUcTTmWlEc4OZQu097F7rAMXQZAu9np7gtyxQs5Xq0q3Me6-A0dsXkWVOJZErhPLcHJ02HQLhmVMQ09Sawt1nFhwqSa4CR-2dt3fwxtswxpiJYWH_Q-x5aE_j-WzXlZVzF9nG9NSJx_haheoVHX5X2uXzqTj4EIWXFNVcsBYgJUITzF8i8BifoALyJGPf4F58.PgOwkYgqdbMpjyOIjfyaspmEAYcUE4cZA_cYQadHotQ&dib_tag=se&keywords=vacuum+filter+paper+funnel&qid=1752093413&sprefix=vacuum+filter+paper+funnel%2Caps%2C130&sr=8-6
 -

spring flowers and good food
chuck123wapati replied to chuck123wapati's topic in All About Us and Off Topic
Things are great here, she is well again and no holes anywhere to patch up lol. i'm wondering why they couldnt teach you to care for his dressings as you are so far from help? That is just crazy. They taught me then when my daughter went back in because of the fistula they had me teach two new nurses how to do the dressings. Today is the hottest day of the year so far it is 94, but my bbq lid thermometer setting in the sun reads well over 175 I could cook in it without any fuel. I fired my first real piece of pottery this morning made from clay I harvested in the wild. i am now the proud maker of an earthenware pot you couldn't sell for three bucks and only spent two weeks of my time and energy lol. But I've proved to myself it can be done and for little money, i can have another paying hobby. I think i'll make weird raku pot pipes and sell them over the border in communist Colorado lol. 🙂 The wife made chicken noodles yesterday, my grandmother's recipe, Pressure cooked gizzards and hearts, cooked till they melt in your mouth, and homemade noodles fresh not dried mmmmmmmmm......... You take care now and stay warm!!! Chuck -
spring flowers and good food
chuck123wapati replied to chuck123wapati's topic in All About Us and Off Topic
this reminds me of a story. My brother, father-in-law, and son were going to Canada on a once-in-a-lifetime trip. As they crossed the border everything became metric and the son, 20ish, seeing a speed limit sign in KPH asked him how long it would take to get to the lake , thinking he couldn't possibly know. George was stymied for a minute, but then realized he could use his speedometer to calculate because it was in mph and kph lol. His son never caught on to the trick the whole time. -

Replacing the Hook (and Bobbin Shuttle) on a Juki LS-341N
friquant replied to Yoshi888's topic in Leather Sewing Machines
Rereading, you asked for a list of potential pitfalls: Unplug the machine before you begin When you pull the hook out, make sure the pin for the bobbin case opener (under the hook) stays more or less in place. (you don't want to lose it) If the hook is stuck, reach for penetrating oil and a hot air gun. (I broke a hook once prying it out) Make sure the hook is properly settled into place before you screw it down. On my 341 clone it's fiddly to get the hook to drop into the hole because the bobbin case opener has to also align. When you insert the hook, it can go in two different ways 180 degrees apart. One works and the other will not pick up the thread Make sure the tang on the bobbin goes into the slot on the needle plate. Be very careful turning the handwheel if the bobbin is installed but the needle plate is not Magnetize your screwdriver for getting the hook gib screws out. These screws are tiny and easy to drop Use a new needle for timing and clearance adjustments (to make sure it is not bent) Set hook-to-needle distance before setting timing. When setting the timing, note the manual specifies the stitch length you should be set to. (Easy to miss) When setting the timing, make sure the timing gear is gently pressed against the other gear. When setting the timing, note there is a little play in the hook, so make sure the timing is checked during forward rotation of handwheel. Sometimes I use one finger on the hook to apply some reverse pressure to it. Make sure you readjust the bobbin case opener so the thread can jump through the latch, and so the bobbin case opener does not bind. Set timing according to the book. After you set it, verify that it catches the thread with forward and reverse feed, with both short and long stitches. Make sure everything moves smoothly and does what you expect before you run under power afterwards. Find out how your hook broke. Did it collide with the side of the feed dog support? (You can file some material off to give more clearance where it is likely to hit) Did it collide with the needle? (You can/should adjust the needle guard to prevent this) -
Replacing the Hook (and Bobbin Shuttle) on a Juki LS-341N
friquant replied to Yoshi888's topic in Leather Sewing Machines
Found two more videos relevant to this project: Uwe's Consew 225 hook timing video. (Different machine but useful for timing basics. Especially useful are putting black marker at the middle of the needle scarf (easier than measuring your needle bar height). And using a clamp on the needle bar to set your reference position. ) https://www.youtube.com/watch?v=1wNBPX8i524 Uwe's Needle Guard Adjustment video. (Different machine, but same concept applies) https://www.youtube.com/watch?v=9EWODLVlOxo -
The most popular weight depends on the job at hand. The right size makes the job easier and more enjoyable. Otherwise you can wear yourself out trying to hold up a heavy maul for easy stuff or wear yourself out beating a light maul repeatedly on heavy stuff. Stamping Tools - everyone needs a 1# maul. With most stamps that weight gives a good deadfall effect. For larger face stamps like 1/2 inch or more geometrics - 1.5# or 2# depending on how intricate the design is. For tiny faced or sharper stamps like seeders and bargrounders, consider stepping down to a 12 ounce maul. Hardware setting, smaller round punches, and most strap end punches - 1#. If you fall to the side of "I don't want to my punches to be really sharp" then 2# for the strap ends and rounds. I don't follow that theory but some do. Large round (2 inches and up) and Rosette punches - 2.5# or 3#. I sell 4.5# mauls for the heavy hitters on big punches. I don't mean to dissuade you from rawhide, but a few things to consider. The industrial handle rawhide mauls new are about twice the cost of a good leather handle maul ike the Wayne Jueschke mauls I sell or Barry King mauls. Rawhide can wear a little faster and can flake off onto your work. There are definite fans of rawhide and I do like them, just not as affordable new and the good used ones are few and far between.
-
Replacing the Hook (and Bobbin Shuttle) on a Juki LS-341N
friquant replied to Yoshi888's topic in Leather Sewing Machines
You can do this! Setting the timing is no harder than removing/installing the hook. You'll want to remove the feed dog so you can see the needle-to-hook relationship better. Do you have already the service manual? Here is a link: https://leatherworker.net/forum/applications/core/interface/file/attachment.php?id=139088 The service manual explains what the adjustment dimensions are, but does not actually go into the details of how to remove the hook. This video by Uwe will show you how to remove. (Different machine, but the removal of hook is similar.) https://www.youtube.com/watch?v=CfkGrz3OugA -
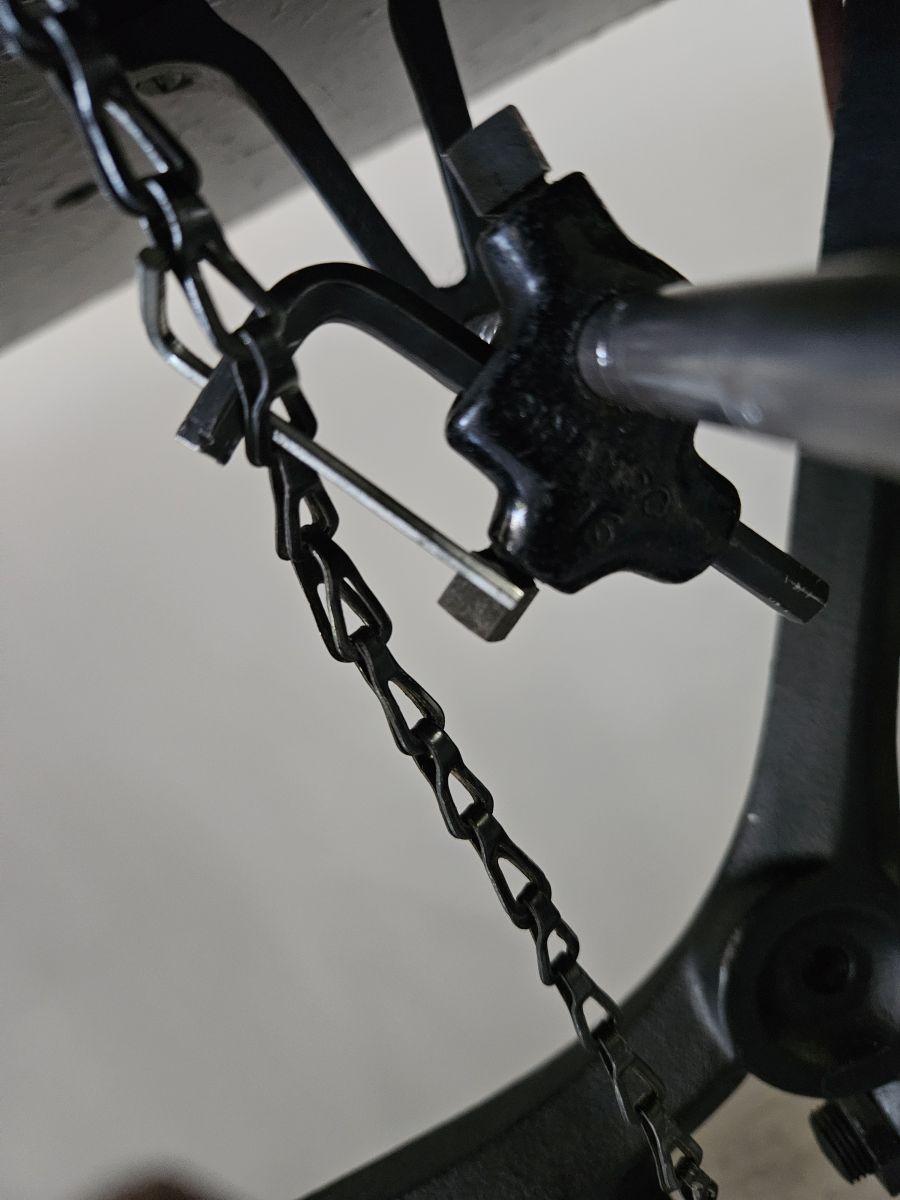
How can i activate foot lifter for 45k25
friquant replied to depodarcom's topic in Leather Sewing Machines
Wow, congratulations! I've got a table coming to me this weekend with an old singer knee lift on it. Now I know what it will look like 😀 On my pfaff 545 I learned to grease the sliding plate that releases the tension discs when the feet are up...the knee lifter moved much easier after that. -
Shit gona happen if you are repetitiously doing same'o same'o every day, day after day . ( me ) working Real Tight Areas on occasion when hurrying to get things done the only that has really tagged my fingers ans knuckles over the years of sewing.are the needle clamp screws that stick out on the sides during shaft strokes . I also been tagged a few times over the years by the 'Toe' of the needle feed feet, and pinch the skin. .
-

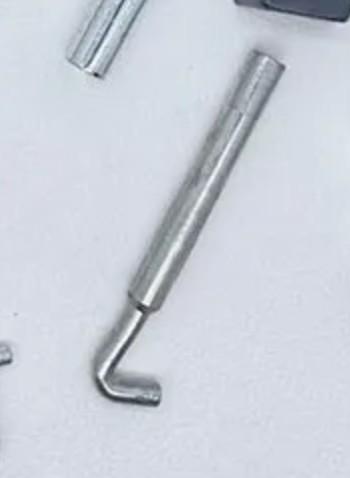
How can i activate foot lifter for 45k25
depodarcom replied to depodarcom's topic in Leather Sewing Machines
With the help of this web site and your valuable suggestions,I have already completed my 45k25 table and knee lift projects. I would like to thank member nickname “jimi” for sharing machine table size post at https://leatherworker.net/forum/topic/74406-singer-45k-treadle-base-parts-information-or-parts-list/ by means of this subject I could reshape my old fur sewing table with jigsaw. and also member nickname “friquant” for valuable video sharing . Even though I know knee lifter mechanism ,I could not imagine application with chain, and watching this video made my work. I bought an original Singer knee mechanism from one of dealers in my city,but I couldn’t find the hook like part,instead of this I used allen no 7 and 1.5 . I drilled a hole on 7 and inserted into allen 1.5 as “hook” for pulling chain mechanism. I tried and it seems working. Thank you 👍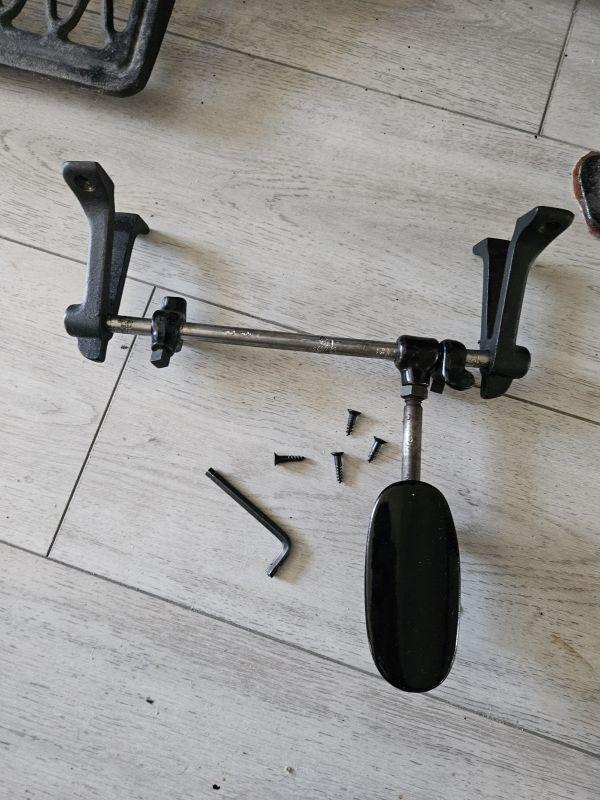
-
I'm not familiar with the pneumatic foot controls so I'll assume (ass-u-me) they actually are piped in to the actuating cylinders and are pneumatic switches. If this is the case, then yes, it can be done using electrically controlled solenoid valves and electrical foot switches and an appropriate power source, depending on the valves chosen. If you want to replace the pneumatics completely, then that is more complicated.
-
Thank you.
-
Nice work.
-
Thank you!
-
That's EXACTLY what it is too!!
-
It looks great!
-
@FrankHester Thanks :-) @rleather Thanks :-), as a Scandinavian something with this amount of ornamentation is almost unheard of, but I decided to take a chance


