All Activity
- Past hour
-
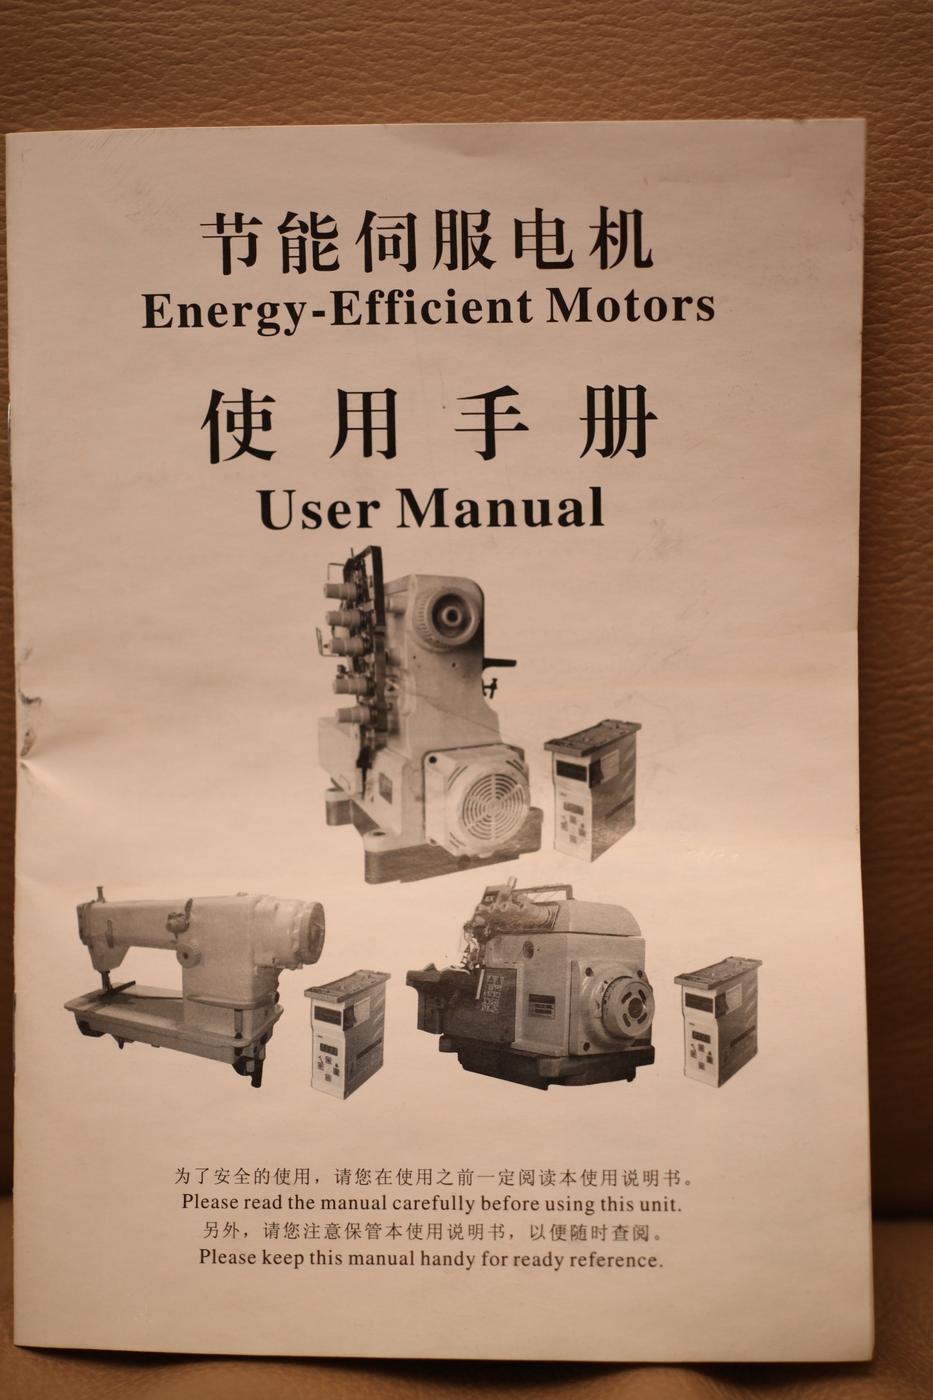
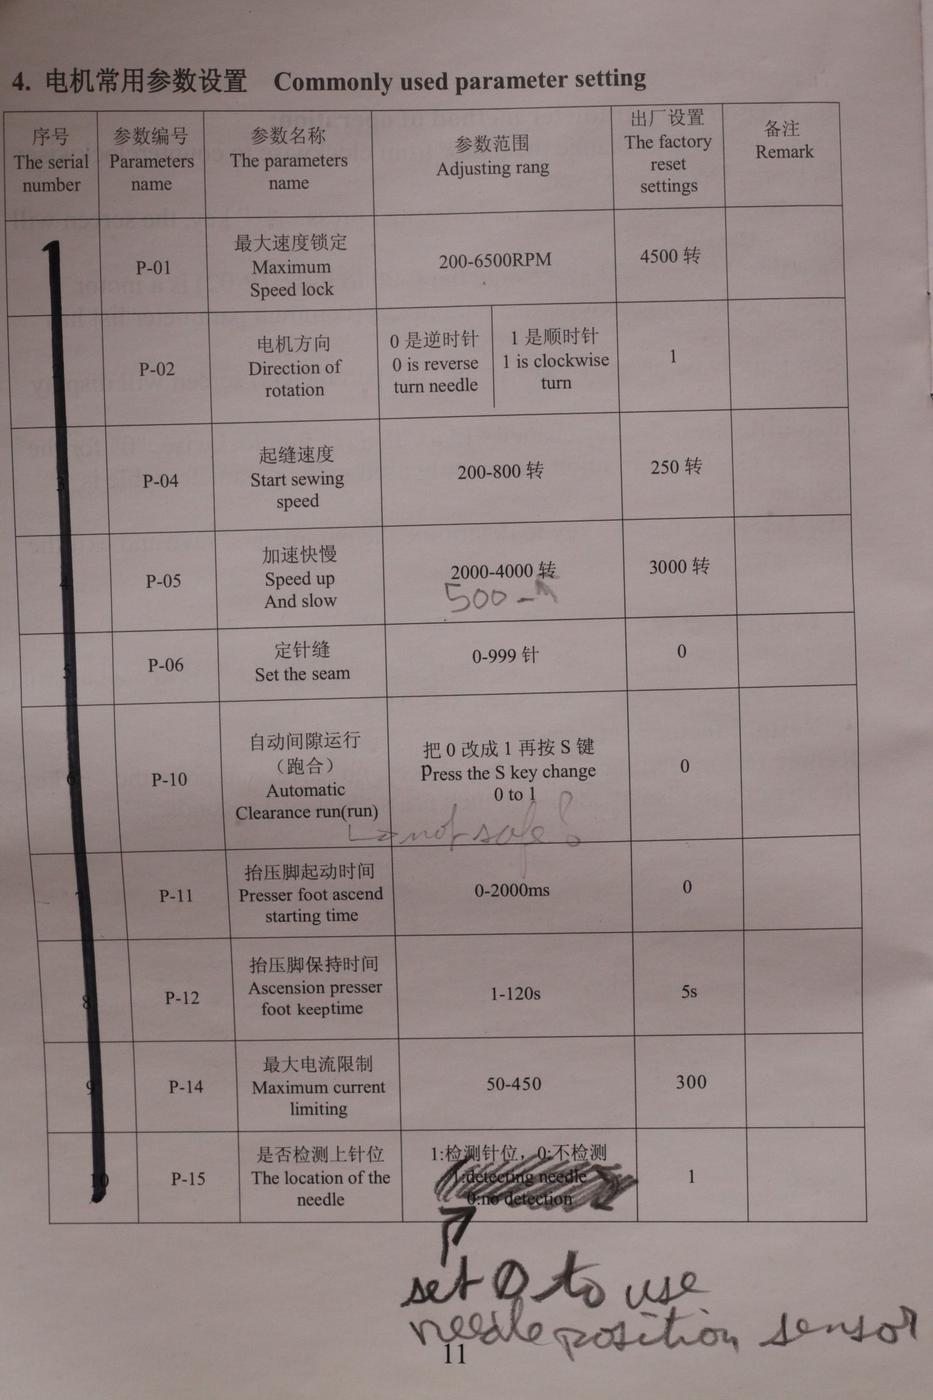
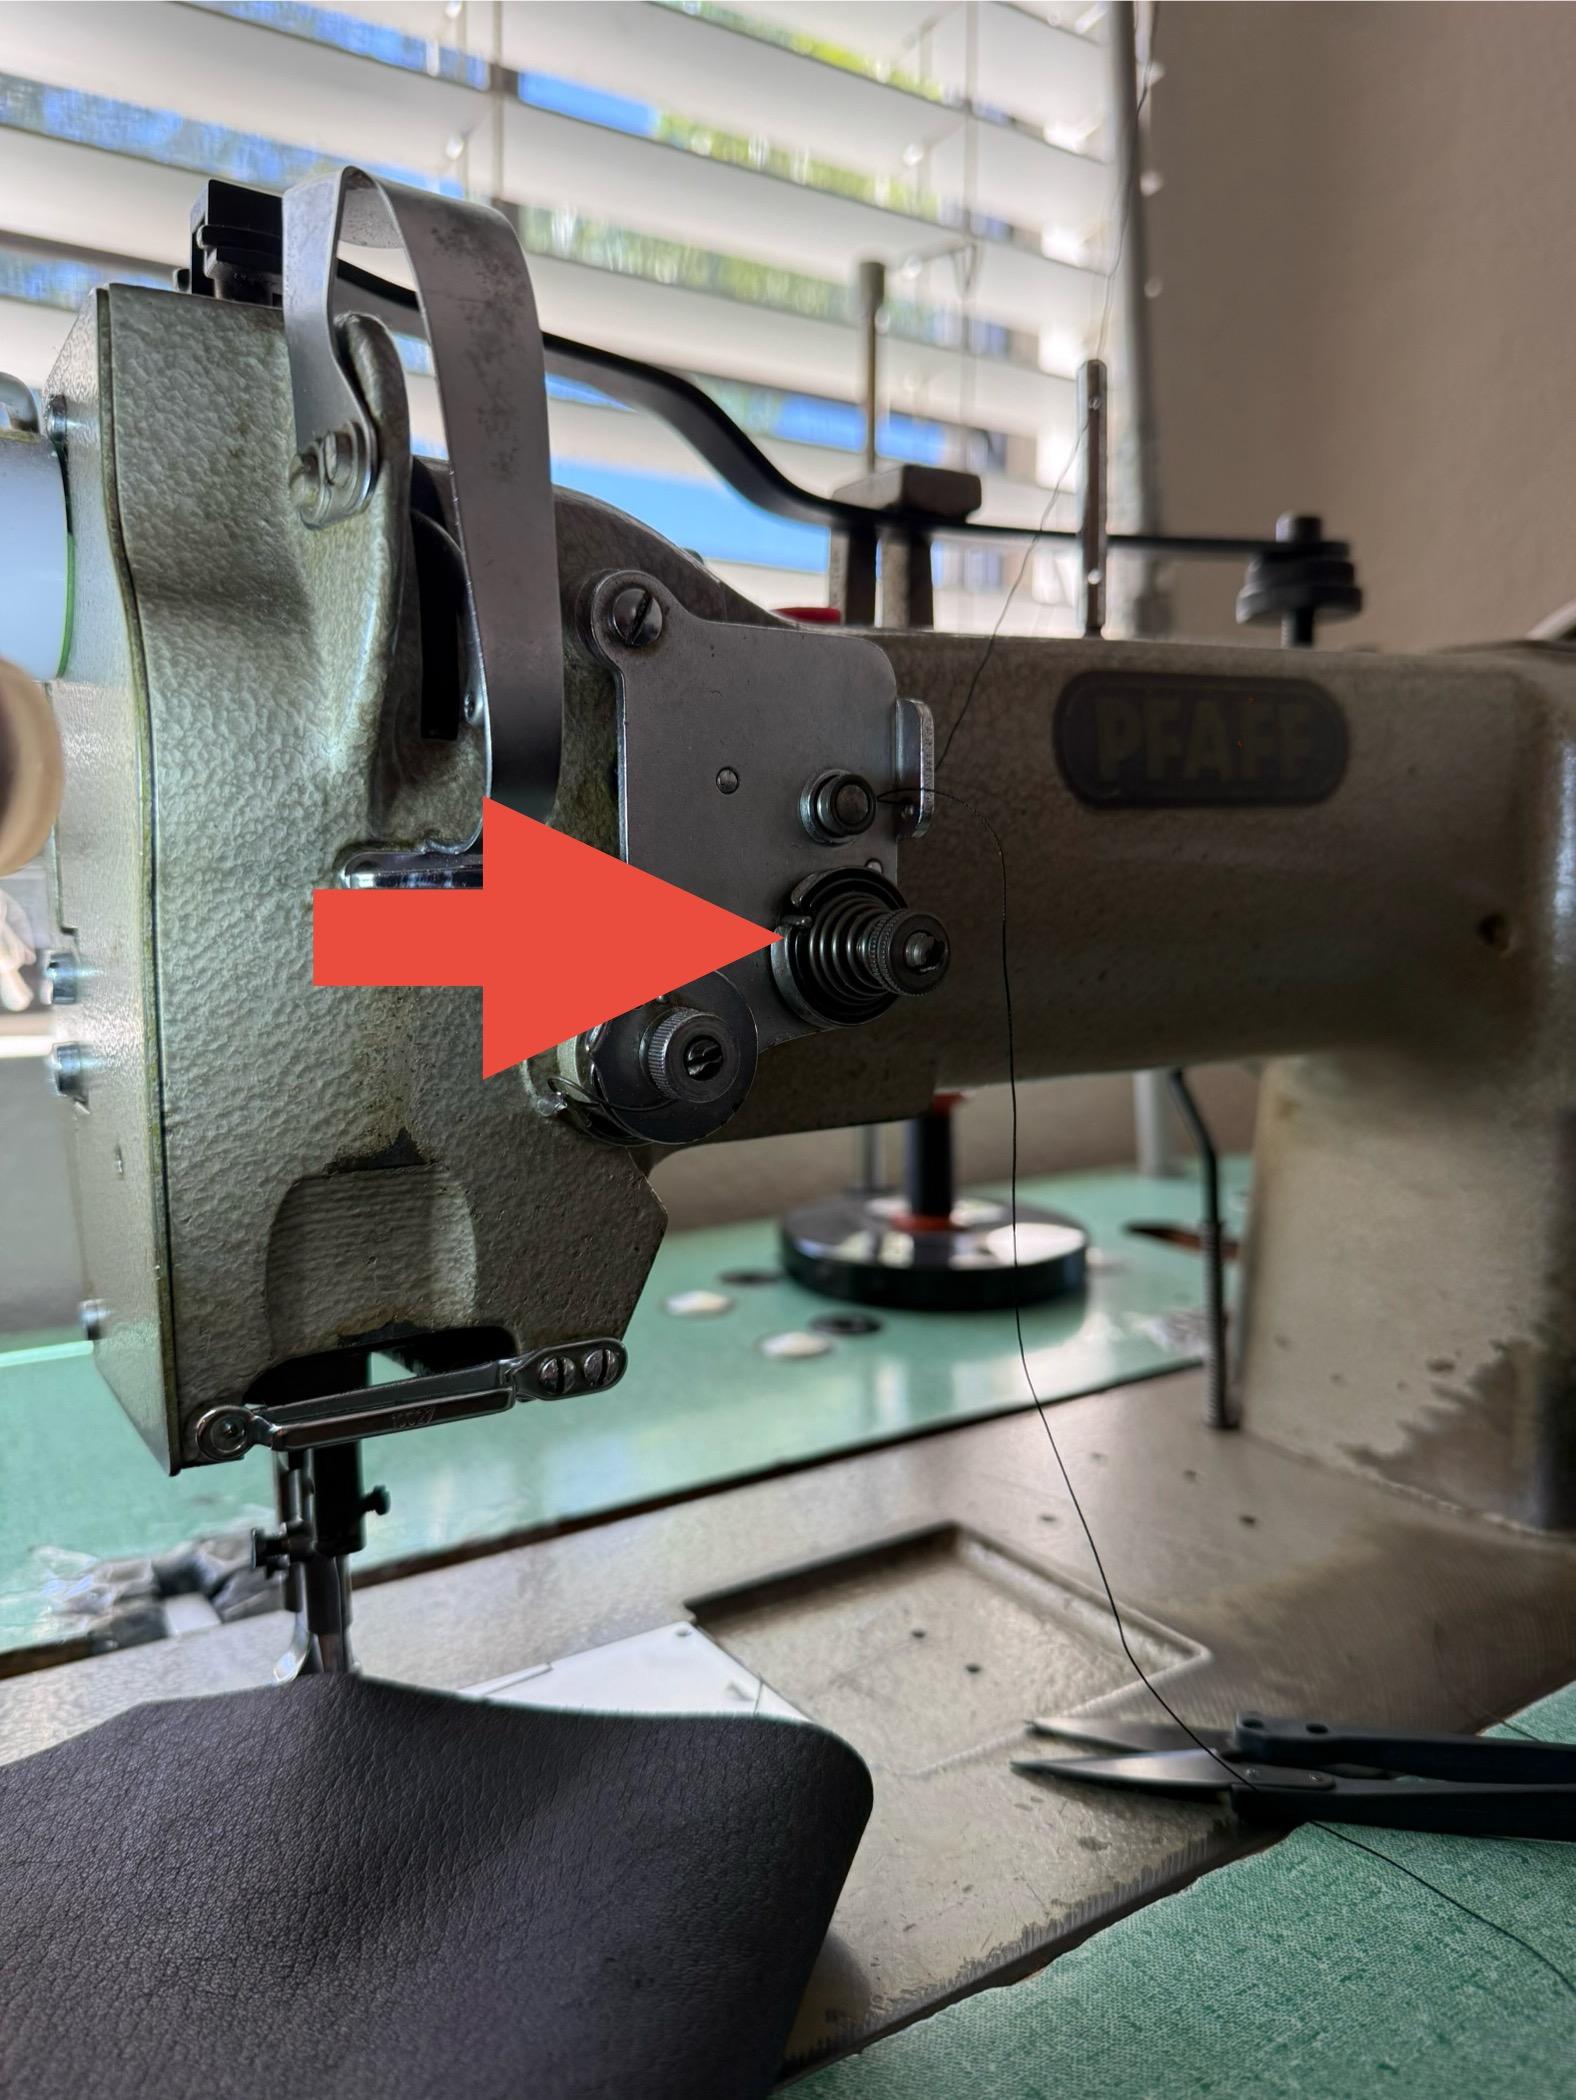
I have the same servo motor. The paper manual shows the wrong values for the P15 settings. On mine P15 actually needs to be set to "0" to enable the needle position sensor. Here are my notes on this servo motor, which may reasonably constitute an English user manual, with some missing pieces.
-
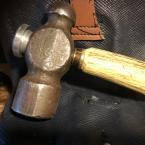
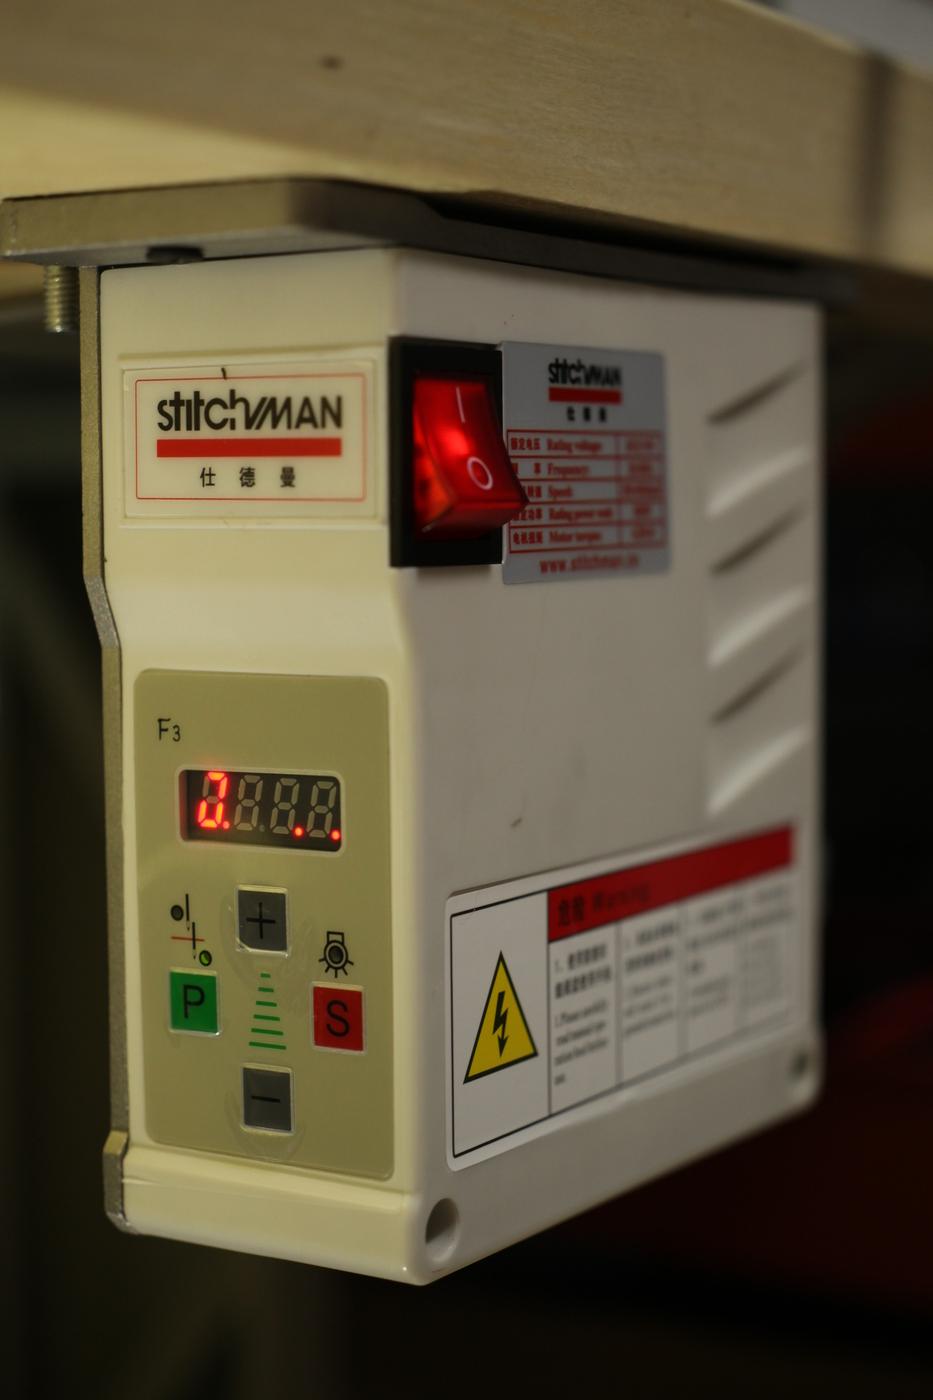
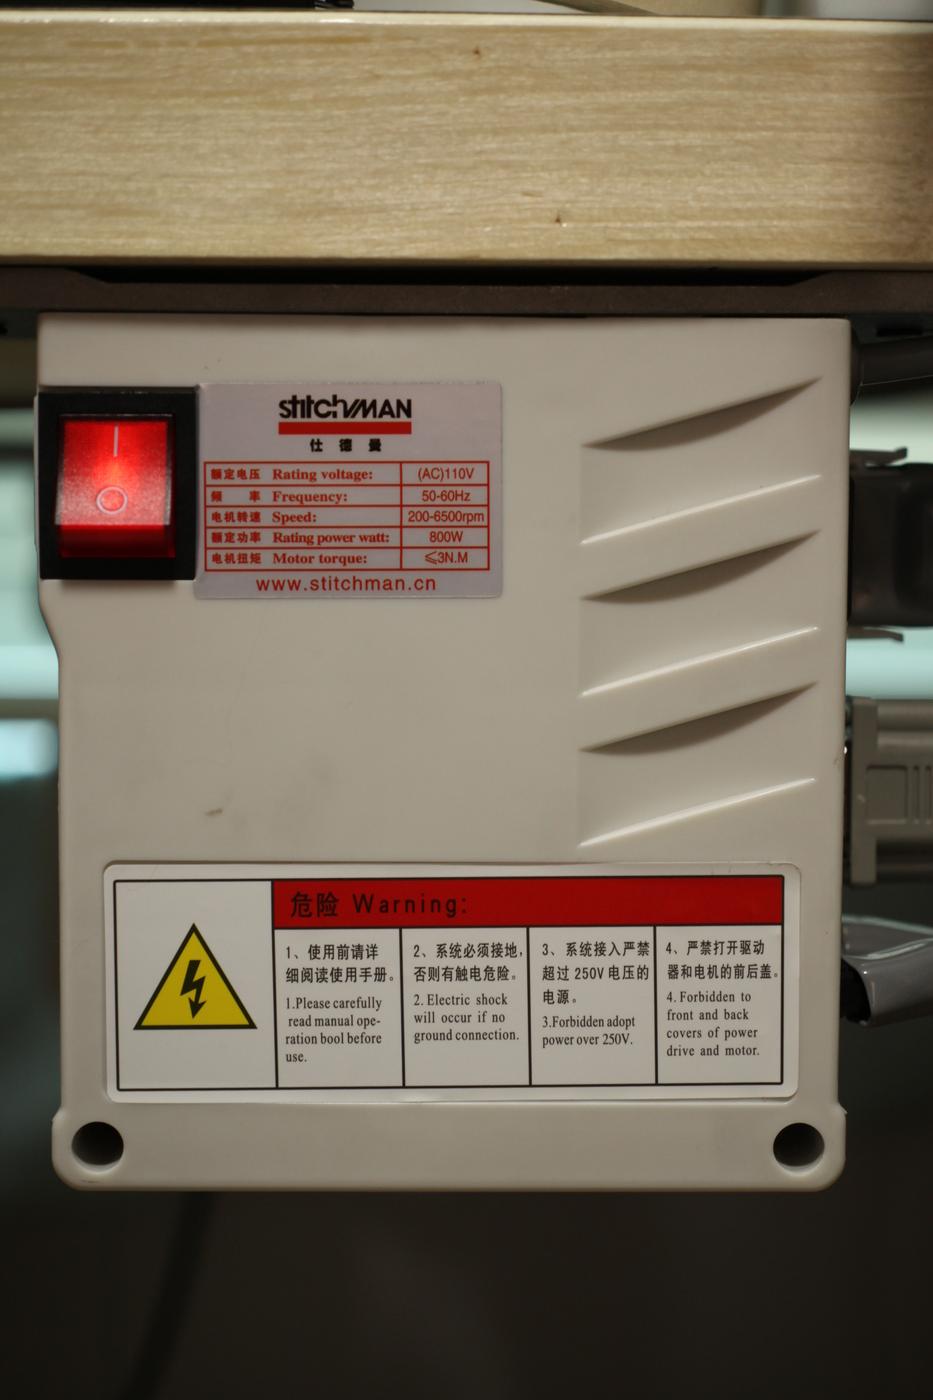
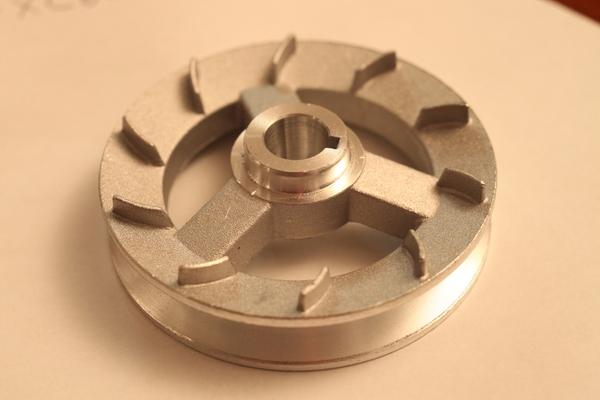
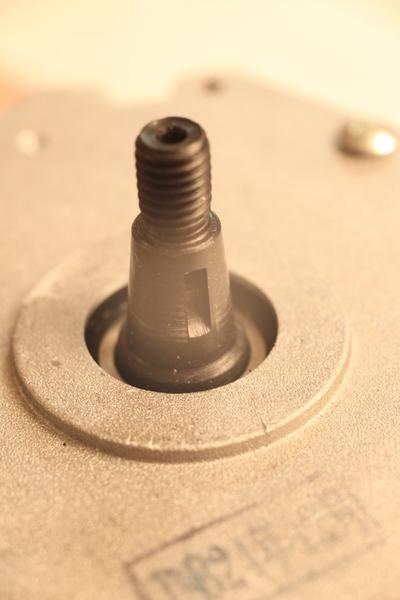
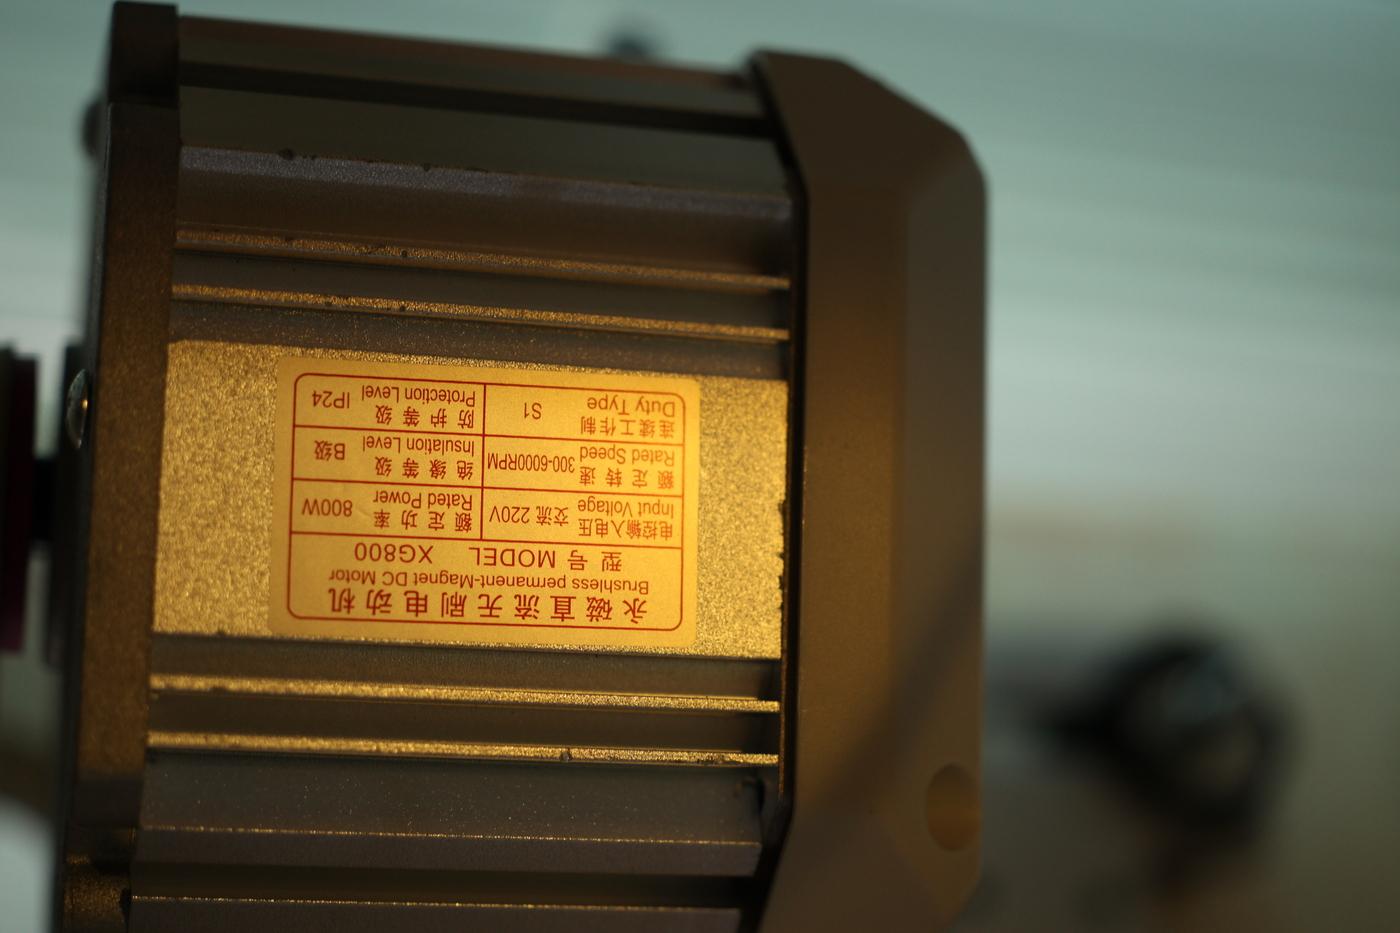
Here is my attempt at documenting the settings for the Stitchman servo motor. After some trial and error, the needle position sensor is working. My setup has 2.2:1 gear reduction by way of an extra small (35mm) motor pulley, and the needle position sensor still knows what to do. If anyone has figured out the slow start settings for this motor, I'd like to hear about it. Normal Mode ### P This sets the needle stop position, and has two green LEDs. One lamp comes on when stop @ up. The other lamp comes on when stop @ down. Both lamps come on when freedom. ### S This turns the lamp on/off. (untested) ### + Increases the max speed. default: 4500 range: 200-6500 (Note you can also increase max speed using P16 in programming mode) ### - Decreases the max speed default: 4500 range: 200-6500 (Note you can also decrease max speed using P16 in programming mode) Programming Mode Most settings are changed from inside programming mode. ### Enter Programming Mode - While holding down "P", press "+" - The screen will display "P-00" ### Save and Exit Programming Mode while in programming mode: Press "S" This saves whatever changes you've made and exits out of program mode ### Restore Factory Settings while in programming mode: - Hold "S" key for 3 seconds Table of Parameters These parameters are accessible from programming mode ### P-00 (apparently not adjustable) ### P-02 (Motor Direction) default: 1 range: 0-1 ### P-03 (UNDocumented Needle DOWN Position) (The needle UP position seems to remain the same. So to change your needle UP position, loosen the screws on the needle positioner.) But setting the needle DOWN position effectively lets you specify how much rotation between needle up and needle down. Note this setting only comes into play when the green "lower" LED (next to the P button) is lit and when P-15 (Needle Detection Mode) is set to "0". (When the green "upper" LED (next to the P button) is lit, heel-tap does nothing.) (Note P-15 is mis-documented in paper handout) default: ? range: 6-18 6: needle-up + 30 deg 7: needle-up + 35 deg 8: needle-up + 40 deg 9: needle-up + 45 deg 10: needle-up + 50 deg 11: needle-up + 55 deg 12: needle-up + 60 deg 13: needle-up + 65 deg 14: needle-up + 70 deg 15: needle-up + 75 deg 16: needle-up + 80 deg 17: needle-up + 85 deg 18: needle-up + 90 deg ### P-04 (Minimum Speed) default: 250 range: 200-800 ### P-05 ("Speed up and Slow") default: 3000 range: 500-4000 (This setting does not do anything on my machine. My machine can go full speed from the beginning.) ### P-06 ("Set the seam") default: 0 range: 0-999 (I do not know what this means or what it does.) ### P-10 (Automatic clearance run) 0: disabled (default) 1: automatic clearance run NOT SAFE!!!! This bypasses the gas pedal and starts a routine of "speed up, slow down, stop, repeat" mode. ### P-11 ("Presser foot ascend starting time") default: 0 range: 0-2000 (milliseconds) (I do not know what this does.) ### P-12 ("Ascend presser foot keeptime") default: 5 (seconds) (I do not know what this does.) ### P-14 (Max Current) Woah this would be cool if it worked default: 300 max: 50-450 (I would love to use this feature. But it is only in the paper manual...it does not show up as an option on my machine) ### P-15 (Needle Detection Mode) THIS IS BACKWARDS/WRONG IN THE PAPER MANUAL 0: use needle detection 1: ignore needle (default) ### P-16 (Max Speed) This is shown in the paper manual as P-01 default: 0900 range: 0200 - 4500 ### P-19 (Unknown) Not listed in paper manual default: 00 range: 0-15 ### P-20 (Unknown) Not listed in paper manual default: 0800 range: 200-3500 Photos Including images of the manual, the controller, the motor shaft (tapered!), and the motor pulley to help you determine whether this is the servo motor that you have. I conjecture that "stitchman" is just a label applied, and that the actual manufacturer supplies these same motors and controllers under various names. Mine came with the purchase of a Jiang Long 341.
-
Daddy can you do your frog impression? Why? Because mummy says when you croak we can all go to Disneyland
- Today
-

Help!!Trouble Uploading Photos - "Upload Failed" Error (Error Code -200)
Jazz_M replied to Jazz_M's topic in Member Gallery
Thanks a ton! You’re too kind. -
 SheRa1983 joined the community
 -
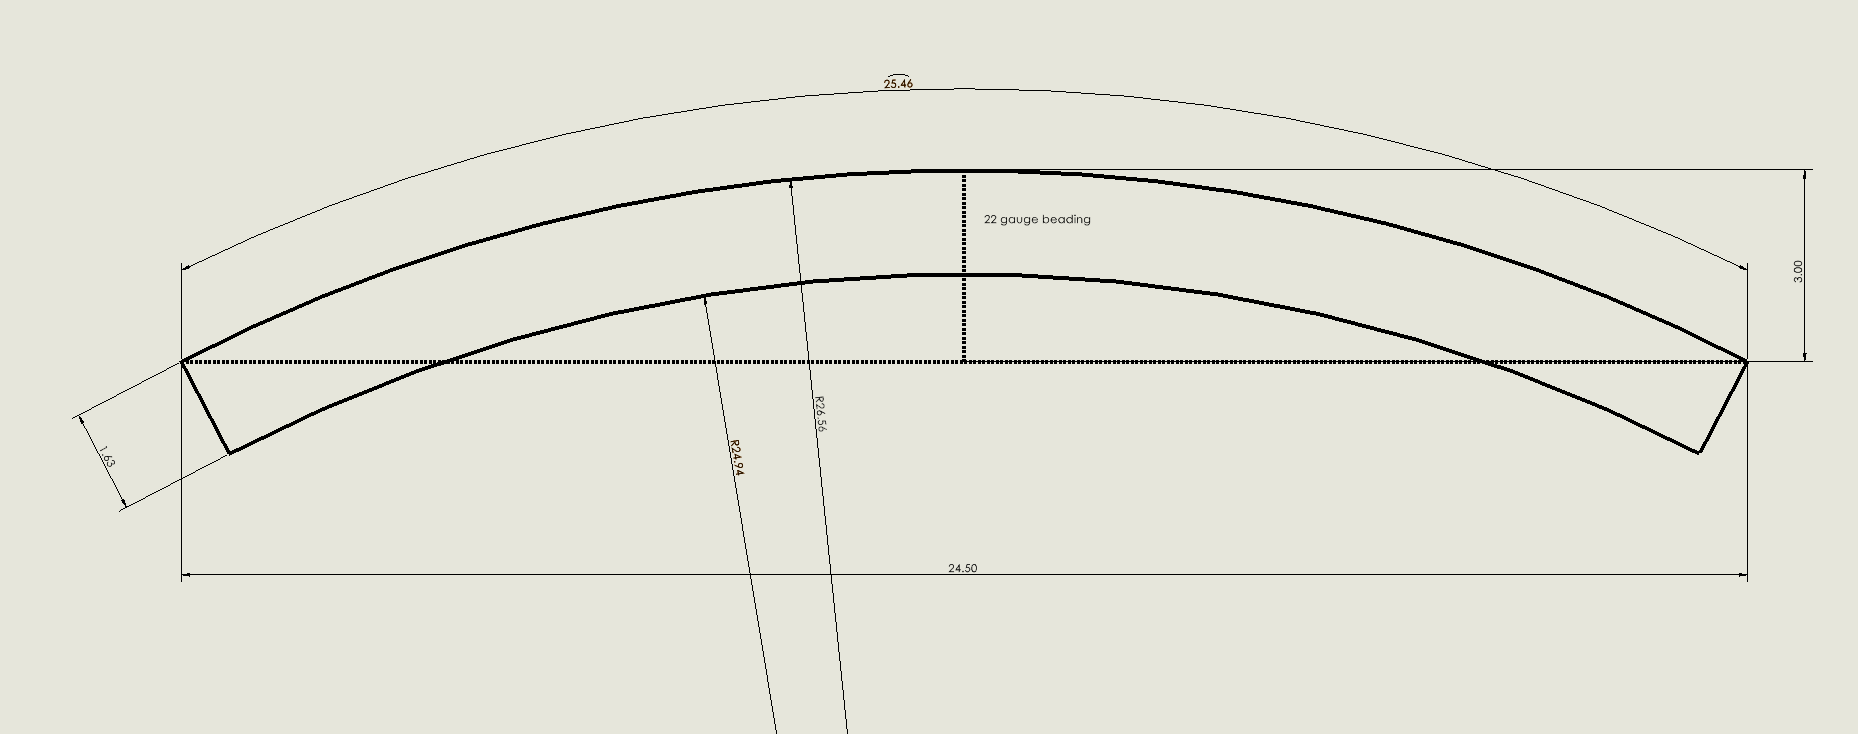
Just recently took up the hobby of custom hat making....so I figured on making my own sweat bands as $10 (+ shipping )a pop for premade is quite a high perceantage on the cost of creating a costume hat...so after some reasearch I drafted a template for the leather section out aluminum, just a big curved ruler if you will. So, its big enough to cater for size 6 thru 8...so the top arc would be the circumference..i might scribe mine with sizes measured out on the right side (length of arc=circumference) I know they use a plastic reeding now but I went old school and use 22 gauge spring stainless steel wire (source Amazon) to insert in the bias binding edge added.I hope this helps someone, the question on dimensions and a template seems to pop up on various forums. Oh...mine is based on 1 5/8" wide sweatband btw. I also used Sheep Leather as my material.
-

Help!!Trouble Uploading Photos - "Upload Failed" Error (Error Code -200)
Dwight replied to Jazz_M's topic in Member Gallery
Get a simple program . . . put it on your computer Adobe photo shop elements 2.0 is a really good one . . . it's 5 bucks on Ebay . . . comes with a disc . . . don't buy one that is a down load as you will forever be plagued with ads and adware Use it to size the photos to 800 by 600 pixels . . . and an overall size of 500 kb or so. Then use the choose files below . . . go to your file on your computer . . . choose the pic . . . and it'll load. You can do a lot with that little photoshop program afterwards as well. May God bless, Dwight -
Very true. Maybe this and similar posts could be pinned in 'Getting Started' for beginners. Nothing is more encouraging than seeing beautiful work done with a minimum number of tools! I wish I had seen all this when I first started 2 1/2 years ago. Very nice @WalterF, Thank you for showing how much can be achieved with simple tools, skill and imagination. I should have said that first.🙂
-
Looking for silver hardware for breast collar
rktaylor replied to DS-Leather's topic in Saddle and Tack Accessory Items
Hansen Western Gear has some options. I've been pleased with their buckles and conchos, but haven't bought anything like this from them. https://hansenwesterngear.com/ Randy -
 Romar joined the community
 -
 orcoporco89 joined the community
 -
Hi everyone, I'm trying to create a new post, but I keep running into an issue when I try to upload photos. Every time I select an image, it just shows "upload failed" and I'm seeing an error code -200. Has anyone else experienced this, or does anyone know what might be causing it? Any suggestions on how to fix this would be greatly appreciated! Thanks in advance for your help.
-
 yashpatel10 joined the community
 -
 Gilbey817 joined the community
 -
I recall a while ago reading a user question on this topic, and am just getting around to adding my two cents worth. Rivets using plain stems cut just "long" of the "clench washer", then peened round to assure a permanent "set" can be challenging. The length above the washer is critical, and MOST easily attained with a compound diagonal cutter (colloquially a "compound dike") Using a "compound diagonal cutter" for these little wonders has been the only time-after-time reliable means I've found of quickly and accurately getting the post clipped off at the correct place without negative effect on my/your carpel tunnel. Got my most recent pair form Walmart for about $9.50. Amazon's got a DeWalt version for about $17.00, Just trying to help. Sorry about the delay in posting.
-
 Does that one fold up from the bottom to close the toe? Quite nice!
 - Yesterday
-
 I have made several holsters for this young man. I am flattered that he likes my work. 2 chest rigs, one leg drop, one for a silenced 22, and others. This is a Springfield Armory Echelon 9mm on a Sharps Brothers aluminum frame with a Holosun red dot. Another dang nice gun. I'm jealous! Hermann Oaks 8/9 oz Fiebings light brown pro dye Resolene 50/50 with water with a 100 % resolene top coat 207 bonded nylon top and bottom Sewn on a Cobra class 3 Dang i like making holsters!
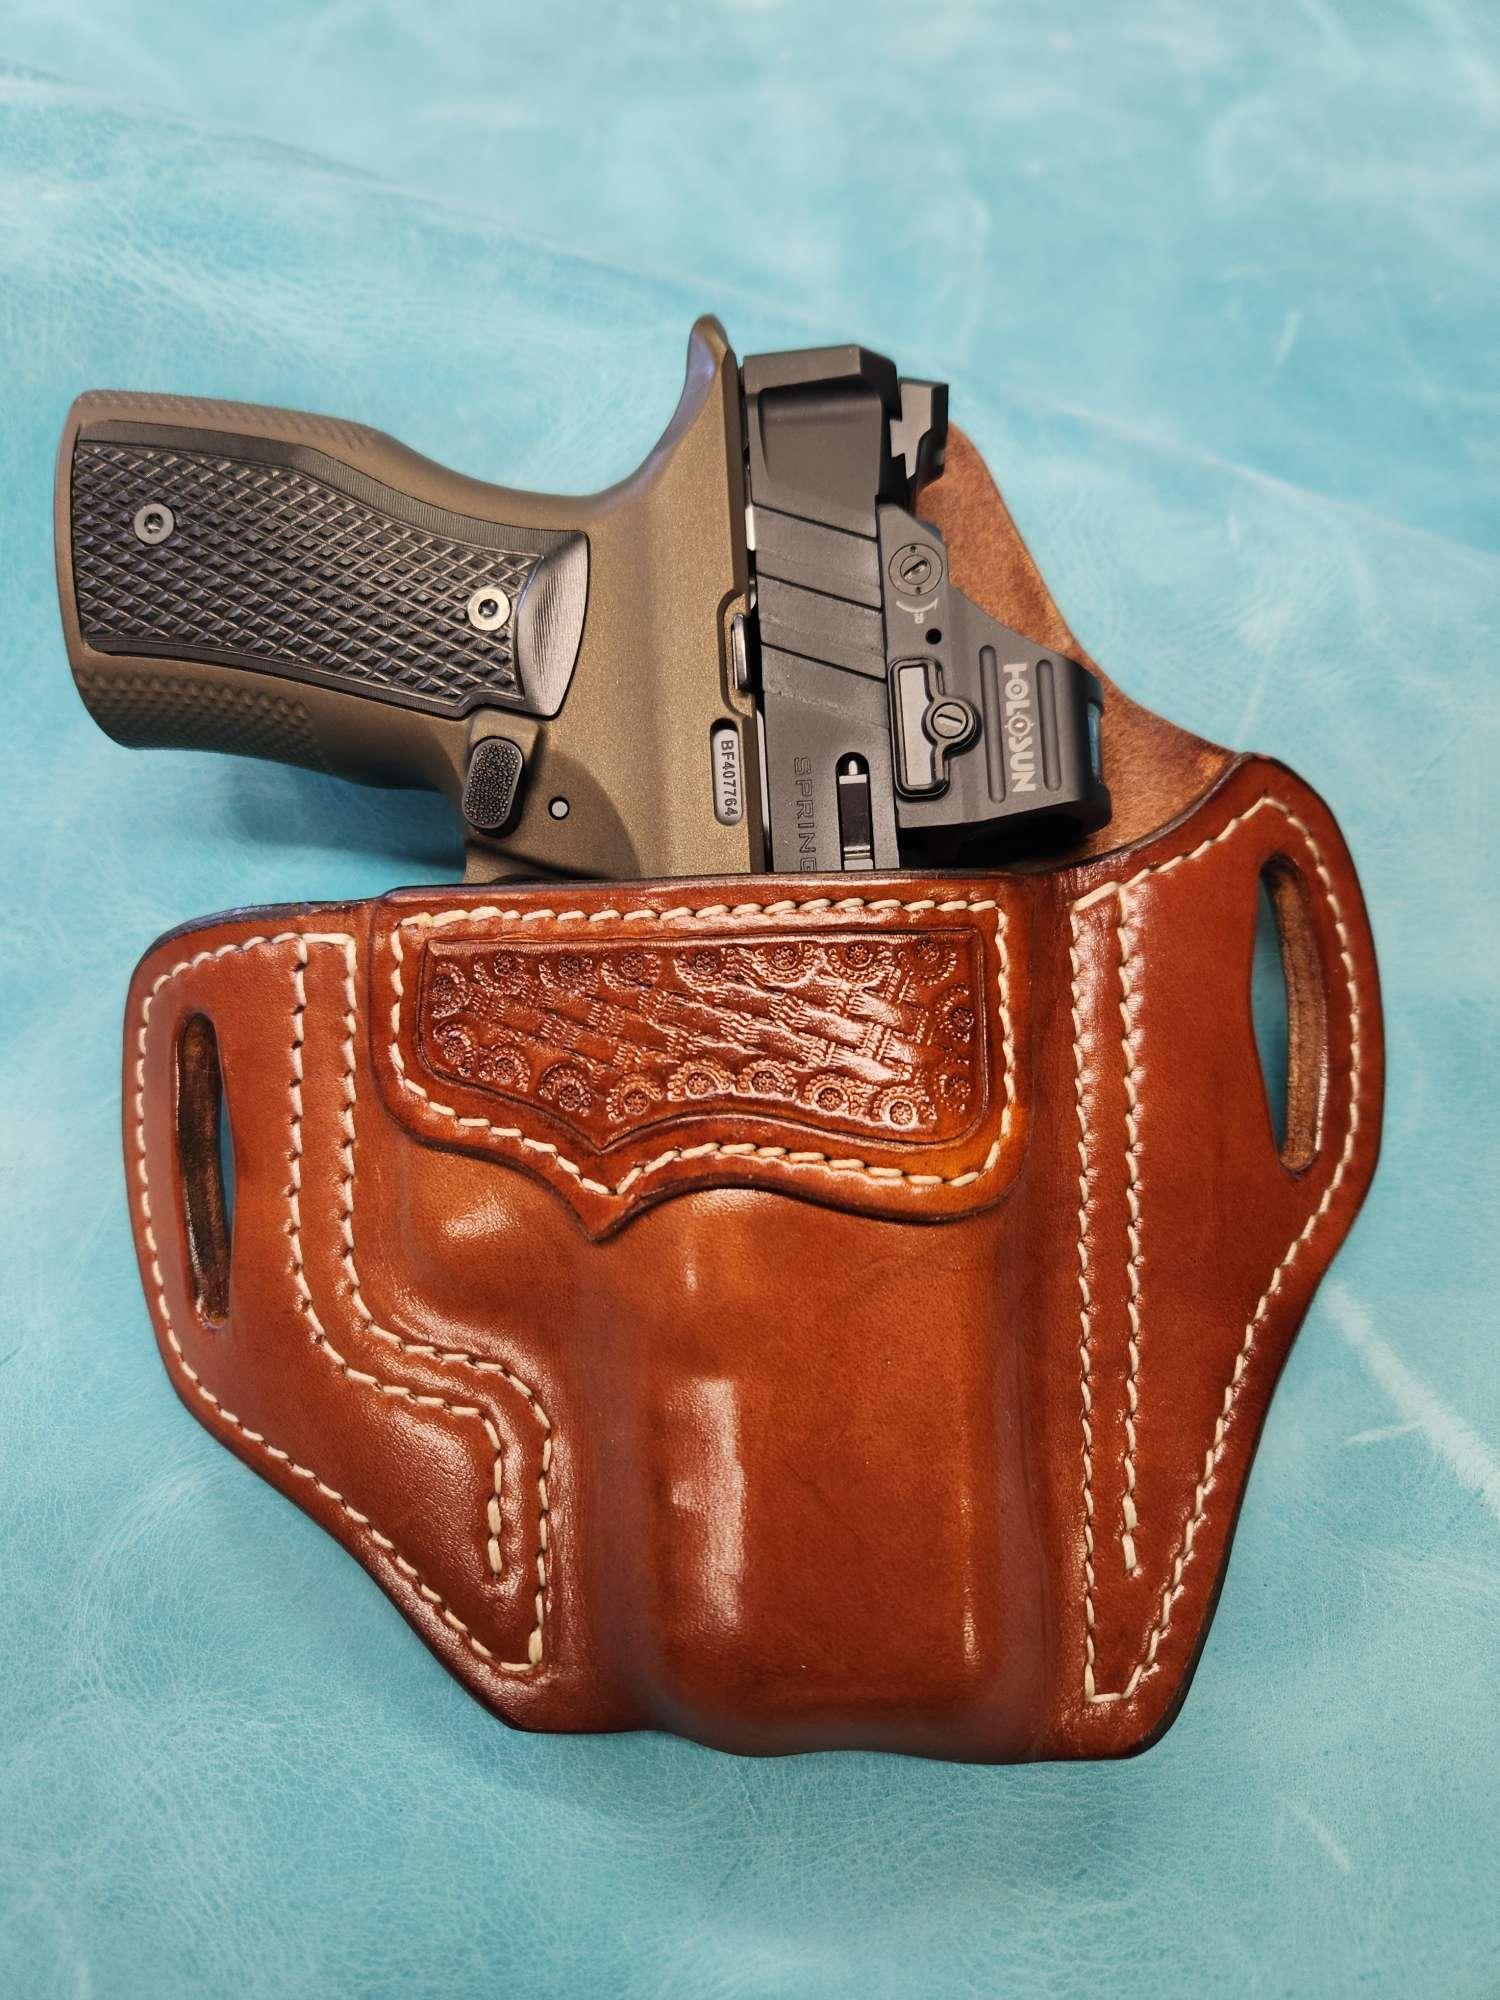
-
Well done Walter. I had the opportunity to show my work at a Boys and Girls club. I enjoyed their enthusiasm very much. While my work is mainly holsters, i was able to show them key rings, ear rings, cattle tags, and many variations of leatherworks. I still get emails from them....
-
Nice big oak leaf... I often associate that sort of leaf of chipster99's with more Northern areas, but then I think I saw some similar to this changing colors on a different road about 10 minutes from here. Cool that you showcased the dried leaf with the good carving
-
 EmmaRose joined the community
 -

Landis 3 Needle and Awl machine not stitching correctly
Goldshot Ron replied to knotzo's topic in Leather Sewing Machines
I just saw this thread. The one thing that I think I see, is that the bobbin is threaded incorrectly in the shuttle. Sewing with the cover off will also affect how it sews. I have messed with my Landis 3 for almost 7 years, and I still do not have faith in it nor myself to tackle a real project. -
Simple, minimalist design and skillfully executed. This is at least your 3rd post showing the importance of practice with minimal tools and skill building over a shop full of the latest big name tooling. Every beginner should read these few posts before they start filling that Amazon cart. Thank you for posting these.
-
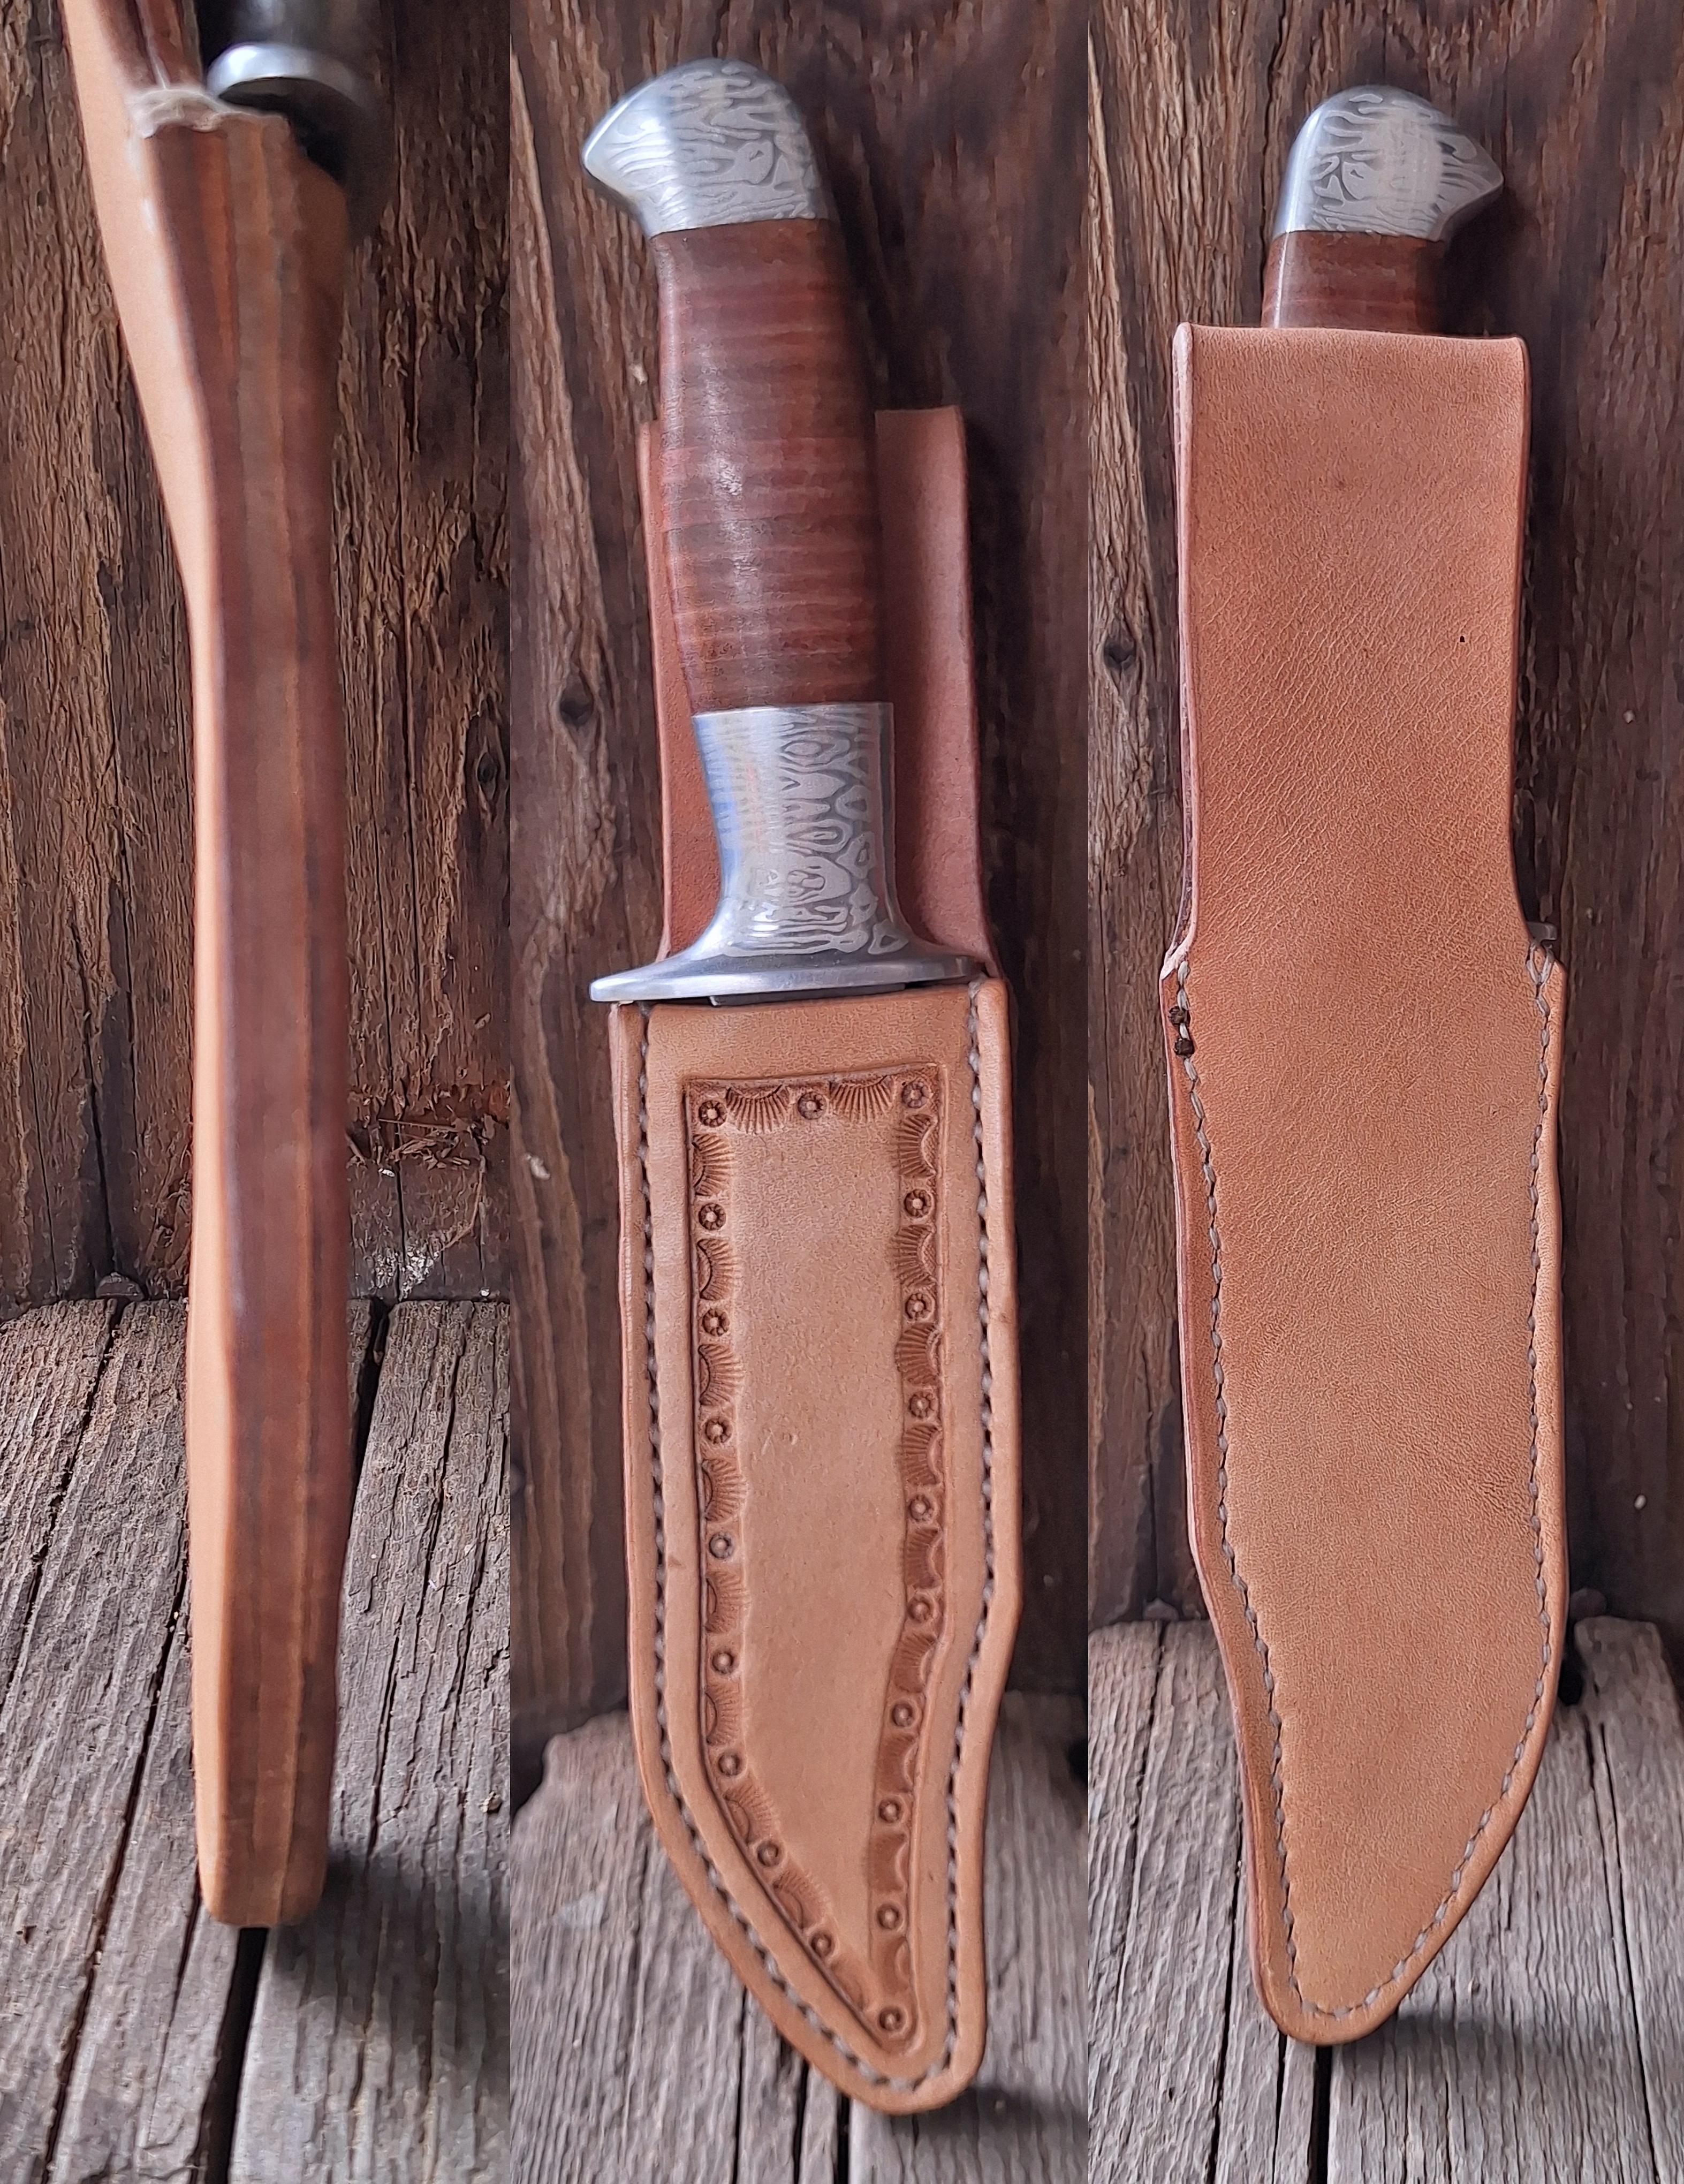
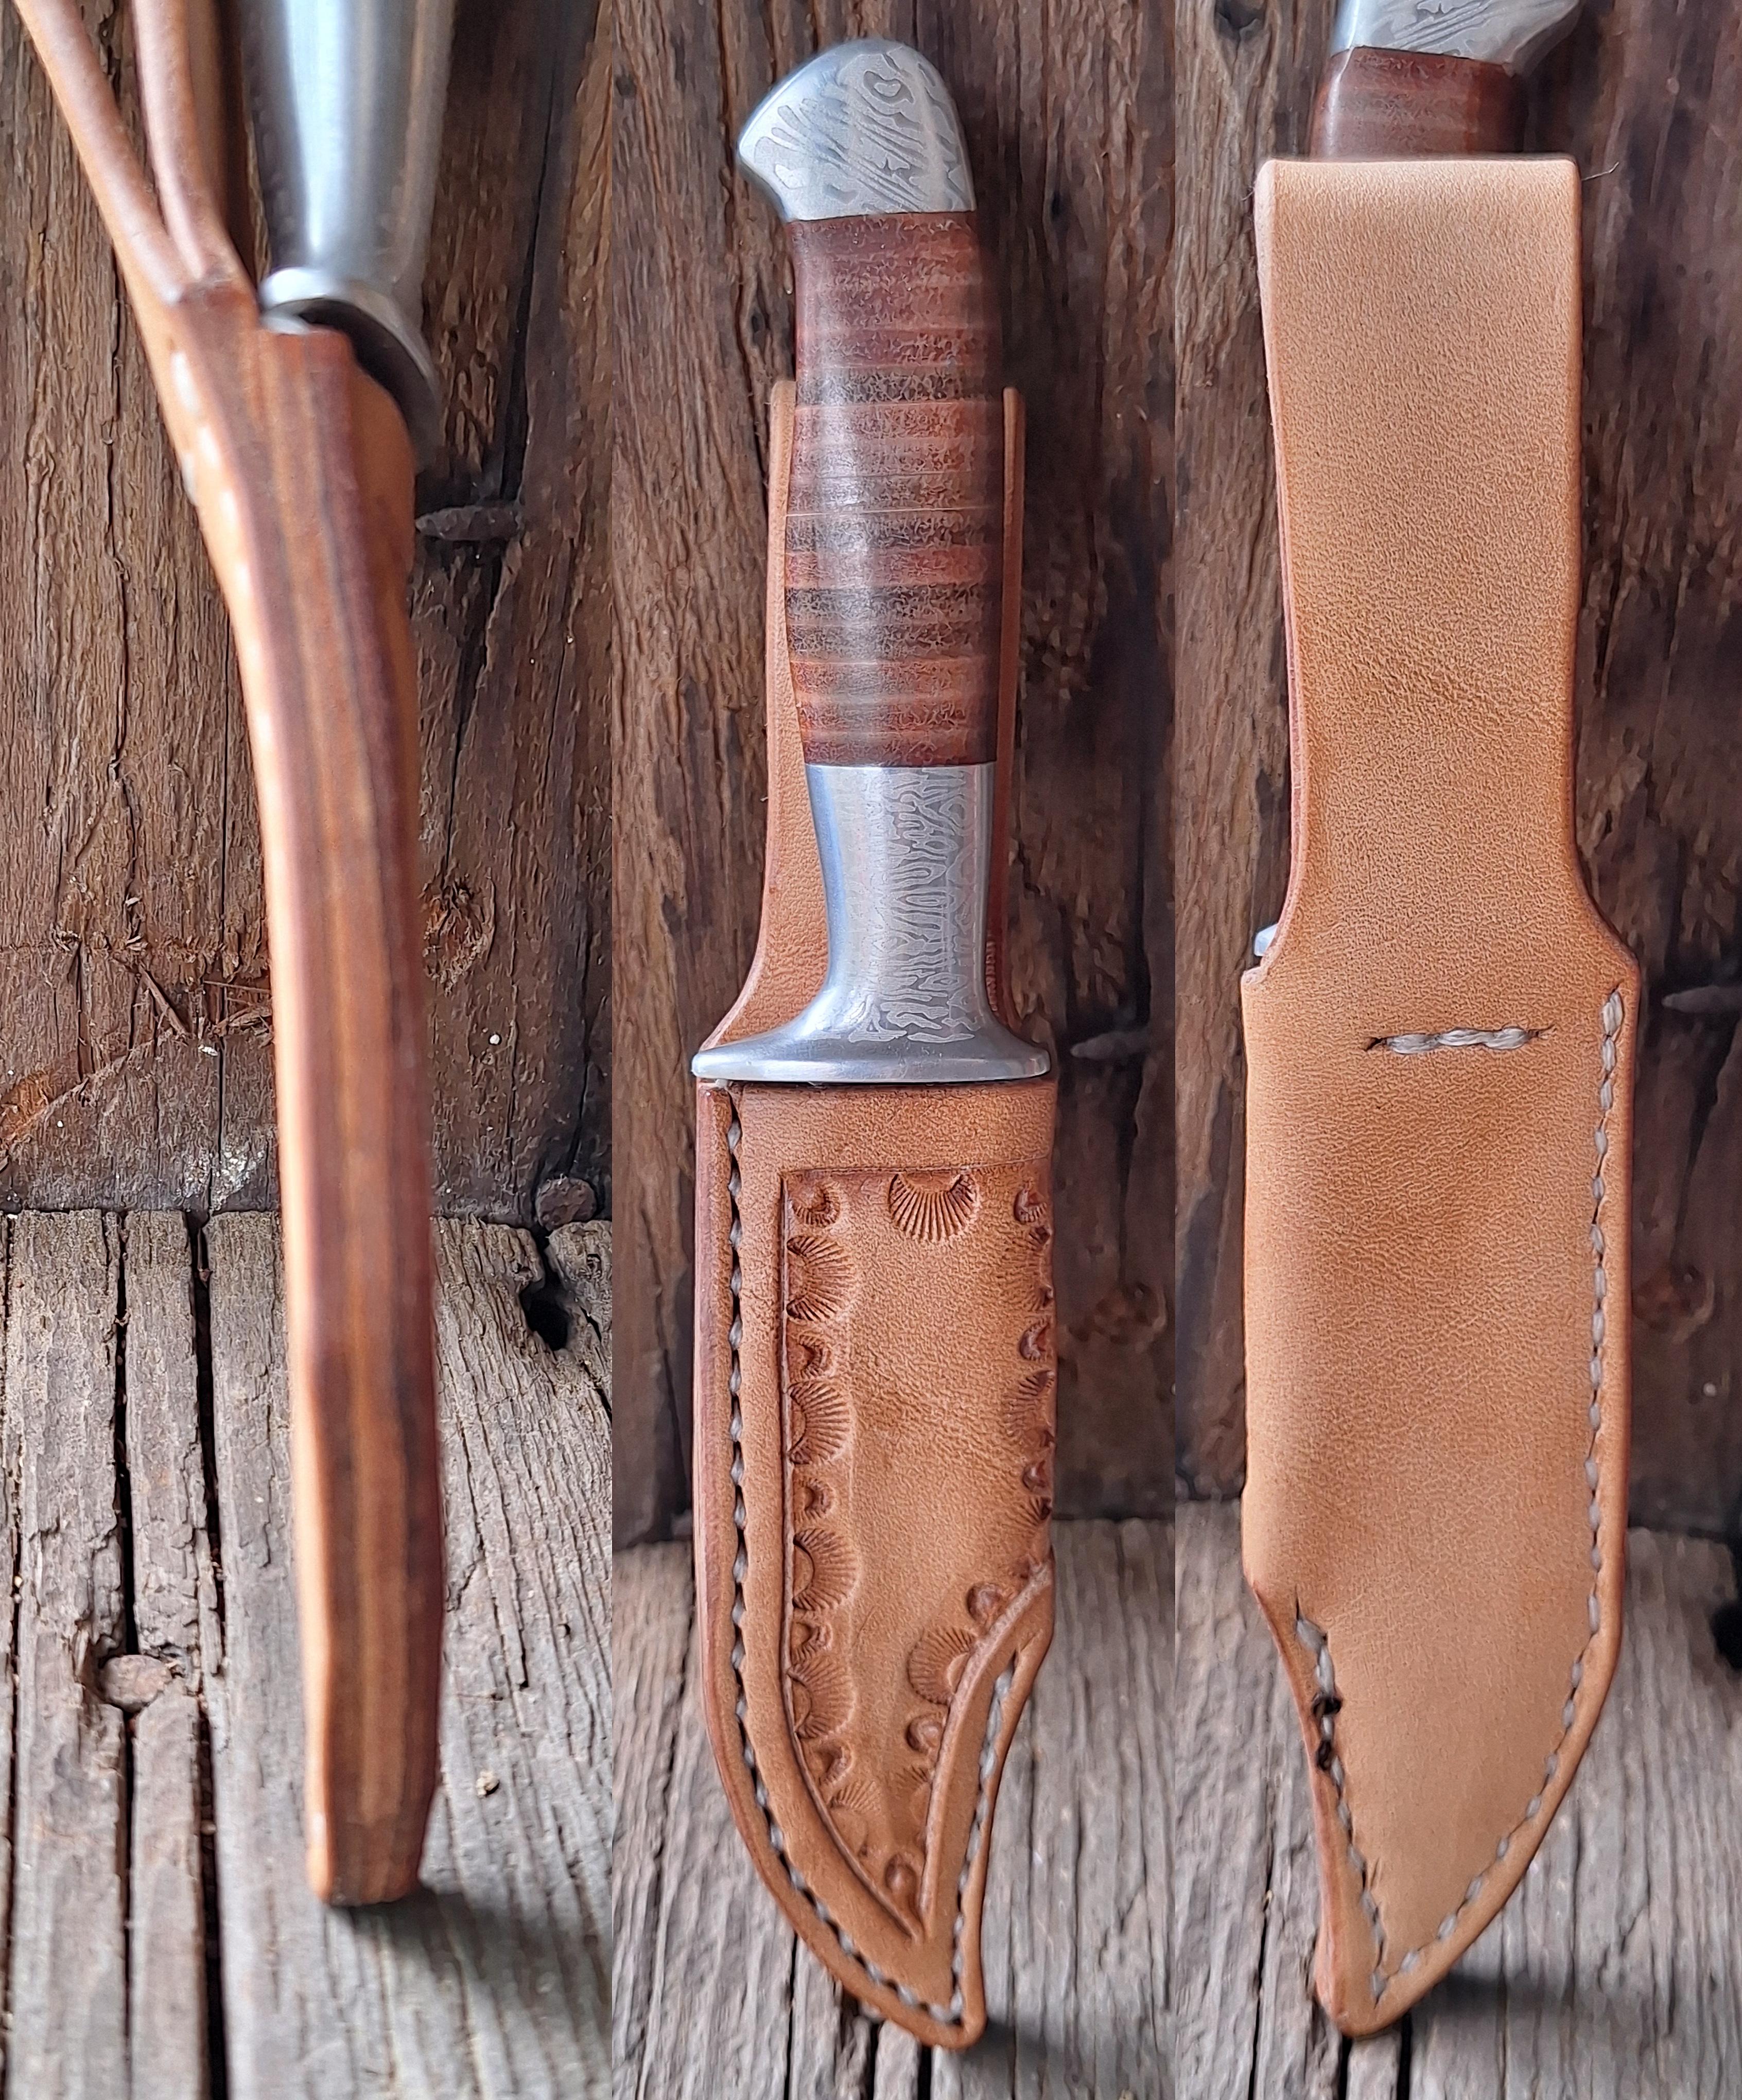
Made 3 different knife sheath styles for a class I have the opportunity to teach in Birmingham, AL on 19 July. Love being able to show a way of designing and making these with minimal tools and expense. Used clearance bellies, contact cement, wax, glycerin soap, thread, and neets foot oil.

-

Landis 3 Needle and Awl machine not stitching correctly
dozernmike replied to knotzo's topic in Leather Sewing Machines
Did you get this working? -
I am looking for a landis 3 loop thrower. The little finger with a hole in it that moves the thread in front of the needle. I have tried the landis number for a few months but I'm not getting an answer. I thought I would see if anyone has one before attempting to make one out of a 5/32 aircraft drill bit.
-
As far as it's backed off I really doubt the tension is the problem,my guess is look for it to be binding ( or getting caught) somewhere between the spool & machine.
-
 Smg joined the community
 -
 RobynR changed their profile photo
 -
The servo motor worked fine with no positioner system prior to transporting to a new location....so thinking it might have to do with some internal misalignment as Constabulary stated.
-
RobynR joined the community
-
I'd take the tensioner apart and see if there's a burr or something else going on. Funny it would rear it's head right at a bobbin change, but it's worth a look. Another thought, make sure it's tight starting at the tensioner and not further along the thread path. Be sure where the problem starts.
-
 Bantais joined the community
 -
I have a Pfaff 145 H3. I ran out of thread while sewing and had to refill a bobbin. After rethreading my machine, everytime I sew after a few stitches my top thread gets stuck in my tension disc (The top thread becomes extremely tight - to the point where pulling on it makes it snap - and the stitches start to show the bottom thread on top). I then have to rethread the top thread, then after a few more clean stitches, the top thread becomes tight and the issue persists. Ive attached a photo here of the tension disc. Nothing has been done to it or changed. I am not sure why this keeps happening now. Any advice?
-
 leatherito joined the community
 -
I used to drop my wife off in a parking lot where a snowmobile would pick her up and take her to her job on last dollar rd outside of Ridgeway Co on the Divide. The Sneffels Range, regionally conterminous with San Juans, is a young, prominent, and rugged range of mountains in southwestern Colorado of the San Juan Mountains. The Sneffels range form the southern border of Ouray County and run west to east. Sneffels Range Sneffels Range
-

spring flowers and good food
chuck123wapati replied to chuck123wapati's topic in All About Us and Off Topic
This doesn't look like much, but if you ever decide to walk the Continental Divide Trail, then you will come to this spot. From here, there is over 100 miles, as the crow flies you won't see another tree except in the only town along this portion of the route through Wyoming. I never could understand how someone could live in a city, this is 30 minutes from my house and I can spend the whole day without seeing another person, and I can usually see a long way lol. Man, the smell of the springtime flowers was glorious as well as the vastness of the world.