-
Posts
1,591 -
Joined
-
Last visited
Content Type
Profiles
Forums
Events
Blogs
Gallery
Everything posted by Trox
-
Thank you Jackie! that's what I call good customer service, I wish more people was like you. I'm looking forward to hear from. Thank you, Tor
- 12 replies
-
- ohio travel bag
- hardware catalog
-
(and 2 more)
Tagged with:
-

Fortuna 121 Band Knife Splitting Machine Manual And Part List.
Trox replied to Trox's topic in Leather Machinery
Got them! -
Thank you, I know that, that's not the same as having a catalog in my workshop where I need it. Tor
- 12 replies
-
- ohio travel bag
- hardware catalog
-
(and 2 more)
Tagged with:
-
I can understand its a cost to send and print such catalog, however it's advertising. First time I had to pay for a catalog. Tor
- 12 replies
-
- ohio travel bag
- hardware catalog
-
(and 2 more)
Tagged with:
-

HELP! What is this edge called and how do I get it?
Trox replied to kozhanumbers's topic in How Do I Do That?
This is what we use now, no heated tool necessary anymore on the latest generation Italian edge paint. Just sanding and paint, for all kinds of leather/ vinyl and so on. You also get a free sample of this if you pay for the postage. You need a applicator tool, that is necessary; it got to be applied thick and even. Giardini www.leatheredgepaint.com I do not think the link will work because of the site update here, you got to type this inn manually. Tor -
Cost me 32 $ to get a catalog?
- 12 replies
-
- ohio travel bag
- hardware catalog
-
(and 2 more)
Tagged with:
-
Dale, did you understand something of this "Instructions" Tor
-
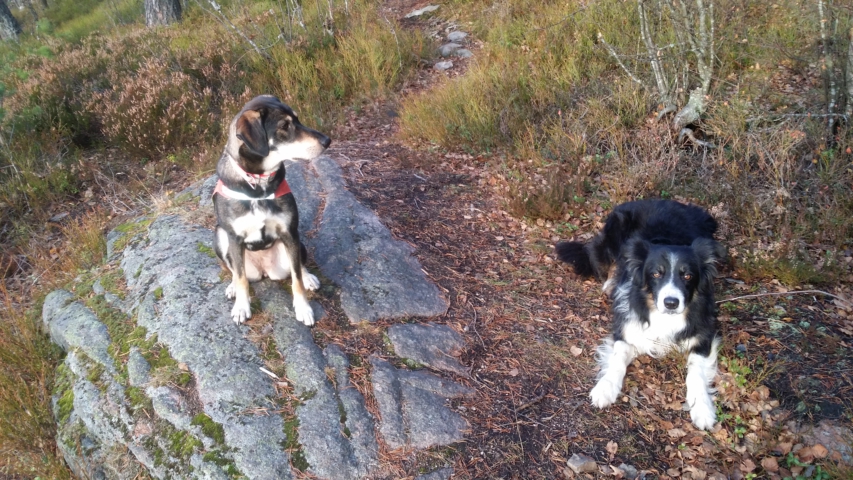
There you go Uwe, a beautiful high key portrait of a material eating dog
-
Well I do have some instructions in Chinglish Called " 2 The Normal-Reverse transition Setup For The Motor" " Motor manufacturer set is the reverse transition. If you need to reset: when motor stops, press the arrow down (button symbol on motor) for several seconds, when LED is "SET.0" press arrow up button with 2 times; when LED is "SET.2", then press the arrow down button again, Led is "roT.E" or "roT.P". If you want to change the transition, and you could press the up arrow for switch of the transition . 5 seconds later, the set pattern will be automatically saved" This is exactly what's written in the instructions, part from the arrow up and down which are pictured by an arrow symbol. English or "Chinglish" are not any of my native language. I've would perhaps use the word direction instead of transition? that would have made it simpler for me anyway. I have not tried this for awhile on my motor (600 watt brushless cobra servo motor, 220 volts but with the same instructions as the 110 volt version). Anyway, running a machine in the wrong direction is not a good thing to do. It might have caused some thing to unscrew/ loosen or knocked out of position. I would recommend you take contact with Steve and tell him about it. It might be trouble regards the warranty later if you don't . It's really not that difficult to adjust these motors when you get to know the display, it's been a long time since I hade to turn /push on any buttons on it. I have used it on the same max speed settings all the time (around 1000 rpm) have not needed to do any thing else with it (that's a good thing ) Good luck Tor
-
Sorry for the double picture entry, I'm not able to delete it without deleting the hole post. Thanks Tor
-
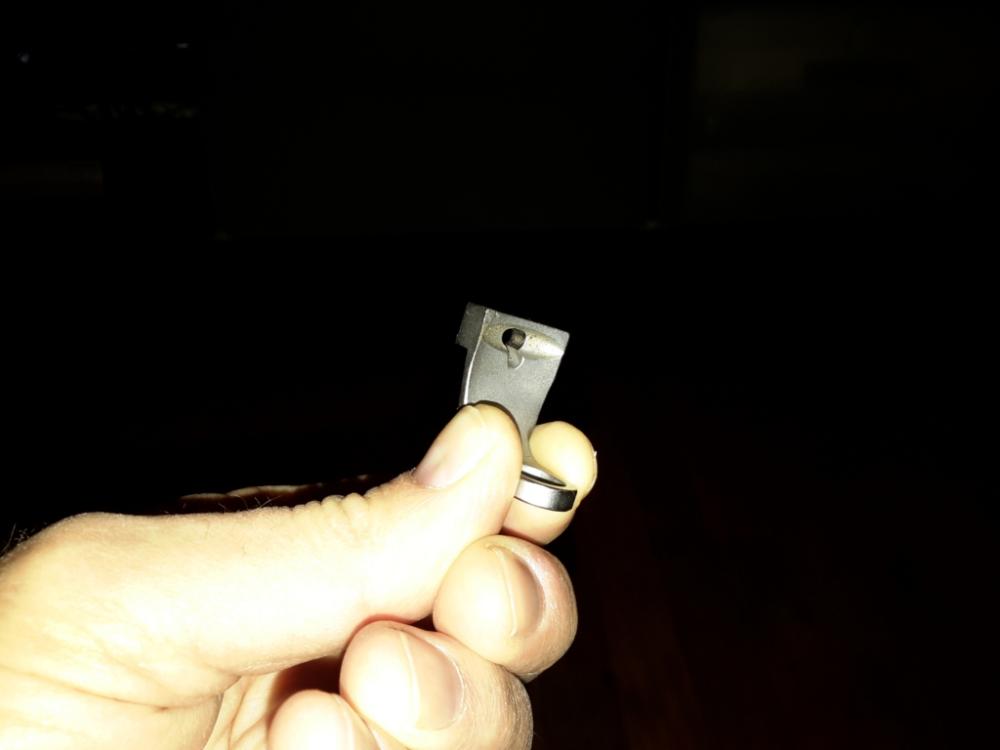
Thank you JerseyFirefighter, for those excellent pictures. I've seen all I need to. Nice looking machine, first US sold clone I've seen with belt cover. (That's obligatory here) And like the sharp eyed Mr. Uwe pointed out, the now patent pending famous lower needle guide is installed in the (that, because this is not yours?) machine. It's not a modified feed dog, that's the real thing. I'm waiting on used one from a old stock Ferdco machine now. The rest of the machine (cannot speak for the hidden parts) looks exactly like mine or any other 441 clone machine, the accessories too. Difference from a Cowboy would be the handwheel and a couple of other bits and screws. Most serrated feed dogs cannot be altered in to this lower needle guide, take a look at my picture. Most are hollow underneath, I've seen them even with bigger cut outs than mine (I looked at that possibility before of course). A lower needle guide is much more simpler to produce new. The upper needle guide is of course a closed toe inside harness foot. They aren't patented either, and it's a long time since it was. That is if they managed to get it patended at all, I have some doubts about that. They was not the first who made such presser´s, I have old Pfaff foot that looks like that. Perhaps they patended the name Anyway, looks like a well put together machine, good proven solutions. Nice price too. Of course it's twice the price of buying similar in China (that goes for all of the brands), but everybody have to make a living here of course. By the way, somebody should make up some of these needle guide before a new patent. Patent means more money from us customers, we do not want that Tor
-
And use a thinner thread perhaps.
-
I have an old Blanchard tool for cutting washers (washer cutter), cutting round. It's been awhile since I made such boxes. You better find the center of the round bottom, nail it to your work table in such way that you can use the table end to guide the beveled cut (rub away the nail mark with water and bone folder when done). Just lay your knife in a 45 degree angle on the table end and rotate the round leather piece. You could cut it out like this too, and make the 45 deg. in same operation (cut an oversize piece first). Use a curved awl/needles when stitching box side. Remember the bottom stitches spacing is less in the bottom piece (more SPI), because of the smaller diameter. And of course use a wooden dowel, box etc as a lest. Good luck! Tor
-
Mikesc, do you think this will fix it's self when the site here is finished updated. I do not have such possibility to alow scripting on the Samsung tablet I'm using for the moment (only Java script and that's on for all sites). JerseyFirefighter, thanks for posting a pic of your machine. What accessories came with your machine? Does it have the lower needle guide pictured in my post above. That will replace the feed dog when special needle plates are used. Thanks Floyd, if you search or go to Ferdco dot com, you will find the old Ferdco site, who now has been taken over by the Hoffman Bros. The content of the site (pictures, products and description) is the same as before. It's must be more than ten years old. I do not remember when I saw it the first time, buts a long time ago when the Ferdco company was up and running. You can read about the old Bull machines there. Ferdco used a Juki 441 head (called it the Juki Pro 2000 93 to 95) Like Art said, after that they used machine castings from Taiwan. Today, all the 441 clones who are made have the same spec like the super bull, 1 to 1 1/16" foot lift (dependent of presser foot and plate used) The original Ferdco accessories looked much better than the ones on the marked today. Their machines was more expensive, since they once used better parts. In the beginning they used many original Juki parts and small volum custom made parts. Today, I cannot see anything else than standard Chinese clone machine parts. By all means, there are different quality parts out there today, have a look at Tobago dot com (Chinese auction site in Chinese) There you can buy a hole range of different quality sewing machine part. I found 441 feed dogs as low as under 10 USD . what I'm trying to say is, if these new Ferdco was anything else than an standard 441 clone; they would have been more expensive. Tor
-
It still does not work?
-
Http://www.raichert.com/leather/pro2000/ferdcoPro2000Web.htm HI Floyd, I had to write this url in manually. Not possible to come and paste for the moment. Sure it's related to the site upgrading prosess. I try once more to paste the YouTube video, otherwise the link is in the site above. https://youtu.be/f-1 Tor
-

My tips for a "machine" look with Saddle Stitch
Trox replied to DonorLeather's topic in Sewing Leather
I totally agree with Martyn here, the saddle stitch should be sewn in an angle by using an European pricking wheel or iron (needle and awl). That's the only way it should be done. If you want a staight seam, use a sewing machine (of course you also have angled needle points for that to like LR and LL) If a customer wants to pay me extra for hand sewing, I do not want to make it look like it's sewn it on a machine. A saddle stitch with most SPI is the highest regarded work, the best looking and strongest seam there is (done the proper way). Then it must be sewn in an angle, straight you make it weaker and you have to use longer stitches. In the old times bridles was saddle stitched by hand with 14 SPI, you cannot achieve that laying the stitches flat like that. Teach it the right way or do not teach it at all. Tor -
I use vegtan backs and something shoulders. Mostly leather that has been waxed, prepared for outdoor use. Like bridle leather, fat leather and such. Sometimes I use natural vegtan for tooling and dyeing, but remember to add leather oil after or before the dye. The alcohol dye dries out the leather and makes it crack easier. I use all kinds rivet in dog leads, but sew inn all bucles/rings in collars and harness. I have experienced cracked leather around buckles and D rings too. However, that happened with some bad quality chrome tanned white colored leather I used once. I do not recommend using bellies for such work, to stretchy and weak. It's not up to the stress. You better sew in the buckles and D rings if the leather cracks around the rivets, the dog collar is subject to enormous stress every day. All kinds of weather conditions etc, it must be made of the best materials. Most tanners sell special leather for such use, ask for it. Good luck Tor
-
Thank you Johanna, I understand you have enough to worry about right now. A answer was all I needed.... more than enough other things to do in the mean time. Thanks Tor
-

Stitches on repaired machine: ready to rock-n-roll?
Trox replied to llucas's topic in Leather Sewing Machines
You will never be able to imitate good hand sewing on a machine, stitches will alway looks uglier on the back side. Something related to the needle punch out, feed dog and plate. Machine sewing is for saving time and labor costs only. Proper hand stitching will always be stronger and more beautiful. With softer lining on the back side, the bottom stitches will look better. Good luck Tor -
I looked at the YouTube video https://m.youtube.co of the new Ferdco Pro 2000. There it has accessories that looks just like all other Chinese ones. The accessories on picture I received from the Hoffman looked just like the old Ferdco ones. I told them I had most of these attchment, but your look different. I almost bought some of them because they looked much better than the normal Chinese ones. I had been pretty disappointed if I received exactly the same as I already had. Perhaps they had some left of the original Ferdco accessories. I do not understand this because the video above is from 2014 and I contacted Hoffman Bros last fall. It was an old picture they sent me and I was primarily interested in the lower needle guide. Here its pictured with the old Ferdco double harness foot this http://www.raichert. Ed Raichert spec on the machine says: up 346 thread, needle sizes from Nm 160 to 280. That's Singer size 23 to 28. There is nothing about a size 30 (Nm 330) needle here. These machines might take a Singer # 29 (Nm 300), like the DA 205-370 also does. According to the patent search the Ferdco lower needle guide is not a valid patent anymore, due fail to renewing the patent payment. Perhaps they just filed to patent it again since Ed Raichert called it a "patent pending lower needle guide", I do not know . "Ferdco 2000 pro super bull" is very good old established brand, that speak for quality and craftsmanship ship. We all know the story about Ferdco. I do not think the Hoffman Bros bought this brand just because of the old rest stock. They had plans of using this well established brand for all its worth, of course. Do not expect to get anymore from them than you get from other dealers to the same price and you will not be dissapointed. Just my 2 cents Tor
-
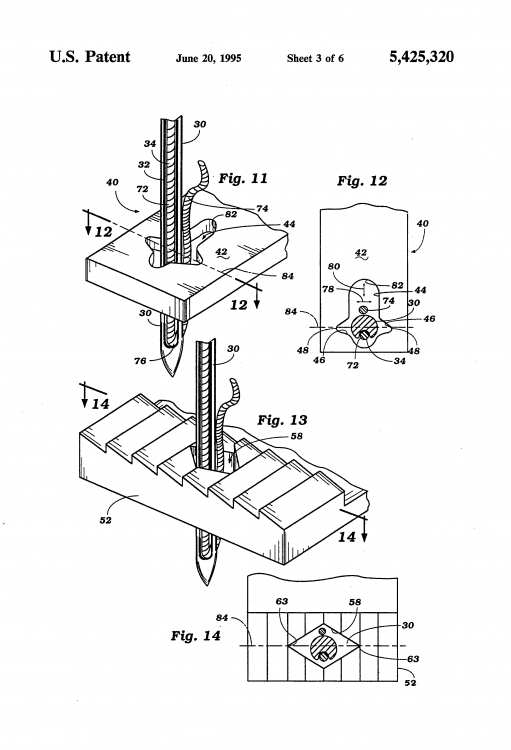
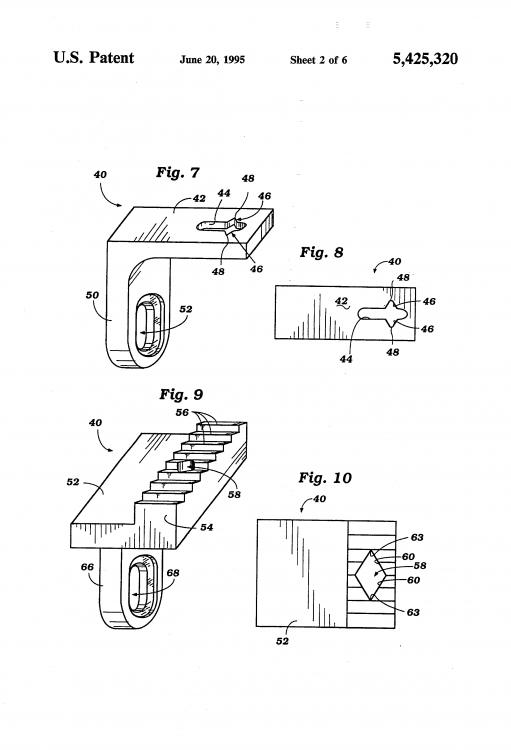
Hi, I contacted the Hoffman brothers not long ago and asked them for the guide. They sent me a complete quote with prices on all the accessories for the Ferdco machine. They still had the needle guide, plates and presser feet´s for the machine. Their accessories looked different from what other clone seller offers. Now I cannot find their email anymore, I must accidently deleted it. Now I found an second hand lower needle guide I'm about to purhase. If that doesn't happen, somebody beat me to it. I got to write them again. Anyway, here is a picture of the patent. It looks exactly like this. Should fix occasionally skipped stitches with the use of slotted, holster and stirrup plates. (Especially when the use of thinner needles) I had some problems with that. Anyway, I do not know anything about their new Ferdco machine. The price suggest it's a standard Chinese clone, otherwise we would have known. They never shut up about such beneficial information. Tor
-

Stitches on repaired machine: ready to rock-n-roll?
Trox replied to llucas's topic in Leather Sewing Machines
Hi Lucas, you are using machine thread, not waxed linen. The thread will not lay flat, the purpose of hammering the stitches are to close the leather around the tread. If a stitch brakes later, the hole seam will not unravel. Do not beat it to hard, then the leather will be thinner, wider and damaged inside. Just hard enough to close the seam. Then you can use a over stitch wheel (or a Tandy pricking wheel, it's formed like a over stitch wheel anyway). The wheel will make the seam nice and natural again. I mostly prefer the use of a French shoe hammer, it has a big polished face. It looks very similar to that Osborne hammer, but the face is a bit more rounded. That hammer looks good for the job, I like them with a bit rounder face, though (that's not necessary). I sometimes use a Blanchard saddlers hammer, when the shoe hammer is to big or to far away on the bench. It's much like the CS Osborne # 55 saddlers hammer and are good for many things (forming leather, drive tacks etc). But the one in your pic is better for hammering seams, the face on the saddlers hammer is a bit to small. (Then it's easy to beat to hard, less surface and more pressure). There are other hammers that can be used, like a car bodywork hammer etc. Remember to polish the face on it on a buffing wheel etc, using grinding/polishing paste. Otherwise it will stain the natural leather (vegtan). A Carpenter hammer is not good for the job, it's to coarse, heavy and sharp sided. If that Osborne hammer or other leather hammer are to expensive, have a look in a shop wit inexpensive tools. Look for something that can be altered/polished in to a good leather hammer. I have a several different old leather hammers, tack hammers, upholstery hammers and saddlers hammers. A good leather hammer is an important and much used tool and so is a good anvil. Tor -

Stitches on repaired machine: ready to rock-n-roll?
Trox replied to llucas's topic in Leather Sewing Machines
Yes after I hammered the stitch to lock them, I run a over stitch wheel. Let's say # 6, measure up the stitch length on the machine with that (before I sew of course). Run that wheel to make a nice stitch, just like you do on hand stitching. It's an very important step to hammer the seam. Tor


