JLSleather
-
Posts
7,378 -
Joined
Content Type
Profiles
Forums
Events
Blogs
Gallery
Everything posted by JLSleather
-

First Builds Using The New Machine
JLSleather replied to cleanview's topic in Gun Holsters, Rifle Slings and Knife Sheathes
Uhh.. not sure what I did, but .. you're welcome -
First Builds Using The New Machine
JLSleather replied to cleanview's topic in Gun Holsters, Rifle Slings and Knife Sheathes
That's a good question. I was thinking I got these from Bob (toledo) but not on the receipt. Maybe some that she ordered.. we'll find out together! -
It may turn out to be true that you were treated better by Steve. At this point, what do you feel he has done for you? I mean, since you haven't got the machine yet.
-
First Builds Using The New Machine
JLSleather replied to cleanview's topic in Gun Holsters, Rifle Slings and Knife Sheathes
Doesn't seem to. I'm not the only one doing it, either. I could steer you to one guy's website of very nice looking holsters - who uses 277 with 24's - but I'll let him pipe in if he cares to. -
First Builds Using The New Machine
JLSleather replied to cleanview's topic in Gun Holsters, Rifle Slings and Knife Sheathes
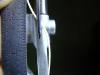
Just like you set tensions, and check before you stick it in the high-dollar stuff.. don't hurt to throw a ruler on it if you've been moving things. This is purdy durn close ta 6/inch. You can see that the stitch line turns at 1 1/2", three more stitches (3 per 1/2") so it's consistent. Oh, that's 277 thread with a 24 needle. -
First Builds Using The New Machine
JLSleather replied to cleanview's topic in Gun Holsters, Rifle Slings and Knife Sheathes
6/inch should be fine. But either that first picture is SERIOUSLY misleading somehow, or yer measurin' stick is broke That LOOKS much smaller than a six. Keep in mind the type of needle can make it appear a bit different. Here's a pic, jus a piece o' scrap.. showing 6/inch. The natural thread is a needle with an LL point. The black thread is done with an 'LR' needle, WITHOUT changing the stitch length. Stick a ruler next to it, and get right at 6 / inch.
-
First Builds Using The New Machine
JLSleather replied to cleanview's topic in Gun Holsters, Rifle Slings and Knife Sheathes
I'm with Ferg.. too many stitches / inch. About 5 - 6 is fine.. not much finer than that, especially with a needle that size. I use a 24 mostly (#23 for 207 thread). -
Blue / Dummy Gun Thingies
JLSleather replied to JLSleather's topic in Gun Holsters, Rifle Slings and Knife Sheathes
Got 'er.. THANKS -
Blue / Dummy Gun Thingies
JLSleather replied to JLSleather's topic in Gun Holsters, Rifle Slings and Knife Sheathes
Yeah, I see that was you 'n' me back then, too Couldn't remember why I didn't already buy the stinkin thing. Then saw teh 2-3 week wait time. Yeah, guess I gotta just get over that -- and wait. THANKS! -
Sheridan Style Pic Frame
JLSleather replied to IngleGunLeather's topic in Floral and Sheridan Carving
I don't know just what the question is -- but the toolin' is purdy -
Blue / Dummy Gun Thingies
JLSleather posted a topic in Gun Holsters, Rifle Slings and Knife Sheathes
I know it was here, but now can't find it. SOMEBODY posted about a dummy for the Smith Wesson SD 9/40 VE. Somebody tell me who has that - and when I git the gun I'll draw the pattern and share it ) -
http://springfieldleather.com/36993/Pen%2CDyeliner%2CBroad-Tip/
-
Maybe these .. http://www.tandyleatherfactory.com/en-usd/home/1249-04.aspx
-
Down in that neck o the woods, you aint too far from S-T Leather in St Louis. I've never used their carving leather, but I get lining leathers and liquids through them. Some of the hardware / buckle stuff, too. The materials are good, the web site sucks Still, you can see what you want, and call down there. ( stleather.com ) or from your area maybe just drive down and look. I've used a lot of knives to cut leather, but I still go back to the utlity knife for long straight cuts, and a #11 x-acto for curves. Works as well as anything, and I dont waste time sharpening (pitch the blade and pop in a new one)>
-
I thin dyes 'thinner' than that, but I'm with chief on the oil.. never considered thinning it. I don't know if you need a "formula" for thinning dye, but I would recommend writing down what you did.. like simple as maybe a piece of masking tape on the bottle. If you never need it, no harm done. But I've mixed dyes, used them, made no note, only to have someone say "hey- kin i git another one like that" Some dyes i use full strength. Some I thin as much as 30:1. I just use dye solvent.. that denatured stuff will kill ya quick!
-
Anybody put ona those together? I added 1/4" to the safety strap (left side of pattern) and moved the snap up that same 1/4". In actual practice, I never mark the female end on the pattern -- but instead I put the male end (and reinf metal if used), assemble the holster, then press the strap on the male end to mark the position of the female snap. Avoids any issues that could have resulted from different leather thicknesses.
-
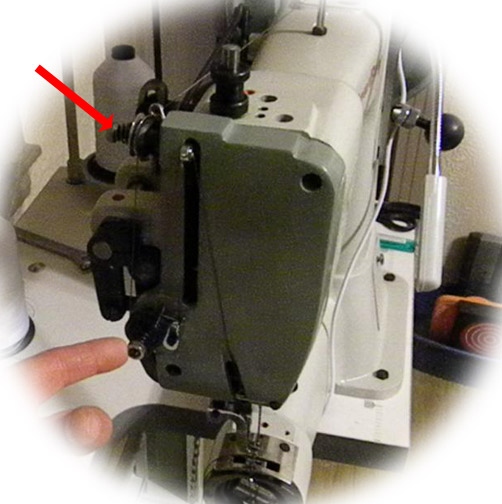
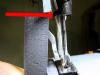
When you say the needle is all the way up, I thought you meant that the position of the bar was top of the travel. This is why I say rotate it without a needle. The pics show the same machine, working. So, forgetting the needle itself, you can set the bottom of the needle stopper (red arrow) to just over 1", and note the position of the shuttle and driver. Truth is, there isn't much to these machines, and it's a bit sad the price they get for a few bolts and set screws. Since you mention darkened thread and now have some issue in that area, I certainly would recommend taking the hook "stuff" out again and making sure there's nothing in behind there. I'm not sure if those pieces can even go in the wrong way (you'd think that would be made impossible, but like I said there isn't much to these).
-
YIKES! How THICK is that thing when yer done? 6 layers of 2/3 on each side, then a layer of 4/5 each side.. even with no 'overlap' in the pockets, tha's like 18 oz leather -- before anything in it.
-
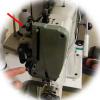
So, I've never checked this stuff before - never had the cause I spose ... Evident here, using the set screw for a pointer... when the needle is all the way down, the set screw is about 10:00 or so, and when the needle is up, the screw points about 4:00 (in rough terms) Yours pictured about 2:00, meaning it had to 'get there' AWFULLY early to hit the back side like that. So, timing perhaps, but I'm still thinking a guy check to make sure that needle isn't extended TOO FAR. The picture stops for a second er two at the bottom position of the needle. With the needle fully "in", this is as low as it should ever get.
-
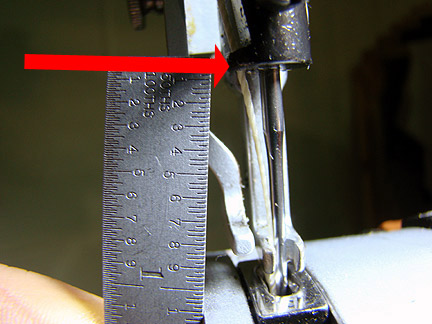
Alrightey .... Pic 1. Shuttle area, needle at TDC Pic 2. Shuttle area, needle at BDC Pic 3. Measurement needle holder to plate, needle BDC (1.050" -ish) Pic 4. Measurement needle holder to plate, needle TDC (3.250" -ish) Pic 5 Needle top position, clearance from plate not quite 1.25" (plus needle about 2" extension to holder). Keep in mind, these are close-ish, as I'm measuring with a ruler at an angle... oh, and these measurements are taken from the spot shown by the arrow ..
-
If that's as 'up' as the needle goes, I'd start right there! Possibly just moved the needle. I would ... 1.) Take the needle OUT (if possible) or if not ... 1a) Loosen the screw holding the needle and make sure it's shoved high as it will go (note that if you do this with the machine OFF you can both feel and hear it hit at the top). 2.) Remove the needle. 3.) Rotate the machine a good full turn (without needle) to make sure you haven't BOOGERED the works (you probably didn't -- so don't panic just yet). 4.) Having verified there is nothing else in the way, no other obstructions, replace the needle (all the way up), and try cranking a couple rounds without material or thread. I'll get a couple quick pics shortly ...
-
Really? Nobody? Googlizin' says that's a 4" barrel, so this won't fit. Still, seems like SOMEbody should make a quick rig and show us a picture of the fit
-
Start And Stop On Holster Question
JLSleather replied to cleanview's topic in Gun Holsters, Rifle Slings and Knife Sheathes
It would be difficult - to say the least - to keep a good eye on the bobbin and the corner at the same time. Simply put, the needle needs to go all the way down AND START BACK UP before making the turn. As for tensions, basically you're running bigger thread through the same hole, which would logically be tighter. So, IN THEORY if you switched the bobbin AND the top thread size together, the tension shouldn't require much adjustment, if any. Think of a scale, and then add 10 lbs to each side. Still balanced, yes? Other hand, for example... if you left the 207 in the bobbin, and changed the top to 277, then you might find it a bit tighter in the top (which "should" result in a bottom thread pulled up a bit too far). In this case, a guy might turn that top tension BACK (likely counterclockwise on yours). Turn it like 1/8 to 1/4 turn, then test it. It don't take that much, with a new spring in there (which yours would be). By way of a low-rent TIP: Some folks might put a dab of color on the thumbscrew so you know how much it turned. Personally, I generally remember, but a feller COULD ask the wife for a drop of nail polish. Actually, that's probably not politically correct any more --- some 'fellas" got nail polish too -
No pictures?
-
Start And Stop On Holster Question
JLSleather replied to cleanview's topic in Gun Holsters, Rifle Slings and Knife Sheathes
I got no instructions for that machine, but isn't the top tension set up above? And I agree.. for a couple THOUSAND dollars, you'd think there would be a current manual. Ten $$ hand tools from Tandy come with instructions, or at least a picture...