JLSleather
-
Posts
7,386 -
Joined
Content Type
Profiles
Forums
Events
Blogs
Gallery
Store
Everything posted by JLSleather
-

Herman Oak Issues From Anyone Else?
JLSleather replied to Modad2010's topic in Leatherwork Conversation
We just returned two 8/9 backs of HO to springfield -- WAY too much waste factor. I understand that "B" grade isn't flawless (that's why it's "B") but that was ridiculous. You'd be lucky if you could use HALF of that leather. The ONLY thing good about that whole deal was they accepted it back without issue. 'Course, that means UPS got paid twice, but SCL made nothing and we don't have 8/9 oz. -
A little perspective... Leather going up by 80¢ / ft means that your standard size holster has an increased cost of $1 (assuming a 15-20% waste factor), a 2-layer belt goes up $1.50, etc.
-
Any Tips On My First Revolver
JLSleather replied to cleanview's topic in Gun Holsters, Rifle Slings and Knife Sheathes
Not sure what happened to the picture of the back of this one. It's a Ruger, but not the right one -
Any Tips On My First Revolver
JLSleather replied to cleanview's topic in Gun Holsters, Rifle Slings and Knife Sheathes
-
Any Tips On My First Revolver
JLSleather replied to cleanview's topic in Gun Holsters, Rifle Slings and Knife Sheathes
Someone always going on about holster patterns. But, the 'stories" and "facts" run as wide a range as the "right" way to measure a belt. I personally don't see where the difficulty lies, except perhaps the hype created by 'professionals" trying to convince you they're doing something you can't. Seriously, some of these people will have you standing on the left foot facing northwest in the morning arguing about nylon vs poly. Here's the short version -- to fit snugly and prevent weapon movement, the inside of the leather would be the same size as the outside of the gun. That sounds too simple, because it IS. Amazing how many people miss that. Seriously, anyone who's ever used a real or dummy gun to form a holster SHOULD have realized that. Leather has some natural "forgiveness" built in, so it's not necessary to measure every millimeter. Some of the larger Glocks are good for examples -- since they are basically a rectangle "'this much by this much". With a revolver, it's the same idea, but instead of a flat surface you have a radius (actually, it's called cylinder because it's a cylindrical). Now, just a bit of "tech" stuff, which is in it's own paragraph so people can bypass it if they like "Theoretically", the width of the leather for the Glock (let's use a model 19 jus for example, those seem popular these days) would be 5.1" (like a rectangle roughly 1.5" x 1.050"). In the same way, lets say that the cylinder on the Ruger is Ø 1.56" (which is close depending on machine tolerances). This makes the measurement around 4.90". Where things sometimes get screwed up, I think, is that some forget that this is the measurement on the INSIDE of the holster. This ignores even MORE technical stuff that would be considered for higher production -- like fold lines and bend radii. For those who can't see why that matters, I don't think I can help you. Once you have this "wrap", then belt slots / loops / sweat shields / straps / etc. can largely be whatever size and location you like (within reason). And, structurally there is no benefit gained or lost by how sharp the stitch line turns. From a maker standpoint, it's a tad quicker to run a small curve simply because you avoid the necessity of exact stitch placement (which usually means slowing down a bit). I have a sharp turn at the tip of ALL of my belts -- never had one break there Now then .... Since it seems to be some type of closely guarded secret - here's yet another tip. Everybody loves to go on about how the Glock 17 and the model 22 can be made with the same dummy. Someone will chime in a second later to say thats also good for the model 31. Fair enough. What some don't say (some don't know, others don't want to say) is that the Glock models 19, 23, and 32 are EXACTLY the same, with the exception of being about 1/2" shorter (well, officially like 16 mm). All the difference is is the muzzle end (triigger area and slide no different), so that same glock 17 mold can be used to make holsters for all 6 pistols Oh, wait... the compact models 26, 27, 33 are ALSO the same 'around' dimensions, everywhere except the muzzle end. Those subcompacts don't have 'rails', and the base is just a tad wider - I'm talking like .03". Just the frame under the slide -- the slide itself is not different, except shorter (by about 5/8"). So now, we have a pattern that can be used for NINE pistols, simply by cutting the end longer or shorter. Due to that extra bit of 'beef' on the subcompact muzzle end, once formed it would be a tad loose at teh bottom on the other models. Basically, I mean you could get the models 22 holster to form to the 27, though a bit of stretch would make it not so great fit on teh 22 any more. BUT, if you had a 22 pattern, made the holster, and then formed it with the 27, you'd be fine -- this is my point. -
That actually doesn't look that far off. The circles would be a combination of foot pressure and "smooshy" leather (probably not possible to entirely eliminate this effect). Beyond that, the holes look quite large for the thread... try larger thread or smaller needle.
-
Any Tips On My First Revolver
JLSleather replied to cleanview's topic in Gun Holsters, Rifle Slings and Knife Sheathes
Nope. You've made 'avenger' holsters before - this one not so very different. A little less 'square' than a rig for a pistol, but .... -
-
Brick And Mortar Store Start Up
JLSleather replied to Cowboymade's topic in Marketing and Advertising
I wouldn't sell "out of " any store that wasn't mine. Between the shipping companies, the tax guys (plural), and the welfare recipients, there are more than enough people getting a 'cut' already. -
Looks like maybe a little 'fuzzy' at the top (or just the pic?), but the color looks pretty good, stitches are consistent, slots aren't "wollered out' to no end (see a lot of that lately). Overall, I like it (though, I personally WOULD cut the bottom right off there )
-
For what it's worth, these are currently no up to about $20 each. Might be a chance for somebody to pick a REAL mean deal. I think i have most of these, or I'd buy it myself. http://www.ebay.com/itm/21-Blue-Guns-Great-for-Holster-Making-Glock-S-W-SIG-Springfield-Ruger-/141521679987?pt=LH_DefaultDomain_0&hash=item20f3597673
-
Determining Seam Lines For A Pancake Revolver Holster
JLSleather replied to Paramedic04's topic in How Do I Do That?
You made the pattern for the 1911? You've made holsters for revolvers? Okay, now just put the two together You'll find that the "center line" on your 'avenger' revolver holster is so close to the front stitch line on a pancake that it's virtually the same thing. With the python, you have one of the few revolvers that this might vary a bit. But this is due to the "rib" down the barrel more than the cylinder. How long is the barrel on the Colt? How high will it ride? And how wide the belt it fits? Now that you've brought this up, I think I'll do one of these... -
Not sure I understood your last post, but if you just want 'general' info and instruction - particularly for revolver holsters - you can download one of the classics from the library.. should show you all you need to know to get started https://www.leathercraftlibrary.com/p-1119-how-to-make-holsters-by-al-stohlman.aspx
-
You're probably going to need more information. The S/W 38 special was made in frame sizes M, I, J, K, L, and N and at least two others that I am aware of but not familiar with. Most of what we see these days are "K" or "L" frame models, but if you had a model number that would go a LONG way in narrowing it down. Are you looking for the model 10, 65, 586 ... ?
-
I have that one Troy That's the new replacement, close as I could see the one she had. Basically, the name was about all that was recognizable any more on the old one. Personally, I don't care for that stamped look, but that's what they had and what they wanted to replace with.
-
Well, don't know if it's THE one or not, but stick in something close-ish
-
Small Oaks Notebook
JLSleather replied to BearMan's topic in Purses, Wallets, Belts and Miscellaneous Pocket Items
There was a 'doodle page' looked JUST like this,.. where was that.. something from like 1986? Maybe '87... Can't read the publish date, maybe it's on the other side? https://www.leathercraftlibrary.com/p-974-shade-dyeing-with-spectra-shade-dyes-by-glenda-karrenbrock-tony-laier-series-7d-page-8.aspx -
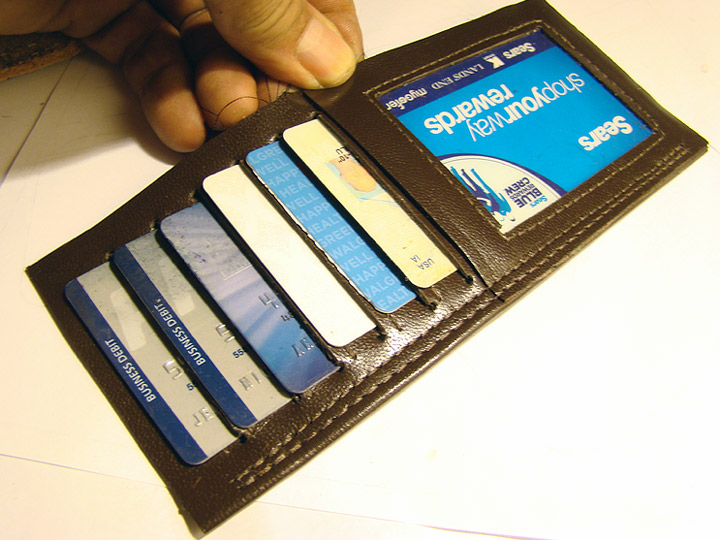
Chubby girl makes these -- this one in 1.5 oz kidskin. One layer, except where the id window is on top, and where it's folded (folded edge is middle of wallet). Every pocket stitched in. Looks great, and keeps a wallet thin. Still, takes a LONG time, requires a pretty small needle (this one in a machine with a #16 needle and 8 spi). Unless you are making ONE every so often, probably cost effective to just call the gals at SLC and order the chaylor interior (stick it and go).

-
HO is going up a bit. 50¢ - ish.
-
Tanners Bond Contact Cement Problem. Please Help.
JLSleather replied to NewYorkerInSydney's topic in How Do I Do That?
It is possible that the glue has gone bad since 2012 when the original post was made. Other than that, I have used and do use tanner's bond. Ordinarily, I use Barge, but I was a bit low and near a Tandy one day, so I currently have some. Gluing lined belts with it all month -- no problems (other than the fact that the stuff really stinks). -
Looks pretty solid.. nice stitchin' too.
-
Cb3200 Breaking Needle Thread In Reverse
JLSleather replied to RoosterShooter's topic in Leather Sewing Machines
that's what I was gonna suggest.. look for some obstruction in the shuttle area .. it grabs the thread, which then twists wrong (because .. duh.. reverse ) and then.. well .. you see -
Need Help Setting Up Cowboy Cb3200
JLSleather replied to RoosterShooter's topic in Leather Sewing Machines
Nope, sure don't. But if the feet lift with the hand lever, then possibly your chain is binding somewhere. -
As a rule, I like to use the smallest hole I can get away with. And I generally would use the 23 with 207 just like you said. Still, not all threads are the same, etc. Since that's such a simple fix, I'd start right there. I mean, if you get too big a hole, and the issue isn't fixed, it's simple to put the other needle back. And yes, 'low' meant the knots. If you've verified it's not the needle / thread size combination, and the thread pulls smoothly from the bobbin, THEN you can turn up the top tension a bit. You already know to make sure that there's nothing keeping the feet from coming all the way down (lever up, chain binding, etc). Point was, don't assume the worst.. it sometimes is pretty simple. I've ran the bobbin right out of thread.. top tension ALL out of whack when that happens.
-
That looks like a tight hole, at a glance. Always always always start with the simplest 'fix'. Not 'sucking the knot' enough means... 1.) Hole too small for the thread size 2.) Too much bobbin tension 3.) Insufficient top thread tension First check the obvious... 277 thread? Then we should have a 24 or 25 needle. Hole size, check. (For 277/207 combo I like the 24 needle, for 277/277, I use the 25). With a tension issue, don't auto assume you need to start compressing springs and moving dials. Is there something in the path of the thread binding or dragging (creating tension NOT related to a setting). Is the thread coming off the spool smoothly (this seems obvious, but really). Pull the bobbin thread with a thumb and finger.. can you pull thread smoothly? Is the bobbin in the machine so that thread spools off the bobbin the right direction? This seems like no big issue, but it really can make a difference. Your bottom stitches look fairly consistent. They're consistently too low, but consistent. Point is, if there was something binding the thread, usually there's a more erratic look to it. Probably not the issue here, but I'd still check that (takes seconds). How to fix this issue, this time -- first GUESS, I'd try one size larger needle.