camano ridge
-
Posts
1,907 -
Joined
-
Last visited
Content Type
Profiles
Forums
Events
Blogs
Gallery
Store
Everything posted by camano ridge
-
STRUCK THROUGH: The dyeing of leather can be controlled by the manufacturer to either fully or partially penetrate it. Since full penetration requires more dye, leather that has been fully penetrated is more costly to produce than leather that has only been superficially (the flesh and grain surfaces) penetrated. Leather that has been fully penetrated with dye is known as fully struck through leather. If it has only been superficially dyed, it is called partially struck through.
-
Type Of Leather For Sword Handle Wrap And Other Advice
camano ridge replied to grmnsplx's topic in How Do I Do That?
If you are doing just a wrap. I like shark skin. It gives a good grip and is durable. If you do a search for wrapping a sword hilt in leather you will find some you tube videos that may help. Here is a you tube video that may help this one is wrapping a tennis racket handle but the principal is the same. If you want it permanent I would use contact cement and would coat the handle and the leather strip. <iframe width="640" height="390" src="https://www.youtube.com/embed/Re7BnG0bRs0" frameborder="0" allowfullscreen></iframe> -
What kind of tools are you looking to buy? All most all of us own some Tandy tools even if some won't admit it. The older tools are better in most cases. However there are tools from Tandy work just fine. Some stamps are of. Try them out at the store before you buy to make sure it makes the impression you want. However there are other places to buy tools, GoodsJapan, there is another one I can't think of right now. I am sure some one else will mention it. When ordering from others on line you need to ask for the brand as some places carry tandy tools. If you have the money to spend you can't go wrong with Barry King, Jeremiah Watt etc.
-
Type Of Leather For Sword Handle Wrap And Other Advice
camano ridge replied to grmnsplx's topic in How Do I Do That?
Is this going to be wrapped over a wood core? Will the leather be wrapped in wire, or will it be a straight leather wrap? -
1/8th inch should be good. When I do copper rivets I use a set of nippers and set the end flush against the leather. I do not cut the rivet off in one cut I will take a partial cut then rotate the cutter around the rivet a little and take another cut and continue to do that until I have gone all the way around the rivet before taking the last cut. This leaves a pointed or pyramid end that domes nicely. When using your setter put the burr over the stud of the rivet place the hole in your setter over the stud and tap it down until the burr is set firmly against the leather. I have noticed that some setters have a deeper dome that makes it harder to dome the rivet The shallower the better at least for me. Careful on leaving to much of the rivet it may bend instead of dome. Make sure you have an extremely solid surface like an anvil or a concrete floor behind your rivet when peening it. I would go ahead and get a ball peen, you can get a whole set of them for around $10.00 at harbor freight.
-
Trying To Get Started Having Some Issues
camano ridge replied to Obeliske's topic in Getting Started
Obeliske, not sure what kit you bought, does it not have a stitching groover, awl and overstitch wheel . That is what you need for stitching unless you want to use pricking irons. Here is one group of patterns http://leatherworker.net/forum/index.php?showtopic=46571&hl=armor&page=10 go to post 135 to down load the pattern pack. Here is a downloadable book with armor patterns. I believe this guy has come out with a second book with more patterns. www.lederkraft.com/freebook If you search the forums here there are patterns for different pieces of armor, however it takes a while to search through all the threads asking for patterns. DO you have a style or period of helmet you are looking for? -
Tallbald, Ryan's sport does have some good prices, however watch there shipping costs. It can be fairly high on small quantities. a handfull of Chicago screws - $16.00 for UPS ground. They would not even tell me what priority mail would be until they were ready to ship.
-
I think he accidentally did a double post. The other post he is asking for ideas for a sheath to carry it in. Here is his other thread http://leatherworker.net/forum/index.php?showtopic=65220
-
I would dye first then oil, let sit at least 24 hours to give the oil a chance to migrate through the leather.
-
Perhaps instead of looking at specifically holster variant you might want to look at knife sheath variant. Since in shape your tool and a knife have more similarities. Here is a tutorial on a Mexican Loop knife sheath easily adaptable to your pin pointer http://www.wrtcleather.com/1-ckd/mexloop/_mexloop.html For more ideas google knife sheath pictures. Also pancake knife sheath and pancake multi tool holder.
-
do you have a picture or drawing of what you are looking for?
-
Old Leather Tools Beard-Gore-Hack Barth-King Etc
camano ridge replied to Junkyarddog's topic in Leatherwork Conversation
To buy a lot of the Beard tools new will cost you more then $50.00 each. Trust me I just bought some from Robert. The Barry kings tend to run about $40.00 and up for new. If you are intent on selling some of them I would suggest listing there numbers as well as a picture of an impression of each stamp. There may be several of us on this sight interested in buying some of those stamps. -
The WIll Gohrmely Cheyen Pattern Pack has that tooling pattern. The pattern pack is about $9.00 on line more expensive if you order directly from Will.
-
Where are you located?
-
Andrews You Tube Video
camano ridge replied to Red Cent's topic in Gun Holsters, Rifle Slings and Knife Sheathes
It was in another thread -
1938 22 Holster Question
camano ridge replied to cleanview's topic in Gun Holsters, Rifle Slings and Knife Sheathes
Heiser saddlery was in business from 1858 to 1955. Denver Dry Good Company bought them out in 1947 and continued to use the logo until 1955. Anything is a collectors item if you find some one who wants to collect it. Look on some of the auction sites. I frequently see Heiser holsters for sale. Here is one http://www.gunbroker.com/Auction/ViewItem.aspx?Item=495633561 -
1938 22 Holster Question
camano ridge replied to cleanview's topic in Gun Holsters, Rifle Slings and Knife Sheathes
The Heiser Saddlery Company was in business from 1858 to 1955. It was bought out by Denver Dry Goods company in 1947, they continued to use the Heiser logo Until 1955. That holster looks 1900's. Anything is a collectors item if you can find someone that wants it. Look on some of the auction sites. I frequently see Heiser holsters on different sites. -
I think it is best to order over the phone direct. I have ordered on line and still ended up making phone calls to make sure I got what I wanted or that it was definitely in stock. I have had experience where their online store said they had it in stock but it ended up they did not. Everything I have ordered has been what I expected. The only negative comment I have is that I believe their shipping cost are a bit high especially on smaller things. There is no reason shipping should be $16.00 on a nine dollar pattern pack.
-
Gun Not Included With Holster.
camano ridge replied to GaryNunn's topic in Gun Holsters, Rifle Slings and Knife Sheathes
Even if people did not automatically think that the gun was included. There are people that would take advantage of no disclaimer and insist that you led them to believe that the gun was included because of the picture. -
If you do a search you will find this has been discussed before. Most people don,t have the equipment to do it. Unless you are doing several hydes the cost of the amount of dye to put into a vat or drum would be expensive and probably out weight the cost of just buying drum dyed sides. I think it was David L on these forums that was looking into growing his own hydes on the hoof and then drum dying hydes. Not sure howe far he has gotten with any of it.
-
Like Kings X says if you do a search for inlay stone in leather you will find several. Here is one to help you get started http://leatherworker.net/forum/index.php?showtopic=26568&hl=%2Binlay+%2Bstone+%2Bleather#entry167111 It includes links to a few other threads.
-
If it is veg tanned and has not been pre loaded with waxes and or oils, or have a finish on it can be wet molded.
-
onlyoblicion, here is a tutorial that may help you. This one does not use a stacked welt. http://www.northcoastknives.com/northcoast_knives_tutorials_LeatherSheath.htm
-
Sorry, pictures are now posted on previous post.
-
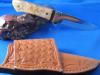
On any knife sheath you should have welt to protect the thread. On this knife I would use an additional piece about 2 -21/2" long (depending on how deep you want the knife to sit in the sheath. It should be tapered. If you are concerned about putting holes through thick leather poke all your holes on the front of the sheath first then glue the welt on and repoke the holes then add the tapered piece repoke the holes in that section then glue to back of sheath repoke holes and stitch. Wet mold to suit. Here is an example, you can't see the welt real well I will see if I can find a better picture. The sheath in the picture is for horizontal or Scout carry. The other way is to use a single layer welt, when drawing your pattern leave a little extra leather in the area of the guard. Then wet mold the sheath pushing the knife into the sheath and shaping the top of the sheath around the knife handle.