camano ridge
-
Posts
1,907 -
Joined
-
Last visited
Content Type
Profiles
Forums
Events
Blogs
Gallery
Store
Everything posted by camano ridge
-
I am confused are you asking for Medicine ball or medicine pouch or both? Here is a tutorial for medicine pouch that might help. http://www.sterlingsculptures.com/Resources_folder/Pouches_folder/Pouches.htm
-
Belt Slots
camano ridge replied to paris3200's topic in Gun Holsters, Rifle Slings and Knife Sheathes
Can you show us a picture? We can then see if there is a tip we can give you in making them look better. -
Do You Make One Product At A Time?
camano ridge replied to DavidL's topic in Leatherwork Conversation
I always have several going at a time in different stages.I will usually cut one out do what I need to before dying then dye it I let it dry for 12 to 24 hours. While it is drying I will make a pattern or cut another or stitch one, depending on what I have and in what stages. When it is dry I will stitch the mouth and toe if applicable, then glue the main seam, again allowing 12 to 24 hours drying time. It will also depend on how many projects I want going at one time and what else I have on the agenda that may take time away such as Dr.'s appointments etc. -
Homemade Electric Burnisher ... What Do I Need?
camano ridge replied to RoosterShooter's topic in Leather Tools
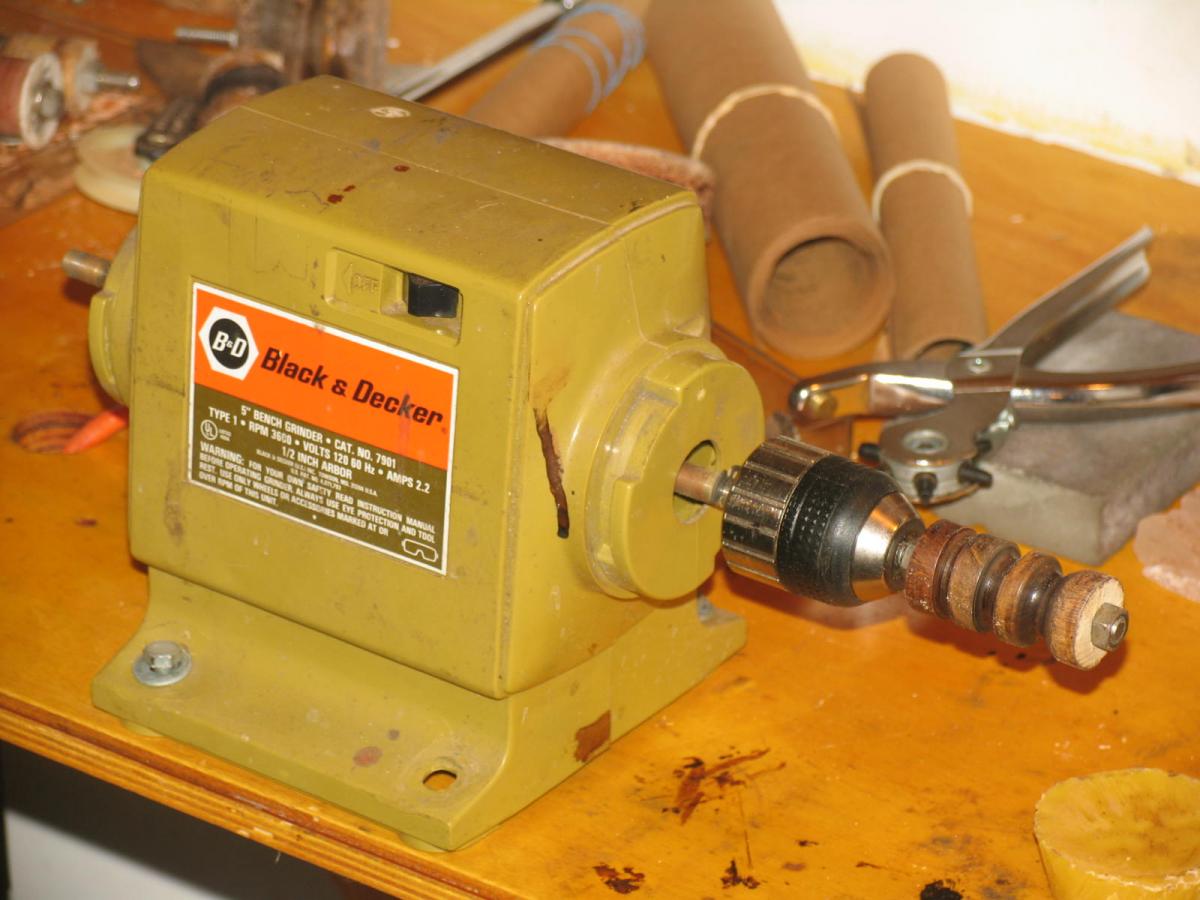
Rooster, go to Lowes get a key-less drill press chuck. It will fit on your arbor and you can easily change burnishers or what ever you want to put in the chuck. You can eve get one for each side. Here is a picture of that type of set up Red Cent posted the other day on another thread.
-
Looking For Specific Hardware Can't Find It Anywhere!
camano ridge replied to bylinesupplyco's topic in Suppliers
The Buckle Guy sells solid brass line 24 snaps that I believe are close to what you want. http://www.buckleguy.com/line-24-snaps-cap-15mm-ring-socket-natural-brass-s15b51ln-solid-brass-100-per-bag/ The Buckle Guy also has what are advertised as Solid brass rivets. No idea how thick the heads are, however they are good people and helpful if you give them a call. http://www.buckleguy.com/double-cap-rivets/ As to the name embossed on the snap, SX Industries says that they do that, however I am sure there will be a set up charge and minimum quanity. -
vdy, welcome to the forums.
-
Like was said above, Niegel will give you great information stitching and pricking irons etc. Also check out Stohlman's book the Art of Hand Stitching. You may be using to long of a rivet for the thickness of your project. Make sure you have the appropriate setting kit for the type of rivets you are using.
-
That is pretty impressive for only being in leather for 5-6 months.
-
Gluing Rawhide To Leather For Cowboy Holster
camano ridge replied to bushpilotmexico's topic in How Do I Do That?
Looks pretty nice. -
LoneWolf some people start out making a holster as their first project. Looking at your facebook page it looks like you have a several projects under your belt and have some good basic skills. You should be able to make a holster. There will be a learning curve just in terminology and getting exactly what the customer wants. You will need to know make and model of the 1911. Also you will need the gun or a holster mold. I have sent you a PM
-
Took my first wood shop class in Jr. high about 1965-66. Been dabbling in woodworking ever since.
-
Thanks for the number.
-
ignore, I'll be back later
-
ignore
-
Wrightcamp, that does look close. Although the one in the border looks a little more tear drop shaped for the arms or pedal or what ever you want to call them. Now if I could only find one.
-
Everybody develops there way. Your method is used by some others use other methods. I myself use a groover then mark my holes with an over stitch wheel then poke each hole with a diamond awl. Its not one way is better then another it's what works for you. I have one of the Costco vacuum sealers. the texture is only on one side of the bag, so when I insert my holster I make sure the front of the holster is against the smooth side. The texture wil imprint on the back side but it is a light diamond texture and on the back of the holster not a big deal.
-
Figure where your stitch lines will be then bevel the inside of the mouth and toe between the stitch lines. If you bevel the inside edge of the pieces that get glued and stitched together you will end up with a groove in the middle of your edge. I found that out the hard way along time ago.
-
Now next question to thread size, are you hand or machine stitching, what thread are you going to use. Tiger thread is flatter then the rounder poly thread from Tandy etc.
-
Well I am not saying that this was not a decent holster for your first attempt, because it is a decent one for the first. Just pointing out some things for the next one. When you do the next one try to remember to bevel the edges of the mouth of the holster and the toe before assembling then to the main edges after you have put the holster together.
-
Carson, welcome. While i am definitely not a teen, there are some on here and I am sure they will find you. We would really like to see some of your work. Especially the dress shoes, for only doing leatherwork for 5-6 months that is quite the undertaking.
-
Do you have a picture of the #844 stamp? I can't find one on line.
-
If you are trying to make a flat back holster, my suggestion is to wet form the front first. Tape your gun down to a flat board or surface. Get your piece of leather pretty wet (make sure your piece of leather is big enough to cover the gun and allow plenty of room for shaping. Now press the leather to the gun forming it to the gun. Let it sit for a while to loose some of the moisture content. now form it some more as tight against the gun as you can. Mark your approx stitch line and put some push pins through the leather and into the board. This will hold the leather in place while it dries. Let dry, after a couple of hours pull the gun out and let the leather dry completely. Now cut to shape mark your belt slots and place over the piece of leather that will be the back. Outline the shape of the holster onto the piece that will be the back. Cut the back out and assemble. If it is a lined holster you will want to stitch the mouth and the toe before assembling. You stitched the mouth so I assume it is a lined holster, however I don't see a stitch line across the toe of the holster. I would suggest beveling and burnishing the edges a little more. No offense but in the picture of the toe opening of the holster it looks like the leather was cut with a coarse blade cross cut saw. The weight of leather should be fine most of mine are 8-9oz, if lined 5-6 with 3-4oz. As to the fingernail marks everyone learns that the hard way. Trim the nails and watch where and how you are placing your finger tips when working the leather.
-
What is your project, how big etc. A picture would be worth a thousand words.
-
I Am In Need Of A Few Basic Beginner Patterns
camano ridge replied to dm110's topic in Patterns and Templates
Check out Tandy Leather Craft library on line. http://www.leathercraftlibrary.com/ There are several free patterns, the premium subscription you can sign up for 1 month for $9.99 gives you access to many how to videos. . Do a search on these forums for tooling patterns. Also do a search for Acorn and Oak leaves. You will find some patterns as well as a tutorial or two. -
Yes, Neatsfoot will darken your leather. One important thing when using Neats Foot is once it is applied let the oil sit and migrate through the leather at least 24 hours before doing anything else. As the oil migrates through the leather it will even out and lighten up some. I often use just the oil and then tan it in the sun to get nice color without dying. Always put the Neats foot on in light coats. I just do what i call finger tip applications very light coat and let sit .