camano ridge
-
Posts
1,907 -
Joined
-
Last visited
Content Type
Profiles
Forums
Events
Blogs
Gallery
Store
Everything posted by camano ridge
-
Muzzleloader Pistol Pouch Holster
camano ridge replied to keplerts's topic in Patterns and Templates
Keplerts, that looks like it turned out well. If you get a picture from the customer with the muzzle loader in it, it would be great if you could post it. Thanks for posting the pattern. For those that may want it it would be better if you could scan and save it as a PDF file then post the PDF. As it is it prints small size as a picture. -
First Holsters
camano ridge replied to thejaxxxon's topic in Gun Holsters, Rifle Slings and Knife Sheathes
To mold get the holster good and wet inside and out. this only takes a couple of dunks or hold under the faucet getting all areas wet. The holster should feel fairly pliable. Insert the gun or holster mold into the holster start using your fingers and thumbs to push leather against the gun, you will start to see some shape start to take place, I let the holster rest and dry a little then start again when you get most of the shape you can get more defined lines using tools such a modeling spoon etc. If you have a close enough stitch line you should have to pretty much force the gun into the holster and you will already begin to see the shape and some of the contours of the gun just keep working from there. Do the molding before or after dying but definately before putting any finsh or sealer on. As to locating the stitch line there are several methods. Here is a little tutorial that may help you. This is just one way of doing it. http://leatherworker.net/forum/index.php?showtopic=35904&hl=%2Bmarking+%2Bstitch+%2Bline+%2Bholster -
First Holsters
camano ridge replied to thejaxxxon's topic in Gun Holsters, Rifle Slings and Knife Sheathes
A couple of things. It looks like you tried to mold them a bit. Stitch lines look like they need to be moved closer to the gun. The holster will loosen up pretty quickly with use. You said you want to darken the holsters without loosing retention. Did you wet mold them and then dry with a little heat. If you have a good firm holster you should be able to apply a light coat of Neats Foot oil, or Olive oil then lay in the sunn for a nice tan. Depending on how dark you want them you can dye them without any effect to the retention. A suggestion, I usually find it much easier to burnish the edges of the open toe and the mouth of the holster before stitching together. -
Where in Canada are you located?
-
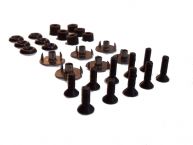
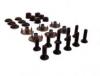
Like Twin oaks said you can get pretty much everything you need at a hardware store or one of the big box stores. Below is a picture that shows pretty much every thing you need. If you don't want to collect everything you need you can get what you need from Rob Bennett the bluegunstore.com. Index fastners http://www.ifithermoplastics.com/category/fasteners also has everything you need.
-
Jim posted a PDF of holster tooling patterns on this thread http://leatherworker.net/forum/index.php?showtopic=61196
-
Jim, great read. I am curios, did Ogg get the file in drawing 2 figure A at Cave Depot.
-
Avenger? Mag Holder
camano ridge replied to rundogdave's topic in Gun Holsters, Rifle Slings and Knife Sheathes
I would sew the loop onto the back piece then stitch on the molded front piece. Are you hand stitching or machine stitching. I your concern is sewing the center seam between the two mg pouches. I would recommend two belt loops one centered behind each mag pouch. This will allow the double mag pouch to bend slightly on the belt and mold better to the body. Stitch both loop on the back first then stitch the molded front on. -
Half Veg Tan Same As Re-Tan? What Are They Good For?
camano ridge replied to jmorton's topic in Leatherwork Conversation
Erystawi, thank you for confirmation. Can't get any closer to the source then that. DavidL is correct re-tanned is leather that usually is veg tanned first then chromium salts are added. -
Half Veg Tan Same As Re-Tan? What Are They Good For?
camano ridge replied to jmorton's topic in Leatherwork Conversation
It is difficult to find a US supplier that has an available and consistent supply of half tanned. Half tanned is tanned partially leaving a raw core. It is predominantly found in Scandinavia. It is a bit more expensive and shipping costs are not cheap. It can be ordered from Brisa in Finland. IT works quite well for Scandi style sheaths. -
Recommended Drive Punches...and How To Sharpen Them?
camano ridge replied to SantaFeMarie's topic in Leather Tools
Almost all tools from Tandy that have an edge for cutting need sharpening out of the box. Try sharpening the edges a little. Punching through the leather with just one hit will depend on thickness of the leather and the leather it's self, not necessarily the tool. I rub the out side of the punches with a little paraffin wax this helps when you with draw them from the leather. -
First Fixed Blade Sheath
camano ridge replied to DTrap's topic in Gun Holsters, Rifle Slings and Knife Sheathes
I make a fair amount of sheaths. When you are doing one for a knife with a guard you do want it built up so that the knife lays flat on the sheath and not push against the belt loop. Not all of what you see on Dtraps sheath is actually welt. I am making a sheath that will have similar thickness in part of the sheath, there is the back piece the will also form the belt loop then there is another full length piece of leather to build out from the back of the sheath. On the one I am making the guard is fairly wide so on top of that piece I am adding a wedge to get the thickness I need. On Dtraps he said he does not like the wedge look, that is personal preference. Then on top of these pieces is the welt usually a thickness equal to the thickness of the thickest part of the blade, then the front piece of the shelf. If you are using 8 - 9 oz leather that adds up pretty quickly. Dtrap your inlay and overlay look pretty good as well. -
Simple Holster
camano ridge replied to Bryan M's topic in Gun Holsters, Rifle Slings and Knife Sheathes
Here is a picture of the Bianchi Foldaway. pretty similar design. This picture shows the back side. When I said based on the Bianchi Pattern I should have said similar to the Bianchi pattern. I don't know which came first. I was just noting that they are similar.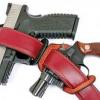
-
Simple Holster
camano ridge replied to Bryan M's topic in Gun Holsters, Rifle Slings and Knife Sheathes
Looks like it is based on the Bianchi Foldaway. Looks like it turned out fine. -
Josh looks great. I am sure Jim will be pleased with your rendition of the pattern.
-
Thanks for the information.
-
Wow, very impressive. What brand paints are you using?
-
Great read Jim, thanks for sharing.
-
Best Method To Cut Internal Holes And Finish The Edges
camano ridge replied to jshill's topic in How Do I Do That?
I picked up on ebay some small edge bevelers pretty cheap. http://www.ebay.com/itm/U-V-Shaped-Stitching-Groover-Skiving-Edge-Beveler-Leathercraft-Leather-Tool-Kit-/181473645114?pt=LH_DefaultDomain_0&hash=item2a40ac123a They will work for the small area. Be careful they are sharp and can remove a fair amount of material quickly. As to burnishing the inside edges, get a small diameter hardwood dowel sand different sized grooves into the dowel. Now either rub the dowel against the edges by hand or chuck the dowel in a drill motor and burnish the edges. -
I also have the Tandy one and it does work great. However if you need different sizes. You can easily make your own from conduit. Do a search on these forums, I think dwight has kind of a tutorial on how he makes his. I will see if I can find it and post later.
-
Holster For A J Frame Sw
camano ridge replied to DannyBoyCustomLeather's topic in Leatherwork Conversation
Yep your right, That front sight would definitely make things a little tight. Depending on your construction (pancake etc. and how tight your stitch line is you could possibly stretch it enough. However it sounds like you have already decided to not re do. You will find it happens occasionally even if you have a blue gun. Scott -
Holster For A J Frame Sw
camano ridge replied to DannyBoyCustomLeather's topic in Leatherwork Conversation
The 60-15 is a J frame with a 3" barrel. So the answer is yes as long as you take into consideration the 3" barrel and full length ejector shroud. The frames are the same. -
Muzzleloader Pistol Pouch Holster
camano ridge replied to keplerts's topic in Patterns and Templates
Find out the brand make and caliber. Not sure what he means by standard size. there are many calibers barrel lengths brand, round barrel octagonal barrel etc. Also is his percussion or flintlock I will post rough sketch of how that holster is put together it is two pieces The piece Piece that goes on the belt forms the back of the holster front is a piece that is stitched at the top of the holster back then folded over the pistol and sewn to the bottom edge of the holster back. Not sure that is clear when I post the sketch it will be a little clearer. -
Muzzleloader Pistol Pouch Holster
camano ridge replied to keplerts's topic in Patterns and Templates
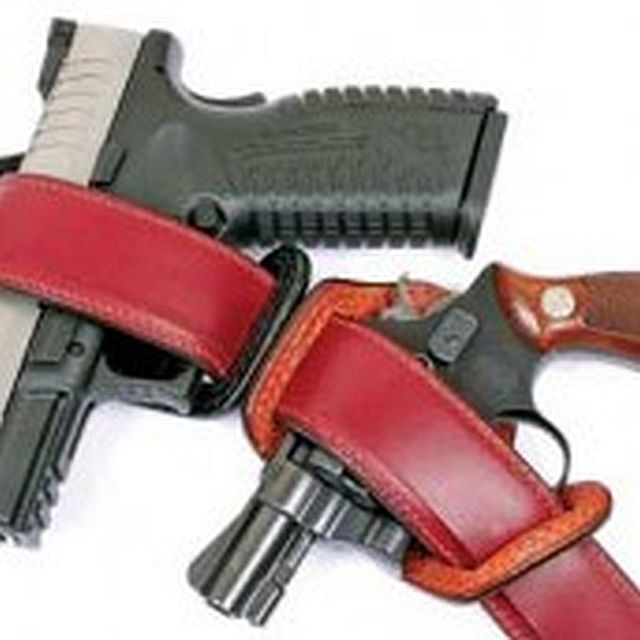
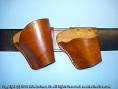
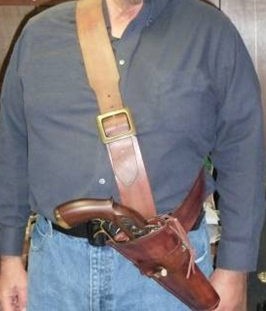
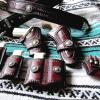
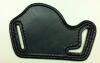
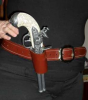
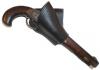
Keplerts, I have made them but have not seen patterns for them. They can be made very basic or get as fancy as you want. You can go very basic cut an L shaped piece of leather with the bottom of the piece large enough to wrap around the pistol and the top of the L large enough to wrap around the belt. Wrap the bottom around the pistol mark where you want to rivet or stitch, trim accordingly. Fold the top of the L over the belt mark where you want to stitch or rivet. Below are some examples. The last picture is one I made for a monster of a muzzle loader with a baldric to carry the holster.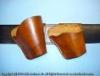

-
First Pair Of Work Boots
camano ridge replied to Tim Schroeder's topic in Shoes, Boots, Sandals and Moccassins
Very impressive. They look great.