Ferg
-
Posts
2,274 -
Joined
-
Last visited
Content Type
Profiles
Forums
Events
Blogs
Gallery
Store
Everything posted by Ferg
-
It mounts to a machine that has heat platen with pressure. That size roll was used on a pretty good sized unit with a platen of probably 8 or 10 inches square. There is a flat metal plate with a silicon rubber mould/die in the shape of the finished product. Can be used to emboss names, logos most anything similar to that onto leather plus many other types of substrates. We had one for about five years. Now you know more than you wanted to know. LOL ferg
-

Scottish Thistle Tape Measure
Ferg replied to MHolzer's topic in Purses, Wallets, Belts and Miscellaneous Pocket Items
Bruce, I agree with most of what you have to say. I know that some times I lean a little heavy but praising what is really bad doesn't help anyone get better. The gentleman knew his work was pretty bad, I simply saw no reason to tell him it was okay. I have stated before that I have had my own business since I was 18 years of age. That included Radio and TV repair, Building and remodeling fine homes and industrial buildings as well as building commercial cabinetry. I cannot think of a man or woman I ever had working for me saying in later years that how I taught them was wrong. I was director of a 32 member singing group for five years. We traveled all over Ohio and Indiana. What is your reaction to a singing or instrumental group that is lousy. If they couldn't stand the heat they just stayed home. Some times constructive criticism is harsh. ferg -
Squeek, Squeek, Squeek...hoping This Isn't Permanent
Ferg replied to stanly's topic in Leather Sewing Machines
I assure you this is "A Miracle in a Can". The spray can lubricant I use is the MK-30301-12. They make a fuel additive and the Hyper Lubricant, probably some others, these are the ones I have used. We have a '92 Olds '88 that doesn't get driven often. Last winter it wasn't running too great so I put the oil additive and fuel additive in it. Took one day for the car to sound like a new vehicle. I use the spray or the oil additive on hand tools. We have a 10 horse Vacuum Pump on our CNC machine. This thing uses a ten gallon tank for hydraulic fluid. I put one quart of the additive in it and it smoothed it out like honey. When you change your oil in a car or truck you add 2 ounces per quart. It will not overflow the crank case no matter how much you put in it, within reason of course. Only need to add the additive about every third oil change. We have a large sliding table saw. I have , before MotorKote, used several different lubricants on the bearings in the slides. Needed to re-lube at least once a week. I applied the spray one year ago and have not lubed again. Back to the sewing machines. I check the rod in mine every day. No residue, accumulated dirt, gum or anything else, it moves without hesitation. They have a special on for the remainder of this month I think, don't remember the discount but it is worth it and they do not charge shipping. Please understand: I do not represent the company in any way. Simply a very satisfied customer among thousands. Forgot to mention, I don't know that there is a statement on the product saying explicitly, "Satisfaction Guaranteed" You won't be disappointed. They are good people, I am sure if you have a specific problem with any of the products they will be more than happy to work with you. ferg -
New Westren Holster Project
Ferg replied to goodfella's topic in Gun Holsters, Rifle Slings and Knife Sheathes
Looks to be a very good grade of leather, simple, clean design with no clutter. The Ranger Belt Design is an eye catcher where ever you go. Nice work. ferg -
I especially like your designs and quality of workmanship. Herman-Oak or W&C? That is a great looking piece of leather with a great color and finish. Did you stitch after stamping your edge? ferg
-
Scottish Thistle Tape Measure
Ferg replied to MHolzer's topic in Purses, Wallets, Belts and Miscellaneous Pocket Items
I am sorry. I have a hangup on hand crafted product that is sold or given to friends that is sub par. I done Stained Glass for a number of years and was simply appalled at what is being sold as great work when it stinks. I have thrown away more product than some folks make over the years, simply because I didn't think it met standards I placed on my work. Strive for excellence in what ever you do, even if it means your friends and family won't get to even see what you done when starting out. Just trying to be helpful. ferg -
Scottish Thistle Tape Measure
Ferg replied to MHolzer's topic in Purses, Wallets, Belts and Miscellaneous Pocket Items
I am not trying to be hard on you BUT. If I was going to give someone a gift of what I done, it would be at least the second of these. This is pretty bad. ferg -
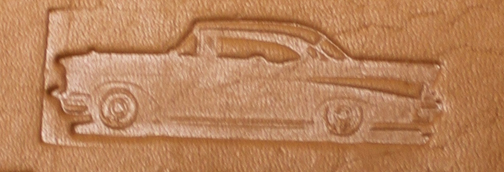
The photos included are of a test piece I done. Sorry I don't have any of the stained pieces available for taking photos. This is Veg tan natural with a couple applications of Neat Lac. The image of the 57 Chevy is 2" long. That should give you a reference for the other images. Sorry for the bad photos. That is what you get when in a hurry.
-
I will take some pics and post them this evening. ferg
-
If you have a drill press use a piece of steel 1/4" thick or aluminum about 3/8" thick on top of the printing block. Lower whatever you have chucked into the drill press in the center of the printing block. It will take steady and ample pressure but it will work. ferg
-
No, they don't have handles. Some have a block of wood attached to the metal printing plate. ferg
-
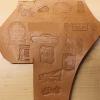
We browse antique shops in the summer when we have nothing better to do on a Sunday afternoon. A number of them have old Printing Press advertisements etc. many of them would be in the Public Domain. These are lead, brass, steel, copper, aluminum, some with wood tops. I have found images of cars, tractors, heavy equipment, Christmas images, you name it. I place them on leather wrist bands and other items. Antique the leather. The various images are beautiful and I don't know of any leather shop that carries them in stock. I place a clean heavy piece of material on the drill press table, lay the leather on that, place the icon where I want it, lay a hard piece of wood on top and press down with a character stamp handle chucked in the drill. Some of you might like to try it. ferg
-
If you have a drill press of at least 1/2" capacity you can "soft chuck" most any of the stamps into it and just move the handle to bring the chuck with the tool down to the leather pressing reasonably hard, Presto you have a stamp machine. BTW: Don't turn the drill press on while doing this. ferg
-
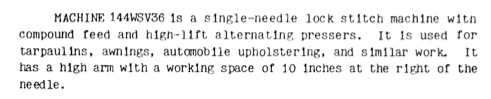
I like to find info that folks say they can't find. Value appears to be all over the place topping out at about $900. Here is the manual for it. Description: singer144WSV36_WSV37_WSV38.pdf

-
That nasty old flakey paint can get into soft places in the leather, I would clean that off first. Anything you use to cut leather can benefit from a stropping. Make sure you hold the tools so the cutting end is away from you, pulling towards you. Roll the punches in your fingers as you dress them. ferg
-
Could be mould. Since you wish to use what you may have in the house...... Is there a bottle of white vinegar? If so mix a solution that is one part vinegar to 3 parts water. BTW: I am giving you these instructions with the idea the leather probably isn't usable anyway so trying this cannot hurt. Dampen the leather with a little warm water in a sponge or soft wash cloth. Use the sponge with the solution and rub lightly on the entire piece. May remove it and may only remove part of it, be patient. It may take several applications. When finished rinse with warm water and allow to dry to workable shade of your leather before anything else. ferg
-
I am guessing it might be a upholstery/canvas machine. Doesn't look like a leather sewer. If there is a model number on it anywhere GOOGLE. There are literally millions of Singers out there and lots of information on them. ferg
-
Squeek, Squeek, Squeek...hoping This Isn't Permanent
Ferg replied to stanly's topic in Leather Sewing Machines
Before I tell you what I have used I want to inform the many professional sewing machine people that I have tried this and in two weeks I see no buildup of dirt etc. There is a product called "Motor Kote". It was formulated for use in Semi Tractors and most anything that turns or has a motor. I put it in everything I own PU truck, cars, sliding table saw carriage, etc. They now have the product in a spray can. The feet on my machine began "Hanging Up" when I pushed on the knee lift. Determined it might be the foot lift rod. I oiled it regularly with little result, lightly sprayed it with Motor-Kote, it has been working perfectly ever since. BTW: The product is available at Meijer's if you have one and a number of truck stops. They have a web site: https://www.motorkote.com/ with free shipping. ferg -
Please reduce the size of your photos so we can actually see what the entire machine looks like. ferg
-
I have bought an old splitter. Unfortunately it hasn't been delivered yet so I am at a loss as to good information for you. This is a crank splitter and from what I have found out, you don't want a "Hand Pull through" splitter if you intend to do much splitting. My splitter was intended for splitting shoe sole leather but "Wiz" has checked it for me and it does a great job of other leathers also. Will post when I receive it and try it out. ferg
-
How 'bout using Pig Skin? That is the pattern/texture on a football. ferg
-
As has been said, "Read all posts on this site that pertain to what you are interested in." This site is very much like an Encyclopedia of Leathercraft. Also: If you have a Tandy store near you, visit and ask the folks working there many questions, check out the many information books they have. If you don't have a Tandy store close to you by all means visit their Web Site. There are many retailers that advertise on this site also. Tandy is a great place to begin. ferg
-
Very nice. Nice design and tooling. ferg
-
Eeww! What With My Glue?
Ferg replied to blkbd's topic in Dyes, Antiques, Stains, Glues, Waxes, Finishes and Conditioners.
I remove the brush inside the can as soon as I get the glue. Haven't noticed any problem with a little rust, it does discolor the glue a little. ferg -
Visit this web site: http://www.warner-criv.com/ Search for black patina on copper. If they don't have it there are other Stained Glass companies, just GOOGLE. ferg