Ferg
-
Posts
2,274 -
Joined
-
Last visited
Content Type
Profiles
Forums
Events
Blogs
Gallery
Store
Everything posted by Ferg
-
Hi Mary, You need the 135 x 16 needles for leather. I am enclosing a chart for needle sizes in reference to thread. Your machine will handle #207 thread but makes it work hard, #138 is really the largest unless you modify your machine and/or stitch one stitch at a time. ferg
-
First stop? A Tandy store if you have one close by. They will instruct you and have classes. You can buy a starter set of needed tools. Please do not get the idea that leather crafting is a cheap craft to get into. Once the leather bug has bitten you, all brevity is off. If you are married, brace yourself for an uphill climb when you see a tool or book you simply must have. Al Stohlman books are fantastic for beginners. "Tech Tips" and "How to carve leather" are just two of them. ferg
-
Shelly, We manufacture an item, not leather, in our family business. We sell strictly wholesale and have for 35 years. I take every movement made to make the product, time it. Every item of leather plus a percentage for waste, electricity for lighting, insurance, absolutely everything. Total those costs and realistically figure the number of items you can make in say, 8 hours. Being a family business we figure $25.00 per hour. Now you know how much it costs for each pair of straps. Take one half of the total costs, add it to the cost, add 10 percent of that total for profit. That is the way we do it. There are definitely other methods. This has worked for us for 35 years. We are living our fruits of the labor in our beautiful Log Home for the last 16 years and I hope a lot more. ferg
-
Now, you see you have your method and I have mine. Yours works for you and mine for me. I have tied off the thread and I have glued the tips with super glue. Some folks burn the ends. For you to say that tying off by hand is the correct practice simply is not necessarily true. I will continue to use the leather needles no matter if I reverse or not. I agree that you can sew leather with a round point IF you use an oversize needle. Personally I don't like a thread hole that I can drive a truck through. Simply like what I get with a leather needle. I am glad you like the round point but don't try to convince me that your way is the best, it just works for you. ferg
-
One of my daughters is a Caregiver. None of our family would have thought she would be one to do this, she loves it. We are proud of her. ferg
-
I think you done a very good job on the edge, especially since you hand stitched. Nice color choice on the leather and thread. ferg
-

Computer Drawing Software For Making Leather Patterns
Ferg replied to Blackey Cole's topic in Computer Help
Curious to know what the financial damage is on the machine you have. ferg -
Go to this site: http://www.thethreadexchange.com/miva/merchant.mv?Screen=CTGY&Store_Code=TTE&Category_Code=nylon-thread-information to get much information on thread. A must read for many sewing machine beginners. ferg
-
LesNo6, You are giving some tainted information there. Leather point needles are for stitching leather because they cut/pierce the leather so the remainder of the needle and thread can do it's thing. Round point needles are for fabric, canvas, and vinyls etc. If the machine is perfectly timed I would bet the needle will return into exactly the same hole without cutting the thread. ferg
-
Computer Drawing Software For Making Leather Patterns
Ferg replied to Blackey Cole's topic in Computer Help
I am referencing your third paragraph. I see nothing on this company site that would suggest they have a machine that will trace onto leather. The machines are all "cutters". Can you clarify? ferg -
Computer Drawing Software For Making Leather Patterns
Ferg replied to Blackey Cole's topic in Computer Help
Bobby, I have an Epson printer that will print 13 x 18, very handy for making drawings on Vellum. There is always a down side, this particular printer has a thirst for ink. Illustrator makes it possible to draw on any size you wish, dependent only on your monitor size. Simply print the actual size you need. My hand is not steady enough to do much drawing by hand. This is where the drawing programs hit the sweet spot. ferg -
I have used the 2oz calf skin for the wrapped edge. Looks absolutely beautiful if you keep your stitches perfectly aligned. I like a slightly different shade of dye on the wrap than body of bag. ferg
-
Computer Drawing Software For Making Leather Patterns
Ferg replied to Blackey Cole's topic in Computer Help
Your wacom drawing can be copied to Photoshop but you must remember, Photoshop is not a designing platform, you need Illustrator to move your drawing from the tablet. You can resize much easier and keep everything in proportion at the same time. There are some less expensive drawing programs, you need to check the specs to see if they will import from the Wacom. ferg -
Normally if it is on 120 volts doesn't matter which wire is to the posts, technically. If you reverse the wires and the hot wire happens to be connected to the case of the motor you will get shocked every time you touch it. If motor is on 220 volts you can reverse the motor by exchanging the two hot wires, leave the ground wire alone. That said: I would bet he screwed up the parts when he put them back in. ferg
-
This company has many fine looking items. You do realize they are in the Czech Republic? ferg
-
Welcome to the worlds greatest Leather site, let's see some pics soon. ferg
-
Hello Gents And Ladies
Ferg replied to smoke10's topic in Gun Holsters, Rifle Slings and Knife Sheathes
Your work looks very nice but I would like to see it all without scrolling, scale your photos down please. ferg -
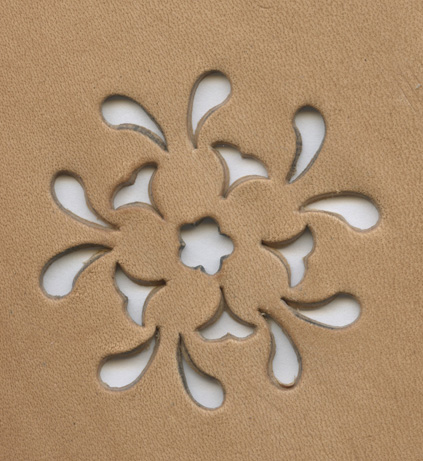
This is a filigree done with shaped punches. You would normally place a contrasting color behind this.
-
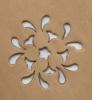
Ladies purse. Horses was fun for a change :)
Ferg commented on Anet du Toit's gallery image in Our Leatherwork Galleries
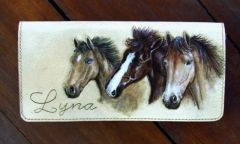 I have/had four brothers and one sister, she was a jewel. You are getting better Anet. This is one of your best. ferg
 -
Seen your other photos of the case. You done an excellent job with the style, pattern, and workmanship. I like your finger cuts also. ferg
-
Making Evergreen (Spuce) Type Trees In Leather?
Ferg replied to jestermg's topic in How Do I Do That?
I downloaded a couple of the doodle pages. I remember some of them many years ago were very enlightening. Unfortunately, the ones I have seen are not so. The book I mentioned above is still the best $15 you will ever spend. ferg -
This may help you. Each ounce of leather is 1/64" or 0.396875mm. Eight ounce leather 1/8" or 3.175mm. Hope this helps a little. ferg
-
Tandy for starters but there are many outlets for the dye. Google "Leather Dye". ferg
-
Making Evergreen (Spuce) Type Trees In Leather?
Ferg replied to jestermg's topic in How Do I Do That?
You need a copy of Al Stohlman book: Pictorial Carving Finesse. This book has many different types of trees and bushes with tool selection and how to use them. The book was written some time ago so there may be some tools shown that are not available anymore. There is almost always a good substitute though. ferg -
Hi Valery, Your English is very good as is your work. Stitching is good, you need to glue the ends of your stitches. Cut the thread as close to the last stitch as possible then put a drop of Super Glue or similar directly on the thread. That will prevent the last thread from coming loose with wear. ferg