Goldshot Ron
-
Posts
405 -
Joined
-
Last visited
Content Type
Profiles
Forums
Events
Blogs
Gallery
Store
Everything posted by Goldshot Ron
-

First Saddle Project - Advice Appreciated
Goldshot Ron replied to rdl123's topic in Saddle Construction
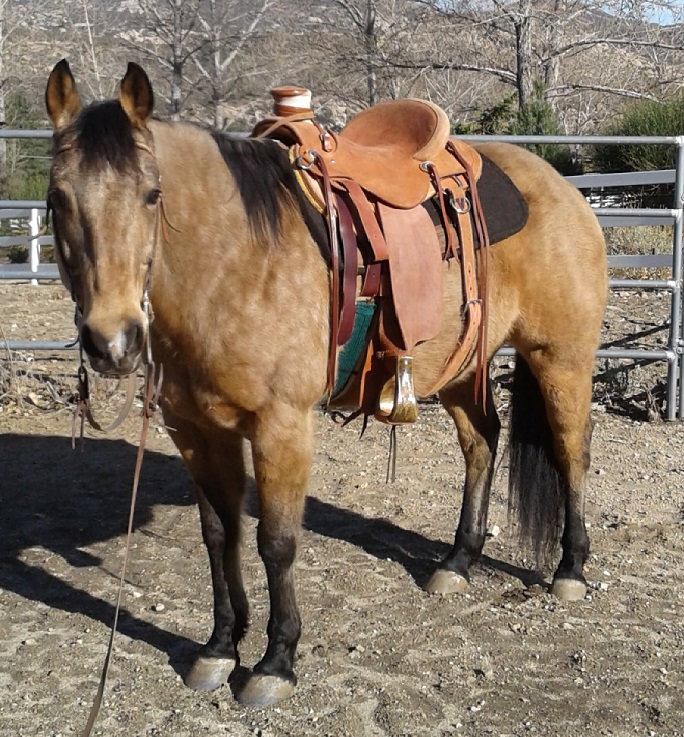
Randy, what you'll find is that saddle pads are only 29 to 31 inches in length. Last year I built a saddle that I thought looked good, and it was based on a design of Pat Parreli's saddle. The skirts were too long for the clients pad and his horse. I ended up making new skirts; and, the finished product now fit the clients horse; but, didn't look the way that I had envisioned. -
Randy, I've used Stohlman's design now for seven years. I've read that his design wasn't level, etc.. So, I parked my horse on a flat place and set a bare tree on her. I took a 3 ft. level and set it on the horn and measured up from the cantle to the level. (It takes four hands, but is do-able.) I then went into the shop and reversed the process on my stand. It wasn't that far off (if at all). However, the modification that I did make was to add some saddle seat foam to the rear of the stand to better simulate a horses loin area, and hold the rear of the bars in a more secure position. The foam does raise the rear of the tree up some, but not 2 inches. Ron
-
First Saddle Project - Advice Appreciated
Goldshot Ron replied to rdl123's topic in Saddle Construction
Randy, Your saddle looks good. A thousand in materials is pretty average any more. I, like you, make about fifty cents an hour. But, it is a thrill to finish a saddle and sit in it for the first time on your horse. Have you worked with leather prior to attempting this first saddle? I think your stamped border looked good. Now, you need to purchase the Jeremiah Watt dvd and get a whole different perspective on saddle making. Ron -
Tom, Think of the preinstalled ground seat as you would your regular metal groundseat. How does it feel on your rear? As Josh said, you need to determine how much build up you want in the front and seat comfort. If you are going to install a padded seat, then that will determine your build up. LaPorte and Chicago Stock Yard trees would require less underlayment than a tree with an added plastic ground seat. Most of the molded trees (Ralide, Laporte, etc.) have dimples in the seat area between the cantle and bars. You need to fill in these dimples, this will require a second groundseat piece to smooth out the bumps. Ron
-
Tie Down Noseband
Goldshot Ron replied to gallopinglitter's topic in Saddle and Tack Accessory Items
Are you looking for a simple noseband attached to a poll strap that fits under the bridle? -
Barry King also makes a concave crowner that works well on small flower petals. As Bob Blea mentioned, a lifter works well on the inside curve. After cutting in the inside and outside curves with these two tools, you can come back with your checkered bevelers to achieve the affect that you're looking for.
-
Older flateplate rigged saddles will have the rear part over the bars laced together. This creates a continuous rigging; however, like Bob, I've never seen webbing or leather over the seat. This would interfer with your stirrup leathers, and as mentioned, it would be in the way of the handhole. Ron
-
Your bags are unique. I think they show that some thought went into their design, and appear very functional. The gussets have worn quite well with this design. Thanks for sharing your work. Ron
-
First Saddle Project - Advice Appreciated
Goldshot Ron replied to rdl123's topic in Saddle Construction
I agree with Bob about redoing the horn if you don't like it. I've recovered a horn three times on one saddle before I got it like I wanted it. When I first started working with leather, I didn't want to waste leather. So I told myself to live with my mistakes, and I'd correct them on the next saddle. It's still hard, but now I redo a lot of my projects until I'm satisfied. Look at the Ray Hunt Wades that Timberline makes. This may be the horn and style that you are looking for. This is a picture of a Ray Hunt Wade tree from Timberline. Best of luck on your first attempt. Ron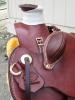
-
Toot, Could you post a photo of your gussets? The seam on the gussets sounds like a good idea. I usually sew the front gusset with an inward seam, then the back of the gusset with a flat outward seam. However, when sewing both seams the same, it is hard to get the gusset to lay correctly. Thanks, Ron
-
You're on the right track with your designs. Keep practicing on flowing your lines into the circle without abrupt turns, practice on more graceful lines. Also, keep your stems flowing in the same direction. The circle on the extreme right has stems or leaves going in opposite directions. I couldn't make out where you attached the flowers to your stems. You need to practice on the transition from stems to the flowers and buds. I don't remember all of Bob's book, but I think that he mentioned "C"s and "S"s. These are the two shapes used in creating stems and flower designs. When you find yourself boxed into a corner with your design, go back to the basics: "C"s and "S"s. As a novice tooler, I often go back to the basics when stumped. One last suggestion, stems of flowers flow out from a central point. So your lines should all flow into a centerline. This centerline will not be on your finished product, but should always be visialized in your mind to keep your work flowing. Keep on practicing, you're on the right track. Ron
-
After reading this post, I feel that there is a little confusion in regards to the type of leathers that can be used. Tooling leather and skirting leather are tanned the same. So as mentioned, you can use 8/9 oz. veg tanned leather for you bag flaps, fronts, and backs. Some people will used 6/7 or 7/8 once chap leather for the gussets. Chap leather is chrome tanned, and most of the time is more flexible than veg tanned leather. Some people even make the entire bag out of chap leather. You can also use latigo leather for gussets, 6/7 oz. If you are going to decorate the flaps or fronts with tooling, then you'll have to used veg tanned leather (skirting leather or tooling leather). However, your first post sounds like you want soft, flexible saddle bags. If I am correct, then you'll need to consider buying chrome tanned leather. I hope that I'm not confusing your original post, and, if I've muddied up the post, please comment. Ron
-
I'm looking for a 1 3/4" diameter concho used on an F.O. Baird saddle. Unknown date of saddle. The concho is attached with 2 half inch wide loops on the rear. Can anyone help? Thanks, Ron
-
Tom, Your repair looks good. I hope you made some money on this project. Ron
-
My usual way of preparing my skirts is the same way as you'll find in the Stohlman books. The top of the skirts and the filler pieces are glued together, then the sheep skin is glued to the skirts, and one line of stitching holding everything together. However, I feel when using inskirt rigged saddles the extra stitchline helps reinforce the skirts to make the saddle more secure and stronger. I've seen too many inskirt saddles where the stitching has rotted away or torn, and the only things holding the saddle to the horse are a few concho screws. You can use a single stitchline if you want to prepare your skirts. There are no set rules. I tend to over engineer everything I make just to be safe.
-
OK...that's a photo I posted earlier this year. This saddle had a rear jockey so the installment of the flank ring is different than a set of skirts without a rear jockey. With that said: first, determine the design of your skirts and block them. This is easier done prior to putting in your seat. After installing your seat, come back to your skirts and align your top piece. Cut your leather oversize on the outside edges of your bottom piece. Using rubber cement glue the bottom and top pieces together to insure fit. Fitting up includes rigging placement. When satisfied with the skirts on the tree, remove the skirts from the tree (without pulling the cemented skirts apart) and compare them to each other to insure they're alike. Trim your top piece to match the bottom piece and attach your rigging plates and dees. Check your edges once more, sanding them if necessary to insure that they are cut at a 90 degrees. When satisfied, sew them together about 3/8ths of an inch from edge. If your skirting leather is light weight, you can install filler pieces as you would regular skirts; however, this isn't necessary with heavy weight leather and does increase bulk. These skirts are held into place on the bars with screws at the fork, at the cantle corner at the bars (covered by seat jockey), and rear rosettes or conchos. The sheepskin is installed as usual and the sitch line is about 3/16ths from the edge. I'm old, but not an old saddle maker. This method has worked for me on three saddles without any client complaints, knock on wood. Hope this helps, Ron
-
You need to repost your photo...I can't see your photo to see what you are talking about. If you are asking about using inskirt rigging and how to attach it to the bars without using rear jockeys there are some different steps not shown in Stohlman's books; and, I haven't seen any procedures in any other saddle making books. Ron
-
Lace Type/recommendations For Swells
Goldshot Ron replied to stef73433's topic in Saddle Supplies, Tools & Trees
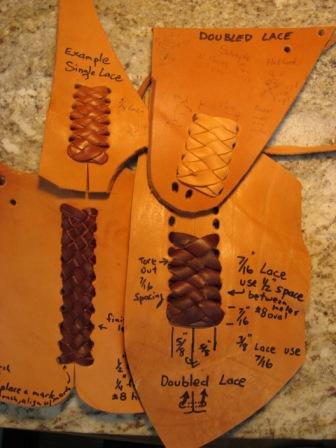
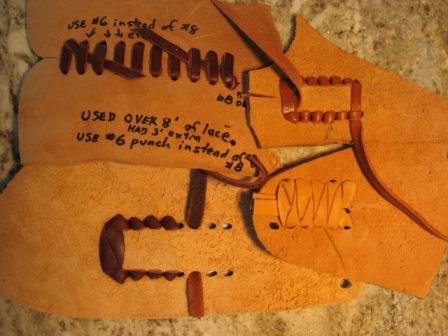
I tired posting photos earlier to show how to practice lacing and the different styles of lacing patterns, but my photos were too large in size. Hopefully these will give some idea of how I've practiced lacing before trying on the finished product. One picture shows the front of the braid, the other shows the back. Ron

-
Lace Type/recommendations For Swells
Goldshot Ron replied to stef73433's topic in Saddle Supplies, Tools & Trees
I'm too lazy to walk to the shop and check Stohlman's Book, but I recommend practicing on scrap leather first, and try differenet patterns before jumping into lacing the fork cover. With that said, I'd recommend using 3/8" lace made from latigo leather. Split it down to about 2-3 oz. and bevel the edges. Now, saddle soap the string and rub the heck out of it. When you think that it's good, apply some more saddle soap and rub some more. Stohlman suggests punching your holes a little less apart than the width of your lace. This is okay if you're a pro, but it risks splitting the leather out between the holes when pulling the sting. Good luck, -
If you don't already have it, I'd suggest you pick up Stohlman's Encyclopedia of Saddle Making Vol. 2. I shows how to make welts, and is a good source for other information. Like Joel mentioned, your swells are quite pronounced, and it would be difficult (as you have noticed) to pull the leather down into the rigging location of the swell without major wrinkles. Ron
-
As Rufus said, it's up to you to use your imagination. However, what are your dimensions on the different components? Your browband appears too large compared to the other parts of the bridle. If you burnish and rub the edges of the straps, you would have a more attractive piece. Also, lining your work will give you a stronger piece of tack, and a more attractive look. If you don't want to line your straps, you could also apply Fiebing's Leather Balm to the flesh side of the straps so they don't absorb swet. Ron
-
Joel, New thought about Sam Stag rigging. Originally it was rigged at centerfire position, with no flanch cinch. The positioning and attachment of the rear bar strap was equally important to hold the saddle on the horse, like a McCelland. With that said, you need to figure in your rear ring style also. This plays an important part of how the narrow (around the horn) strap will be placed and secured. If not done properly, the front ring may swing or pivot back and forth as the horse moves, especially as the latigo slackens during a ride. You may have noticed on saddles 3 and 5, the fork botton attachs the wide strap to the bars. This helps keep the ring in the desired rigging position, but may pull out with wear, and torque on the latigo ring. I'm still looking for pictures. Ron
-
Joel, I've looked in several sources (probably all that you've looked at), and none show the reverse side. I'd bet you, there is no one "best" way to do it. I haven't used the Sam Stagg rigging, so I can't offer any suggestions from experience. In Harry Adams book he talks a little about the history of this rigging. To keep with the essence of this style, I'd suggest braiding the straps together at the ring, and avoid using rivets and screws. Harry mentioned that this style was used when nails and screws were not readily available. I would think that even attaching the straps to the bars with screws would defeat the purpose of the strap over the fork, and maybe even weaken the strap. Please post your saddle when done, good luck. Ron
-
Remake A F.a. Meanea Saddle?
Goldshot Ron replied to Spartan's topic in Saddle Supplies, Tools & Trees
Following Oldtimer's first post...Timberline Trees can build you a good tree. I recently received a Butch Cassidy tree that I'm using as a period style saddle. The turn around for the tree was great (less than 4 weeks), and I like the way it fits my quarter horse. Now, with that said, you need to sit down and really draw up your plans for the saddle. That requires a lot, and I mean a lot of research. As Oltoot mentioned, if you are shooting for authentic realism can result in a saddle that doesn't see the back of a horse if not done correctly. If this is your first saddle attemp, you may want to reconsider building a period style saddle, and start with just a basic ranch style saddle. Period saddles require a different rigging style that a first timer may not really understand. The seat of a period style saddle is different also. Rigging and seat are your most important things that a saddle maker needs to consider and understand (after getting a well made tree). I could be wrong because there's a person on this site that her first saddle makes me sad to say that I "build saddles"; but, I can't emphasize too many times, learn the basics before starting your masterpiece. Good Luck -
Attached is a photo of one way to attach inskirt rigged skirts to a tree. As mentioned, pockets are created within the skirts to insert the ends of the bars. The skirts are then attached with screws as normal. These skirts will not have rear jockeys attached.