.jpg.e13e7809a690335a89b8a4ed2e876db1.jpg)
Northmount
-
Posts
6,542 -
Joined
-
Last visited
Content Type
Profiles
Forums
Events
Blogs
Gallery
Store
Everything posted by Northmount
-
.thumb.jpg.6e903dd66163ad5672f00f144058c571.jpg)
Why No Polyester Thread From Our Sewing Machine Vendors?
Northmount replied to silverwingit's topic in Sewing Leather
A list of suppliers with poly thread would help others find it, maybe even close to home. Tom -
Applying the finish first helps to reduce the risk of getting something on the leather that is going to leave a permanent stain. With machine stitching, could get a drop of oil, or using pre-lubed thread can leave a stain/discoloration that you wouldn't like. With hand stitching and keeping your hands and tools clean, you have a lower risk of leaving a stain ... except maybe that red stuff in your finger! Tom
-
Pfaff 335-H2 Presser Foot Feed Issues
Northmount replied to subgirl's topic in Leather Sewing Machines
I'm moving your post to sewing machines Tom -
Really depends on the size you are trying to click out. 1 ton on a steel rule die about about 3x5" cuts nicely. I'm thinking of doing wallet backs. Need a steel plate, cutting board, leather, die, steel plate so all stays square, and cutting force is consistent across the die. If the die is too big, then as above, take a bite, move over, take another until it is cut all around. The limitation that might irritate you is arbor presses don't have a lot of throat depth. For small items, that shouldn't be a problem. An arbor press is faster than a shop press, as long as you have enough leverage. Just one stroke. Shop press needs many strokes on the hydraulic jack to get a 1/2" stroke on the ram. So trade offs between ease versus speed. Shop press takes up more space too. I have both, 1 ton arbor, and 20 ton shop press. My shop press is an hour's drive away, so doesn't get used very often. Tom
-
Springfield Leather Company - That Time They Told Me To Get Lost.
Northmount replied to KandB's topic in Suppliers
I agree, this has gone on long enough, thread is now locked Tom -
Looking For People Who Started Rough But Found Their Craft Anyway
Northmount replied to lydian8's topic in How Do I Do That?
When tooling, I have found that a good beveler makes a huge difference in being able to smooth out the beveled lines and avoid the choppiness. My best beveler is one I bought from Tandy back in 1961. It has the proper shape to the toe and the bottom. Many of the craftool stuff produced over the past several years do not have the correct shape. So getting a few (how do you stop at a few?) good tools can make a world of difference. A good sharp swivel knife is requisite to making smooth cuts. The knife needs to fit your hand and be comfortable. A simple rolled "U" for your finger is not comfortable. The edges need to be rounded and the "U" shaped to fit around your finger. And you need to learn how to sharpen and strop the knife to keep it cutting smoothly and neatly. The proper method of casing makes lots of difference to both the swivel knife cuts and and to stamp impressions. I learned by myself for the most part. The first efforts at tooling were pretty bad, mostly because the leather was too wet. Once I got past that, things began to improve substantially. And as mentioned before, practice, practice, practice. Buy a bag of scrap vegtan leather and use it up, then go get a couple more bags and make some small useful projects. If you wreck something, it won't be a big loss; you can toss it, or keep it for reference for a while so you can look back and see what didn't work, and the improvements in the next projects. Good luck with your endeavors. Tom -
Day Planner
Northmount replied to JM Rhoades's topic in Purses, Wallets, Belts and Miscellaneous Pocket Items
Really great job. I want to see more! Tom -
Pretty nice, great job. Your customers will love them. Tom
-
If the crack goes right through, stick a vacuum cleaner up against one side, add good quality wood glue to the other side, and suck it through until is shows on the vacuum side. Them clamp it tight for a couple hours. Another way is to drill a small hole and inject the glue with a syringe. Tom
-
New(Ish) Member - Caligae Ambulatum Factum Sunt
Northmount replied to CaptainBeaky's topic in Member Gallery
Interesting. Welcome to the forum, hope to see you around frequently. Tom -
Outside Presser Foot Marking The Leather (Pfaff 335)
Northmount replied to oclack's topic in Leather Sewing Machines
That's really great news. Good luck Tom -
Great to see you are back at it again. We'll be watching your work closely. I'm really looking forward to seeing your progress. Tom
-
Moved to "Marketplace > Items For Sale > Machinery -- Sewing and Stitching > Used" Tom
-
Pages 13 and 14 of Al Stohlman's Pictorial Carving has some examples. Bark is done with a modeling tool. You can purchase a download this booklet from Tandy. Page 46 of Al Stohlman's How to Carve Leather has a similar illustration. Also available from Tandy. Both of these booklets are good reference material and have lots of western figure carving patterns. Tom
-
How Do I Make This - Rolled Leather Enclosure?
Northmount replied to robb01's topic in How Do I Do That?
Bruce Grants Encyclopedia of Rawhide and Leather Braiding, page 273. Tom -
A photo might help us understand what you are seeing. Tom
-
Wooden mallet also sheds fibres that drop onto your work and may get stamped into the leather if you don't notice in time. So I stay away from wood. You can cut a thin layer off the face of wood or rawhide to square up the face after it has become all beat up. Tom
-
Welcome from another Calgarian. What are your main interests? Carving and tooling, bags, saddles, ... Looking forward to hearing more from you soon. Tom
-
Steel rule dies are not suitable for use as mallet dies. But you can use an arbor press with a couple pieces of 3/8" or thicker steel plate to spread the force. The larger the die, the stronger press you need to use. (and maybe more bites to be able to cut longer or wider pieces) Standard index card size die is easy to use with a 1 ton arbor press as an example of force required for size. Tom
-
Problem With Stitches On My Cylinder Arm Machine..
Northmount replied to CustomDoug's topic in Leather Sewing Machines
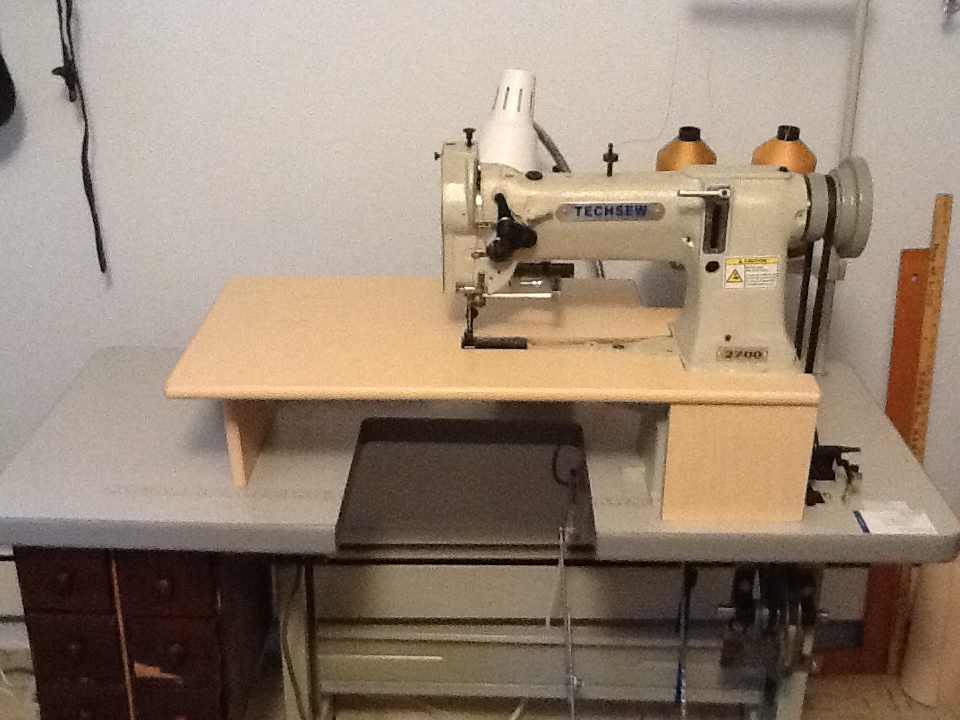
Doug - Took me a while to find it! Sorry, that thread was locked. Here is a pic. Tom
-
If you do a search for "mallet die" (including the quotes) you'll find a few threads with a little information including a supplier. Tom
-
Problem With Stitches On My Cylinder Arm Machine..
Northmount replied to CustomDoug's topic in Leather Sewing Machines
Same sort of thing happened to me. Have to keep the object you are sewing flat, perpendicular to the needle. If you lift the left edge, stitching on the back moves closer to the edge. I built a flat table adapter, problem gone. Tom -
Trying To Choose Between Some Starter Machines
Northmount replied to summerfabian's topic in Getting Started
You can add a flat bed adapter to a cylinder arm machine to use it as a flat bed. But you can't convert a flatbed to a cylinder arm. Nice to be able to reach inside to do purses, bags, etc. Domestics are just that. For leather, get an industrial machine that has been setup for leather. Tom -
Singer 111w155 or the Consew 225 clone
Northmount replied to unclebubba's topic in Leather Sewing Machines
Motors lose torque at low speeds. So if you are trying to punch through thick or hard temper leather a stitch at a time going around a tight curve, the motor is going too slow to produce the torque needed. The addition of a speed reduce set of pulleys gets the motor speed back up, and increases the torque available to your machine. If a speed reduce is 4:1 speed reduction, it will give you a 4x torque amplification besides the increased available motor torque due to its higher speed. Tom -
In addition to the comments above, servo motors normally have a brake. When the pedal is completely released, the servo motor's brake is on, so yes it is even harder to turn against the brake. Press the pedal slightly to release the brake. There is another thread of posts about disconnecting or removing the brake if it is not needed. Typically for most of us, we go slow so don't really need the brake. Tom