


Sanch
-
Posts
699 -
Joined
-
Last visited
Content Type
Profiles
Forums
Events
Blogs
Gallery
Store
Everything posted by Sanch
-
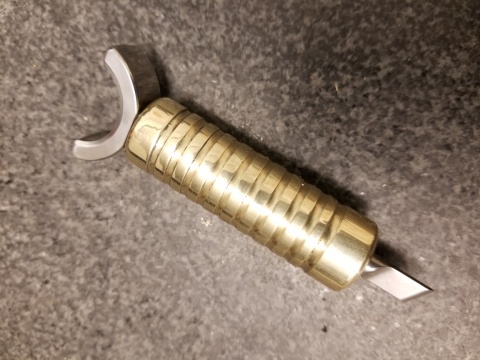
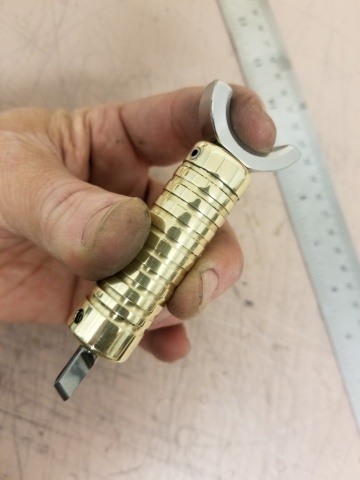
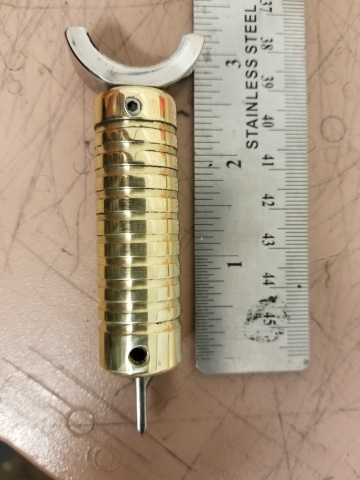
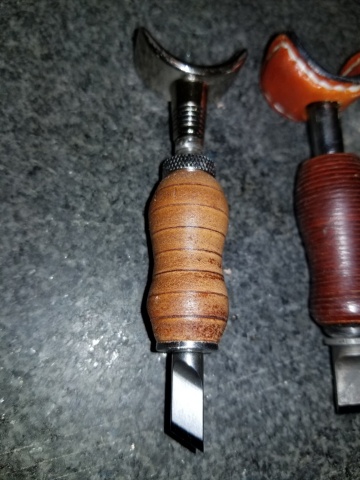
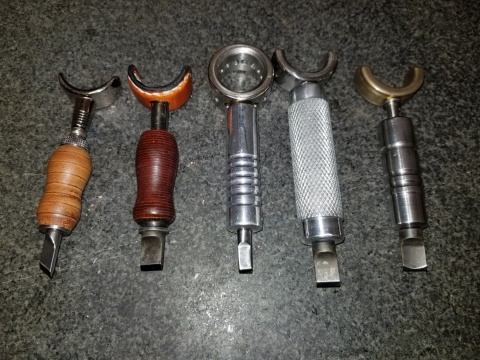
Dad used to say. Son when you can't afford to buy something you gotta use what the good Lord gave you, ability, desire and curiosity. Use these things to gain the knowledge to either afford what you need/want or make it yourself. That's what lead me to leatherworking...Well I'm not a wealthy man so...I make what I need or want. Most of the time I'm happy in doing so and the results are in my eyes are good and will go to my sons when im gone hand made by me for me and them. Here's another swivel knife I made just cause I needed/wanted a brass one with a SS saddle. yea I could've purchased a brass one but this one has part of me in it just like the projects I will carve with it. Thanks for looking.
-
The saddle stem should just press back into place. Make sure the tiny split ring is in its groove you may want to lube the stem or the split ring itself with a lil grease or 3 & 1 oil. I'd use the later. As far as maintenance goes a light coat of 3 & 1 oil on the blade to keep any rust from forming between uses depending how often you carve, strop before use this will also remove the oil from the bevel so it doesn't pollute your leather! Don't throw it don't drop it nor use it to cut cheese. That's it.
-
I re-done my ergo handled Tammy knife as well but i used thicker leather like you it worked fine and less spacers to cut! Here she is next to her sister! oh and here are the rest of the crew... Thank you!
-
Yes sir..err um ok boss,dude whatever lol! Yea I get ya been in the south for a long time here brother!
-
Thanks! I have too many customs lol! One for every blade.! Awww man! Thanks! Have another for me sir! Thanks, I've done more than a few stacked handles on knives so I knew how to attack it! You inspired me sir thanks again!
-
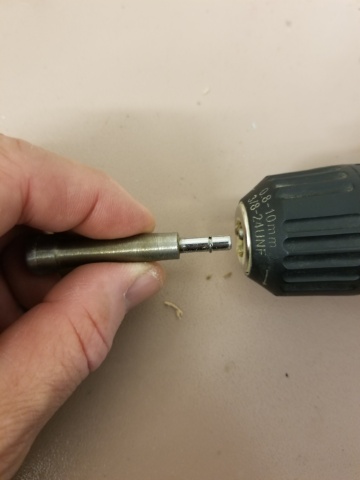
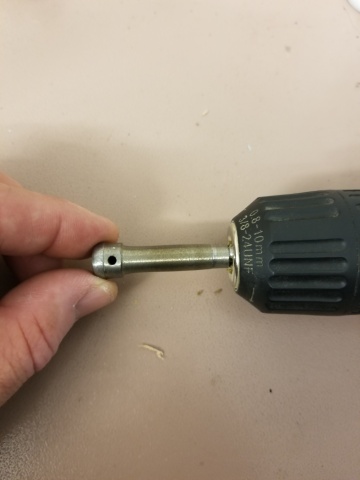
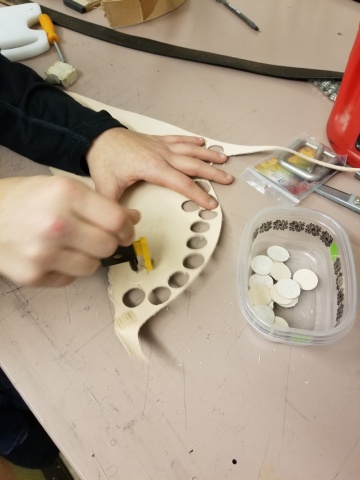
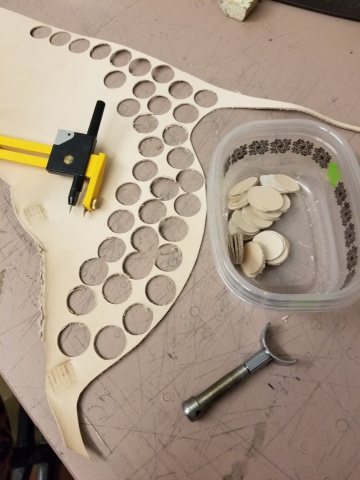
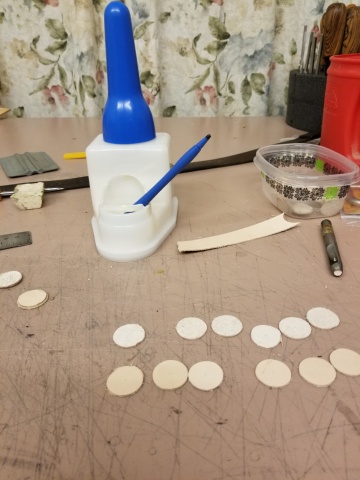
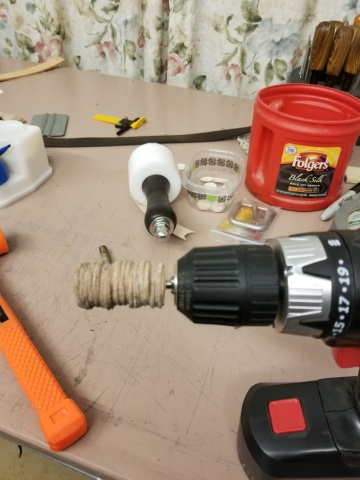
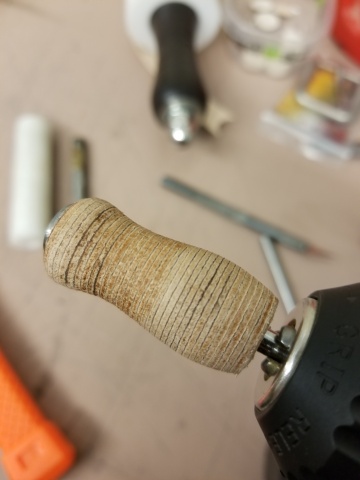
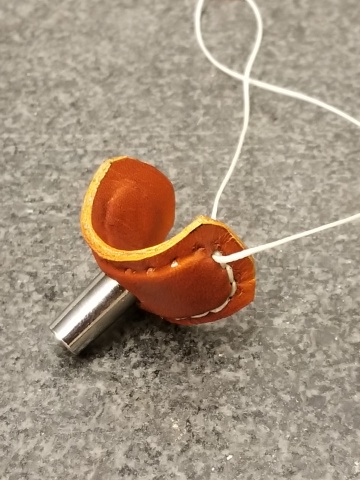
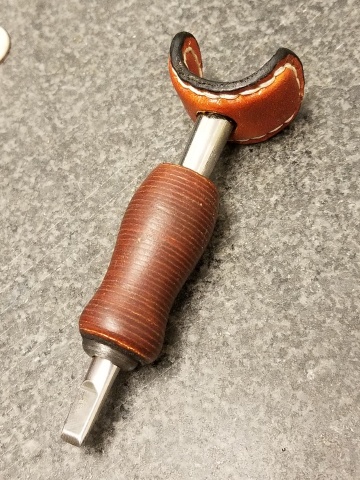
Ok so I was inspired by @Mjolnir when he posted his swivel knife mod here's mine all frankenswiveled! Bringing the barrel down to size, clamped it in the drill and ran it on a belt sander . cut out a bunch of disks 4 ounce veg tan. Had some little hands help me! glue them all together in stacks of four. If there is any question as to the durability of Rania Aquilim 315 I still have my money on it ! here it is all stacked together and chucked back in the drill ready to be shaped on the Belt Sander. and here's the shape after some sanding on the Belt Sander while spinning in the drill to keep it round. a little bit of work on the saddle. This part was a pain in the you-know-what just because I had no way of clamping it to do the saddle Stitch. and finally here is to finished knife it's a hundred times better than the original! I dyed both the saddle and the barrel tan. I then finished the barrel with pure beeswax melted in. thanks for looking and I hope you guys enjoyed the walkthrough sorry it was so lengthy!
-
I have a bunch of 4 to 5 4 to 5 oz scrap left over from wallets and motorcycle seats that I plan to use, I also have a Fisker cars Circle cutter that I plan to use it's kind of like a compass with the sharp razor edge
-
That's a great idea boss Ima borrow it I have a couple of old cheap Tandy knives that need new life... dang now I gotta make a round punch the size i need thanks for the extra work
-
What's Your Handle? (Origins of your maker marks)
Sanch replied to Mjolnir's topic in Leatherwork Conversation
Mine "Sanch" is simple short for Sanchez. The mark I hand drew when I first started it was a quick 2 min sketch seated on the seat of a fork truck at work years ago on graveyard shift. I was an art major way back then and when I found leatherworking it tied many of my favorite media together per say. So that's the spade my "ace in the sleeve" if you will. Leather working has remained where my other habits/hobbies have tapered off, except periodic knife making. Here's the mark.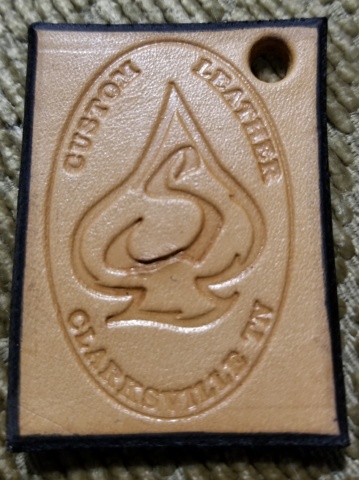
-
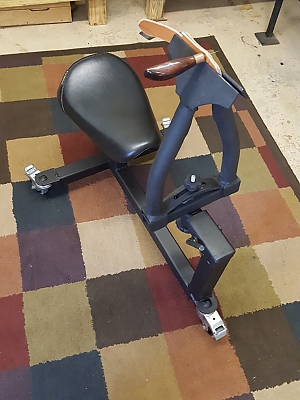
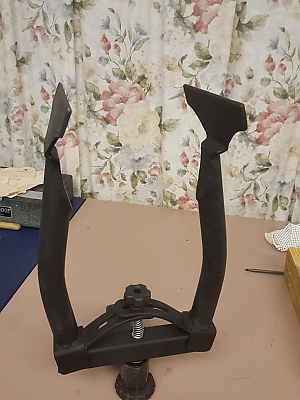
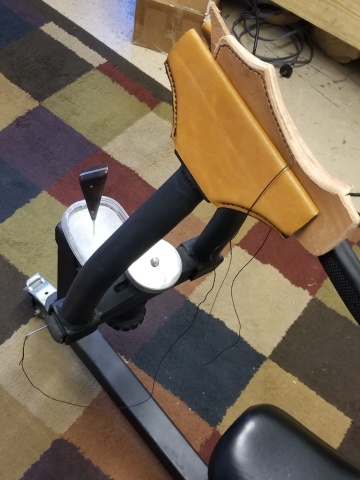
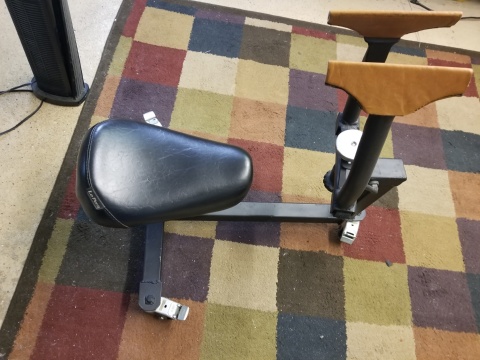
I guess I can play.. here is my stitching "Clydesdale" as @bikermutt07dubbed it. the jaw arms came from the arms of an old exercise machine, the jaws are 3" angle iron 7 1/2- 8" long. Second photo is before the jaws were covered and the new "tightening knob" was installed. You can see in this photo the" tilt" function/rotational knuckle. the rest of the frame is 2x2" square tubing recycled from other scrap I had laying around Here's another photo of the build showing the jaws articulation and the spreader spring. Both of the jaw arms are permanently welded onto a 3/8" pin that goes through the bottom base. In this photo you can see the "rotation" function limiter or tightening knob. (It's what the assembly is standing on as well as part of the knuckle. The seat is a "recycled" le Pera Sportster gel "solo" that was given to me I own an FLH so.... and finally I had to replace the knob to something more user friendly, so I jumped on the lathe and popped the shiny knob you see here in the middle out. thanks for letting me play! I also have some head knives I could post but I think this is plenty!

-
What to put on work surface?? (plywood)
Sanch replied to Sledzep01's topic in Leatherwork Conversation
Simplest most sanitary solution=don't eat on the leather working tables! -
What to put on work surface?? (plywood)
Sanch replied to Sledzep01's topic in Leatherwork Conversation
Lol!!! Yea I guess that would be a worry had I not scrubbed them 8x with acetone and denatured alcohol followed by strait chlorine bleach then Clean water rinse!! -
They look nice who's ever they are. Also I did a search for a video of using these things and of course I didn't find anything at all everything I found was Maul or mallet, I know there was an explanation and some pictures on how to use them and I have a very good idea of how they're used but would like to see them in action I'm sure most of us would!
-
What to put on work surface?? (plywood)
Sanch replied to Sledzep01's topic in Leatherwork Conversation
All of my tables are uhmw shower stall separators if you can find a construction company that has recently tore down and remodel the bathroom the stall dividers work fantastically -
The 2 in the second picture are they the same as the 1st? I think they are beautiful the grain of the wood really pops!
-
I cloned a lace cutter from all thread, square tubing for the clamping part, 1 inch diameter stainless steel and Brass for the tightening device. Oh yeah the collar is Delrin with a set screw..
-
That's a ridiculous amount to pay for a hammer that is not being used for its intended use! You would have been better off purchasing a professionally-made maul! Just my humble opinion
-
Hmmm, possibly!
-
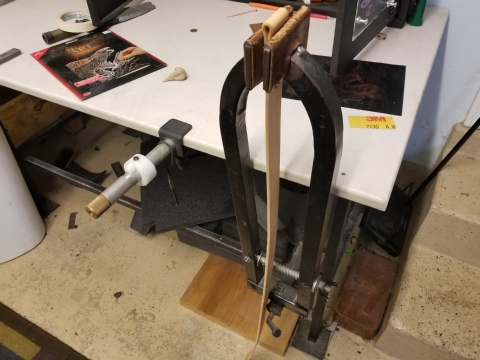
Every bit of both of the clamps is repurposed! As you can see the larger of the two has a Harley-Davidson Sportster seat on it. I would be careful about acquiring railroad track as it is a federal offense! One of my co-workers gave me a piece that is approximately 18 to 20 in long. I may have to find a way to cut some chunks off of it!
-
The brush that the TS boy glue pot comes with will work just fine as long as you keep it rinsed as suggested. Here's a quick picture of my setup as you can see I purchased all of it except for the silicone brushes from Sorrell Notions. the blue handle thingy on the right of the picture is the silicone brush LOL! The other one is in the glue pot. For the price of 2 I would purchase them vs the specific brush shown on the Sorelle Notions website. Just my opinion.

-
Okay so I've already posted it but I want to post again this time I will show pictures of my two fancy sewing machines! Lol! They are neither stitching ponies nor traditional clamps!

-
Hmmmm... Delrin heads center aluminium handle hmmmm.... my tool junkie is kicking in!!
-
Fantastic showing by all! Also a very humbling experience LOL! I don't think I've ever seen so many leather stitching machines! I'm going to have to clean up my work area and show more current pictures! I like to keep everything at arms length reach as well next on my list of things is a roller stool, I don't think I'll ever have one of those super fancy sewing machines though so I've fabricated a couple of sewing clamps which I'll show as well.
-
New irons and a card walet
Sanch replied to LeatherLegion's topic in Purses, Wallets, Belts and Miscellaneous Pocket Items
Okay so I have a question the first picture shows your card holder along with something underneath it it tool of sorts I'm guessing that is a stitching awl? Did you use the pricking irons to mark your stitches and then use the awl or did you use the irons? Either way the stitching looks very clean and tidy great job! And nice looking tools! -
The aquilim 315 is not an instant stick, it has to pop off or get Tacky in other words. There is a slight learning curve but once you understand that the glue does tack up after a few minutes or you can force it with a heat gun the bond is more less instant and very very strong I would put it against any solvent-based cement that I have used. the way that I use it is I heat it with a heat gun and then Hammer my glued edges it has been working flawlessly.