


Sanch
-
Posts
699 -
Joined
-
Last visited
Content Type
Profiles
Forums
Events
Blogs
Gallery
Store
Everything posted by Sanch
-
Sorry for the late reply! I did purchase my ts boy glue pot from Sorrell Notions the brushes I got from Rockler were there small detail brushes I did not get them from the same place that I bought the glue pot. I suppose that the brush that the glue pot came with would work just fine I just wanted a silicone brush that I could clean easily and as of yet have to be disappointed in any way shape or form with the silicone brush I got from Rockler
-
Different colors indicate different grits and also can indicate different materials that they are to be used on for example there is a blue Rouge that is primarily used on Plastics. For our purposes generally speaking white and or green are fine to use or such has been my experience.
-
My tools came ready to use. No need for any abrasives other than rouge on the strips, which are flexible and will not deform the edge of the tools. The method you speak of will be great to "sharpen" a dull tool.
-
Looking for a leather manufacturer for my round dog leashes and collars
Sanch replied to anikli1982's topic in Old/Sold
Interested in this"inside stitching" technique and how it's done by hand... -
No replies from op.
-
Yes it does dark in the leather a little and can be applied by either hand or buy cloth
-
Added Fiebings mink oil to a half tub of the Montana Pitch Blend made more of a mink oil based paste/cream still has the bees wax and some pitch but more oil than the other 2 ingredients. It works well for me no complaints.
-
Okay so I decided to go ahead and make a new strop for my Jeremiah Watt edgers and decided why not make a tutorial of sorts here it is to include pictures. 1. Get some scrap leather I used 8 to 9 oz for what I'm doing here you can use whatever you find suitable cut it to quarter inch width straps about 13 in Long. 2. Find a suitable piece of wood to glue the strips to using contact cement of your choice. In my case I just use the old strop backing board. I drew three lines parallel with each other and the board on it just so I knew where to place my glue and my leather strips . 3. After the strip is glued in place and the glue sets I ran the edge bevelers along the edges beveling them the way I needed for each respective size. The picture shows a number 1 size . 4. Once all of the edges are beveled accordingly I use neat's-foot oil to wet the leather strips. 5. Load the strips with green Jeweler's Rouge. The oil helps the loading process as well as helps to lubricate. Finally here is the strop. As you can see I wrote on it with a sharpie the sizes from 0 through 4. The first strip is only for 0, the subsequent 2 strips are as numbered the middle one is for size 1 and 2, the third one is for size 3 and 4. I hope this helps someone out if you have any questions feel free to ask.
-
I used this stuff IMHO its no good. It was given to me at the Tandy Leather to try out as a Lexol replacement, Lexol is by far and wide better in my opinion. I have yet to try the Skidmores. Montana Pitch Blend is my go to. And I think is similar to the Skidmores but could bre wrong.
-
Thanks mutt!
-
Recently switched to the Aquilim 315 best choice and investment I've made since I started a long time ago plus T-S-Boy glue pot and mini silicone brushes from Rockler. Wish I'd have gotten both years ago the cost would've been easily offset by ease of use, smell, and easy cleanup not to mention all the times I've dumped glue due to it drying up to messy boogers in the pot. Such a waste oh well hindsight and all.
-
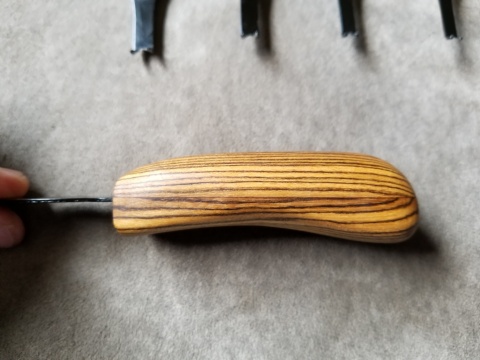
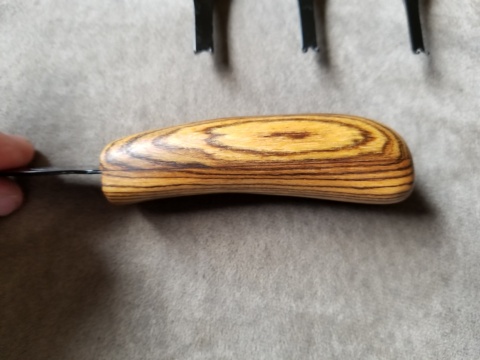
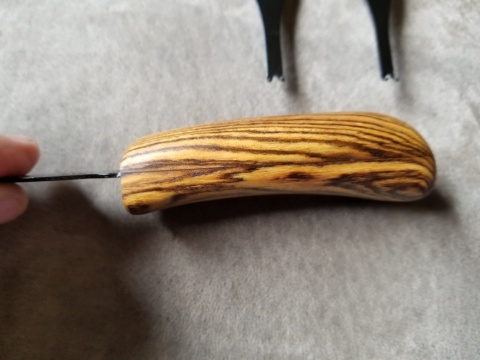
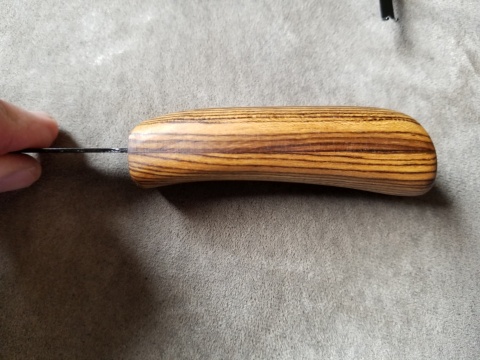
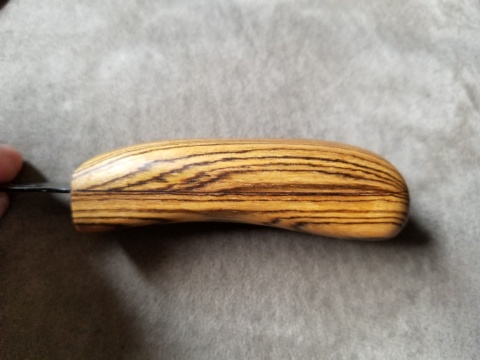
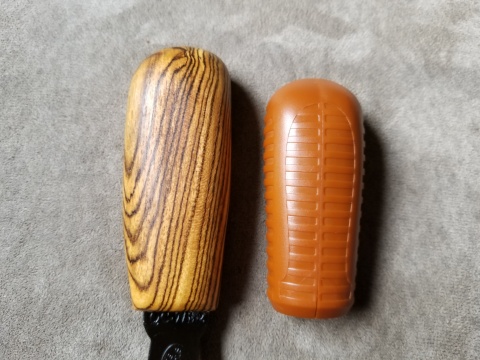
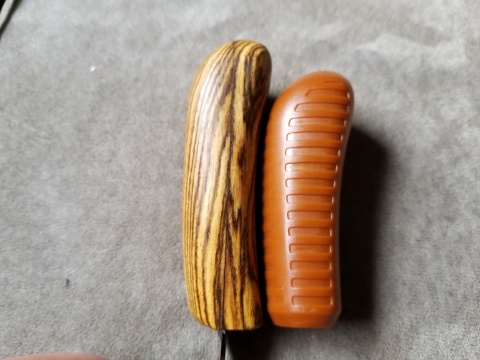
No no the handle was very comfortable it was just plastic which is the only thing that I did not like about it. Maybe being able to make handles like I did was simply for Aesthetics and I was able to add a little length to them. The handle design itself stayed relatively the same just a little larger and made out of Bocote, finished with beeswax and oil because I like the feel of the wood I did not want a plasticky feeling handle. Thanks for the replies
-
Thanks!
-
They were ready to use right out of the box, no issues whatsoever if you do plan on sharpening them more I would suggest getting a piece of leather that is equal to each size and beveling it initially with each respective beveler apply some Rouge to it and then sharpen.
-
I used to only have one Edge beveler which was the Tandy Craftsman series and I would say by far and wide yes they work better
-
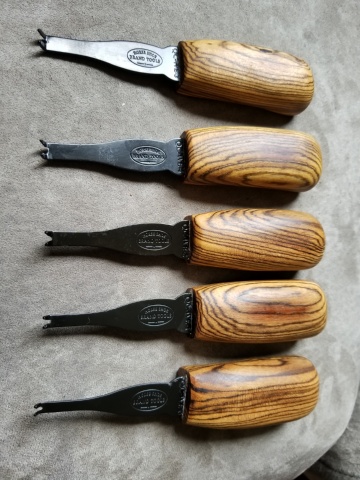
Okay so I had the extra time today and I finished up the handles they're all shaped on a small belt sander because my 2 by 72 belt grinder took a crap on me or to clarify I should say the frequency drive took a crap on me! Either way here they are sanded down to 400 grit only and finished with an Oil and Beeswax finish that was melted into the wood itself. As I said before the only drawback that I personally had to ordering this set was the plastic handle and it was as you can see in the pictures a little small ish.
-
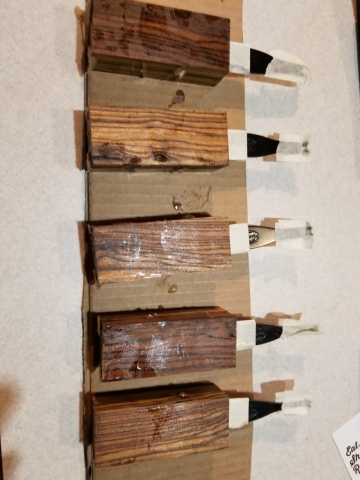
Okay so after having purchased the Jeremiah Watt Quick Change Edge bevelers I decided I wanted a different handle for them the shape is fine but the material is not to my liking so I decided to make my own handles because I am more than confident the steel these are made of will last quite some time. I chose to use Bocote as the wood for these. Here is a picture of the start kept it very simple used T - 88 marine-grade epoxy. I will post more as I make progress on them thanks for looking!
-
Sorry for the late response.
-
Ok I'll play here are Some older pix
-
This is a true statement and I will post some later been kind of busy at work and it's been a long day!
-
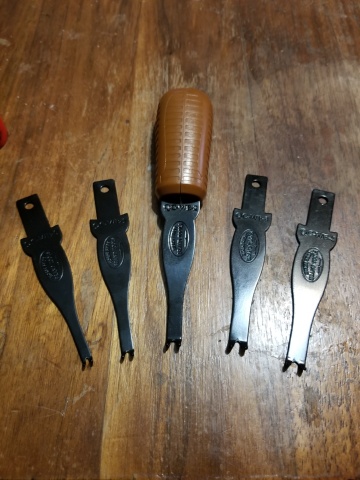
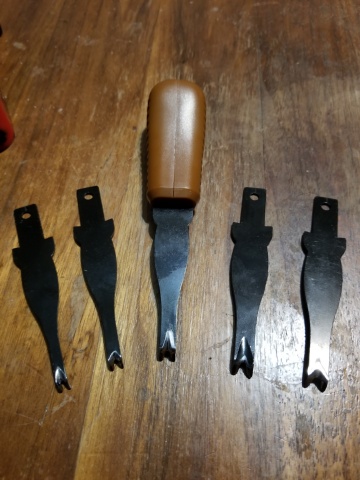
My decision to purchase this set and what made me pull the trigger. So after some time of thinking about purchasing this set of western-edge style Edge bevelers from ranchtoarena.com I decided to email the company. After a couple of emails my patience was wearing thin because it is what it is and we live in a fast-food world blah blah blah! I decided why not call and speak to someone there. Well lo and behold I found out that they happened to be out of the country and that's why my emails went with no response! No harm no foul, I was even able to speak to Jeremiah, who was kind enough to give me the specifications on the type of Steel used for these bevelers etc etc. He did go through the Heat Treating process and what not. 15 minutes after speaking to him I ordered this set! Needless to say their customer service is beyond phenomenal! I was supposed to have received the set of bevelers and handle on Monday I received them Saturday! Of course like a kid with a brand new toy I went to playing! I grabbed some scraps of leather all vegtan varying in thickness from 4oz all the way to 12-14oz saddle skirting and begin to try them out. My initial impression as well as my thoughts after having used them a few times now is this. These things are phenomenal I have absolutely no regrets in purchasing them! For those of you that have any trepidation about the thickness of the tools and the shape of the handle you have no worries whatsoever! First of all the thickness of the tools actually allows for better performance and the quality of the 1075 Spring Steel that they are made of is fantastic! The parallel line that has been spoken of in previous threads and seen on a video was an issue that I addressed to Jeremiah. He in turn explained to me what may have caused this issue. There could have been several factors to include the type of leather and "angle of attack" for lack of a better term needless to say this was not an issue for me. The handle: The handle has a very ergonomic shape! Also as many of you have seen already this handle is not like the round handles we are used to, which means it will not go for a walk off of your bench and land business end first on the blade! The shape of the handle itself leads the user to hold the tool in a correct fashion. It is not counterintuitive to the use whereas a straight handle sometimes can be. I know a little about this as I am a lean manufacturing instructor the importance of good tool design and the ergonomics of them can effect the end user greatly either in a negative or positive manner. Also I have made many "bladed" tools for myself ranging from stitching awls to round knives and am a fairly decent knife maker who knows the importance of good steel and the absolute importance of HT and temper, so much of what I asked Jeremiah about pertained to this. NOW as with anything else there has to be cons that follow all of the pros and here they are. The only con that I have personally is the handle, not the shape, but the material "plastic" Keeping in mind these tools are meant to be cost effective, both for the individual purchasing them and the company I would say that using plastic was a very prudent choice, but if I had my way (which I will) I would prefer a wooden handle. Again in keeping cost to customers at a reasonable range as well as cost to the company plastic is a good alternative. I will in the future make some handles for the set I have out of stabilized wood that is how confident in the quality of the blades I am. They will last me a great long time! Finally. My disclaimer I am in no way shape or form affiliated with ranchtoarena.com everything that I wrote is my personal opinion and I am just giving my thoughts if you are looking to purchase some edge bevelers GET EM! On the off-chance that Mr Watt or anyone there reads this I would like to thank them greatly, you are fantastic people to deal with!
-
Best Finish for Belts
Sanch replied to steelhawk's topic in Purses, Wallets, Belts and Miscellaneous Pocket Items
+1 M&G but 60/40 or even 70/30 distilled water. Then Montana pitch blend or my blend. Warned with heat gun them buffed to a satin. -
Called the nice folks at ranch2arena actually got to speak with Mr. Watt himself they were out of country hence no replies to my email queries about the QC edgers. He gave me a very clear and concise explanation about the "line" that the edgers made in the video and that some users are getting. It's not a product deficiency more of a user issue and how the edgers should be maintained. I ordered the 6 piece set today. Also if there is any interest they are made of 1075 spring steel which is a good carbon steel, very tough and very good for holding an edge.
-
Thank you all for your answers and your time! I have researched this before and again the same answers as before no change and this go round different responders as well as a confirmation of my gut feeling I've decided again yup save my pennies thanks again!!
-
Cool tools only I don't make boxes but will keep this in mind if I ever need to!