


Tree Reaper
-
Posts
1,870 -
Joined
-
Last visited
Content Type
Profiles
Forums
Events
Blogs
Gallery
Everything posted by Tree Reaper
-
Ostrich works.
-
Some kind of foil sleeve for the cards with a foil flap that closes over the open end, I'm guessing. Difficult to prove without an RF tester.
-
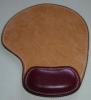
I would use denatured alcohol on the fresh leather and after that neatsfoot oil. If you see any sign after that then let the neatsfoot oil soak in for a couple of days and then try a deglazer..
-
If you use the C clamps use them with the screw down so you don't end up with metal flakes on your leather.
-
I was reading up on it and it appears the RFID chip signal is omnidirectional.
-
I don't have a tried and true answer but hanging them outside on a clothes line in the fresh air won't hurt them.
-
That's pretty much what I do, over stitch or back stitch, leave about 1/8" of tail and melt it down and press it into the stitch hole with my thumb on both sides. When hand stitching I can put both ends on the back side.
-
You can buy aluminum tape with an adhesive back that would easily stick to the inside of a wallet back. It's used for taping duct joints.
-
It might be time to consider lining wallets with foil to prevent credit card fraud. http://youtube.googleapis.com/v/lLAFhTjsQHw%26sns=em
-
I use a press for 3D stamps so that might be a consideration for you, it never fails to leave a deep impression. Even something as simple as a 6 inch C clamp might work better for you.
-
What are you using to put the leather on to stamp it? Which tool are you using to put in the 3D stamp? The larger the stamp the more pressure it will take because of the larger surface area. Do you have one of these http://www.ebay.com/itm/Craftool-Ram-Foot-Heavy-Duty-/290313567372?pt=LH_DefaultDomain_0&hash=item4398097c8c or a hefty handle?
-
Joe; It's an idea that worked for you and you were good enough to share it with everyone so if people want to modify it in any way to make it work for them then all the power to them. You deserve a lot of credit for not only the time spent on designing and testing this idea but more importantly sharing it and allowing people to decide for themselves what they want to do with it. Good work!
-
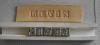
The only thing I didn't mention is the 1/2 inch router bit is a half a hair too large to get a friction fit so when I inverted the stamp to place it on the leather the individual stamps would have fallen out so to keep them secure I used rubber cement in the groove of the jig and it did the trick.
-
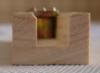
It can be made fairly quickly, I think this wooden one I made took about twenty minutes on the router table. If I was using it a lot I would have one machined out of metal but with the wood I can make a strip three feet long and just cut a new one if I needed it. Here's an end view ...
-
Joe; I've been working on a prototype that would allow you to use the "I" in your words. It's just a 1/2 inch groove with a 5/8 counter bore that will accommodate 7-8 letters. I put it in the shop press and give it 1/2 ton worth of pressure. Kevin.
-
What Exactly Is Tan Kote ?
Tree Reaper replied to Leprechaunleather's topic in Leatherwork Conversation
Tan Kote over dye will give your leather a nice mellow look. You have to put it on in light coats, if you wipe the leather more than twice you'll remove dye with it. I put it on quick and let it dry before applying it again. -
Questions can be submitted on this forum. Critique is usually done on this forum Critique my Work! I use a soldering iron with a pointed tip to burn thread ends.
-
1/2 ton is more than enough for that task.
-
How Do I Get This Effect On Leather ?
Tree Reaper replied to Leprechaunleather's topic in How Do I Do That?
It could be antique paste applied, let sit for less than a minute and then wiped off. -
Hair Stylists Tool Holster
Tree Reaper replied to Murray's topic in Purses, Wallets, Belts and Miscellaneous Pocket Items
Well done Murray, try and get a picture of it loaded if you can. -
Sheath for Scissors - Front
Tree Reaper commented on Ja5on's gallery image in Gallery- Our Leatherwork
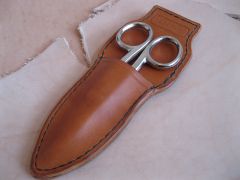 I recently made a case for the same splicing scissors but mine has the combination knife and scissors. When I was a cable repairman I made one like that with a belt clip that could be clipped to the pocket of my coveralls when splicing a cable back together. The scissors were always handy hanging off the front pocket and when I retired one of my co-workers asked me for it so I gave it to him. Kevin.
 -
When I use the fence it allows me to mark the edge of the letter on it with a pencil, the next letter gets placed against the pencil mark.
-
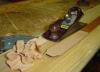
A block plane will work if you learn how to sharpen it properly. I have only used it on belts but it works very well.
-
How To Remove Edge Paint From Leather
Tree Reaper replied to leatherbuff's topic in How Do I Do That?
If the shine wax made it run then a little on a Q Tip might remove it. What base was the paint, water or alcohol? -
rawcustom; The problem with that is you are removing material by drilling which will weaken the leather. Try and use an awl when ever you can.


