Tree Reaper
-
Posts
1,870 -
Joined
-
Last visited
Content Type
Profiles
Forums
Events
Blogs
Gallery
Store
Everything posted by Tree Reaper
-
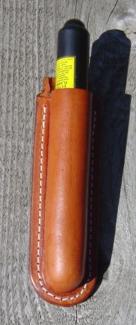
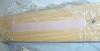
This is the finished lighter case using the clay molding.

-
You don't have to freeze it, use a scrap piece of wood under it.
-
I make one swipe, not more than two really light coats at one time, do this a few times if needed. Spraying is best if you have a gun.
-
Is the resolene pooling, going on too heavy? If the dye went on well then it's most likely the resolene. Kevin.
-
You can press a knife, lipstick tube or just about anything into the soft clay and make your mold then bake it.
-
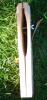
This is what I used http://ecx.images-amazon.com/images/I/51R2o%2BAgrKL.jpg I also bought this http://ecx.images-amazon.com/images/I/818x6J08RFL._AA1500_.jpg but haven't tried it yet. For an 1 1/2" diameter epi pen you could form the clay around a piece of plastic pipe or bottle about 1 3/4"outside diameter then use a piece of 1 1/2" wood dowel to mold the wet leather. You can do the same for pen cases, use wood dowels for your molding.
-
I'm using a router to make the wooden molds but in your case where you don't have the router you could make a mold out of clay instead of wood then use that to form your leather.
-
Hi Cheryl; This is the mold I was telling you about for an epi pen but on a smaller scale, 3/4" in diameter. I made the original (routed) wood mold for forming the leather slightly larger to accommodate 5oz. leather and then I made another (routed) wood mold 1/4" smaller to form the clay mold. The smaller clay mold combined with 5 oz. leather fit perfectly inside the leather mold. To stiffen the clay I wrapped four lengths of wire clothes hanger in foil tape and molded the clay around that. This mold should last a long time and I'm able to make two cases at once if I cut the molded leather in half. I'm very happy with this process.
-
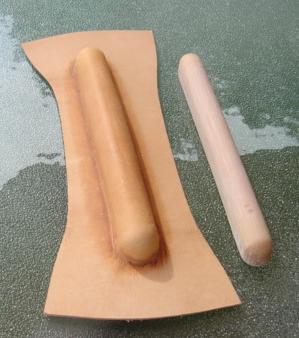
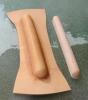
Here's another method for molding wet leather. I'm using a molding putty, forming the mold in the first picture then removing it from that mold and baking it in the oven to harden it. In the second picture the hard clay mold has been used to mold the leather. This works really well for odd shapes.
-
 Thanks for the tip!
 -
I used #3 on a coaster and it worked but I think the problem is the foot walks the leather straight and you really have to concentrate to keep up with it on the curve. Shorter stitches might help.
-
Will this work? http://www.mygift.com/hard_case_belt_clip.html
-
That's my problem as well.
-
Canvas waterproofing would repel water.
-
I haven't had much luck sewing thin leather on my 4500, it's better suited for 8oz. and up.
-
You can buy square tubing in aluminum and steel. http://web4.hobbylinc.com/gr/k+s/k+s3015.jpg
-
I use a clamp as well on longer cuts, doesn't hurt to have a third hand.
-
Latest Sheath Work
Tree Reaper replied to Trav's topic in Gun Holsters, Rifle Slings and Knife Sheathes
Very nice work, some of the knives with larger handles appear to be sucking the leather in from the sides giving the appearance that the cases are becoming narrow at the handle end. I'm trying to eliminate this on my cases so they end up being uniform from top to bottom. I'm not sure if the answer is using a thicker welt near the handle or taper the sheath out at the handle end adding more leather to compensate for the shrinkage. -
The first mold,I just used a piece of zip lock freezer bag. Any light plastic from even a garbage bag should work. There isn't a lot of stress on the plastic, it is supported by the leather and gets trapped between the foam and the wood top where it can be trimmed off later. Mark your mold block with a sharpie or pen so the screw holes always line up.

-
Is it really leather or composites such as soft bioplastic resin or "manmade" leather?
-
I've been working with molds for some time now and prefer the foam to wood blocks for the ease of squirting the foam as opposed to carving the blocks to fit the mold. If you make your mold inside the block and don't run out into the end of the block you can get two cases from one mold. Kevin.
-
You want to calculate the wattage you'll be using, get the biggest one you can afford and carry because you'll have to lift it in and out of the vehicle. Get copper winding not aluminum, it will cost more but last longer.
-
It's important to cover all of the leather and more with light plastic to prevent the foam from sticking to the bottom of the wood mold because it's like glue and will adhere both sides of the mold together. The foam doesn't stick to plastic.
-
I drilled the two holes, one for foam and the other for the air to escape. The holes are the exact same size as the straw you get with the foam. From the outside of the form I counter bored the two holes out about one inch in, one size under 1/4" to match two dowel plugs that I cut with tapered ends. When the foam starts to exit the holes, drive in the plugs, cut them flush and put the mold into a wood working vise.
-
This is what I made to clamp in a Black and Decker Work Mate. When the work is done it gets put in a corner.