WinterBear
-
Posts
900 -
Joined
-
Last visited
Content Type
Profiles
Forums
Events
Blogs
Gallery
Everything posted by WinterBear
-
More Stuff
WinterBear replied to Chief31794's topic in Purses, Wallets, Belts and Miscellaneous Pocket Items
USB drives are supposed to be impervious to magnetic fields, so I don't think you'll have an issue. Chief, your moneyclips look great. I especially like the oak leaf. -
I've seen hairdryer holsters that resemble fat gun holsters, so I think wandering through the Holsters subforum should give you some good ideas. For the pockets for the scissors, razor, brush, and comb, you might want to consider lining them, perhaps with a heavy mil clear vinyl, on the inside. While the vinyl wouldn't be visible, it would allow the pockets to be wiped with a disinfecting solution, such as barbacide. A local hairstylist was asking me about having a "leg apron" made, and wanted to make sure that he complied with our state cosmetology regulations by having the surface that touched the comb, scissors, and clippers able to be sanitized.
-
Me! Me me me! I have been trying to get these forever. Sending a PM.
-
You might try looking for a jewelry finding used for fabric chokers and bracelets sherlockian. It is commonly called a "ribbon crimp end". They are sold by most places that sell beads and stringing supplies, as well as online (I use Fire Mountain Gems for much of my beading supplies), and materials range from plated metal to platinum, with corresponding prices. Anyway, once you've attached a ribbon crimp end to each of the ends of your braid, a regular bracelet clasp (lobsterclaw, toggle, magnetic clasp, etc.) can be attached to the crimp end for the actual clasp.
-
I still get asked if we have electricity, how long I have to ride a horse to get to work, and other stupid things. "Gee, we run a generator on methane from horse manure so I can get the power to run the computer, and our internet service runs on telegraph wires". And they believe it. Oy.
-
Not terribly surprised. I was a TA for a comparative anatomy class, and had students that thought the newts and salamanders were seriously ill lizards and the tree frog had genetic deformities. And these were students who had to have had at least 2 semesters of biology to even be eligible for this class.
-
Nope, not a turtleskin. You are probably right that these are ring lizard skins. If you are curious, a turtle does not have skin under its shell. The underside of the dome of the shell is made of plates of bone. If you were to look at the inner surface of the turtle shell, you would see its spine and ribs fused with the bony plates that make his shell. The turtle's skin lies over his bones, so on top of his shell, and is mostly visible on the shell as thin plates of a material similar to fingernails.
-
3D Skull Leather Bag
WinterBear replied to Janus1810's topic in Purses, Wallets, Belts and Miscellaneous Pocket Items
Great molding! -
How very odd. Bill, the only ads I get here are the 4 in the banners at the top of the screen, since I allow ads for LW. But I'm running Firefox, since IE kept allowing popups through and was hugely slow when attempting to show pictures.
-
What browser are you running? Most of them have an option that when selected, it prevents nearly all popups and new tabs from being opened.
-
Take a look at the videos Chief has made using these templates. They really show how nice they are. http://www.youtube.com/user/Chief31794/videos?flow=grid&view=0
-
Yes, it is a shop based out of Ohio. Here is the link to Joyce's home page, and the ebay store. I do believe the templates can be shipped internationally. Joyce has 3 different guitar strap templates: 2 consisting of different widths of the guitar straps with a leather adustment strap, and 1 with a sliding buckle and Chicago-screw adjustment arrangement. http://www.blackrive...mplates-gauges/ http://www.ebay.com/...=p2047675.l2562
-
So you're looking for embossing plates then? Some plates are laser-cut from delrin, some are cast fiberglass resins, some are metal (usually a magnesium or copper alloy). You can even use old letterpress "cuts", but those usually result in a fairly shallow impression. Here are some embossing manufacturers, US : http://www.bunkhousetools.com/ http://www.infinitystamps.com/magnesiumplates.html Canada: http://www.greenmanleather.ca/embossing-debossing.php UK: http://www.a-finlay-primitive-crafts.co.uk/embossing_plates.html There are also some people on this site that do custom stamps. Studio-N and Phillips Engraving to name a couple.
-
This is a really old thread, so you'll probably want to look for something newer or start a new topic to get the information you need. But I'll see what I can do to help out. I'm thinking you'll probably want to avoid the dollar store and other candles, especially if the candles might possibly be an import. There has been a stink about metals in the wicks--lead and cadmium, but also arsenic and mercury. If it's in the wick, chances are it will be in the wax. If you want food safe wax: Parafin: A parafin wax can be found where you find home canning supplies are sold. Most groceries should have it. Beeswax: It is difficult to find a true food-grade beeswax, but as beeswax is edible, most seem to use a cosmetic-grade wax. Cosmetic-grade beeswax can be found at health food stores, usually near where soaps are sold. It usually runs around $1/oz, and is sold in small bars. Sometimes it can be found in larger blocks at hobby stores for candle and soapmaking but it may not be as clean as cosmetic wax. Carnauba: Found in health food stores in cosmetic grade, and can usually be found in specialty food stores in food grade. You'll have to talk to the folks that make bottles and maybe drinking horns about the wax mix and where they get their waxes and what proportions they use if they use a mix of waxes. Try also this topic: http://leatherworker...?showtopic=3084 (page 4 has the tutorial with all of the pictures still, but read the whole thing, as they really have some good tips in there on the waxing process)
-
What's Happend With Barry King Tools?
WinterBear replied to swivel knife's topic in Leatherwork Conversation
Mountain time, so -7:00 GMT. It's just now 4pm here. -
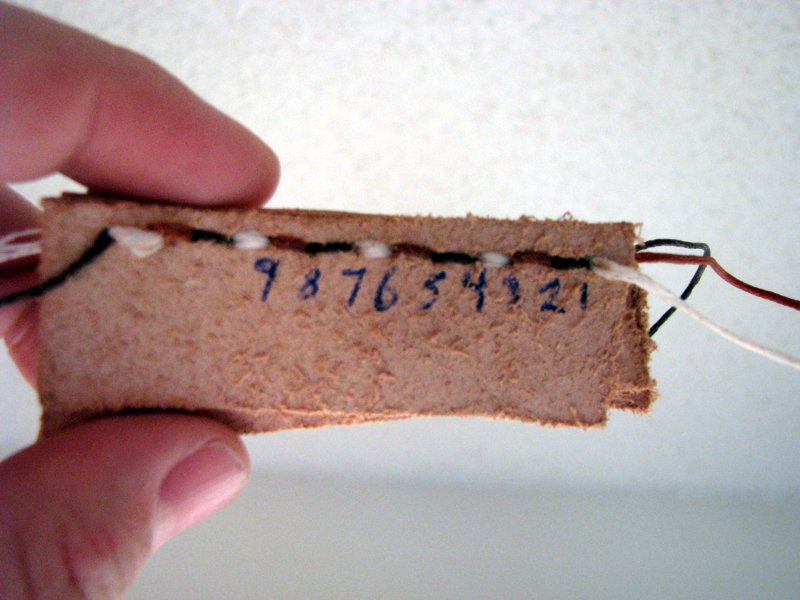
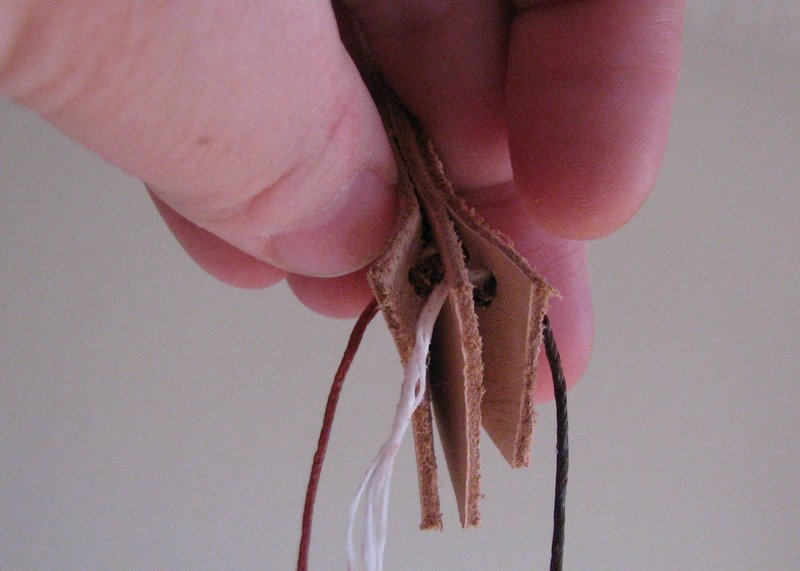
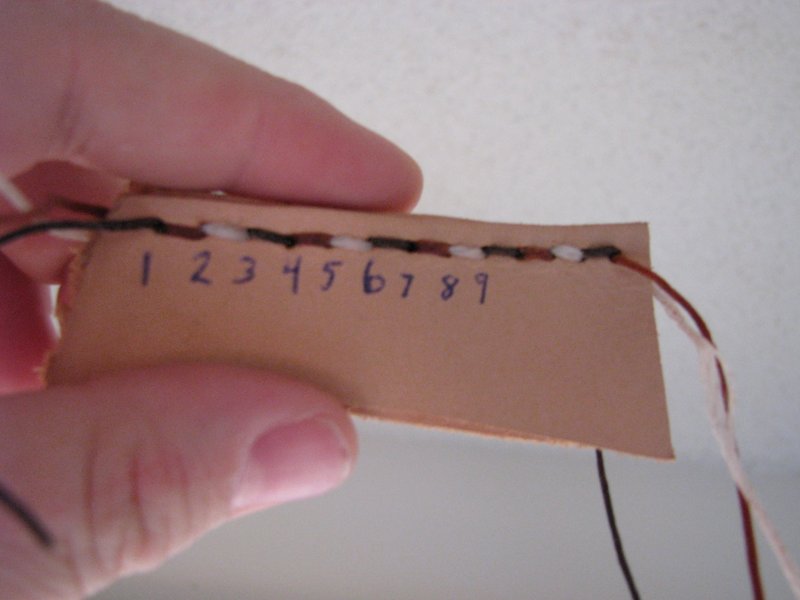
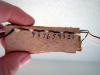
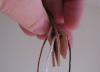
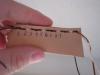
Ok, maybe this will help. Excuse my stitches, I wasn't exactly 100% awake, so I wasn't terribly careful about which thread was on top of the next, so they're a little wonky. This is where you can hide the threads in the welt, so you show three-colored stitch on the front, and a three-colored stitch on the back. It's not exactly a saddle stitch, more like a backstitch crossed with a saddle stitch, and likely a weaker join overall than a saddle stitch. I have three layers of leather in this example. The top (T), the middle or welt (W), and the bottom ( . For this, I stacked the pieces all grain side up, but you could certainly have the outside layers both grain side out. The three threads are called White, Brown, and Dk. Brown in the directions below. Now, the hidden threads in this example lie between the welt layer and the top layer, but could just as easily lie between the bottom and the welt. You can cut a groove to hold the bulk of the hidden stitch in the welt, or if you are using two layers to the welt, you could cut a groove into the sides of the welt that face each other, making a hidden channel to hold the threads. To start, I ran White from the backside through the first hole in the bottom layer (so hole B1), the first hole in the welt layer (W1), and the second hole in the top layer (T2), then down through all three layers at hole three (T3, W3, B3). The Brown cord starts in the welt, and goes up through T1, then down through T2, W2, B2. The Dk Brown cord starts at the top and goes down through all three layers in the first hole (T1, W1, B1), then up B2, W2, T3, down T4, W4, B4. The White cord goes up through B4, W4, T5, then down through T6, W6, B6. The Brown cord goes up B3, W3, T4, then down T5, W5, B5. Dk Brown goes up B5, W5, T6, then down T7, W7,B7. White goes up B7, W7, T8, then down T9, W9, B9. Brown goes up B6, W6, T7, then down T8, W8, B8. Dk. Brown goes up B8, W8, T9, then down T10, W10, B10. And etc. Front or top view. Back or rear view. View of hidden stitches between the welt and top layer. The top layer is to the left.
-
If you're using a welt, you can run the extra thread between the welt, so you only show one thread front and back, albeit each stitch on both sides will show in different colors.
-
Yup, that's Studio N then. http://www.lasered-stamps.com/category.sc?categoryId=2 is the main website, and Sudio N is a member on here. He's got a nice set of pinwheel stamps in delrin that I quite like and have been considering.
-
That's one of Studio-N's isn't it glockinator? benlily, that looks great, I am certainly intrigued, and might have to get some. What size is that stamp? about 2" long?
-
Yeah, the prices of their stamps went up to $9.99 retail this summer. But the quality seems to be a little better in these newer ones. Still not the same quality and clarity of impressions of the old craftool stamps though.
-
Couple Of Wallets Off The Bench
WinterBear replied to jayjay's topic in Purses, Wallets, Belts and Miscellaneous Pocket Items
I'm really liking the dye job. Nice color on those. I can't decide which I like better. -
New To Exotic Hides
WinterBear replied to Matt Alsaker's topic in Gun Holsters, Rifle Slings and Knife Sheathes
Sure thing. And I'd love to see what you make when you get to that stage. -
New To Exotic Hides
WinterBear replied to Matt Alsaker's topic in Gun Holsters, Rifle Slings and Knife Sheathes
Whipsnake or seasnake, rattlesnake, lizard, and python are easy to sew and make great inlays. Ostrich hide is relatively easy to sew as long as you don't try to go through a quill bump with part of the quill still in there, and ostrich leg is fairly easy to sew too, as long as you're not trying to force the large shin scales to go around a bend (they'll lift up). Springfield Leather sells scrap exotic mixes and scrap ostrich hide, so the pieces are relatively inexpensive. They also sell ostrich shin. Ostrich shin and scaled reptile usually is sealed with something to stick the scales down and make them less likely to lift up. Ostrich hide and shin, and most reptile leathers can be cut with scissors or a knife. Frog and fish is a little harder to find, and can be quite a bit more expensive, but they sew well once you compensate for their rubbery texture and tendency to “grip”. Buffalo and Waterbuffalo are usually a little harder to sew as they tend to be thicker, but all in all, pretty similar to cow. Stingray, gator, and croc are all harder to sew, depending on how they are prepared, what part you are using, and how they are sewn. They also tend to be slightly pricier. For crock and gator, belly-cut tails and the underside, especially the belly itself, are easier to sew than hornback or backstraps. Springfield currently has a special on cayman tails, and this leather is easily sewn and cut. Small gator, belly, and tails can be cut with a utility knife, round knife, or scissors. Gator tongue is a weird leather, and harder to find. It's also a pain to handsew from what I understand due to a hard temper and uneven thickness. The nodules on stingray are hard to cut, and can deflect the needle or awl, and cut or broken nodules can scratch a person or cut threads. It’s usually cut with tin snips or some other heady-duty shears. Some people use a drill bit to "punch" hole for stitching, some sand down the nodules on the edges--respiratory protection should be used when abrading, drilling, or sanding stingray. Stingray prices range from inexpensive to very pricey. The finishes will vary depending on what leather you start with, what it will be made a part of (holster or sheath, wallet or key fob, etc.), how it is attached (inlay, overlay, whatever), and who will be using it and where they will be using it. There are lots of people who can give you advice on finishes if you can tell them what you’d like to make and with what kind of leathers you’d like to try. -
Very clever design on the top, I like how you've secured it. How are the veg-tan pieces secured? Are they just cemented in place?
-
Try Precious Metals Leafing Finish. Seems a lot of hobby stores carry it. It is water based, low odor, and I've had pretty good luck with it on leather as long as I use very thin layers and build up.