


sbrownn
-
Posts
535 -
Joined
-
Last visited
Content Type
Profiles
Forums
Events
Blogs
Gallery
Store
Everything posted by sbrownn
-
Thanks, It shows a little wear and there are some things I am going to change.
-
Not sure how UV would have any effect on a leather pattern or mold unless you were going to leave them out in the sun. In any event I have made and used over a hundred molds and patterns and never had an issue with either temperature or UV. There are some strength issues which could probably be resolved by using nylon but I've never made enough of any one thing in enough quantity to wear out a mold. A few years back I made about 50 pocket and flap type knife sheaths and while the mold started to show a little wear, it was still functional. I would think that 3D printed molds and patterns would be a boon to a small shop producing limited quantities.
-
Would not have to upgrade but seriously, I haven't needed to smooth the molds. I have designed the molds and worked out a process where the pattern doesn't imprint on the leather unless I want it to. One of the nice things about 3D printing the molds is that they can be pretty exact dimension wise and you can put a draft on them. Adding draft makes the mold halves easy to separate and helps minimize sidewall abrasion.
-
I'll post them over the next week or so.
-
The 3D printer and press are the most used leather machines I have. Together both cost about half as much as a new Cobra splitter or sewing machine. Thanks, I'll post them over the next few weeks. I'll also make the STL files available to anyone who wants them.
-
Thanks, That's good to know about the soldering iron. I wonder about what a heat gun would do? I haven't actually found smoothing the molds to be necessary for what I do but I have smoothed ABS molds in the past. Now I just oversize the top of the female mold so it forms the leather but doesn't press hard enough to leave a pattern. That means that you have to really pay attention to the thickness of your pocket leather and make sure you are using the thickness the mold was designed for. If you don't wet the leather it helps in not leaving a pattern. With these molds and a press you don't have to get the leather wet. If you are using Bridle, Harness or latigo leather, just put it in a microwave for ten or fifteen seconds to soften the oils and waxes and then form it while it is still hot. Once the waxes and oils re-harden it helps the leather to hold it's pressed shape.
-
-
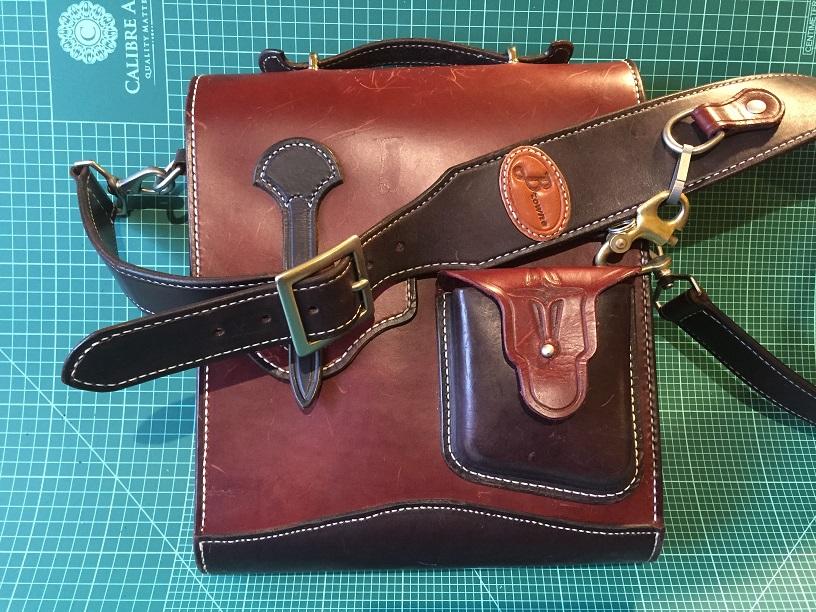
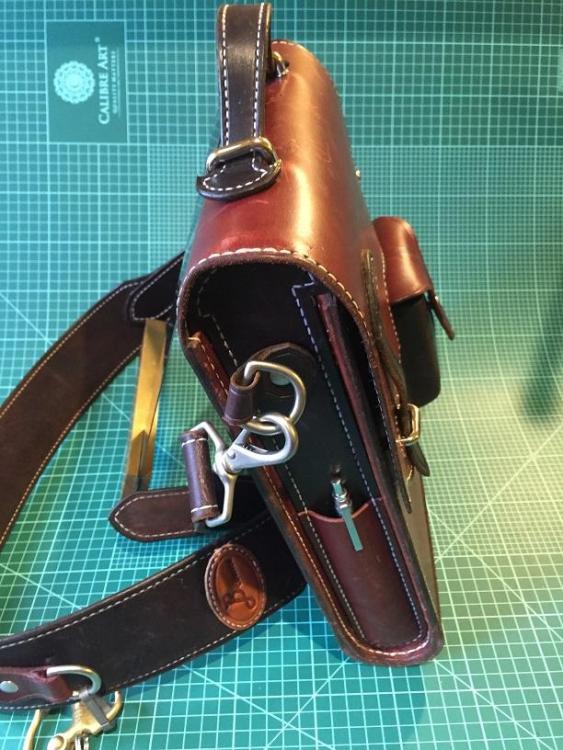
Absolutely and in fact making the mold for the end gusset for the bag was one of the first molds I made. I wanted an end gusset that was stiff enough to hold the shape of the bag through all sorts of weather and abuse. This particular bag was primarily designed to carry a tablet. Yes, I'll post a couple of photos in a minute.
-
I used over 20 molds and patterns to make this bag design. If anyone is interested in seeing some of the rest of them I would be happy to post the patterns and the pieces in the order I made and used them.
-
I have experimented around with different infills but basically came to the conclusion that filament is cheap as compared to what you get. Yes, there is a time factor too but I have found the best way to cut down time and still end up with a strong mold is to use a larger nozzle size. Like the shoemaker's fairies, I let my printer work at night.
-
I used a filament printer with PLA. ABS is actually a better choice as it can be smoothed with acetone but my printer is much less problematic using PLA. I have gone down as low as 50% but I usually use 100% as it is more durable and I can do the forming without getting the leather very wet. The top section of the mold is 0.2" thick. If you don't get the weather too wet and you leave enough clearance in the mold the pattern won't transfer. If you use ABS you can smooth the interior of the mold so there is no pattern to transfer. In some cases the pattern, if it transfers actually looks good.
-
There is a cap on the bottom of the bag whose contour the pocket fits up against. Yes, it was a design choice driven by the shape of a cap piece that is on the bottom of the bag. I didn't attach anything to a block of wood so I'm not sure what you are referring to.
-
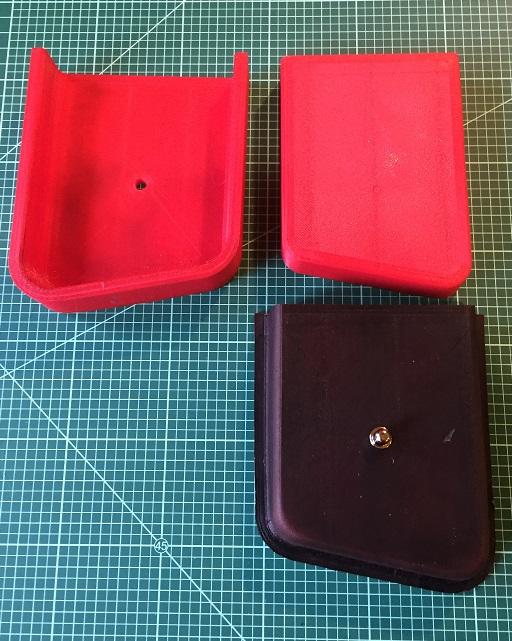
This is a 3D model of a bag that I designed that I want to produce in leather. I 3D modeled the bag to facilitate creating 3D printed molds, stamps and templates to use to make it. Now that the bag is accurately modeled in a CAD program I can create the 3D STL files directly from the model. The first part I created was the pocket. I designed and printed 3 parts to form, stamp and cut out the pocket: a two piece mold for making the pocket itself and a combination stamp and template for patterning and cutting out the pocket flap. I have uploaded a photo of the pocket as completed from the molding, stamping and cutting based on the 3D printed parts. The third picture shows the pocket and the two piece male/female mold parts that were used to form it. The final picture is of the pressing/cutting template used to make the pocket flap. This process can be used for all kinds of pockets and all kinds of flap geometry and flap designs.


-
New forum for 3D printers, engravers and laser cutters
sbrownn replied to Wizcrafts's topic in 3D Printers and Lasers
The degree of resolution you can get on a home 3D printer depends on the nozzle size you use, the smaller the nozzle the better the resolution. My nozzle selection goes from .2mm up to 1.2mm. You probably can't get down the the kind of resolution you can get with either milling or laser engraving but on the positive side you can do it at home pretty cheaply and you can experiment around with a lot of designs before you decide to spend the money for one done in metal. As far as durability goes, even with PLA you can get quite a number of stampings before you need to print a new stamp. I use CAD and the 3D printer for everything I do in leather; it makes molds, patterns and templates for every project I do. -
Does anyone know what the cylinder arm diameter is at the needle?
-
My offer is $2k for a Cobra, Cowboy, Artisan or equivalent 16-1/2" machine shipped to Moscow, Idaho.
-
Did you sell it yet?
-
Looking to purchase a Singer cylinder arm machine.
-
Some people get enjoyment out of using Barry King edge tools with cocobolo handles even though they may not do any better job than the economy Tandy edger. So what? If using a particular tool makes the task more enjoyable for someone then I say "go for it". Don't worry about, or listen to, people who criticize you for wasting your money or call you a sucker. To each his own.
-
cobra sewing machine Cobra C3 - Thread options?
sbrownn replied to entropie's topic in Leather Sewing Machines
I've been running the 0.6 mm Tiger thread in my Campbell and it seems to work just fine and looks great. I use it on the bobbin as well as the top. I was running it off a 25 yd. spool to try it and planning on switching back to polyester when it ran out but after looking at the polyester stitching in comparison I decided I am going back to the Tiger thread. The bottom stitch is much nicer with the Tiger than the with nylon, polyester or linen. I have a piece that goes from machine to hand stitch and back to machine and it is really difficult to tell when one stops and the other starts. -
I like to use Simplify 3D. The inputs are almost infinitely adjustable and the results are great.
-
My tips for a "machine" look with Saddle Stitch
sbrownn replied to DonorLeather's topic in Sewing Leather
Sometimes it is nice to be able to have a hand stitch mimic a machine when there are specific areas on a piece that you can't do on the machine but want to match. -
Most of the models you might 3D print for leather working really don't require a very in depth knowledge of CAD. Start off by making yourself some cutting templates. These are really just 2D models with the only 3D aspect being thickness. To make a cutting template you begin with a sketch of what you want and then make it 3D using whatever the extrude feature in your program is called. My favorite program is SolidWorks but there are a bunch out there and they all basically do the same thing. Once your model is complete save it as a .stl file. The .stl file is the file type the printer reads. You can either use the software that came with your printer or an after market program to prepare the .stl file for printing. I use a program called Simplify 3D. It is easy to use and is fast. If anyone would like some basic instruction on how the process works, send me a sketch of what you want to make and I will lead you through it.
-
I have been printing 2D and 3D guides and molds for my leather work for 4 years now. I rarely make something anymore without making cutting and stitching templates and male and female mold patterns first.
-
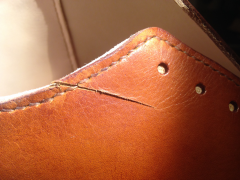 First use a syringe to inject some medium viscosity super glue into the slit and then press it with a roller after that make your decision.
