TwinOaks
-
Posts
4,513 -
Joined
-
Last visited
Content Type
Profiles
Forums
Events
Blogs
Gallery
Store
Everything posted by TwinOaks
-
How quaint! I carry a .45. No sense in letting them get inside knife range
-
Beltslide Holster For Kahr PM45
TwinOaks replied to Randyc's topic in Gun Holsters, Rifle Slings and Knife Sheathes
...but you sewed it up BACKWARDS!!! It's supposed to be on the OTHER side Seriously...that's a very nice looking rig. Is the leather that color naturally or have you done something to it? -
I stuff the holster with twisted/wadded paper towel (shaped like the gun) to help soak up moisture and heat for about 20 minutes. That's enough to 'set' the leather, but not dry it out too much. If you're looking at a wax impregnated holster, then it's a whole different ball game. If you're just coating it, you'll want to mix the beeswax with a light oil (probably Neatsfoot) but I'm not the expert in that area. please standby for more responses And who says you shouldn't do anything to the inside? I routinely treat the inside of my holsters with Aussie leather conditioner to seal the leather and prevent moisture and dye transfer from leather to steel or anything caustic (powder residue) from the leather.. I guess if you're using a block glock or other polymer gun it wouldn't be an issue.
-
....and when you use an awl, you don't have to beat the leather off of the chisel because it stuck when you drove a 4 prong chisel through it.
-
Cool! You found an easy way to strip the crappy coating off upholstery leather! Now all you gotta do is pick a color you want and spray it on!
-
Wallet pattern test
TwinOaks replied to rdb's topic in Purses, Wallets, Belts and Miscellaneous Pocket Items
That looks like an awfully dangerous place to carry those razor scissors....... Nice neat design. Yeah, I see what you mean about overkill on the stitching, too. My personal preference has always been to have a liner of some sort on the inside of the wallet, but as I said...preference. I like it. -
That is some of the best tri-weave stamping I've seen. Period. There's a few things that we could all pick at, but it's personal taste issues. As far as the work on the leather, there's nothing to critique.
-
Howdy Darby, and welcome to Leatherworker.net! Veg-tan leather will stiffen a good bit as it dries. If you really want to harden it, use a little heat. About 140F makes the leather quite a bit harder than just drying. When I make holsters, I typically use my countertop oven (it's a convection style) for the last little bit of drying. Obviously, take precautions to not set anything on fire. The leather doesn't need to bake for a long time, either. By the way, ONLY USE THIS METHOD FOR HEAT SETTING LEATHER DAMPENED WITH WATER. You'll have to play around with the 'cooking' time, as it will be different with the various thicknesses of leather. Also, when you remove it, you'll want to used a hair dryer to dry the inside of the holster. As for finishing it, there's quite a variety of what you can do. It will really depend on the type of dye you use- particularly the differences between Eco- dyes, and spirit dyes (alcohol). Regardless of what you choose, you need to buff the leather after dying it to remove any pigment particles that haven't penetrated the leather. Failure to do so will probably result in bleed through of the color. For a first time holster, I'd recommend Resolene or Supersheen, just for the ease of use.
-
Lining Holsters
TwinOaks replied to rickeyfro's topic in Gun Holsters, Rifle Slings and Knife Sheathes
Also, some holsters are made with the flesh side out (called rough-out) and don't require lining, as the grain side is against the handgun. -
Amras Elanessë and Berilac Hardbottle It would appear that a lot of us leatherworkers are somehow related.......the nuts must not fall far from the tree. Right Aunt Kate?
-
Thumb strap. You musn't forget the thumbstrap, especially for the first few holsters. It makes the difference between a holster you can use until you get enough practice for an open top, and a box of 'almost right' holsters. When I've made revolver holsters (pancake), I overlay the template with a folder and include a little 'dart' of the folder folded in on itself to allow a touch more leather for the cylinder. Then, mark the edges and cut out, glue, stitch, and wet form. The 'dart' I'm refering to is just a tiny little bit, maybe enough to insert a finger between the two halves (centered where the cylinder will be). It is worth noting that I form the exterior piece more than the inside, prefering something along (A) in Jordan's diagram. This method has allowed me to stretch the leather to get good details, but still be thick enough and firm enough for good retention.
-
Echo Kate's post. Family first, and we'll be here for conversation, support, advice (if you trust a bunch of loony leather pounders), or all three. Take care and have a Merry Christmas and a prosperous new year.
-
For additional info, search "more vinegaroon questions". We got pretty detailed in the discussion, but here it is in a nutshell- The chemical reaction between the ferric acetates and the tannins causes the leather to turn black. The reaction also forces some of the tallows/oils in the leather to the surface, resulting in a somewhat water resistant finish. Unfortunately, that means that the oils are no longer in the core of the leather, so adding oil or something comparable to the leather helps it. I used F. Aussie conditioner, and it has to really be rubbed in. Some have reported better conditioning results by heating the leather with a hairdryer, and it does seem to help. You're basically forcing all the oils/waxes back into the leather. Re: baking soda. It may help with the darkening, but if there's enough reagents, the acidic nature of the vinegar is completely neutralized, and chemically speaking,a wash in tap water will suffice. The leather does like a slightly acidic environment anyway. Besides, I had a devil of a time getting a baking soda wash to even penetrate the leather, and plain water worked better. Different tanneries use different recipes, so there may be some slight differences. I got a box of scrap from one of the members and there was IIRC, some Wicket and Craig leather in it. When vinergarooned, it turned the most awesome shade of blue- and stayed that way. If when bent, you're getting lightening of the surface, it's too dry. Add some conditioner/oil. Note: For holsters, I paint the vinegaroon solution on with a sponge, inside and out, instead of dipping. I also wash the inside very well, and then complete wet molding the holster. Once molded, I stuff the holster with paper towels and heat the leather in a covection oven to about 140 F. This seems to be the magic temperature for hardening the leather, and some of the daily worn holsters I've made for people haven't lost shape after 6 months or so. My Vin. mix was made in a half gallon glass jar with a plastic lid. I used white vinegar, and a handful of old nails from my work shop with a pad of burnt steel wool. After X months ('cause I forgot when I made it) it doesn't smell as bad, and still works just fine. There is no reaction to mixing the vinegaroon with straight baking soda, which means that the acid is more or less totally neutralized. Thank you for reading my e-book.
-
PANCAKE HOLSTER FOR A BRICK
TwinOaks replied to BruceGibson's topic in Gun Holsters, Rifle Slings and Knife Sheathes
Shoot a clear coat on it and let it tan for a day. It's got very clean lines, and is gorgeous leather. No need to change it at all. -
Welcome to Leatherworker.net! You're sure to find some great advice on seats here.
-
riddle me this Batman: Yeah, I know that the metric system's weight is based on grams. "American" or at least non-metric is based on the ounce, pound, and ton. So where the #$%^%$ did a metric ton come from?! And could it be divided into Metric pounds? AAAAAAHHHHHHH! I prefer to do my leather measurements in tool increments.
-
Rubber cement blunder
TwinOaks replied to Hilly's topic in Dyes, Antiques, Stains, Glues, Waxes, Finishes and Conditioners.
Marlon and David, Thank You! I now see the difference. I appreciate the clarification, and now I know what to look for next weekend. -
Rubber cement blunder
TwinOaks replied to Hilly's topic in Dyes, Antiques, Stains, Glues, Waxes, Finishes and Conditioners.
I believe it's also called a "kneaded rubber eraser". A pretty quick way to check for bubber cement would be to give the leather a very fine misting of water. It will bead on the glue. -
Christmas Wallet
TwinOaks replied to Randy Cornelius's topic in Purses, Wallets, Belts and Miscellaneous Pocket Items
Nice work Randy. I like the way you spread the corner lacing out to three holes. It looks better than the one I just finished, using three passes through a single corner hole. I think I'll try that on the next one. -
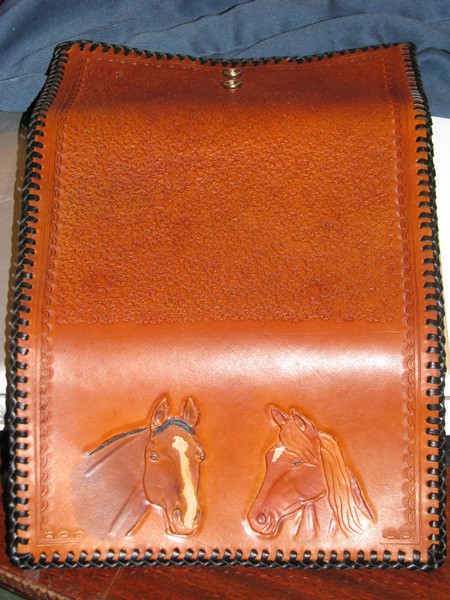
that I'd given up leather to just read about it on the forum, here's something I've made time to do: Yes, it's a Tandy kit... Sodapop asked me about color x-fer through the Aussie, and while I didn't have it at first, I do have some slight x-fer now. What is a good topcoat for bleedthrough on Aussie? Yes, some buffing occurred. BTW, the color is all airbrushed, using liquid latex for the resist/block on the horse heads, then blue tape for masking everything else when coloring the horses. Latex applied over unsealed dye stripped the test piece to clean leather- something worth remembering.

-
One side double, one side single
TwinOaks replied to Shorts's topic in Gun Holsters, Rifle Slings and Knife Sheathes
The only downside I can think of is the use of extra leather, and the additional sewing involved. The added thickness on the back of the holster will definitely stiffen it, so I don't think I'd go that route for IWB holsters. Unless, you've got some 4oz that you'll glue flesh to flesh. That I think would work well, as it would give (for a rough out holster) grain against the pistol and against the body. -
Hi from Iowa and I sure hope I don't make anybody mad...
TwinOaks replied to Striker1's topic in Member Gallery
Welcome to Leatherworker.net! Sorry to hear about your circumstances, but if ever there was a friendlier more helpful group than here, I've never heard of it. Glad to hear that you're getting back into leather, -
Deliver to the local saloon and have a few drinks while waiting...oh I'm willing to pay to see two leather workers try to equally split a hide after a few drinkies. "...and it was wierd," says owner Mick Flanagan, " 'cause these two guys I've never seen before come in, have a few drinks, and have a knife fight in my bar with some funky half moon shaped knives. It's got to be an initiation into some sort of cult..." ----AP reports.
-
Take a trip to town and go to a thrift store. Once there, find the gawd-awful-ugliest woman's dress you can in your size. Cut off the sleeves and trim to length. Wear this dress any time you intend to dye leather where others can see you and I guarantee you'll never spill another drop If you are looking for a leather apron in which to work, I suggest checking farrier supply, or black smith supply places for one.
-
Another option if you're matching edges- overlap slightly and cut the double thickness. That way you have the same edge, even if you hold the blade at an angle. For thicker leather, I use a head knife, for thinner I use a "hobby knife". It's an exacto style blade in a fixed plastic handle- no working loose, no change out. I also strop this blade reglarly when cutting.