DJole
-
Posts
1,091 -
Joined
-
Last visited
Content Type
Profiles
Forums
Events
Blogs
Gallery
Store
Everything posted by DJole
-
Need hardware like clasps, buckles, and what-not? Look here: Ohio Travel Bag The Buckle Guy Ning Bags
-

Wallet with Buddhist motifs
DJole replied to DJole's topic in Purses, Wallets, Belts and Miscellaneous Pocket Items
I find they work okay. I also have Feibings dyes available-- I use one or the other mostly because of color choice. What doesn't work for you with the Angelus dyes? I'm curious to know if I'm doing something differently with them than you are. -
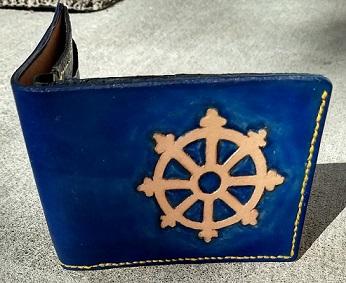
A wallet I recently completed, using Buddhist motifs. The pattern is based on Corter and Weaver's fancy wallet pattern (with slight modifications). The colors are Angelus dyes: Rose, Green, and Light Blue. The stitching is 3mm JapanGood irons, and Kevin Lee 3mm Reverse irons. I'm starting to really like those! The inside pocket thread is metallic gold, and the outside thread is gold colored waxed polyester. The outside leather is 3mm (7-8 oz) veg tan; rather thick for a wallet, but it was from a remnant of a hide I've had for years now, and the interior is smooth, not rough or fuzzy. Inside leather is reddish pigskin and black liner leather. Edges are burnished with clear Tokonole.

-
Very nice work! I'm curious -- all the tooled pieces you show are the Western floral style. Do you have any that use Chinese motifs and design?
-
Nice tooling work!
-
I am astounded to see the knife sheath and knife still around, after years of use and abuse! I still have the luggage tag I made from a kit during 7th grade shop, back in 77-78, with some pretty bad attempt at floral tooling. I think that the emphasis on western floral was too soon, so that in my mind leatherwork equaled floral tooling, which I didn't find appealing.
-
Welcome to the forum! You may not get immediate answers to questions or problems, but there are a lot of helpful folks here with an incredible depth and breadth of knowledge. Part of the learning process here in the forum is figuring out which sub-forum is best for a particular question topic -- there are places devoted to tooling, to dyes, to sewing machines, to sharpening...it's all there.
-
Thanks for sharing these. They are wonderful pieces of art!
-
Not much in K-12, unless you happen to live in/on one of the big reservations (like the Navajo, for example). It's mostly only discussed briefly as the western cultures collided with the native peoples over the past 3 centuries. It's also difficult to get to a "good level" on "their" history, because they are not one single group, either cultural or regional. In the past, that was hundreds of tribes, nations, and confederacies, with different languages and histories. And if we add modern Canada and Alaska to the mix, the amount of information doubles in size and complexity. There are fewer now, but still a daunting amount of information to try and master. So one can only really get a sense of native American or First Nations' people's history on a university level by deliberately seeking it out and seeking to become a specialist -- or by diving into the Internet with the same intent.
-
It just takes time and patience to cut all the fiddly bits out carefully. I'd LOVE to have the time/tools to make a 3-d printing, as others point out above, but this was dirt cheap, and available in about 15 minutes.
-
That is true. But I only wanted a light impression to guide the swivel knife cuts.
-
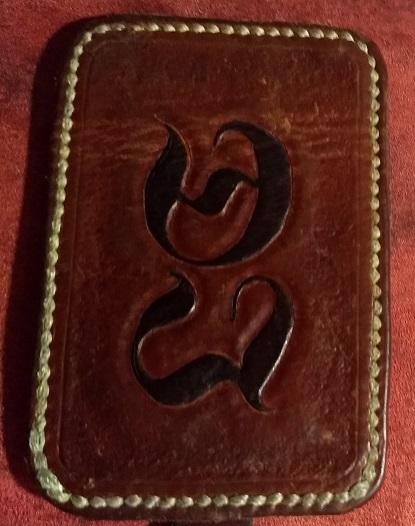
How tough is leather? This tough...
DJole replied to DJole's topic in Purses, Wallets, Belts and Miscellaneous Pocket Items
The card was only slightly bent, nothing else. -
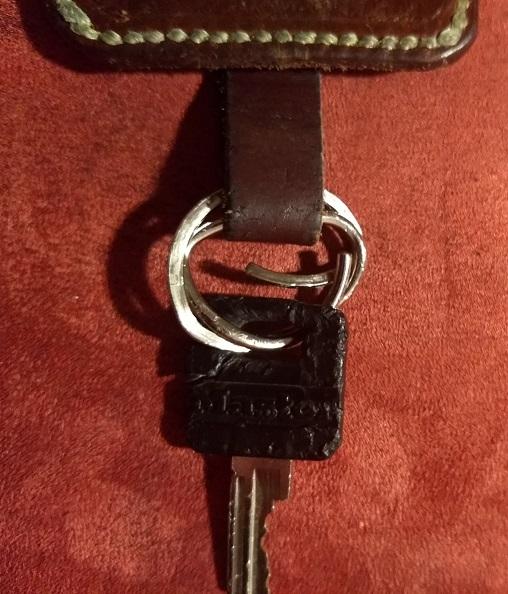
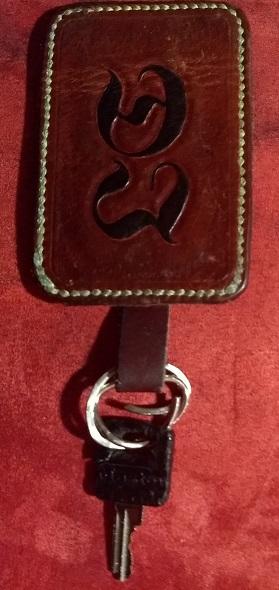
I have an electronic alarm key-card I use at work. I decided to tool a nice case for it, with my initials, using scrap leather and some cheap, ugly fluorescent yellow polyester thread (hey, it was cheap, on sale at Tandy!). I put my locker key on it, also. I've had it for a couple of years now, riding nicely in my pocket. This last week, I somehow lost it -- I could not figure out where it went. Not in my house, or car, or at work. Where could it have gone? I got a new card issued to me in the meantime. This morning, after 4 or 5 days or so, a woman rang our doorbell and handed me my card holder, with card! She had found it on the side of the street (maybe 1/4 to 1/2 mile away) in some beauty bark. I figure that somehow I had left it on top of my car, and it had managed to stay there for a ways until falling off into the street, where for a few days it was lying in the street, getting run over and run over and so on. So, down below, are pictures. You can see that the leather is in suprisingly good shape, both the tooled side and the smooth leather side! The leather has been bent a bit (look at the D), but there are very few scratches and no tears. The thread has been scuffed a bit on the keyring end, but still intact. The rivet holding the keyring loop is scratched and battered. But the smooth leather here seems untouched. I am quite surprised. The split ring -- it is mangled, hard! I am baffled at just how badly it got bent. The key is battered too -- the plastic cracked on one side, but it still opens my lock just fine. Luckily, it hasn't rained in the last two weeks, or things might be different! Here's a shot of the whole thing in its glory:

-
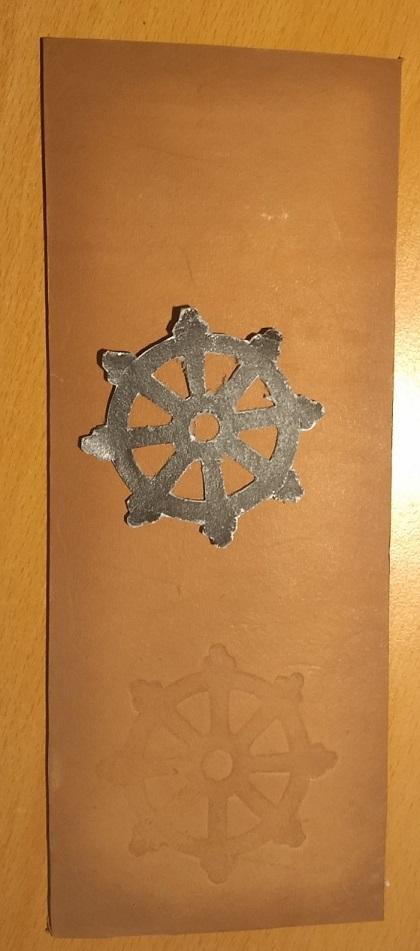
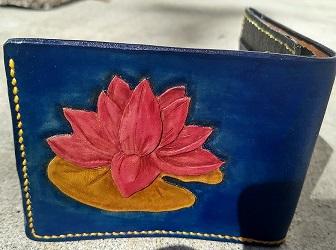
I have a new project, a wallet with a Buddhist design scheme. So I want to put a lotus blossom and an 8 spoked Dharma wheel onto the leather. The design looks...well, okay, when I trace it onto the tracing film. However, I really want a lot more precision in the straight lines and curves. Kind of like...well, a stamp! So, I came up with this idea to make a light stamp: 1) print the design onto paper, at correct size. 2) cut out design, glue onto light cardboard (like a cereal box carton, or something similar). Let dry. 3) using micro-tip scissors, carefully cut the design out. 4) Spray design with art fixative (waterproofing, basically.) Let dry. 5) Case leather, to same dampening for tooling. 6) Carefully place design onto leather. 7) Use mallet to tap design, stamping it onto the leather. And here are the results! I show the stamp itself, and down below it is the image it created. Now I can start tooling, knowing the design is clean and sharp, meaning one less thing I can mess up! And I can reuse the stamp, if I want to. Another bonus!

-
I bet you could sell a bunch of those. That's lovely work!
-
That's a pretty broad request -- can you narrow it down to what kinds of patterns (i.e. a specific culture), so we don't send Aztec, or Chinese, or Art Nouveau, when what you really wanted was Floral Western?
-
Tool pouches, packs, bags, and the works
DJole replied to RuralHill's topic in Leatherwork Conversation
What are you going to carry in this bag? That may help people point you in the right direction. -
First Custom Axe Sheath
DJole replied to WalterF's topic in Gun Holsters, Rifle Slings and Knife Sheathes
Nicely done! With a sheath as good looking as that, you almost don't want to take it out into the woods to get dirty and muddy! -
Maybe https://laughingcrowe.com/ has what you are looking for.
-
There are LOTS of discussions about these Chinese cobbler machines on this forum, usually from people who bought one and then realize that they can't get it to work well, and ask for help.
-
A bunch of those metal tools on the left seem to be tools used for classic Western floral styles (veiners, camouflagers, etc.) Are you interested in learning that style of leather tooling? If so, you can find a LOT of expertise on this message board to help you learn those skills. There appears to be one three pronged Tandy "diamond" stitching chisel there. If you want to learn hand stitching, that's okay for learning and practicing, but it leaves BIG holes in leather, which might not be what you want in some projects. So you will likely be adding some other sort of pricking iron or stitching chisel set to your tool set. (If you want to learn the differences between those tools, and the variations between various manufacturers, YouTube will help you a lot.) Your swivel knife there will probably need sharpening and stropping. You may also find that it doesn't fit well in your hand, but this one is non-adjustable in height, like other models are. You may find you'll need another after trying this one out. What are those 4 tools on the far right? A couple seem to be only handles with no tools. A stitching pony is an excellent help for quality hand stitching.
-
Learning tooling and carving 1st lesson results
DJole replied to SamG71's topic in Floral and Sheridan Carving
Nice work for beginning the craft! I don't really do floral, but you have had great instructors who've given you a firm foundation for the basics of leather tooling. Feathers and animal hair--- definitely out of my expertise! Hopefully an expert will chime in. Do a search for "feathers" on this forum and you'll see some posts and pictures of feather carving. -
Card Wallet -- with extra pockets
DJole replied to DJole's topic in Purses, Wallets, Belts and Miscellaneous Pocket Items
You are welcome to copy the extra pockets design. Just make sure you post it so we can admire your work! -
That is a beautiful piece of work, with a bold color scheme!
-
So your dog loves eating plastic and not leather, eh? ;-)