


dikman
-
Posts
4,862 -
Joined
-
Last visited
Content Type
Profiles
Forums
Events
Blogs
Gallery
Store
Everything posted by dikman
-
If you're making clothes, making/repairing rugs, sails, tarpaulins etc then a flatbed on a large table will make it much easier to handle the material. For what we do a cylinder arm has a bit more flexibility, but it's not essential.Many on here are happily using a flatbed for their work. My suggestion is to read as much on here as you can, looking at which machines members are using and what works for them. You will see that the same brands/models often tend to get mentioned. Make a list of what will suit you and then start looking to see what's available.Sometimes it can take a while until the right machine appears (unless you're very lucky, occasionally we've all had that happen ).
-
You've sort of got it right with your photo, basically there is the needle bar, an outer foot and an inner foot. You can do belts on a cylinder arm. Some people make a small table to fit around the arm so it acts as a flatbed. There are photos on the site showing these (Uwe makes a really nice one). Either cylinder arm or flatbed will work for you, it's a matter of what you can find (and afford). For most of us this is only a hobby, although it can get expensive if the "machine collecting bug" bites!
-
Home Grown Burnisher
dikman replied to Dwight's topic in Gun Holsters, Rifle Slings and Knife Sheathes
Elizabeth, you definitely DO need a lathe . Anyone who is a "cheap-skate" will find one invaluable. (Might be cheaper than some of your student stuff, unfortunately I suspect it rates low on your list of priorities at the moment). -
Thanks cobber, excellent write-up. I've seen these 555's come up from time to time, but have ignored them because they don't suit my needs.I'll keep my eyes open now, 'cos if I can get one (or similar with the Efka servo) at a good price I now know I can use the motor. That stand looks the same as my Singer, except without Singer on it. Really nice stand.
-
Home Grown Burnisher
dikman replied to Dwight's topic in Gun Holsters, Rifle Slings and Knife Sheathes
Not a cheap-skate (a term usually applied by people who are incapable of making their own "stuff" and are probably just jealous anyhow). I take a great deal of pleasure in fabricating my own gear, when possible. Guess it's how I was brought up. -
Burnishing Problem Solved - Motorized on the Cheap
dikman replied to cjartist's topic in Leather Machinery
" It's like accessories don't really add any value when buying used" . Applies to other things too, when I traded in one of my motorbikes (on another one) the salesman said to strip off all the extras because they'll give me the same price, with or without them! If there are extras the buyer usually gets the benefits, but the seller doesn't. I remember the Shopsmith's from many years ago (when I used to read Popular Mechanics). Always wanted one but 1) couldn't get them in Oz and 2) too expensive anyhow for me. -
If you can only have one machine a cylinder arm is more versatile, but a flatbed should do what you want to do - except holsters, don't even think about doing holsters on any machine unless it is heavy duty. Most machines in the "medium weight" range should have a lift around 10 mm. You need to look for industrial walking foot machines, ignore anything else regardless if the seller says things like "industrial quality", "semi-industrial" etc.
-
Constabulary is right, that tab must be in the notch on the bottom of the needle plate or it won't work (personal experience here - more than once!!).
-
You're not the first to do that, and I can guarantee that you won't be the last!
-
I reckon a book like that would have some members on here positively salivating.......
-
Need Needles for my Singer 144WSV37
dikman replied to DelNeroDesigns's topic in Leather Sewing Machines
If all your information suggests a particular needle size, but it doesn't fit, my first thought would be that someone has reset the needle bar to take a different size needle. Can you reset the bar for the needles you bought? -
Burnishing Problem Solved - Motorized on the Cheap
dikman replied to cjartist's topic in Leather Machinery
Only negative I can see is that access may be an issue, as most motorised burnishers usually have the wheel hanging over the edge of a table which gives better access for long pieces (belts). -
Which servo motor should I buy in Australia?
dikman replied to Carrie88's topic in Leather Sewing Machines
No worries, Brian, only too happy to help. Don't forget you sent me those thread samples, at no charge, when I was first trying to understand thread sizes, types and what would work in my machines. -
I can't comment on the other machines (model numbers would be nice) other than to say Seiko and Adler make some nice machines. I see this one has the binding attachment, if he's going to supply the plain walking feet you want to see it set up first to make sure it has the correct needle plate and replacement cover where that binding plate fits. Also, it looks like it has a clutch motor, you really need to factor in a servo motor if you can as it will be much easier to learn to use.
-
Which servo motor should I buy in Australia?
dikman replied to Carrie88's topic in Leather Sewing Machines
I see what you mean! Doesn't say much for the seller, imo, makes me think he doesn't understand it either. Ok, to get into the adjustment setting, press and hold the P key and turn on the power. It should display SH, which is the first parameter and sets max. speed.(Release the P key when it does). Press P again, which should let you change the settings. Pressing N will increase the value, S will decrease it. Should go up to 5500 rpm, if the seller is right then it's currently set for 1500 rpm.When you've got the right setting press P again, which exits this parameter. I think this means it will then display SH (which is the current parameter). Pressing S should change to the next parameter, SL, lower limit of minimum speed. (Pressing S goes forward, N goes back when searching the parameters). If you press P it will enter this parameter and display the current setting. If you don't want to change it press P to exit it. Once you've changed all that you want to, turn off the power, then turn it back on and you will be back to normal operating with the new settings. I have no idea what some of those parameters are for, obviously some are for the needle positioning system, but as for the others.... I also found a handbook for this motor (well, the controls are the same at least), don't know if you've got it? Anyhow, look at page 10, those three buttons can be used to change settings without getting into the "technician mode". Top one lets you fiddle with the needle position setting, but if you hold it in for at least 3 seconds it will reverse the motor direction!!! The middle button, Speed Mode switch key, lets you change between two speed modes, low speed and non-low speed (that's what it says). I'm guessing that these setting might be governed by the Kp/Ki parameters, but that's only a guess. It will also let you engage soft start mode.Third one is a Speed Setting key, it looks like you can use it to set the speed between min and max (presumably the settings entered via the "technician mode". If I had it with me I might be able to figure out some of those parameters - maybe! Anyhow, hope this helps a bit? Carrie, apologies for digressing slightly in your thread. Link to handbook, wouldn't let me download it. https://www.scribd.com/doc/270478518/Heavy-Duty-Sewing-Machine-Servo-Motor -
Which servo motor should I buy in Australia?
dikman replied to Carrie88's topic in Leather Sewing Machines
Carrie, from what I could find out they're much of a muchness. The housing will change (some are all-in-one, some have separate controls and different control panels) but that's about it. I suppose there may be some quality differences, but how one can tell I don't know. I'm interested in this facebook page too (just out of curiosity). -
Which servo motor should I buy in Australia?
dikman replied to Carrie88's topic in Leather Sewing Machines
Brian, I'll put this in here because it relates to the servo I've mentioned. Mine is a two-button control. The first 5 parameters can be accessed, the rest only change when the needle position synchronizer is fitted and turned on (there are others on the next page but they can't be accessed). The first two are the main ones.N.1 has a range of 10-80 (100-800 spm), N.2 from 1-45 (100-4500 spm). These are the values shown on the display, which are different to those in the book!?! For the two button operation - press "-" until N.O displayed press "+" to select the parameter wanted press "-" to show the value press "+" or "-" to change value, wait for the display to return. Is that what you wanted to know?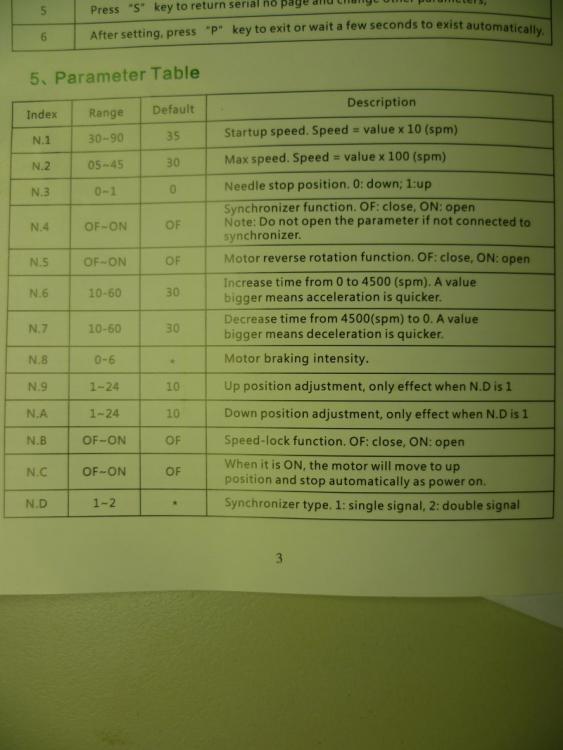
-
Which servo motor should I buy in Australia?
dikman replied to Carrie88's topic in Leather Sewing Machines
Not sure what those numbers mean, Brian. There are lots of adjustments in the "handbook", but only a couple have any effect. One sets the max. speed and the other sets how slow it goes at startup (or something like that, the book is down in my other shed and it's now dark, cold and wet so I'll have a look tomorrow). I do know that the two settings inter-react somewhat, i.e if you set a high max. speed then the startup is faster. I'll post back tomorrow. -
Doc Holiday Shoulder Holster Pattern Needed
dikman replied to Dwight's topic in Gun Holsters, Rifle Slings and Knife Sheathes
Looks good Dwight. What a complicated bit of strapwork! -
MERNICKLE "WILD BUNCH" 1911 HOLSTER
dikman replied to AA3JW's topic in Gun Holsters, Rifle Slings and Knife Sheathes
Red Cent, did you airbrush that rig? It's certainly very striking in appearance! AA3JW, that last rig definitely shows improvement from the first. Keep at it, you're doing well. -
Which servo motor should I buy in Australia?
dikman replied to Carrie88's topic in Leather Sewing Machines
Ho-hsing are generally considered to be a very good motor. That one doesn't include GST - another $42 - + shipping? This is where I bought mine - https://www.aliexpress.com/store/product/Energy-Saving-Brushless-Servo-Motor-TD-422-550W/1088544_1606343305.html?spm=2114.12010608.0.0.2995e5c0iwbxBR $180 for a 550 watt, for another $30 you can get a 750 watt.Free shipping. It comes with a 75mm pulley but when I bought mine they were offering a 50 mm instead, not sure if they still are. NC, a friend bought a 555 and reckons the servo was brilliant, but the machine didn't suit his needs and it was going to be too much trouble to swap the servo over and try and get it working. You've done well, just out of curiosity what was involved in getting it working on the Consew (in case I come across one at a good price )? -
Which servo motor should I buy in Australia?
dikman replied to Carrie88's topic in Leather Sewing Machines
This was posted in another section - They will be more expensive here (as is everything) because of the logistics involved for people selling them. As mentioned, changing a plug is easy (if you know what you're doing) but I'm sure you could find a friend who does know how if you're not sure. -
Burnishing Problem Solved - Motorized on the Cheap
dikman replied to cjartist's topic in Leather Machinery
Ok, that explains your comment. Sounds like a nice motor if you can get hold of one, good luck with the retirement (I can highly recommend it ). -
Machine for mostly canvas, some heavier stuff
dikman replied to mwpdx86's topic in Leather Sewing Machines
I've snapped more than a couple of needles through deflecting and hitting the needle plate, and a couple because the timing was out and they caught down in the bobbin/shuttle area (), haven't tripped a safety clutch yet. Looks like the 1206 can handle slightly heavier thread. One advantage of buying the 1206 is that you'll be getting a new machine, set up properly to start with. -
Machine for mostly canvas, some heavier stuff
dikman replied to mwpdx86's topic in Leather Sewing Machines
That P1206RB that Wiz mentioned looks pretty good for the money, handles up to #207 thread and even includes a servo!
